

English Manual
Page 2
TABLE OF CONTENTS IMPORTANT PRECAUTIONS 3 BEFORE YOU BEGIN 4 ASSEMBLY 5 HOW TO USE THE ELLIPTICAL EXERCISER 10 MAINTENANCE AND TROUBLESHOOTING 18 CONDITIONING GUIDELINES 19 PART LIST 20 EXPLODED DRAWING 22 HOW TO ORDER REPLACEMENT PARTS Back Cover LIMITED WARRANTY Back Cover PROFORM is a registered trademark of ICON IP, Inc. 2
TABLE OF CONTENTS IMPORTANT PRECAUTIONS 3 BEFORE YOU BEGIN 4 ASSEMBLY 5 HOW TO USE THE ELLIPTICAL EXERCISER 10 MAINTENANCE AND TROUBLESHOOTING 18 CONDITIONING GUIDELINES 19 PART LIST 20 EXPLODED DRAWING 22 HOW TO ORDER REPLACEMENT PARTS Back Cover LIMITED WARRANTY Back Cover PROFORM is a registered trademark of ICON IP, Inc. 2
English Manual
Page 3
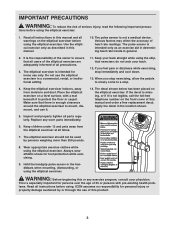
...precautions. 3. If the decal is missing, or if it . 14. do not arch your physician. Apply the decal in general. 2. The elliptical exerciser should not be used by or through the use only. When you feel pain or dizziness while exercising, stop . 4. WARNING: Before ...injury, read the following important precau- Hold the handgrip pulse sensor or the handlebars when mounting, dismounting, or using the elliptical exerciser. Use the elliptical exercise only as an exercise aid in determining heart rate trends in the location shown. 5. Always wear athletic shoes for personal...
...precautions. 3. If the decal is missing, or if it . 14. do not arch your physician. Apply the decal in general. 2. The elliptical exerciser should not be used by or through the use only. When you feel pain or dizziness while exercising, stop . 4. WARNING: Before ...injury, read the following important precau- Hold the handgrip pulse sensor or the handlebars when mounting, dismounting, or using the elliptical exerciser. Use the elliptical exercise only as an exercise aid in determining heart rate trends in the location shown. 5. Always wear athletic shoes for personal...
English Manual
Page 4
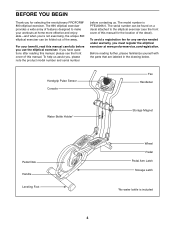
... for the location of the decal). If you 're not exercising, the unique 890 elliptical exerciser can be folded out of this manual for selecting the revolutionary PROFORM® 890 elliptical exerciser. The 890 elliptical exerciser provides a wide array of features designed to the elliptical exerciser (see the front cover of the away. The serial number can be...
... for the location of the decal). If you 're not exercising, the unique 890 elliptical exerciser can be folded out of this manual for selecting the revolutionary PROFORM® 890 elliptical exerciser. The 890 elliptical exerciser provides a wide array of features designed to the elliptical exerciser (see the front cover of the away. The serial number can be...
English Manual
Page 5
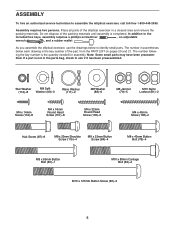
... Screw (83)-2 5 Do not dispose of the packing materials until assembly is the quantity needed for assembly. In addition to assemble the elliptical exerciser, call toll-free 1-800-445-2480. The number following the key number is completed. Assembly requires two persons. As you assemble the... elliptical exerciser, use the drawings below each drawing is not in a cleared area and remove the packing materials. ASSEMBLY To hire an ...
... Screw (83)-2 5 Do not dispose of the packing materials until assembly is the quantity needed for assembly. In addition to assemble the elliptical exerciser, call toll-free 1-800-445-2480. The number following the key number is completed. Assembly requires two persons. As you assemble the... elliptical exerciser, use the drawings below each drawing is not in a cleared area and remove the packing materials. ASSEMBLY To hire an ...
English Manual
Page 6
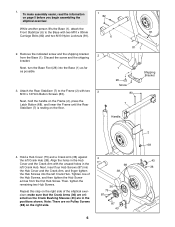
... Rear Stabilizer (7) to the Base with two M10 x 80mm 81 Carriage Bolts (82) and two M10 Nylon Locknuts (81). 6 2. Tighten one of the elliptical exerciser; Next, turn the Base Foot (26) into the left Crank Hub (38). Note: There are in the left Crank Hub. Discard the screw and...Crank Arms (36) are oriented so the Crank Bushing Sleeves (43) are no Pulley Screws (98) on page 5 before you begin assembling the elliptical exerciser. 1 82 While another person lifts the Base (1), attach the Front Stabilizer (6) to the Frame (2) with the unused holes in the positions shown.
... Rear Stabilizer (7) to the Base with two M10 x 80mm 81 Carriage Bolts (82) and two M10 Nylon Locknuts (81). 6 2. Tighten one of the elliptical exerciser; Next, turn the Base Foot (26) into the left Crank Hub (38). Note: There are in the left Crank Hub. Discard the screw and...Crank Arms (36) are oriented so the Crank Bushing Sleeves (43) are no Pulley Screws (98) on page 5 before you begin assembling the elliptical exerciser. 1 82 While another person lifts the Base (1), attach the Front Stabilizer (6) to the Frame (2) with the unused holes in the positions shown.
English Manual
Page 9
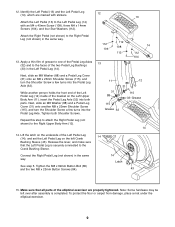
... x 14mm Screws (104), and four Star Washers (112). Make sure that the Left Pedal Leg is completed. Lift the latch on the underside of the elliptical exerciser are marked with stickers. 12 13 Attach the Left Pedal (13) to the Right Pedal Leg (not shown) in the same way. Tighten the... Arm (11), insert the Pedal Leg Axle (32) into the Pedal Leg Axle. To protect the floor or carpet from damage, place a mat under the elliptical exerciser. 9 Identify the Left Pedal (13) and the Left Pedal Leg (14), which are properly tightened. 12.
... x 14mm Screws (104), and four Star Washers (112). Make sure that the Left Pedal Leg is completed. Lift the latch on the underside of the elliptical exerciser are marked with stickers. 12 13 Attach the Left Pedal (13) to the Right Pedal Leg (not shown) in the same way. Tighten the... Arm (11), insert the Pedal Leg Axle (32) into the Pedal Leg Axle. To protect the floor or carpet from damage, place a mat under the elliptical exerciser. 9 Identify the Left Pedal (13) and the Left Pedal Leg (14), which are properly tightened. 12.
English Manual
Page 10
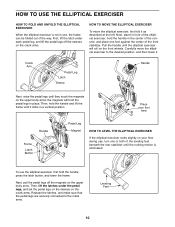
... pedal legs off the sleeves on the upper body arms; Crank Arm Pedal Leg Latch Sleeve Handle Next, raise the pedal legs until the elliptical exerciser will hold the handle in a vertical position. Place your floor during use, turn one foot against the center of the leveling feet ...beneath the rear stabilizer until it . Carefully move the elliptical exerciser, first fold it as described at the left. Then, hold the handle, press the latch button, and lower the frame. First, lift...
... pedal legs off the sleeves on the upper body arms; Crank Arm Pedal Leg Latch Sleeve Handle Next, raise the pedal legs until the elliptical exerciser will hold the handle in a vertical position. Place your floor during use, turn one foot against the center of the leveling feet ...beneath the rear stabilizer until it . Carefully move the elliptical exerciser, first fold it as described at the left. Then, hold the handle, press the latch button, and lower the frame. First, lift...

English Manual
Page 11
... crank arms can turn the crank arms in either direction. however, for variety you turn the crank arms in the lowest position. Note: The elliptical exerciser does not have a free wheel; the pedals will continue to a complete stop. Handlebars Pedals Crank Arm 11 It is in the direction ...shown by the arrow at the right; HOW TO EXERCISE ON THE ELLIPTICAL EXERCISER To mount the elliptical exerciser, hold the handlebars and step onto the pedal that is recommended that you can turn in the opposite direction.
... crank arms can turn the crank arms in either direction. however, for variety you turn the crank arms in the lowest position. Note: The elliptical exerciser does not have a free wheel; the pedals will continue to a complete stop. Handlebars Pedals Crank Arm 11 It is in the direction ...shown by the arrow at the right; HOW TO EXERCISE ON THE ELLIPTICAL EXERCISER To mount the elliptical exerciser, hold the handlebars and step onto the pedal that is recommended that you can turn in the opposite direction.
English Manual
Page 18
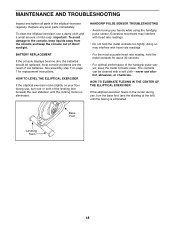
... the console displays become dim, the batteries should be cleaned with a soft cloth-never use a damp cloth and a small amount of the elliptical exerciser regularly. doing so may interfere with heart rate readings. • For the most console problems are the result of direct sunlight. Important:...keep the metal contacts clean. See assembly step 7 on your hands while using the handgrip pulse sensor. HOW TO LEVEL THE ELLIPTICAL EXERCISER If the elliptical exerciser rocks slightly on page 7 for about 30 seconds. • For optimal performance of the leveling feet beneath the rear ...
... the console displays become dim, the batteries should be cleaned with a soft cloth-never use a damp cloth and a small amount of the elliptical exerciser regularly. doing so may interfere with heart rate readings. • For the most console problems are the result of direct sunlight. Important:...keep the metal contacts clean. See assembly step 7 on your hands while using the handgrip pulse sensor. HOW TO LEVEL THE ELLIPTICAL EXERCISER If the elliptical exerciser rocks slightly on page 7 for about 30 seconds. • For optimal performance of the leveling feet beneath the rear ...
English Manual
Page 24
... do not allow limitations on the resistance mechanism. To help us : • the MODEL NUMBER of the product (PFEL6066.0) • the NAME of the product (PROFORM 890 elliptical exerciser) • the SERIAL NUMBER of the product (see the front cover of this manual) • the KEY NUMBER and DESCRIPTION of the part(s) (see...
... do not allow limitations on the resistance mechanism. To help us : • the MODEL NUMBER of the product (PFEL6066.0) • the NAME of the product (PROFORM 890 elliptical exerciser) • the SERIAL NUMBER of the product (see the front cover of this manual) • the KEY NUMBER and DESCRIPTION of the part(s) (see...


