
Instruction Manual
Page 2
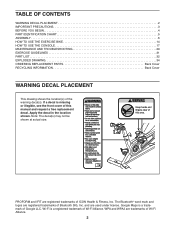
... the warning decal(s). WPA and WPA2 are registered trademarks of ICON Health & Fitness, Inc. PROFORM and IFIT are trademarks of Bluetooth SIG, Inc. TABLE OF CONTENTS WARNING DECAL PLACEMENT 2 IMPORTANT PRECAUTIONS 3 BEFORE YOU BEGIN 4 PART IDENTIFICATION CHART 5 ASSEMBLY 6 HOW TO USE THE EXERCISE BIKE 14 HOW TO USE THE CONSOLE 17 MAINTENANCE...
... the warning decal(s). WPA and WPA2 are registered trademarks of ICON Health & Fitness, Inc. PROFORM and IFIT are trademarks of Bluetooth SIG, Inc. TABLE OF CONTENTS WARNING DECAL PLACEMENT 2 IMPORTANT PRECAUTIONS 3 BEFORE YOU BEGIN 4 PART IDENTIFICATION CHART 5 ASSEMBLY 6 HOW TO USE THE EXERCISE BIKE 14 HOW TO USE THE CONSOLE 17 MAINTENANCE...

Instruction Manual
Page 5
Extra parts may be included. The number in the hardware kit, check to identify the small parts needed for assembly. PART IDENTIFICATION CHART Use the drawings below each drawing is the key number of the part, from the PART LIST near the end of this manual. Note: If a part is the quantity needed for assembly. The number following the key number is not in parentheses below to see if it has been preassembled. M4 x 12mm Machine Screw (100)-4 M4 x 20mm Screw (80)-1 M6 x 12mm Screw (79)-4 M6 Bolt Set (70)-2 M10 x 25mm Screw (69)-4 5
Extra parts may be included. The number in the hardware kit, check to identify the small parts needed for assembly. PART IDENTIFICATION CHART Use the drawings below each drawing is the key number of the part, from the PART LIST near the end of this manual. Note: If a part is the quantity needed for assembly. The number following the key number is not in parentheses below to see if it has been preassembled. M4 x 12mm Machine Screw (100)-4 M4 x 20mm Screw (80)-1 M6 x 12mm Screw (79)-4 M6 Bolt Set (70)-2 M10 x 25mm Screw (69)-4 5

Instruction Manual
Page 6
... your warranty in Australia, email or post the following tool(s): one Phillips screwdriver one adjustable wrench one rubber mallet one pair of scissors Assembly may be easier if you have internet access, call Customer Service (see the front cover of this manual) 6 To avoid damaging parts... until you finish all parts in the UK, go to iconsupport.eu. If 1 you do not use power tools. 1. ASSEMBLY • Assembly requires two persons. • Place all assembly steps. • Left parts are marked "L" or "Left" and right parts are marked "R" or "Right." • To identify...
... your warranty in Australia, email or post the following tool(s): one Phillips screwdriver one adjustable wrench one rubber mallet one pair of scissors Assembly may be easier if you have internet access, call Customer Service (see the front cover of this manual) 6 To avoid damaging parts... until you finish all parts in the UK, go to iconsupport.eu. If 1 you do not use power tools. 1. ASSEMBLY • Assembly requires two persons. • Place all assembly steps. • Left parts are marked "L" or "Left" and right parts are marked "R" or "Right." • To identify...
Instruction Manual
Page 13
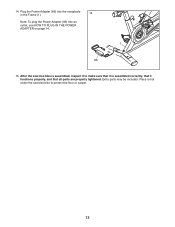
Place a mat under the exercise bike to make sure that it is assembled, inspect it functions properly, and that all parts are properly tightened. After the exercise bike is assembled correctly, that it to protect the floor or carpet. 13 Extra parts may be included. Plug the Power Adapter (86) into the receptacle in the Frame (1). 14 Note: To plug the Power Adapter (86) into an outlet, see HOW TO PLUG IN THE POWER ADAPTER on page 14. 1 86 15. 14.
Place a mat under the exercise bike to make sure that it is assembled, inspect it functions properly, and that all parts are properly tightened. After the exercise bike is assembled correctly, that it to protect the floor or carpet. 13 Extra parts may be included. Plug the Power Adapter (86) into the receptacle in the Frame (1). 14 Note: To plug the Power Adapter (86) into an outlet, see HOW TO PLUG IN THE POWER ADAPTER on page 14. 1 86 15. 14.
Instruction Manual
Page 15
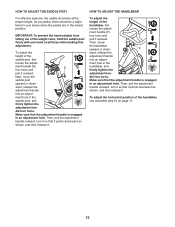
... height. ment hole in the handlebar, and firmly tighten the adjustment han- IMPORTANT: To prevent the hand weights from falling out of the handlebar, see assembly step 10 on page 11. 15 As you pedal, there should be a slight bend in your knees when the pedals are in an adjustment hole...
... height. ment hole in the handlebar, and firmly tighten the adjustment han- IMPORTANT: To prevent the hand weights from falling out of the handlebar, see assembly step 10 on page 11. 15 As you pedal, there should be a slight bend in your knees when the pedals are in an adjustment hole...

Instruction Manual
Page 33
Large Pivot Spacer M4 x 12mm Machine Screw Brake Shaft End Hairpin Cotter Pin Brake Washer Assembly Tool User's Manual Note: Specifications are not illustrated. 33 Qty. Description 91 1 Mount Wire 92 2 M8 Washer 93 1 M8 x 80mm Bolt 94 2 Outer ...
Large Pivot Spacer M4 x 12mm Machine Screw Brake Shaft End Hairpin Cotter Pin Brake Washer Assembly Tool User's Manual Note: Specifications are not illustrated. 33 Qty. Description 91 1 Mount Wire 92 2 M8 Washer 93 1 M8 x 80mm Bolt 94 2 Outer ...


