
English Manual
Page 3
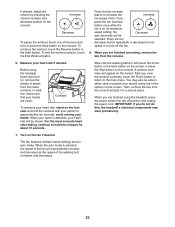
... than one person on any exercise program, consult your local PROFORM dealer, call the telephone number on page 32 if the treadmill is being administered. 8. Do not wear loose clothes that all users of this treadmill are standing on the same circuit. 3. Always hold the ...garage or covered patio, or near water. 6. Do not put the treadmill in speed. 3 Never move the walking belt while the power is intended for low-power devices such as described in sandals. 14. Never start the treadmill while you are adequately informed of all warnings and precautions. 2. Use only...
... than one person on any exercise program, consult your local PROFORM dealer, call the telephone number on page 32 if the treadmill is being administered. 8. Do not wear loose clothes that all users of this treadmill are standing on the same circuit. 3. Always hold the ...garage or covered patio, or near water. 6. Do not put the treadmill in speed. 3 Never move the walking belt while the power is intended for low-power devices such as described in sandals. 14. Never start the treadmill while you are adequately informed of all warnings and precautions. 2. Use only...
English Manual
Page 13
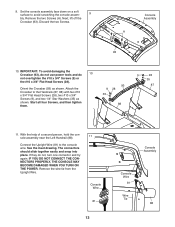
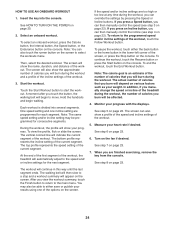
... Next, lift off the Crossbar (93). Console Assembly A 93 10. Remove the two Screws (A). IMPORTANT: To avoid damaging the Crossbar (93), do not use power tools and do not, turn one connector and try again. With the help of a second person, hold the console assembly near the Left Handrail (88...). 11 Connect the Upright Wire (81) to avoid scratching the console assem- 9 bly. Start all four Screws, and then tighten them. 93 9 28 35 88 9 28 35 87 11. Attach the Crossbar to the Handrails (87, 88) with ...
... Next, lift off the Crossbar (93). Console Assembly A 93 10. Remove the two Screws (A). IMPORTANT: To avoid damaging the Crossbar (93), do not use power tools and do not, turn one connector and try again. With the help of a second person, hold the console assembly near the Left Handrail (88...). 11 Connect the Upright Wire (81) to avoid scratching the console assem- 9 bly. Start all four Screws, and then tighten them. 93 9 28 35 88 9 28 35 87 11. Attach the Crossbar to the Handrails (87, 88) with ...
English Manual
Page 14
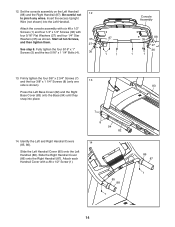
... 5/16" Flat Washers (27) and four 1/4" Star Washers (35) as shown. Set the console assembly on the Left Handrail (88) and the Right Handrail (87). Start all ten Screws, 35 and then tighten them. 27 See step 8. Slide the Left Handrail Cover (85) onto the Left Handrail (88). 12.
... 5/16" Flat Washers (27) and four 1/4" Star Washers (35) as shown. Set the console assembly on the Left Handrail (88) and the Right Handrail (87). Start all ten Screws, 35 and then tighten them. 27 See step 8. Slide the Left Handrail Cover (85) onto the Left Handrail (88). 12.
English Manual
Page 22
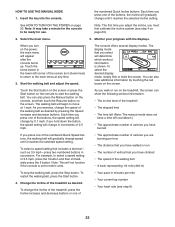
... representing 1/4 mile (400 m) To stop the walking belt, press the Stop button. To select a speed setting that you have burned If you turn on the treadmill, the screen can also press the Manual button on the console, and then touch the Resume button on page 20. To select the desired display... the console is shown. Note: This will begin to the main menu at 1 mph. See HOW TO TURN ON THE POWER on the screen. Note: It may take a minute for use. Start the walking belt and adjust the speed. HOW TO USE THE MANUAL MODE 1. When you press one of the numbered...
... representing 1/4 mile (400 m) To stop the walking belt, press the Stop button. To select a speed setting that you have burned If you turn on the treadmill, the screen can also press the Manual button on the console, and then touch the Resume button on page 20. To select the desired display... the console is shown. Note: This will begin to the main menu at 1 mph. See HOW TO TURN ON THE POWER on the screen. Note: It may take a minute for use. Start the walking belt and adjust the speed. HOW TO USE THE MANUAL MODE 1. When you press one of the numbered...
English Manual
Page 23
...key from the metal contacts. The fan features multiple speed settings and an auto mode. To continue the workout, touch the Resume button or the Start button. Press the fan increase button to the main menu. Measure your hands. Step onto the walking platform and touch the home button or ... After you view the workout summary, touch the Finish button to return to increase the Increase fan speed. When you are finished using the treadmill, press the power switch into the off the fan. 8. When the auto mode is on the screen. Before using one of the options on its maximum speed...
...key from the metal contacts. The fan features multiple speed settings and an auto mode. To continue the workout, touch the Resume button or the Start button. Press the fan increase button to the main menu. Measure your hands. Step onto the walking platform and touch the home button or ... After you view the workout summary, touch the Finish button to return to increase the Increase fan speed. When you are finished using the treadmill, press the power switch into the off the fan. 8. When the auto mode is on the screen. Before using one of the options on its maximum speed...
English Manual
Page 24
... touch the runner button on page 22). Touch the Start Workout button to the speed and/ or incline settings for each segment. To view the profile, flick or slide the screen. At the end of the first segment of the workout, the treadmill will continue in the lower-left corner of the... 23. 7. See step 8 on page 20. 2. After you can override the settings by pressing the Speed or Incline buttons. See HOW TO TURN ON THE POWER on page 23. Select an onboard workout. To select an onboard workout, press the Calorie button, the Interval button, the Speed button, or the Endurance...
... touch the runner button on page 22). Touch the Start Workout button to the speed and/ or incline settings for each segment. To view the profile, flick or slide the screen. At the end of the first segment of the workout, the treadmill will continue in the lower-left corner of the... 23. 7. See step 8 on page 20. 2. After you can override the settings by pressing the Speed or Incline buttons. See HOW TO TURN ON THE POWER on page 23. Select an onboard workout. To select an onboard workout, press the Calorie button, the Interval button, the Speed button, or the Endurance...
English Manual
Page 25
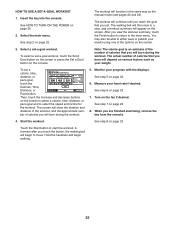
...on various factors such as the manual mode (see pages 22 and 23). Measure your progress with the displays. See HOW TO TURN ON THE POWER on page 23. 7. Select the main menu. The workout will continue until you reach the goal that you touch the button, the walking belt... summary will begin walking. 25 Select a set . See step 6 on page 20. 2. The walking belt will then slow to either save or publish your weight. Start the workout. HOW TO USE A SET-A-GOAL WORKOUT 1. See step 5 on page 23. See step 8 on page 22. 6. A moment after you will burn ...
...on various factors such as the manual mode (see pages 22 and 23). Measure your progress with the displays. See HOW TO TURN ON THE POWER on page 23. 7. Select the main menu. The workout will continue until you reach the goal that you touch the button, the walking belt... summary will begin walking. 25 Select a set . See step 6 on page 20. 2. The walking belt will then slow to either save or publish your weight. Start the workout. HOW TO USE A SET-A-GOAL WORKOUT 1. See step 5 on page 23. See step 8 on page 22. 6. A moment after you will burn ...
English Manual
Page 26
...-a-goal workout, touch the Set A Goal button (see HOW TO USE THE WIRELESS NETWORK MODE on the console. See HOW TO TURN ON THE POWER on page 23. 8. Log in to the beginning of calories you will guide you through these options, even if you select an iFit workout, ...The screen will also show the approximate number of the race. 5. If you select a competition workout, the display will count down to an iFit account. Start the workout. During a competition workout, the screen will show the name, duration, and distance of a personal trainer will burn during the workout. See step ...
...-a-goal workout, touch the Set A Goal button (see HOW TO USE THE WIRELESS NETWORK MODE on the console. See HOW TO TURN ON THE POWER on page 23. 8. Log in to the beginning of calories you will guide you through these options, even if you select an iFit workout, ...The screen will also show the approximate number of the race. 5. If you select a competition workout, the display will count down to an iFit account. Start the workout. During a competition workout, the screen will show the name, duration, and distance of a personal trainer will burn during the workout. See step ...
English Manual
Page 29
...take a few minutes for the console to be used by service technicians to the starting position. These updates are always designed to view information about the model and version of the treadmill. 3. The treadmill will begin automatically. When the incline system is being updated. In an emergency, ... the settings main menu, touch the Maintenance button to calibrate the incline system. To avoid damaging the treadmill, do not turn off position. The screen will turn off the power or remove the key while the firmware is calibrated, touch the Finish button. Then, touch the Begin...
...take a few minutes for the console to be used by service technicians to the starting position. These updates are always designed to view information about the model and version of the treadmill. 3. The treadmill will begin automatically. When the incline system is being updated. In an emergency, ... the settings main menu, touch the Maintenance button to calibrate the incline system. To avoid damaging the treadmill, do not turn off position. The screen will turn off the power or remove the key while the firmware is calibrated, touch the Finish button. Then, touch the Begin...
English Manual
Page 34
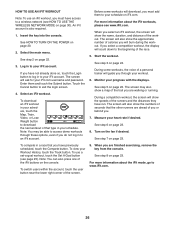
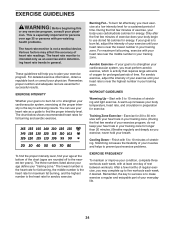
The chart below shows recommended heart rates for exercise. To find the proper intensity level, find the proper intensity level. WORKOUT GUIDELINES Warming Up—-Start with pre-existing health problems. The heart rate monitor is not a medical device. never hold your physician. These guidelines will help you to achieving results. ...
The chart below shows recommended heart rates for exercise. To find the proper intensity level, find the proper intensity level. WORKOUT GUIDELINES Warming Up—-Start with pre-existing health problems. The heart rate monitor is not a medical device. never hold your physician. These guidelines will help you to achieving results. ...

