

User Manual
Page 9
...be operated with batteries (not included) instead of the battery clips. Important: Tighten both Pedals as firmly as shown by the markings inside of the Power Supply (52) if desired. ened. Adjust the Left Pedal Strap (25) to protect the floor. 9 Plug the other end of the Pedal Strap ...posi- Using an adjustable wrench, firmly tighten the 11 Left Pedal counterclockwise into the Right Crank Arm. tion, and press the end of the Power Supply into an appropriate outlet that is properly installed in the same way. Note: The console can be left over. See the inset drawing. After...
...be operated with batteries (not included) instead of the battery clips. Important: Tighten both Pedals as firmly as shown by the markings inside of the Power Supply (52) if desired. ened. Adjust the Left Pedal Strap (25) to protect the floor. 9 Plug the other end of the Pedal Strap ...posi- Using an adjustable wrench, firmly tighten the 11 Left Pedal counterclockwise into the Right Crank Arm. tion, and press the end of the Power Supply into an appropriate outlet that is properly installed in the same way. Note: The console can be left over. See the inset drawing. After...
User Manual
Page 25
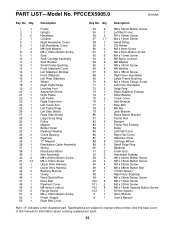
... Upper Wire Harness Lower Wire Harness Bushing Bracket Clamp Reed Switch/Wire Drive Belt Flywheel Cover M8 Nylon Locknut Flange Screw M6 x 13mm Button Screw Power Supply Right Belt Cover Key No. See the back cover of this manual for information about ordering replacement parts. 25 Qty. 54 2 55 1 56 2 57 17...
... Upper Wire Harness Lower Wire Harness Bushing Bracket Clamp Reed Switch/Wire Drive Belt Flywheel Cover M8 Nylon Locknut Flange Screw M6 x 13mm Button Screw Power Supply Right Belt Cover Key No. See the back cover of this manual for information about ordering replacement parts. 25 Qty. 54 2 55 1 56 2 57 17...

