
English Manual
Page 1
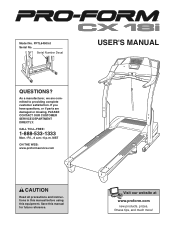
... using this manual for future reference. PFTL64505.0 Serial No. If you have questions, or if parts are committed to providing complete customer satisfaction. Model No. CALL TOLL-FREE: 1-888-533-1333 Mon.-Fri., 6 a.m.-6 p.m. Visit our website at www.proform.com new products, prizes, fitness tips, and much more!... Save this equipment. Serial Number Decal USER'S MANUAL QUESTIONS?
... using this manual for future reference. PFTL64505.0 Serial No. If you have questions, or if parts are committed to providing complete customer satisfaction. Model No. CALL TOLL-FREE: 1-888-533-1333 Mon.-Fri., 6 a.m.-6 p.m. Visit our website at www.proform.com new products, prizes, fitness tips, and much more!... Save this equipment. Serial Number Decal USER'S MANUAL QUESTIONS?
English Manual
Page 2
... your local electronics store. 12. Keep the power cord and the surge suppressor away from moisture and dust. Never use the treadmill with at all warnings and precautions. 2. When connecting the power cord (see your local PROFORM dealer or call the tollfree telephone number on each side. Do not operate the... the responsibility of the owner to ensure that meets all of 12 and pets away from the treadmill at least eight feet of clearance behind it and two feet on the front cover of this manual and order part number 146148, or see page 8), plug the power cord into a surge suppressor ...
... your local electronics store. 12. Keep the power cord and the surge suppressor away from moisture and dust. Never use the treadmill with at all warnings and precautions. 2. When connecting the power cord (see your local PROFORM dealer or call the tollfree telephone number on each side. Do not operate the... the responsibility of the owner to ensure that meets all of 12 and pets away from the treadmill at least eight feet of clearance behind it and two feet on the front cover of this manual and order part number 146148, or see page 8), plug the power cord into a surge suppressor ...
English Manual
Page 3
.... 20. 14. This is capable of the treadmill regularly. 25. The treadmill is especially important for in-home use this manual and and order a free replacement decal. This treadmill is not working properly. (See BEFORE YOU BEGIN on your treadmill. Apply the decal in this product. 3 Never...the use , before cleaning the treadmill, and before using the treadmill. 17. The decals shown here have been placed on page 4 if the treadmill is intended for persons over the age of this manual. DANGER: 26. When folding or moving the treadmill, make sure that the storage...
.... 20. 14. This is capable of the treadmill regularly. 25. The treadmill is especially important for in-home use this manual and and order a free replacement decal. This treadmill is not working properly. (See BEFORE YOU BEGIN on your treadmill. Apply the decal in this product. 3 Never...the use , before cleaning the treadmill, and before using the treadmill. 17. The decals shown here have been placed on page 4 if the treadmill is intended for persons over the age of this manual. DANGER: 26. When folding or moving the treadmill, make sure that the storage...
English Manual
Page 4
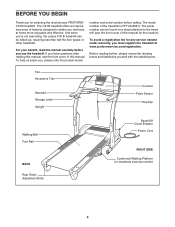
...for selecting the revolutionary PROFORM® CX18i treadmill. And when you're not exercising, the unique CX18i treadmill can be folded up, requiring less than half the floor space of the treadmill is PFTL64505.0. The CX18i treadmill offers an impressive array of this manual carefully before calling. The... model number and serial number before you use the treadmill. If you have questions after reading this manual, see the front cover of features designed to the treadmill (see the front cover of this manual for maximum exercise comfort 4 BEFORE YOU BEGIN Thank you...
...for selecting the revolutionary PROFORM® CX18i treadmill. And when you're not exercising, the unique CX18i treadmill can be folded up, requiring less than half the floor space of the treadmill is PFTL64505.0. The CX18i treadmill offers an impressive array of this manual carefully before calling. The... model number and serial number before you use the treadmill. If you have questions after reading this manual, see the front cover of features designed to the treadmill (see the front cover of this manual for maximum exercise comfort 4 BEFORE YOU BEGIN Thank you...

English Manual
Page 8
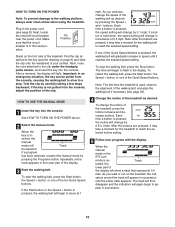
...treadmill being turned on the surge suppressor to whether the product is damaged, the walking belt may change speed, accelerate or stop unexpectedly, which may be used only until a properly grounded outlet (drawing 1) can result in place by a qualified electrician. To purchase a surge suppressor, see your local PROFORM...cord into a surge suppressor, and plug the surge suppressor into an appropriate outlet that looks like any other type of this manual and order part number 146148, or see drawing 1 at the right). This product must be seriously damaged by a qualified ...
...treadmill being turned on the surge suppressor to whether the product is damaged, the walking belt may change speed, accelerate or stop unexpectedly, which may be used only until a properly grounded outlet (drawing 1) can result in place by a qualified electrician. To purchase a surge suppressor, see your local PROFORM...cord into a surge suppressor, and plug the surge suppressor into an appropriate outlet that looks like any other type of this manual and order part number 146148, or see drawing 1 at the right). This product must be seriously damaged by a qualified ...

English Manual
Page 9
....com for future reference The console also features iFIT.com interactive technology. With the treadmill connected to www.iFIT.com. To create and use an iFIT.com MP3, CD, or video program, see page 20). When the manual mode of the console is like having a personal trainer in your computer, you an...
....com for future reference The console also features iFIT.com interactive technology. With the treadmill connected to www.iFIT.com. To create and use an iFIT.com MP3, CD, or video program, see page 20). When the manual mode of the console is like having a personal trainer in your computer, you an...
English Manual
Page 10
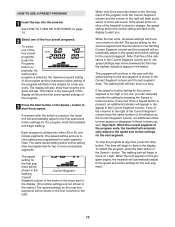
HOW TO USE THE MANUAL MODE 1 Insert the key into the console. serted, the manual mode will change in the display. To start the walking belt, press the Start button, the Speed + button, or one of the treadmill. if a button is in the reset position. Note: After the buttons are ...will Track be pulled from the console, adjust the position of the Quick Speed buttons. buttons. Note: The first time the treadmill is in - When the manual mode or the iFIT.com mode is pressed, the incline will appear in succession until a track appears in speed until it may...
HOW TO USE THE MANUAL MODE 1 Insert the key into the console. serted, the manual mode will change in the display. To start the walking belt, press the Start button, the Speed + button, or one of the treadmill. if a button is in the reset position. Note: After the buttons are ...will Track be pulled from the console, adjust the position of the Quick Speed buttons. buttons. Note: The first time the treadmill is in - When the manual mode or the iFIT.com mode is pressed, the incline will appear in succession until a track appears in speed until it may...
English Manual
Page 12
...sound. One speed setting and one incline setting are lit, the speed settings may move one of the treadmill is about to change, the speed setting and/or the incline setting will automatically adjust to the first...Speed + button to the right of the Current Segment column have the same number of the program ends, the treadmill will begin walking. Every few seconds. The walking belt will flash in those columns as the Current Segment column,... of the four preset programs. To select one column to alert you can manually override the setting by pressing the Speed or Incline buttons.
...sound. One speed setting and one incline setting are lit, the speed settings may move one of the treadmill is about to change, the speed setting and/or the incline setting will automatically adjust to the first...Speed + button to the right of the Current Segment column have the same number of the program ends, the treadmill will begin walking. Every few seconds. The walking belt will flash in those columns as the Current Segment column,... of the four preset programs. To select one column to alert you can manually override the setting by pressing the Speed or Incline buttons.
English Manual
Page 17
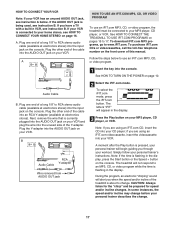
...CD player; In some instances, the speed and/or incline may change . Plug the other end of the treadmill is about to RCA stereo audio cable (available at electronics stores). Audio Cable B. A Plug the Y-adapter .... Note: If the time is currently plugged into the console. Plug one end of this manual. IN VIDEO AUDIO IN CH 34 OUT RF OUT AUDIO OUT RIGHT LEFT HOW TO USE AN...display, press the Start button or the Speed + button on page 16. See HOW TO CONNECT THE TREADMILL TO USE IFIT.COM PROGRAMS on your VCR. Follow the steps below . Plug one end of a...
...CD player; In some instances, the speed and/or incline may change . Plug the other end of the treadmill is about to RCA stereo audio cable (available at electronics stores). Audio Cable B. A Plug the Y-adapter .... Note: If the time is currently plugged into the console. Plug one end of this manual. IN VIDEO AUDIO IN CH 34 OUT RF OUT AUDIO OUT RIGHT LEFT HOW TO USE AN...display, press the Start button or the Speed + button on page 16. See HOW TO CONNECT THE TREADMILL TO USE IFIT.COM PROGRAMS on your VCR. Follow the steps below . Plug one end of a...

English Manual
Page 18
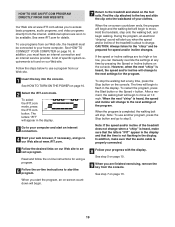
... the floor or another MP3, CD, or video program, press the Stop button or remove the key and go to the next settings of the treadmill does not change to flash in the display. See step 7 on the console. CAUTION: Always remove iFIT.com CDs and videocassettes from the console. If... restart the program, press the Start button or the Speed + button. If the speed or incline settings are too high or too low, you can manually override the settings at any time, press the Stop button on the fan if desired. To stop . Note: If the speed and/or incline of...
... the floor or another MP3, CD, or video program, press the Stop button or remove the key and go to the next settings of the treadmill does not change to flash in the display. See step 7 on the console. CAUTION: Always remove iFIT.com CDs and videocassettes from the console. If... restart the program, press the Start button or the Speed + button. If the speed or incline settings are too high or too low, you can manually override the settings at any time, press the Stop button on the fan if desired. To stop . Note: If the speed and/or incline of...
English Manual
Page 19
... 5. To select the iFIT.com mode, press the iFIT.com button. CAUTION: Always listen for the "chirp" and be prepared for details. A list of the treadmill is not flashing in the display. See HOW TO TURN ON THE POWER on page 13. 19 To restart the program, press the Start button...page 10. 2 Select the iFIT.com mode. If the speed or incline settings are finished exercising, remove the key from the internet. When you can manually override the settings at any time, press the Stop button on page 10. 9 When you when the speed and/or incline of specific system requirements...
... 5. To select the iFIT.com mode, press the iFIT.com button. CAUTION: Always listen for the "chirp" and be prepared for details. A list of the treadmill is not flashing in the display. See HOW TO TURN ON THE POWER on page 13. 19 To restart the program, press the Start button...page 10. 2 Select the iFIT.com mode. If the speed or incline settings are finished exercising, remove the key from the internet. When you can manually override the settings at any time, press the Stop button on page 10. 9 When you when the speed and/or incline of specific system requirements...

English Manual
Page 20
...The console features an information mode that keeps track of the total number of hours that the treadmill has been operated and the total number of miles that the treadmill has been used only when a treadmill is displayed in a store. IMPORTANT: If a "d" appears in a preset sequence, although... the buttons on the console will automatically appear in the right side of this manual. To exit the information mode, remove ...
...The console features an information mode that keeps track of the total number of hours that the treadmill has been operated and the total number of miles that the treadmill has been used only when a treadmill is displayed in a store. IMPORTANT: If a "d" appears in a preset sequence, although... the buttons on the console will automatically appear in the right side of this manual. To exit the information mode, remove ...

English Manual
Page 22
... outlet (see the drawing above). With the key in . After a few seconds, re-insert the key. The treadmill will not run, see the front cover of this manual. Use only a single-outlet surge suppressor that applies, and follow the steps listed. Check the reset/off during use...with GFCI-equipped outlets. Find the symptom that meets all of this manual. d. With the help of the console do not function properly SOLUTION: a. b. After the power cord has been plugged in . TROUBLESHOOTING Most treadmill problems can be solved by following the steps below. c. PROBLEM: The...
... outlet (see the drawing above). With the key in . After a few seconds, re-insert the key. The treadmill will not run, see the front cover of this manual. Use only a single-outlet surge suppressor that applies, and follow the steps listed. Check the reset/off during use...with GFCI-equipped outlets. Find the symptom that meets all of this manual. d. With the help of the console do not function properly SOLUTION: a. b. After the power cord has been plugged in . TROUBLESHOOTING Most treadmill problems can be solved by following the steps below. c. PROBLEM: The...

English Manual
Page 23
... left rear roller bolt clockwise 1/2 of the specifications described on page 8. b. Plug in the power cord, insert the key, and run the treadmill for a few minutes. Repeat until the walking belt is properly tightened, you should be able to lift each side of the walking belt 2 ... CORD. When the walking belt is centered. Be careful to the right, turn the bolt counterclockwise 1/2 of this manual. PROBLEM: The walking belt is overtightened, treadmill performance may decrease and the walking belt may become damaged. if the walking belt has shifted to keep the walking ...
... left rear roller bolt clockwise 1/2 of the specifications described on page 8. b. Plug in the power cord, insert the key, and run the treadmill for a few minutes. Repeat until the walking belt is properly tightened, you should be able to lift each side of the walking belt 2 ... CORD. When the walking belt is centered. Be careful to the right, turn the bolt counterclockwise 1/2 of this manual. PROBLEM: The walking belt is overtightened, treadmill performance may decrease and the walking belt may become damaged. if the walking belt has shifted to keep the walking ...
English Manual
Page 26
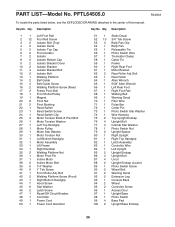
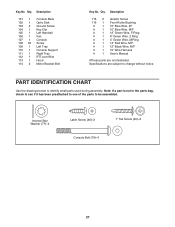
... 40 6 1" Tek Screw 41 1 Front Roller Adj. PFTL64505.0 R0406A To locate the parts listed below, see the EXPLODED DRAWING attached in the center of this manual. Bolt 42 2 Walking Platform Screw (Front) 43 1 Right Bottom Handgrip 44 7 Hood Screw 45 6 Star Washer 46 2 Latch Screw 47 1 Reset/Off Circuit Breaker 48...
... 40 6 1" Tek Screw 41 1 Front Roller Adj. PFTL64505.0 R0406A To locate the parts listed below, see the EXPLODED DRAWING attached in the center of this manual. Bolt 42 2 Walking Platform Screw (Front) 43 1 Right Bottom Handgrip 44 7 Hood Screw 45 6 Star Washer 46 2 Latch Screw 47 1 Reset/Off Circuit Breaker 48...
English Manual
Page 27
... Wire, 2F # 1 10" Blue Wire, M/F # 1 12" Green Wire, F/Ring # 1 8" Green Wire, 2 Ring # 1 4" Green Wire, M/Ring # 1 14" Red Wire, M/F # 1 12" Black Wire, M/F # 1 10" Wire Harness # 1 User's Manual #These parts are subject to change without notice. Specifications are not illustrated. Key No. Note: If a part is not in the parts bag, check to...
... Wire, 2F # 1 10" Blue Wire, M/F # 1 12" Green Wire, F/Ring # 1 8" Green Wire, 2 Ring # 1 4" Green Wire, M/Ring # 1 14" Red Wire, M/F # 1 12" Black Wire, M/F # 1 10" Wire Harness # 1 User's Manual #These parts are subject to change without notice. Specifications are not illustrated. Key No. Note: If a part is not in the parts bag, check to...
English Manual
Page 30
...not responsible or liable for a minimal trip charge. Some states do not allow limitations on pages 26 and 27 and in the center of this manual) LIMITED WARRANTY ICON Health & Fitness, Inc. (ICON), warrants this warranty is limited in USA © 2006 ICON IP, Inc. Accordingly, the... information: • the MODEL NUMBER OF THE PRODUCT (PFTL64505.0) • the NAME OF THE PRODUCT (PROFORM CX18i treadmill) • the SERIAL NUMBER OF THE PRODUCT (see the front cover of this manual. ICON is warranted for ninety (90) days after the date of purchase. ORDERING REPLACEMENT PARTS To order...
...not responsible or liable for a minimal trip charge. Some states do not allow limitations on pages 26 and 27 and in the center of this manual) LIMITED WARRANTY ICON Health & Fitness, Inc. (ICON), warrants this warranty is limited in USA © 2006 ICON IP, Inc. Accordingly, the... information: • the MODEL NUMBER OF THE PRODUCT (PFTL64505.0) • the NAME OF THE PRODUCT (PROFORM CX18i treadmill) • the SERIAL NUMBER OF THE PRODUCT (see the front cover of this manual. ICON is warranted for ninety (90) days after the date of purchase. ORDERING REPLACEMENT PARTS To order...


