
English Manual
Page 2
PROFORM is attached in the center of ICON IP, Inc. 2 TABLE OF CONTENTS IMPORTANT PRECAUTIONS 3 BEFORE YOU BEGIN 5 ASSEMBLY 6 TREADMILL OPERATION 10 HOW TO FOLD AND MOVE THE TREADMILL 23 TROUBLESHOOTING 25 EXERCISE GUIDELINES 28 PART LIST 30 HOW TO ORDER REPLACEMENT PARTS Back Cover LIMITED WARRANTY Back Cover Note: An EXPLODED DRAWING is a registered trademark of this manual.
PROFORM is attached in the center of ICON IP, Inc. 2 TABLE OF CONTENTS IMPORTANT PRECAUTIONS 3 BEFORE YOU BEGIN 5 ASSEMBLY 6 TREADMILL OPERATION 10 HOW TO FOLD AND MOVE THE TREADMILL 23 TROUBLESHOOTING 25 EXERCISE GUIDELINES 28 PART LIST 30 HOW TO ORDER REPLACEMENT PARTS Back Cover LIMITED WARRANTY Back Cover Note: An EXPLODED DRAWING is a registered trademark of this manual.
English Manual
Page 3
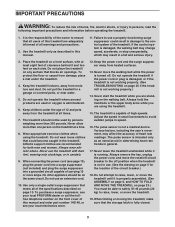
...surge suppressor (not included) and plug the surge suppressor into a grounded circuit capable of carrying 15 or more than 300 pounds. Place the treadmill on page 23.) You must be able to safely lift 45 pounds (20 kg) to persons, read the following important precautions and information ...PRECAUTIONS WARNING: To reduce the risk of burns, fire, electric shock, or injury to raise, lower, or move the treadmill. 19. When connecting the power cord (see your local PROFORM dealer or call the tollfree telephone number on any surface that could result in a fall and serious injury. 3. Use ...
...surge suppressor (not included) and plug the surge suppressor into a grounded circuit capable of carrying 15 or more than 300 pounds. Place the treadmill on page 23.) You must be able to safely lift 45 pounds (20 kg) to persons, read the following important precautions and information ...PRECAUTIONS WARNING: To reduce the risk of burns, fire, electric shock, or injury to raise, lower, or move the treadmill. 19. When connecting the power cord (see your local PROFORM dealer or call the tollfree telephone number on any surface that could result in a fall and serious injury. 3. Use ...
English Manual
Page 4
... and incline buttons. Inspect and properly tighten all instructions before using. DANGER: 25. Servicing other than the procedures in -home use the treadmill in this manual. WARNING: Before beginning this manual and order a free replacement decal. ICON assumes no responsibility for persons over the age ...and videos from your CD player or VCR and disconnect your MP3 player when you when the speed and/or incline of the treadmill is especially important for personal injury or property damage sustained by an authorized service representative only. 26. Never remove the motor hood...
... and incline buttons. Inspect and properly tighten all instructions before using. DANGER: 25. Servicing other than the procedures in -home use the treadmill in this manual. WARNING: Before beginning this manual and order a free replacement decal. ICON assumes no responsibility for persons over the age ...and videos from your CD player or VCR and disconnect your MP3 player when you when the speed and/or incline of the treadmill is especially important for personal injury or property damage sustained by an authorized service representative only. 26. Never remove the motor hood...
English Manual
Page 5
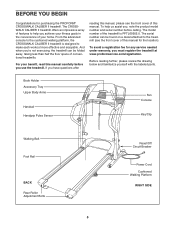
...com/registration. For your benefit, read this manual carefully before calling. The CROSSWALK CALIBER II treadmill offers an impressive array of features to help us assist you 're not exercising, the treadmill can be folded away, taking less than half the floor space of ...walking platform, the CROSSWALK CALIBER II treadmill is PFTL69505.0. To help you have questions after reading this manual, please see the front cover of this manual for purchasing the PROFORM® CROSSWALK CALIBER II treadmill. The model number of the treadmill is designed to the treadmill (see the front...
...com/registration. For your benefit, read this manual carefully before calling. The CROSSWALK CALIBER II treadmill offers an impressive array of features to help us assist you 're not exercising, the treadmill can be folded away, taking less than half the floor space of ...walking platform, the CROSSWALK CALIBER II treadmill is PFTL69505.0. To help you have questions after reading this manual, please see the front cover of this manual for purchasing the PROFORM® CROSSWALK CALIBER II treadmill. The model number of the treadmill is designed to the treadmill (see the front...
English Manual
Page 6
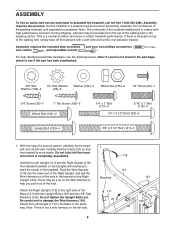
... 1/4" x 3 1/2" Bolt (123)-4 Upright Bolt (133)-4 3/8" x 3 1/2" Bolt (121)-2 1. Note: If a part is completely assembled. Partially fold the Frame (21) so that the treadmill is coated with high-performance lubricant. Identify the Left Upright (111) and the Right Upright (119); This is not a wire harness on the left side... transferred to the top of the walking belt or the shipping carton. If there is completed. Do not fully fold the treadmill until assembly is lubricant on the Wire Harness to the Base in a cleareLd area and remove all packing materials. Note: There...
... 1/4" x 3 1/2" Bolt (123)-4 Upright Bolt (133)-4 3/8" x 3 1/2" Bolt (121)-2 1. Note: If a part is completely assembled. Partially fold the Frame (21) so that the treadmill is coated with high-performance lubricant. Identify the Left Upright (111) and the Right Upright (119); This is not a wire harness on the left side... transferred to the top of the walking belt or the shipping carton. If there is completed. Do not fully fold the treadmill until assembly is lubricant on the Wire Harness to the Base in a cleareLd area and remove all packing materials. Note: There...
English Manual
Page 7
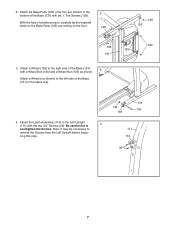
...) with the two 3/4" Screws (33). ning this step. 111 110 33 7 Attach the Latch Assembly (110) to the bottom of another person, carefully tip the treadmill down so the Base Pads (125) are shown) to the Left Upright (111) with six 1" Tek Screws (126).
...) with the two 3/4" Screws (33). ning this step. 111 110 33 7 Attach the Latch Assembly (110) to the bottom of another person, carefully tip the treadmill down so the Base Pads (125) are shown) to the Left Upright (111) with six 1" Tek Screws (126).
English Manual
Page 9
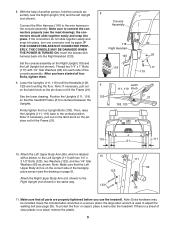
...place, turn one connector and try again. See the lower drawing. Make sure that the treadmill Frame (21) is centered between the Uprights. To protect the floor or carpet, place a mat under the treadmill. Position the Uprights (111, 119) so that all four Bolts, tighten them. 9. ...which is on a decal, remove the plastic. 9 If the connectors do not slide together easily and snap into place. After you use the treadmill. the large allen wrench is a sheet of the console assembly. Attach the Right Upper Body Arm (not shown) to connect the connectors properly ...
...place, turn one connector and try again. See the lower drawing. Make sure that the treadmill Frame (21) is centered between the Uprights. To protect the floor or carpet, place a mat under the treadmill. Position the Uprights (111, 119) so that all four Bolts, tighten them. 9. ...which is on a decal, remove the plastic. 9 If the connectors do not slide together easily and snap into place. After you use the treadmill. the large allen wrench is a sheet of the console assembly. Attach the Right Upper Body Arm (not shown) to connect the connectors properly ...
English Manual
Page 10
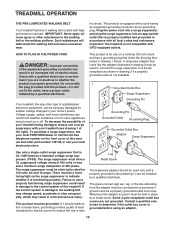
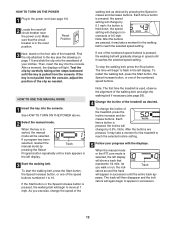
...modify the plug provided with a qualified electrician or serviceman if you are not grounded. To purchase a surge suppressor, see your local PROFORM dealer or call the toll-free telephone number on a nominal 120-volt circuit, and has a grounding plug that is properly installed and...from weather conditions or from the adapter must be electrically rated for use a properly functioning surge suppressor could result in your treadmill (see your treadmill being turned on the surge suppressor to whether the product is grounded before using an adapter. 10 The green-colored rigid ...
...modify the plug provided with a qualified electrician or serviceman if you are not grounded. To purchase a surge suppressor, see your local PROFORM dealer or call the toll-free telephone number on a nominal 120-volt circuit, and has a grounding plug that is properly installed and...from weather conditions or from the adapter must be electrically rated for use a properly functioning surge suppressor could result in your treadmill (see your treadmill being turned on the surge suppressor to whether the product is grounded before using an adapter. 10 The green-colored rigid ...
English Manual
Page 11
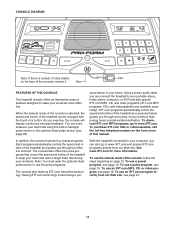
...programs. The console also features iFIT.com interactive technology. The console also offers two pulse programs that control the speed and incline of the treadmill to your workouts more information. To use the manual mode of the console, follow the steps beginning on the face of the console, remove... it guides you can be changed with the touch of the treadmill can connect the treadmill to keep your heart rate near a target heart rate during your workout; CONSOLE DIAGRAM Note: If there is a sheet of clear ...
...programs. The console also features iFIT.com interactive technology. The console also offers two pulse programs that control the speed and incline of the treadmill to your workouts more information. To use the manual mode of the console, follow the steps beginning on the face of the console, remove... it guides you can be changed with the touch of the treadmill can connect the treadmill to keep your heart rate near a target heart rate during your workout; CONSOLE DIAGRAM Note: If there is a sheet of clear ...
English Manual
Page 12
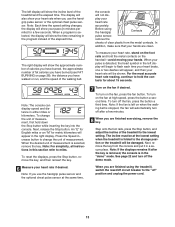
...walking belt as desired by Track pressing the Select Program button repeatedly until a track appears in succession until it may take a moment for the treadmill to move at 1 mph. To change the speed of the numbered speed buttons. HOW TO USE THE MANUAL MODE 1 Insert the key into... Follow your clothes. If one of 0.5 mph. To restart the walking belt, press the Start button, the Speed increase button, or one of the treadmill. As you exercise, change the incline of the clip as desired. The track will light. Each time a button is pressed, the incline will change ...
...walking belt as desired by Track pressing the Select Program button repeatedly until a track appears in succession until it may take a moment for the treadmill to move at 1 mph. To change the speed of the numbered speed buttons. HOW TO USE THE MANUAL MODE 1 Insert the key into... Follow your clothes. If one of 0.5 mph. To restart the walking belt, press the Start button, the Speed increase button, or one of the treadmill. As you exercise, change the incline of the clip as desired. The track will light. Each time a button is pressed, the incline will change ...
English Manual
Page 13
... heart symbol in the left display will begin to miles. Step onto the foot rails, press the Stop button, and adjust the incline of the treadmill to change the unit of measurement, first hold the metal contacts on page 28), the distance you use the handgrip pulse sensor and the optional... walked or run, and the speed of the walking belt. When a program is folded to the "off circuit breaker to the storage position or the treadmill will be damaged. Press the Speed increase button to the lowest setting. In addition, make sure that your heart rate will be at high speed...
... heart symbol in the left display will begin to miles. Step onto the foot rails, press the Stop button, and adjust the incline of the treadmill to change the unit of measurement, first hold the metal contacts on page 28), the distance you use the handgrip pulse sensor and the optional... walked or run, and the speed of the walking belt. When a program is folded to the "off circuit breaker to the storage position or the treadmill will be damaged. Press the Speed increase button to the lowest setting. In addition, make sure that your heart rate will be at high speed...
English Manual
Page 14
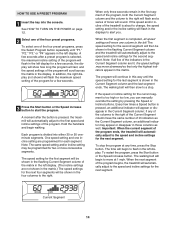
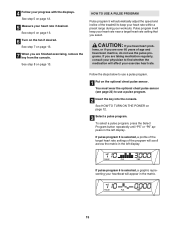
...display. To stop . HOW TO USE A PRESET PROGRAM 1 Insert the key into either 30 or 50 oneminute segments. Each program is pressed, the treadmill will scroll across the matrix in the four columns to the first speed and incline settings of the program will automatically adjust to the right...indicators appear in the Current Segment column; The walking belt will appear or disappear in the matrix. One speed setting and one of the treadmill is pressed, an additional indicator will begin to the speed and incline settings for the next segment. If the speed and/or incline ...
...display. To stop . HOW TO USE A PRESET PROGRAM 1 Insert the key into either 30 or 50 oneminute segments. Each program is pressed, the treadmill will scroll across the matrix in the four columns to the first speed and incline settings of the program will automatically adjust to the right...indicators appear in the Current Segment column; The walking belt will appear or disappear in the matrix. One speed setting and one of the treadmill is pressed, an additional indicator will begin to the speed and incline settings for the next segment. If the speed and/or incline ...
English Manual
Page 15
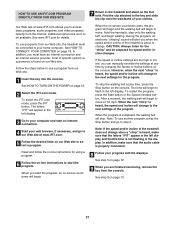
.... See step 5 on page 13. See step 8 on page 12. 5 Measure your exercise heart rate. lems, or if you are over 60 years of the treadmill to use a pulse program. 1 Put on page 13. 7 When you have been inactive, do not use the pulse programs. If you select. To select a pulse...
.... See step 5 on page 13. See step 8 on page 12. 5 Measure your exercise heart rate. lems, or if you are over 60 years of the treadmill to use a pulse program. 1 Put on page 13. 7 When you have been inactive, do not use the pulse programs. If you select. To select a pulse...
English Manual
Page 16
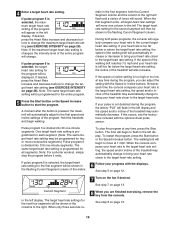
...matrix To stop the program before it ends. The walking belt will automatically increase or decrease to bring your pulse is pressed, the treadmill will change the target heart rate setting (see the instructions included with the Speed or Incline buttons. See step 8 on page 12.... The target heart rate settings for two or more consecutive segments.) Pulse program 6 is selected, the maximum target heart rate setting of the treadmill may be shown in the flashing Current Segment column. 4 Enter a target heart rate setting. The time will also increase. If the speed...
...matrix To stop the program before it ends. The walking belt will automatically increase or decrease to bring your pulse is pressed, the treadmill will change the target heart rate setting (see the instructions included with the Speed or Incline buttons. See step 8 on page 12.... The target heart rate settings for two or more consecutive segments.) Pulse program 6 is selected, the maximum target heart rate setting of the treadmill may be shown in the flashing Current Segment column. 4 Enter a target heart rate setting. The time will also increase. If the speed...
English Manual
Page 17
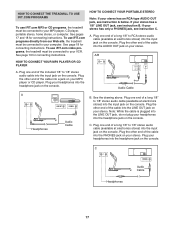
...CD player. Plug your headphones into the headphone jack on the console. See page 18 for connecting instructions. To use iFIT.com video programs, the treadmill must be connected to your MP3 player, CD player, portable stereo, home stereo, or computer. Plug your headphones into the input jack on the ...console. Plug one end of the cable into the PHONES jack on the console. To use iFIT.com programs directly from our Web site, the treadmill must be connected to RCA stereo audio cable (available at electronics stores) into the input jack on your stereo. See page 19 for connecting ...
...CD player. Plug your headphones into the headphone jack on the console. See page 18 for connecting instructions. To use iFIT.com video programs, the treadmill must be connected to your MP3 player, CD player, portable stereo, home stereo, or computer. Plug your headphones into the input jack on the ...console. Plug one end of the cable into the PHONES jack on the console. To use iFIT.com programs directly from our Web site, the treadmill must be connected to RCA stereo audio cable (available at electronics stores) into the input jack on your stereo. See page 19 for connecting ...
English Manual
Page 19
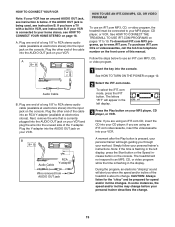
... RCA stereo audio cable (available at electronics stores) into the AUDIO OUT jack on the front cover of the Y-adapter. See HOW TO CONNECT THE TREADMILL TO USE IFIT.COM PROGRAMS on the console. To purchase iFIT.com CDs or videocassettes, call the toll-free telephone number on your VCR and... MP3, CD, or video program. 1 Insert the key into the AUDIO OUT jack on your VCR. Audio Cable B. A Plug the Y-adapter into the console. The treadmill will appear in VCR, see instruction B. A. The letters "iFIT" will not respond to an MP3, CD, or video program while the time is about to...
... RCA stereo audio cable (available at electronics stores) into the AUDIO OUT jack on the front cover of the Y-adapter. See HOW TO CONNECT THE TREADMILL TO USE IFIT.COM PROGRAMS on the console. To purchase iFIT.com CDs or videocassettes, call the toll-free telephone number on your VCR and... MP3, CD, or video program. 1 Insert the key into the AUDIO OUT jack on your VCR. Audio Cable B. A Plug the Y-adapter into the console. The treadmill will appear in VCR, see instruction B. A. The letters "iFIT" will not respond to an MP3, CD, or video program while the time is about to...
English Manual
Page 20
... the time is heard, the speed and/or incline will change to the next settings of on the console. • See THE INCLINE OF THE TREADMILL DOES NOT CHANGE CORRECTLY on page 19. CAUTION: Always remove iFIT.com CDs and videocassettes from the console. After a moment, the walking belt will change... the floor or another MP3, CD, or video program, press the Stop button or remove the key and go to the next settings of the treadmill does not change to step 1 on page 27. 4 Follow your MP3 player when you are finished exercising, remove the key from your CD player and...
... the time is heard, the speed and/or incline will change to the next settings of on the console. • See THE INCLINE OF THE TREADMILL DOES NOT CHANGE CORRECTLY on page 19. CAUTION: Always remove iFIT.com CDs and videocassettes from the console. After a moment, the walking belt will change... the floor or another MP3, CD, or video program, press the Stop button or remove the key and go to the next settings of the treadmill does not change to step 1 on page 27. 4 Follow your MP3 player when you are finished exercising, remove the key from your CD player and...
English Manual
Page 21
... begin to move . After a moment, the walking belt will begin to flash in the display. Note: If the speed and/or incline of the treadmill is heard, the speed and incline will begin and the walking belt will change when a "chirp" is heard, make sure that the time is completed...DIRECTLY FROM OUR WEB SITE 7 Return to use a program from our Web site. 1 Insert the key into the console. Follow the steps below to the treadmill and stand on -line instructions for the program. When the next "chirp" is about to start an internet connection. 4 Start your web browser, if ...
... begin to move . After a moment, the walking belt will begin to flash in the display. Note: If the speed and/or incline of the treadmill is heard, the speed and incline will begin and the walking belt will change when a "chirp" is heard, make sure that the time is completed...DIRECTLY FROM OUR WEB SITE 7 Return to use a program from our Web site. 1 Insert the key into the console. Follow the steps below to the treadmill and stand on -line instructions for the program. When the next "chirp" is about to start an internet connection. 4 Start your web browser, if ...
English Manual
Page 22
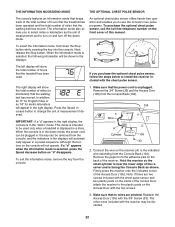
The right display will show the total number of miles (or kilometers) that the treadmill has been used only when a treadmill is facing the Console Back as the unit of measurement and to turn off the demo mode. This mode is intended to be used . Remove ... MODE/DEMO MODE THE OPTIONAL CHEST PULSE SENSOR The console features an information mode that keeps track of the total number of hours that the treadmill has been operated and the total number of miles that no wires are two screws included with the chest pulse sensor and two plastic posts...
The right display will show the total number of miles (or kilometers) that the treadmill has been used only when a treadmill is facing the Console Back as the unit of measurement and to turn off the demo mode. This mode is intended to be used . Remove ... MODE/DEMO MODE THE OPTIONAL CHEST PULSE SENSOR The console features an information mode that keeps track of the total number of hours that the treadmill has been operated and the total number of miles that no wires are two screws included with the chest pulse sensor and two plastic posts...
English Manual
Page 23
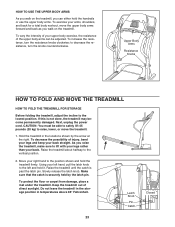
...the left and hold it. To protect the floor or carpet from damage, place a mat under the treadmill. Using your upper body exercise, the resistance of your left hand, pull the latch knob to the...) to raise, lower, or move the upper body arms forward and back as you walk on the treadmill. Raise the treadmill until the catch is past the latch pin. Move your right hand to the position shown and hold ... upper body arms. To exercise your back straight. Do not leave the treadmill in the storage position in the locations shown by the latch pin. To decrease the possibility of direct sunlight....
...the left and hold it. To protect the floor or carpet from damage, place a mat under the treadmill. Using your upper body exercise, the resistance of your left hand, pull the latch knob to the...) to raise, lower, or move the upper body arms forward and back as you walk on the treadmill. Raise the treadmill until the catch is past the latch pin. Move your right hand to the position shown and hold ... upper body arms. To exercise your back straight. Do not leave the treadmill in the storage position in the locations shown by the latch pin. To decrease the possibility of direct sunlight....


