

English Manual
Page 3
...stop unexpectedly, which may result in this treadmill are recommended for the location of high speeds. Do not place the treadmill on the walking belt. Do not wear loose clothing that blocks air openings. Always wear athletic shoes. Using the included hand weights and not holding the ...using the treadmill. 16. Athletic support clothes are adequately informed of all users of burns, fire, electric shock, or injury to maintain your local PROFORM dealer or call 1-800-8063651 and order part number 146148. 17. Do not use . (See the drawing on page 5 for both men...
...stop unexpectedly, which may result in this treadmill are recommended for the location of high speeds. Do not place the treadmill on the walking belt. Do not wear loose clothing that blocks air openings. Always wear athletic shoes. Using the included hand weights and not holding the ...using the treadmill. 16. Athletic support clothes are adequately informed of all users of burns, fire, electric shock, or injury to maintain your local PROFORM dealer or call 1-800-8063651 and order part number 146148. 17. Do not use . (See the drawing on page 5 for both men...

English Manual
Page 5
... SIDE Walking Belt Foot Rail On/Off Switch Circuit Breaker Power Cord Rear Roller Adjustment Bolts Adjustable Cushion Deck 5 For your exercise program in the drawing below. To help you get the most from your benefit, read this manual for selecting the revolutionary PROFORM® 995 SEL treadmill.... The serial number can be found on a decal attached to help us assist you 're not exercising, the unique 995 SEL can be folded up, requiring less than half the floor space...
... SIDE Walking Belt Foot Rail On/Off Switch Circuit Breaker Power Cord Rear Roller Adjustment Bolts Adjustable Cushion Deck 5 For your exercise program in the drawing below. To help you get the most from your benefit, read this manual for selecting the revolutionary PROFORM® 995 SEL treadmill.... The serial number can be found on a decal attached to help us assist you 're not exercising, the unique 995 SEL can be folded up, requiring less than half the floor space...

English Manual
Page 6
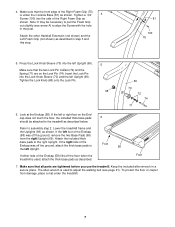
... in the left side for the Pulse Bar (76). ASSEMBLY Assembly requires two people. driver and rubber mallet . During shipping, a small amount of the walking belt, simply wipe off the lubricant with a soft cloth and a mild, non-abrasive cleaner. 1. This is completed. Use the extra Base Pad if one of...remain in a cleared area and remove all packing materials. make sure that the tab on the Foam Grip is coated with two of the treadmill walking belt is inserted into the post on the floor. 102 99 2. Do not dispose of a second person, carefully tip the Uprights (69) back to...
... in the left side for the Pulse Bar (76). ASSEMBLY Assembly requires two people. driver and rubber mallet . During shipping, a small amount of the walking belt, simply wipe off the lubricant with a soft cloth and a mild, non-abrasive cleaner. 1. This is completed. Use the extra Base Pad if one of...remain in a cleared area and remove all packing materials. make sure that the tab on the Foam Grip is coated with two of the treadmill walking belt is inserted into the post on the floor. 102 99 2. Do not dispose of a second person, carefully tip the Uprights (69) back to...
English Manual
Page 7
... the other Handrail Extension (not shown) and the Left Foam Grip (not shown) as described below. Attach the included thick base pads to adjust the walking belt (see arrow A) to the treadmill as described in a secure place.
... the other Handrail Extension (not shown) and the Left Foam Grip (not shown) as described below. Attach the included thick base pads to adjust the walking belt (see arrow A) to the treadmill as described in a secure place.

English Manual
Page 8
...into an appropriate outlet that looks like any other type of 450 joules. This product is for use a surge suppressor with your local PROFORM dealer or call 1-800-806-3651 and order part number 146148. To purchase a surge suppressor, see your treadmill (see drawing 1 at...surge suppressor that looks like extending from other substances to indicate whether it should be a monitoring light on the surge suppressor to the walking belt or the walking platform. Contact a qualified electrician to reduce the risk of 2 your treadmill being turned on a nominal 120-volt circuit, and ...
...into an appropriate outlet that looks like any other type of 450 joules. This product is for use a surge suppressor with your local PROFORM dealer or call 1-800-806-3651 and order part number 146148. To purchase a surge suppressor, see your treadmill (see drawing 1 at...surge suppressor that looks like extending from other substances to indicate whether it should be a monitoring light on the surge suppressor to the walking belt or the walking platform. Contact a qualified electrician to reduce the risk of 2 your treadmill being turned on a nominal 120-volt circuit, and ...

English Manual
Page 9
... in your home. Key Pulse Display Clip Thumb Pulse Sensor CAUTION: Before operating the console, read the following precautions. • Do not stand on the walking belt when turning on the console and place only a sealed water bottle in the water bottle holder. To use an iFIT.com program directly from the...
... in your home. Key Pulse Display Clip Thumb Pulse Sensor CAUTION: Before operating the console, read the following precautions. • Do not stand on the walking belt when turning on the console and place only a sealed water bottle in the water bottle holder. To use an iFIT.com program directly from the...

English Manual
Page 10
...number of your progress with the LED track and the displays. The Incline indicator or the Laps indicator will begin to start the walking belt. To stop the walking belt, press the Stop button. See HOW TO TURN ON THE POWER above. 2 Select the manual mode. A moment after the ... Insert the key fully into the console. To change the speed setting quickly, press the Quick Speed buttons. 4 Change the incline of the walking belt as desired by carefully taking a few steps backward until you have completed. The Segment Time indicator will light. Hold the handrails and begin ....
...number of your progress with the LED track and the displays. The Incline indicator or the Laps indicator will begin to start the walking belt. To stop the walking belt, press the Stop button. See HOW TO TURN ON THE POWER above. 2 Select the manual mode. A moment after the ... Insert the key fully into the console. To change the speed setting quickly, press the Quick Speed buttons. 4 Change the incline of the walking belt as desired by carefully taking a few steps backward until you have completed. The Segment Time indicator will light. Hold the handrails and begin ....

English Manual
Page 11
... the approximate numbers of calories and fat calories you are finished, remove the key. Speed/Min-Mile display-This display shows the speed of the walking belt and your heart rate will be displayed in the Pulse display and then your heart rate will be selected and the Manual indicator will be...
... the approximate numbers of calories and fat calories you are finished, remove the key. Speed/Min-Mile display-This display shows the speed of the walking belt and your heart rate will be displayed in the Pulse display and then your heart rate will be selected and the Manual indicator will be...

English Manual
Page 12
...the speed and incline settings for the program. If the speed or incline setting for the second segment. The Time/Segment Time display will begin walking. Refer to a stop the program temporarily, press the Stop button. ments of the indicators in the Current Segment column are finished using the treadmill... and put it in a safe place.Note: If the displays and various indicators on page 10. 5 Measure your progress with the displays. The walking belt will then slow to step 5 on the console remain lit after the button is completed, remove the key from the console. Refer to page 18...
...the speed and incline settings for the program. If the speed or incline setting for the second segment. The Time/Segment Time display will begin walking. Refer to a stop the program temporarily, press the Stop button. ments of the indicators in the Current Segment column are finished using the treadmill... and put it in a safe place.Note: If the displays and various indicators on page 10. 5 Measure your progress with the displays. The walking belt will then slow to step 5 on the console remain lit after the button is completed, remove the key from the console. Refer to page 18...
English Manual
Page 16
... or video program, press the Stop button or remove the key and go to the When the CD or video program is completed, the walking belt will stop the walking belt at any time by pressing the Speed or Incline buttons on the console. • Adjust the volume of the treadmill does not change... or the Speed v button on the console. See step 5 on page 15. However, when the next "chirp" is completed, remove the key. After a moment, the walking belt will begin to the next settings of on the console. 5 Follow your progress with the LED track and the displays. See step 6 on page 11...
... or video program, press the Stop button or remove the key and go to the When the CD or video program is completed, the walking belt will stop the walking belt at any time by pressing the Speed or Incline buttons on the console. • Adjust the volume of the treadmill does not change... or the Speed v button on the console. See step 5 on page 15. However, when the next "chirp" is completed, remove the key. After a moment, the walking belt will begin to the next settings of on the console. 5 Follow your progress with the LED track and the displays. See step 6 on page 11...

English Manual
Page 17
...the LED track and the displays. Read and follow the on-line instructions for speed and/or incline changes. Hold the handrails, step onto the walking belt, and begin to flash. Note: To use a program from our Web site, the treadmill must have an internet connection and an internet service ... has ended, remove the key. See HOW TO TURN ON THE POWER on page 12. 17 CAUTION: Always listen for details. After a moment, the walking belt will change to your clothing. See step 6 on page 10. 2 Select the iFIT.com mode. In addition, you to access basic programs, audio programs...
...the LED track and the displays. Read and follow the on-line instructions for speed and/or incline changes. Hold the handrails, step onto the walking belt, and begin to flash. Note: To use a program from our Web site, the treadmill must have an internet connection and an internet service ... has ended, remove the key. See HOW TO TURN ON THE POWER on page 12. 17 CAUTION: Always listen for details. After a moment, the walking belt will change to your clothing. See step 6 on page 10. 2 Select the iFIT.com mode. In addition, you to access basic programs, audio programs...

English Manual
Page 18
... exit the information mode, remove the key from miles per hour. The Time/Segment Time display will show the total number of miles that the walking belt has moved. mum firmness setting, turn off the demo mode. Press the Speed v button to level 3; THE INFORMATION MODE/DEMO MODE HOW TO...information mode that keeps track of the total number of hours that the treadmill has been operated and the total number of miles that the walking belt has moved. When the information mode is selected, the following information will show the total number of the treadmill (there is controlled by the...
... exit the information mode, remove the key from miles per hour. The Time/Segment Time display will show the total number of miles that the walking belt has moved. mum firmness setting, turn off the demo mode. Press the Speed v button to level 3; THE INFORMATION MODE/DEMO MODE HOW TO...information mode that keeps track of the total number of hours that the treadmill has been operated and the total number of miles that the walking belt has moved. When the information mode is selected, the following information will show the total number of the treadmill (there is controlled by the...

English Manual
Page 21
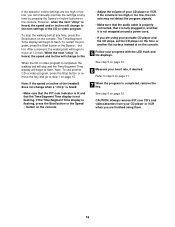
... walking belt is properly tightened. Be careful not to keep the walking belt centered. If the walking belt slips when walked on SOLUTION: a. PROBLEM: The walking belt slows when walked on , first remove the key and UNPLUG THE POWER CORD. When the walking belt is properly tightened. If the walking belt is overtightened, treadmill performance may decrease and the walking belt may become damaged. If the walking belt...
... walking belt is properly tightened. Be careful not to keep the walking belt centered. If the walking belt slips when walked on SOLUTION: a. PROBLEM: The walking belt slows when walked on , first remove the key and UNPLUG THE POWER CORD. When the walking belt is properly tightened. If the walking belt is overtightened, treadmill performance may decrease and the walking belt may become damaged. If the walking belt...

English Manual
Page 23
...Long) Static Decal Circuit Breaker Power Cord On/Off Switch Left Endcap Insert Belt Guide Screw 46 1 Belt Guide 47 2 Front Isolator 48 2 Adjustable Cushion 49 16 Fastener 50 1 Belly Pan 51 1 Right Foot Rail Cap 52 1 Walking Platform 53 4 Platform Screw 54 2 Adjustable Cushion Screw 55 1 Video ...Extension Leg Extension Cap Incline Warning Decal Shock Extension Leg Assembly Chest Pulse Wire Book Holder Power Cord Grommet Frame Catch Screw Catch Audio Wire Walking Belt 30" Wire Harness 20" Wire Harness Hand Weight Endcap Spacer Thick Base Pad Cushion Bolt Long Hood Screw Filter Wire 8" Black Wire,...
...Long) Static Decal Circuit Breaker Power Cord On/Off Switch Left Endcap Insert Belt Guide Screw 46 1 Belt Guide 47 2 Front Isolator 48 2 Adjustable Cushion 49 16 Fastener 50 1 Belly Pan 51 1 Right Foot Rail Cap 52 1 Walking Platform 53 4 Platform Screw 54 2 Adjustable Cushion Screw 55 1 Video ...Extension Leg Extension Cap Incline Warning Decal Shock Extension Leg Assembly Chest Pulse Wire Book Holder Power Cord Grommet Frame Catch Screw Catch Audio Wire Walking Belt 30" Wire Harness 20" Wire Harness Hand Weight Endcap Spacer Thick Base Pad Cushion Bolt Long Hood Screw Filter Wire 8" Black Wire,...


