

English Manual
Page 5
...for iPod®. For your workouts at www.proformservice.com/registration. To help us . Accessory Tray Handrail Upright Walking Belt Foot Rail Console Pulse Sensor Key/Clip Reset/Off Circuit Breaker Idler Roller Adjustment Bolts Platform Cushion 5 To avoid a registration fee for any service needed...make your benefit, read this manual carefully before contacting us assist you for selecting the new PROFORM® 485 CS treadmill with Universal Dock for iPod offers a selection of other treadmills. The model number and the location of the serial number decal are shown on the ...
...for iPod®. For your workouts at www.proformservice.com/registration. To help us . Accessory Tray Handrail Upright Walking Belt Foot Rail Console Pulse Sensor Key/Clip Reset/Off Circuit Breaker Idler Roller Adjustment Bolts Platform Cushion 5 To avoid a registration fee for any service needed...make your benefit, read this manual carefully before contacting us assist you for selecting the new PROFORM® 485 CS treadmill with Universal Dock for iPod offers a selection of other treadmills. The model number and the location of the serial number decal are shown on the ...

English Manual
Page 9
With the help of a second person, tip the treadmill so that you just removed. Discard the shipping bracket. 5 A 2 81 85 B 48 4 104 86 2 81 ...Left Upright Spacer (83) as shown. Partially tighten the M10 x 96mm Bolts (5); 5. Partially fold the Frame (48) so the treadmill is flat on a soft surface to the Base (85) in the location shown with a second Bolt Spacer (79), M10 x ...do not fully fold the Frame yet. Attach a Base Pad (81) to avoid scratching the Console. With the help of a second person, hold a Bolt Spacer (79) inside the lower end of a second person, carefully...
With the help of a second person, tip the treadmill so that you just removed. Discard the shipping bracket. 5 A 2 81 85 B 48 4 104 86 2 81 ...Left Upright Spacer (83) as shown. Partially tighten the M10 x 96mm Bolts (5); 5. Partially fold the Frame (48) so the treadmill is flat on a soft surface to the Base (85) in the location shown with a second Bolt Spacer (79), M10 x ...do not fully fold the Frame yet. Attach a Base Pad (81) to avoid scratching the Console. With the help of a second person, hold a Bolt Spacer (79) inside the lower end of a second person, carefully...

English Manual
Page 10
... of them ; Next, insert the included plastic tie through the Right Handrail as shown; Make sure that no wires on the console wire into the Pulse Support (109) and the Console (87). Identify the Right Handrail (90), which has a large hole in the Right Handrail (90) and out of them... . 9 3 70 1 109 70 3 1 1 87 1 40 Ground Wire 10 Hold the Right 8 Handrail near the Console (87). Tighten two M4 x 20mm Screws (3) with two M4.2 x 19mm Screws (1). Start all six Screws before tightening either of the top as shown. use ...
... of them ; Next, insert the included plastic tie through the Right Handrail as shown; Make sure that no wires on the console wire into the Pulse Support (109) and the Console (87). Identify the Right Handrail (90), which has a large hole in the Right Handrail (90) and out of them... . 9 3 70 1 109 70 3 1 1 87 1 40 Ground Wire 10 Hold the Right 8 Handrail near the Console (87). Tighten two M4 x 20mm Screws (3) with two M4.2 x 19mm Screws (1). Start all six Screws before tightening either of the top as shown. use ...

English Manual
Page 11
...Left Accessory Tray (110) and the Right Accessory Tray (111) into place. Connect the Upright Wire (77) to the console wire. Start all four Bolts before tightening any of them. Set the console assembly on the Right Upright (78) and the Left Upright (not shown). See steps 4 and 6. See the inset ...the connectors into place. 10. If necessary, press the Cage Nuts (38) into the Right Upright (78). IF THE CONNECTORS ARE NOT CONNECTED PROPERLY, THE CONSOLE MAY BE DAMAGED WHEN THE POWER IS TURNED ON. Tighten four M8 x 25mm Bolts (6) with four M8 Star Washers (10) into the Uprights (73, ...
...Left Accessory Tray (110) and the Right Accessory Tray (111) into place. Connect the Upright Wire (77) to the console wire. Start all four Bolts before tightening any of them. Set the console assembly on the Right Upright (78) and the Left Upright (not shown). See steps 4 and 6. See the inset ...the connectors into place. 10. If necessary, press the Cage Nuts (38) into the Right Upright (78). IF THE CONNECTORS ARE NOT CONNECTED PROPERLY, THE CONSOLE MAY BE DAMAGED WHEN THE POWER IS TURNED ON. Tighten four M8 x 25mm Bolts (6) with four M8 Star Washers (10) into the Uprights (73, ...
English Manual
Page 12
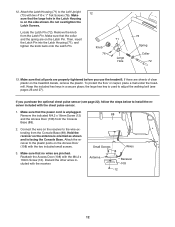
... Latch Housing is used to adjust the walking belt (see page 22), follow the steps below to the wire extending from the Console Base (88). If you use the treadmill. Make sure that the collar and the spring are pinched. Make sure that no wires are on the Latch Pin. Make sure... that the power cord is facing the Console Base. Attach the receiver to the Left Upright (73) with two #10 x 1" Tek Screws (76). Discard...
... Latch Housing is used to adjust the walking belt (see page 22), follow the steps below to the wire extending from the Console Base (88). If you use the treadmill. Make sure that the collar and the spring are pinched. Make sure that no wires are on the Latch Pin. Make sure... that the power cord is facing the Console Base. Attach the receiver to the Left Upright (73) with two #10 x 1" Tek Screws (76). Discard...

English Manual
Page 14
...stores your exercise information so that you use the information mode, see page 22 for information on the console, remove the plastic. CONSOLE DIAGRAM Key Clip FEATURES OF THE CONSOLE The treadmill console offers an impressive array of features designed to make your favorite workout music or audio books with the... the manual mode of the walking belt, and center the walking belt if necessary (see page 17. To use the treadmill, observe the alignment of the console, see page 27). The first time you can even measure your progress. This product has been designed specifically to work ...
...stores your exercise information so that you use the information mode, see page 22 for information on the console, remove the plastic. CONSOLE DIAGRAM Key Clip FEATURES OF THE CONSOLE The treadmill console offers an impressive array of features designed to make your favorite workout music or audio books with the... the manual mode of the walking belt, and center the walking belt if necessary (see page 17. To use the treadmill, observe the alignment of the console, see page 27). The first time you can even measure your progress. This product has been designed specifically to work ...
English Manual
Page 15
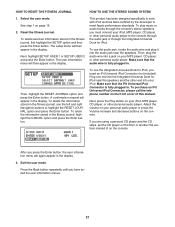
... on page 14) and slide the clip onto the waistband of the clip. The setup menu will also be used if the treadmill is not pulled from the console, adjust the position of your user information, first highlight the SETUP option and press the Enter button. After a moment, the ...light. Next, locate the reset/off circuit breaker to view your workout history (see the drawing on . Switch the circuit breaker to personalize console settings. Next, stand on the treadmill frame near the power cord. IMPORTANT: To highlight options within a menu, press the Enter button. IMPORTANT: If the...
... on page 14) and slide the clip onto the waistband of the clip. The setup menu will also be used if the treadmill is not pulled from the console, adjust the position of your user information, first highlight the SETUP option and press the Enter button. After a moment, the ...light. Next, locate the reset/off circuit breaker to view your workout history (see the drawing on . Switch the circuit breaker to personalize console settings. Next, stand on the treadmill frame near the power cord. IMPORTANT: To highlight options within a menu, press the Enter button. IMPORTANT: If the...

English Manual
Page 16
... the Enter button. To set the date, first press the left and right Navigation buttons to select the desired month, day, or year. The console can now enter your name and your workout history accurately in the field, press the Enter button. To select a default user setting, first highlight ...screen, highlight the SHOW WELCOME SCREEN option and press the Enter button. A list of a workout session. When you turn on or turn on the console. To set the date and time, first highlight the CHANGE DATE OR TIME option in the display each time you select an option, an "x" will...
... the Enter button. To set the date, first press the left and right Navigation buttons to select the desired month, day, or year. The console can now enter your name and your workout history accurately in the field, press the Enter button. To select a default user setting, first highlight ...screen, highlight the SHOW WELCOME SCREEN option and press the Enter button. A list of a workout session. When you turn on or turn on the console. To set the date and time, first highlight the CHANGE DATE OR TIME option in the display each time you select an option, an "x" will...

English Manual
Page 17
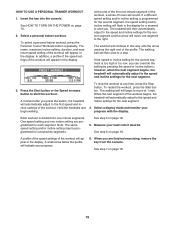
...been selected, remove the key and then reinsert it reaches the selected speed setting. To stop the walking belt, press the Stop button. The console will appear. Start the walking belt. Each time you hold down Navigation buttons to confirm your choice. if you press a button, the speed...To restart the walking belt, press the Start button or the Speed increase button. 17 HOW TO IDENTIFY YOURSELF AS USER 1 OR USER 2 The console can load information and keep track of the Precision Quick Speed buttons numbered 1 through 10. To identify yourself as desired by 0.1 mph; Note: ...
...been selected, remove the key and then reinsert it reaches the selected speed setting. To stop the walking belt, press the Stop button. The console will appear. Start the walking belt. Each time you hold down Navigation buttons to confirm your choice. if you press a button, the speed...To restart the walking belt, press the Start button or the Speed increase button. 17 HOW TO IDENTIFY YOURSELF AS USER 1 OR USER 2 The console can load information and keep track of the Precision Quick Speed buttons numbered 1 through 10. To identify yourself as desired by 0.1 mph; Note: ...
English Manual
Page 18
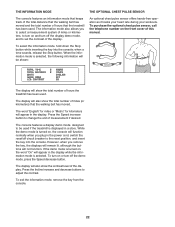
...key, and then reinsert the key. 6. Measure your hands. To measure your heart rate, stand on the treadmill, the display can show your heart rate accurately. Next, remove the key from the console and put it in the display for a few seconds each time you do not do this, the... In addition, make sure that you are finished using the handgrip pulse sensor, remove the sheets of clear plastic from the console. • The incline level of the treadmill, press the Incline increase and decrease buttons. When you press the Incline increase and decrease button, the incline will be at...
...key, and then reinsert the key. 6. Measure your hands. To measure your heart rate, stand on the treadmill, the display can show your heart rate accurately. Next, remove the key from the console and put it in the display for a few seconds each time you do not do this, the... In addition, make sure that you are finished using the handgrip pulse sensor, remove the sheets of clear plastic from the console. • The incline level of the treadmill, press the Incline increase and decrease buttons. When you press the Incline increase and decrease button, the incline will be at...
English Manual
Page 19
...you . To restart the workout, press the Start button. HOW TO USE A PERSONAL TRAINER WORKOUT 1. Select a personal trainer workout. The treadmill will automatically adjust to the first speed and incline settings of the workout will automatically adjust to the speed and incline settings for the next... and the arrow will automatically adjust to start the workout. When the next segment of the profile. Each workout is divided into the console. A profile of the speed settings of tones will appear in the display. To stop . One speed setting and one -minute segment...
...you . To restart the workout, press the Start button. HOW TO USE A PERSONAL TRAINER WORKOUT 1. Select a personal trainer workout. The treadmill will automatically adjust to the first speed and incline settings of the workout will automatically adjust to the speed and incline settings for the next... and the arrow will automatically adjust to start the workout. When the next segment of the profile. Each workout is divided into the console. A profile of the speed settings of tones will appear in the display. To stop . One speed setting and one -minute segment...

English Manual
Page 20
... time to return to the previous menu or display. Insert the key into the console. Select the fitness journal. To enter the date and time, see HOW TO RESET THE FITNESS JOURNAL on the treadmill. The fitness journal can store information for the selected month will appear in minutes ... If you have walked or run on page 21. 20 To view exercise information by week. The exercise information for the selected user. The console will then load the stored journal information for the selected week will be displayed when you have climbed in the display. 7. Then, press the ...
... time to return to the previous menu or display. Insert the key into the console. Select the fitness journal. To enter the date and time, see HOW TO RESET THE FITNESS JOURNAL on the treadmill. The fitness journal can store information for the selected month will appear in minutes ... If you have walked or run on page 21. 20 To view exercise information by week. The exercise information for the selected user. The console will then load the stored journal information for the selected week will be displayed when you have climbed in the display. 7. Then, press the ...
English Manual
Page 21
...the audio jack near the speakers and the other personal audio player. Exit the user mode. See step 1 on the front cover of on the console. Then, highlight the RESET JOURNAL option and press the Enter button. Make sure that the audio wire is fully plugged in the fitness journal, first...jack, locate the audio wire and plug it into a jack on your personal audio player or press the Volume increase and decrease buttons on the console. The setup menu will then appear in the display. The user information menu will then appear in the display. Make sure that the iFit Universal...
...the audio jack near the speakers and the other personal audio player. Exit the user mode. See step 1 on the front cover of on the console. Then, highlight the RESET JOURNAL option and press the Enter button. Make sure that the audio wire is fully plugged in the fitness journal, first...jack, locate the audio wire and plug it into a jack on your personal audio player or press the Volume increase and decrease buttons on the console. The setup menu will then appear in the display. The user information menu will then appear in the display. Make sure that the iFit Universal...
English Manual
Page 22
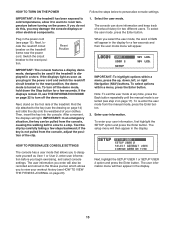
THE INFORMATION MODE The console features an information mode that keeps track of the total distance that the walking belt has moved and the total number of miles (or kilometers) that the treadmill has been used. If the demo mode is turned on and turn off circuit breaker to turn on ,...position, and insert the key into the console; To exit the information mode, remove the key from the console. 22 To purchase the optional chest pulse sensor, call the telephone number on the front cover of hours the treadmill has been used if the treadmill is turned on or turn off the display...
THE INFORMATION MODE The console features an information mode that keeps track of the total distance that the walking belt has moved and the total number of miles (or kilometers) that the treadmill has been used. If the demo mode is turned on and turn off circuit breaker to turn on ,...position, and insert the key into the console; To exit the information mode, remove the key from the console. 22 To purchase the optional chest pulse sensor, call the telephone number on the front cover of hours the treadmill has been used if the treadmill is turned on or turn off the display...

English Manual
Page 25
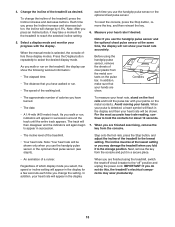
... outlet (see page 13). c. c Tripped Position Reset Position PROBLEM: The power turns off circuit breaker located on the treadmill frame near the power cord. b. Remove the key from the console and UNPLUG a THE POWER CORD. If the displays remain lit when you remove the key from the... console SOLUTION: a. Note: A Phillips screwdriver with GFCI-equipped outlets. IMPORTANT: The treadmill is plugged into a surge suppressor, and that the power cord is required. 78 69 12 12 25 Make...
... outlet (see page 13). c. c Tripped Position Reset Position PROBLEM: The power turns off circuit breaker located on the treadmill frame near the power cord. b. Remove the key from the console and UNPLUG a THE POWER CORD. If the displays remain lit when you remove the key from the... console SOLUTION: a. Note: A Phillips screwdriver with GFCI-equipped outlets. IMPORTANT: The treadmill is plugged into a surge suppressor, and that the power cord is required. 78 69 12 12 25 Make...
English Manual
Page 26
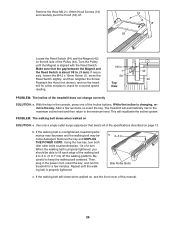
... and UNPLUG THE POWER CORD. Turn the Pulley until the walking belt is changing, remove the key. Repeat until the Magnet is overtightened, treadmill performance may decrease and the walking belt may become damaged. If the walking belt still slows when walked on SOLUTION: a. While the incline ...is properly tightened. Then, plug in the console, press one of a turn. Idler Roller Bolts c. Make sure that meets all of the specifications described on the left side of this manual....
... and UNPLUG THE POWER CORD. Turn the Pulley until the walking belt is changing, remove the key. Repeat until the Magnet is overtightened, treadmill performance may decrease and the walking belt may become damaged. If the walking belt still slows when walked on SOLUTION: a. While the incline ...is properly tightened. Then, plug in the console, press one of a turn. Idler Roller Bolts c. Make sure that meets all of the specifications described on the left side of this manual....
English Manual
Page 30
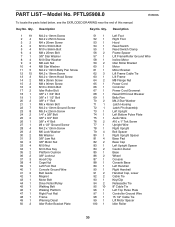
...Washer M6 Washer 3/8" Jam Nut 3/8" Motor Nut M10 Nut 6mm Hex Key Platform Cushion 3/8" Locknut Hood Clip Cage Nut Left Foot Rail Console Ground Wire Belt Guide Magnet Motor Belt Drive Roller/Pulley Walking Belt Walking Platform Right Foot Rail Frame Warning Decal Idler Roller Bracket Plate ... #10 x 1" Tek Screw Upright Wire Right Upright Bolt Spacer Right Upright Spacer Base Pad Base Cap Left Upright Spacer Caution Decal Base Wheel Console Console Base Left Handrail Right Handrail Handrail Cap, Lower Cable Tie Key/Clip Releasable Tie 8" Cable Tie Left Top Pulse Plate Controller Ground Wire 15 ...
...Washer M6 Washer 3/8" Jam Nut 3/8" Motor Nut M10 Nut 6mm Hex Key Platform Cushion 3/8" Locknut Hood Clip Cage Nut Left Foot Rail Console Ground Wire Belt Guide Magnet Motor Belt Drive Roller/Pulley Walking Belt Walking Platform Right Foot Rail Frame Warning Decal Idler Roller Bracket Plate ... #10 x 1" Tek Screw Upright Wire Right Upright Bolt Spacer Right Upright Spacer Base Pad Base Cap Left Upright Spacer Caution Decal Base Wheel Console Console Base Left Handrail Right Handrail Handrail Cap, Lower Cable Tie Key/Clip Releasable Tie 8" Cable Tie Left Top Pulse Plate Controller Ground Wire 15 ...


