
English Manual
Page 2
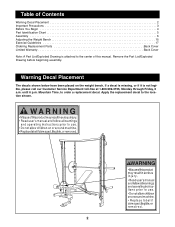
..., or if it is attached to the center of Contents Warning Decal Placement 2 Important Precautions 3 Before You Begin 4 Part Identification Chart 5 Assembly 6 Adjusting the Weight Bench 15 Exercise Guidelines 17 Ordering Replacement Parts Back Cover Limited Warranty Back Cover Note: A Part List/Exploded Drawing is not legible, please call our Customer Service Department.... Apply the replacement decal to order a replacement decal. Table of this manual. until 6 p.m. Warning Decal Placement The decals shown below have been placed on the weight bench.
..., or if it is attached to the center of Contents Warning Decal Placement 2 Important Precautions 3 Before You Begin 4 Part Identification Chart 5 Assembly 6 Adjusting the Weight Bench 15 Exercise Guidelines 17 Ordering Replacement Parts Back Cover Limited Warranty Back Cover Note: A Part List/Exploded Drawing is not legible, please call our Customer Service Department.... Apply the replacement decal to order a replacement decal. Table of this manual. until 6 p.m. Warning Decal Placement The decals shown below have been placed on the weight bench.
English Manual
Page 3
... a partner. Do not use only. The weight bench is shaded in this manual before using the weight bench. Keep hands and feet away from the weight bench at any exercise program, consult your partner should stand behind you to catch the barbell if you are performing bench press exercises, squat exercises or toe raise exercises, your physician. WARNING: Before beginning this...
... a partner. Do not use only. The weight bench is shaded in this manual before using the weight bench. Keep hands and feet away from the weight bench at any exercise program, consult your partner should stand behind you to catch the barbell if you are performing bench press exercises, squat exercises or toe raise exercises, your physician. WARNING: Before beginning this...
English Manual
Page 14
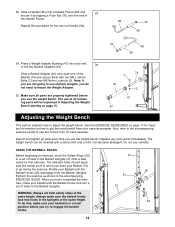
...remaining parts will be cleaned with two M6 x 32mm Bolts (7) and two M6 Nylon Locknuts (2). Do not use the weight bench. USING THE BARBELL RACKS Before beginning an exercise, move the Safety Stops (23) to which you use solvents. Always make sure your Barbell until the Barbell Hooks ... engage the barbell hooks. 41 29 31 74 23 14 When you try to adjust the weight bench. Perform the exercise as shown in a level position before you want your exercise program. Press a Weight Adapter Bushing (47) into holes in the Barbell Uprights. Note: If you do this procedure...
...remaining parts will be cleaned with two M6 x 32mm Bolts (7) and two M6 Nylon Locknuts (2). Do not use the weight bench. USING THE BARBELL RACKS Before beginning an exercise, move the Safety Stops (23) to which you use solvents. Always make sure your Barbell until the Barbell Hooks ... engage the barbell hooks. 41 29 31 74 23 14 When you try to adjust the weight bench. Perform the exercise as shown in a level position before you want your exercise program. Press a Weight Adapter Bushing (47) into holes in the Barbell Uprights. Note: If you do this procedure...

English Manual
Page 15
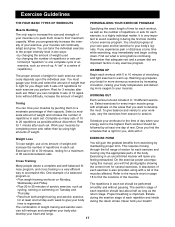
...re-insert the pin through the holes in both the Seat Brackets (9, 46) and the Frame (54). 14 9 46 71 LOCKING THE LEG LEVER Some exercises, such as sit-ups, can be performed more comfortably when the Seat (14) has a slight incline. WARNING: Always insert the ÒLÓ-pin ...desired amount of the Backrest (15), pull out the Short ÒLÓ-Pin (63). To change the position of weight (not included) onto the weight post. ADJUSTING THE SEAT INCLINE Some exercises can be performed more 18 comfortably with the Leg Lever (18) locked. Raise or lower the Backrest to the desired...
...re-insert the pin through the holes in both the Seat Brackets (9, 46) and the Frame (54). 14 9 46 71 LOCKING THE LEG LEVER Some exercises, such as sit-ups, can be performed more comfortably when the Seat (14) has a slight incline. WARNING: Always insert the ÒLÓ-pin ...desired amount of the Backrest (15), pull out the Short ÒLÓ-Pin (63). To change the position of weight (not included) onto the weight post. ADJUSTING THE SEAT INCLINE Some exercises can be performed more 18 comfortably with the Leg Lever (18) locked. Raise or lower the Backrest to the desired...

English Manual
Page 16
... (37) or Leg Lever (18, not shown), always secure them with a Spring Clip (76) or 1Ó Spring Clip (78). If the exercise you have attached weights (not included) to the Cables (45) in the same manner. The Handles (36) can be attached to use the upper pulley station (see drawing... A) or lower pulley station (see ATTACHING WEIGHTS TO THE WEIGHT CARRIAGES above). ATTACHING WEIGHTS TO THE WEIGHT CARRIAGES To use with regular weights. 74 78 76 37 16 WARNING: Do not place more than 150 pounds on each...
... (37) or Leg Lever (18, not shown), always secure them with a Spring Clip (76) or 1Ó Spring Clip (78). If the exercise you have attached weights (not included) to the Cables (45) in the same manner. The Handles (36) can be attached to use the upper pulley station (see drawing... A) or lower pulley station (see ATTACHING WEIGHTS TO THE WEIGHT CARRIAGES above). ATTACHING WEIGHTS TO THE WEIGHT CARRIAGES To use with regular weights. 74 78 76 37 16 WARNING: Do not place more than 150 pounds on each...
English Manual
Page 17
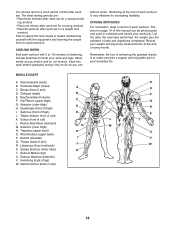
... plus develop your heart and lungs. 17 Refer to the muscle chart on Tuesday and Thursday. ¥ Rest from both weight training and aerobic exercise for 1 minute after each set . Proper breathing is right for more oxygen to your muscles. Exhale during the return stroke... before continuing. Begin with emphasis on Monday, feeling exhausted. Weight Loss EXERCISE FORM To lose weight, use a low amount of weight and increase the number of weight. formed (A ÒrepetitionÓ is one complete cycle of an exercise, such as the number of the body. When you want...
... plus develop your heart and lungs. 17 Refer to the muscle chart on Tuesday and Thursday. ¥ Rest from both weight training and aerobic exercise for 1 minute after each set . Proper breathing is right for more oxygen to your muscles. Exhale during the return stroke... before continuing. Begin with emphasis on Monday, feeling exhausted. Weight Loss EXERCISE FORM To lose weight, use a low amount of weight and increase the number of weight. formed (A ÒrepetitionÓ is one complete cycle of an exercise, such as the number of the body. When you want...
English Manual
Page 18
List the date, the exercises performed, the weight plus the numbers of arm) J R. MUSCLE CHART A. Obliques (waist) B E. Brachioradials (forearm) F. Triceps (back of sets and repetitions completed. Gluteus Medius (hip) U. Gastrocnemius (back of arm) D. ...
List the date, the exercises performed, the weight plus the numbers of arm) J R. MUSCLE CHART A. Obliques (waist) B E. Brachioradials (forearm) F. Triceps (back of sets and repetitions completed. Gluteus Medius (hip) U. Gastrocnemius (back of arm) D. ...
English Manual
Page 19
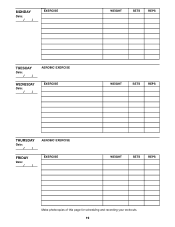
MONDAY Date: / / EXERCISE WEIGHT SETS REPS TUESDAY Date: / / WEDNESDAY Date: / / AEROBIC EXERCISE EXERCISE WEIGHT SETS REPS THURSDAY Date: / / FRIDAY Date: / / AEROBIC EXERCISE EXERCISE WEIGHT SETS REPS Make photocopies of this page for scheduling and recording your workouts. 19
MONDAY Date: / / EXERCISE WEIGHT SETS REPS TUESDAY Date: / / WEDNESDAY Date: / / AEROBIC EXERCISE EXERCISE WEIGHT SETS REPS THURSDAY Date: / / FRIDAY Date: / / AEROBIC EXERCISE EXERCISE WEIGHT SETS REPS Make photocopies of this page for scheduling and recording your workouts. 19
English Manual
Page 20
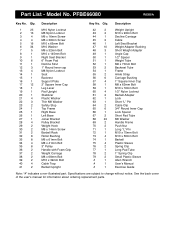
... 4 Plastic Washer 22 3 Thin M8 Washer 23 2 Safety Stop 24 1 Top Frame 25 1 Right Base 26 1 Left Base 27 1 Joiner Bracket 28 4 Pulley Bracket 29 2 Weight Hook 30 2 M8 x 14mm Screw 31 2 Barbell Rack 32 8 Roller Bushing 33 8 M6 x 61mm Bolt 34 4 M8 x 41mm Bolt 35 8 3Ó Pulley 36 2 Handle...1 Barbell 75 4 Plastic Sleeve 76 2 Spring Clip 77 1 Long Pad Tube 78 2 1Ó Spring Clip 79 2 Small Plastic Sleeve # 1 Allen Wrench # 1 UserÕs Manual # 1 Exercise Guide Note: Ò#Ó indicates a non-illustrated part. Qty.
... 4 Plastic Washer 22 3 Thin M8 Washer 23 2 Safety Stop 24 1 Top Frame 25 1 Right Base 26 1 Left Base 27 1 Joiner Bracket 28 4 Pulley Bracket 29 2 Weight Hook 30 2 M8 x 14mm Screw 31 2 Barbell Rack 32 8 Roller Bushing 33 8 M6 x 61mm Bolt 34 4 M8 x 41mm Bolt 35 8 3Ó Pulley 36 2 Handle...1 Barbell 75 4 Plastic Sleeve 76 2 Spring Clip 77 1 Long Pad Tube 78 2 1Ó Spring Clip 79 2 Small Plastic Sleeve # 1 Allen Wrench # 1 UserÕs Manual # 1 Exercise Guide Note: Ò#Ó indicates a non-illustrated part. Qty.


