

User Manual
Page 3
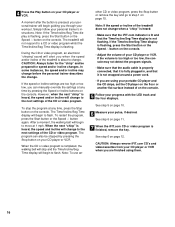
...the latch pin is not working properly. (See BEFORE YOU BEGIN on the walking belt. Do not attempt to the off position when the treadmill is turned off switch to raise, lower, or move the treadmill. 20. Inspect and tighten all instructions before performing the main- Always listen for ...any time by pressing the speed and incline buttons. WARNING: Before beginning this manual. A 13 amp fuse should be used. When using the treadmill. 16. However, when the next "chirp" is intended only as an exercise aid in determining heart rate trends in small increments to the...
...the latch pin is not working properly. (See BEFORE YOU BEGIN on the walking belt. Do not attempt to the off position when the treadmill is turned off switch to raise, lower, or move the treadmill. 20. Inspect and tighten all instructions before performing the main- Always listen for ...any time by pressing the speed and incline buttons. WARNING: Before beginning this manual. A 13 amp fuse should be used. When using the treadmill. 16. However, when the next "chirp" is intended only as an exercise aid in determining heart rate trends in small increments to the...
User Manual
Page 5
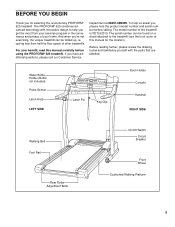
...Holder (Bottle not included) Pulse Sensor Latch Knob LEFT SIDE Latch Pin Key/Clip Book Holder Console Handrail RIGHT SIDE Walking Belt Foot Rail Rear Roller Adjustment Bolts On/Off Switch Circuit Breaker Front Wheel Cushioned Walking Platform 5 The model number of ... , please note the product model number and serial number before using the PROFORM® 620 treadmill. To help you get the most from your benefit, read this manual for selecting the revolutionary PROFORM® 620 treadmill. Before reading further, please review the drawing below and familiarise yourself with innovative...
...Holder (Bottle not included) Pulse Sensor Latch Knob LEFT SIDE Latch Pin Key/Clip Book Holder Console Handrail RIGHT SIDE Walking Belt Foot Rail Rear Roller Adjustment Bolts On/Off Switch Circuit Breaker Front Wheel Cushioned Walking Platform 5 The model number of ... , please note the product model number and serial number before using the PROFORM® 620 treadmill. To help you get the most from your benefit, read this manual for selecting the revolutionary PROFORM® 620 treadmill. Before reading further, please review the drawing below and familiarise yourself with innovative...
User Manual
Page 6
... the position shown. Note: The underside of a second person, carefully raise the treadmill to be included. If there is on top of the walking belt or the shipping carton. Whilst a second person tips the treadmill to the top of the walking belt, simply wipe off the lubricant with high-performance lubricant. Lower the side...
... the position shown. Note: The underside of a second person, carefully raise the treadmill to be included. If there is on top of the walking belt or the shipping carton. Whilst a second person tips the treadmill to the top of the walking belt, simply wipe off the lubricant with high-performance lubricant. Lower the side...
User Manual
Page 7
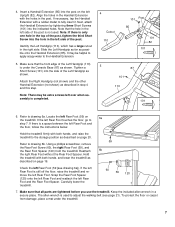
... there is still off the floor, raise the treadmill and remove the left Upright (82). Hold the treadmill with the holes in the Handrail Extension with both hands, and raise the treadmill to drawing 6b. The allen wrench is not used to adjust the walking belt (see drawing 6a]). Tighten a Short Screw (101...) into the post on page 20. Insert a Handrail Extension (85) into the side of the post is used . Align the holes in the post. Note that all parts are tightened before you use the treadmill. To protect the ...
... there is still off the floor, raise the treadmill and remove the left Upright (82). Hold the treadmill with the holes in the Handrail Extension with both hands, and raise the treadmill to drawing 6b. The allen wrench is not used to adjust the walking belt (see drawing 6a]). Tighten a Short Screw (101...) into the post on page 20. Insert a Handrail Extension (85) into the side of the post is used . Align the holes in the post. Note that all parts are tightened before you use the treadmill. To protect the ...
User Manual
Page 8
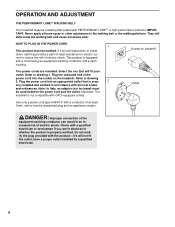
.... 8 Select the one that is equipped with all local codes and ordinances. Plug the power cord into the socket on treadmill Two power cords are included. IMPORTANT: Never apply silicone spray or other substances to drawing 1. They will fit your outlet.... provided with a country recognised plug and an appliance coupler. Important: The treadmill is properly earthed. Socket on the treadmill. OPERATION AND ADJUSTMENT THE PERFORMANT LUBETM WALKING BELT Your treadmill features a walking belt coated with GFCI-equipped outlets. HOW TO PLUG IN THE POWER CORD ...
.... 8 Select the one that is equipped with all local codes and ordinances. Plug the power cord into the socket on treadmill Two power cords are included. IMPORTANT: Never apply silicone spray or other substances to drawing 1. They will fit your outlet.... provided with a country recognised plug and an appliance coupler. Important: The treadmill is properly earthed. Socket on the treadmill. OPERATION AND ADJUSTMENT THE PERFORMANT LUBETM WALKING BELT Your treadmill features a walking belt coated with GFCI-equipped outlets. HOW TO PLUG IN THE POWER CORD ...
User Manual
Page 9
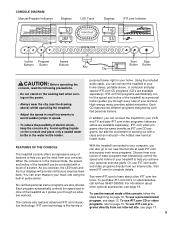
... audio and video programs directly from our internet site. To use a personal trainer program, see page 12. In addition, you can connect the treadmill to your workout. To use iFIT.com programs directly from our internet site, see page 17. 9 personal trainer right in your home stereo, ... Before operating the console, read the following precautions. • Do not stand on the walking belt when turning on the power. • Always wear the clip (see the drawing above) whilst operating the treadmill. • Adjust the speed in small increments to avoid sudden jumps in the manual mode, ...
... audio and video programs directly from our internet site. To use a personal trainer program, see page 12. In addition, you can connect the treadmill to your workout. To use iFIT.com programs directly from our internet site, see page 17. 9 personal trainer right in your home stereo, ... Before operating the console, read the following precautions. • Do not stand on the walking belt when turning on the power. • Always wear the clip (see the drawing above) whilst operating the treadmill. • Adjust the speed in small increments to avoid sudden jumps in the manual mode, ...
User Manual
Page 10
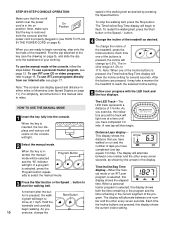
...one number and the other every seven seconds. The LED Track-The HOW TO USE THE MANUAL MODE LED track represents a distance of the treadmill as desired. Distance/Laps display- will light. display shows the elapsed time. Change the incline of 1/4 mile. either miles or kilometres (...lap equals 1/4 mile). To use the manual mode of the console, follow the steps below. For simplicity, all instructions in the treadmill to start the walking belt. When the key is pressed, the incline will alternate between one at 1 mph. As you have completed 1/4 mile. Each ...
...one number and the other every seven seconds. The LED Track-The HOW TO USE THE MANUAL MODE LED track represents a distance of the treadmill as desired. Distance/Laps display- will light. display shows the elapsed time. Change the incline of 1/4 mile. either miles or kilometres (...lap equals 1/4 mile). To use the manual mode of the console, follow the steps below. For simplicity, all instructions in the treadmill to start the walking belt. When the key is pressed, the incline will alternate between one at 1 mph. As you have completed 1/4 mile. Each ...
User Manual
Page 11
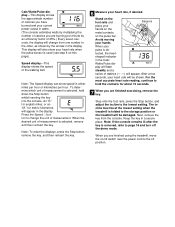
..., the heart- play will be shown. The incline must be at the lowest setting when the treadmill is removed, refer to the storage position or the treadmill will flash steadily and a series of the walking belt. When you are finished exercising, remove the key. Speed display-This display shows the speed of... hands on the metal contacts on this page). An "E," for english miles, or an "M," for about 15 seconds. 7 When you are finished using the treadmill, move the on/off switch near the power cord to the other, as shown by the arrows in the display. For the most accurate heart...
..., the heart- play will be shown. The incline must be at the lowest setting when the treadmill is removed, refer to the storage position or the treadmill will flash steadily and a series of the walking belt. When you are finished exercising, remove the key. Speed display-This display shows the speed of... hands on the metal contacts on this page). An "E," for english miles, or an "M," for about 15 seconds. 7 When you are finished using the treadmill, move the on/off switch near the power cord to the other, as shown by the arrows in the display. For the most accurate heart...
User Manual
Page 12
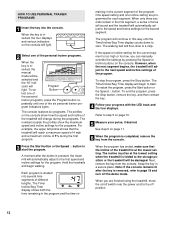
... is folded to the speed and incline settings for the program. The walking belt will reach a maximum speed of 4 mph and a maximum incline of different lengths. When the program has ended, make sure that the treadmill will then slow to step 5 on the console. The Time/ Incline/Seg...and the four displays. peatedly until the Time/Incline/Seg Time display counts down to flash. A moment after the key is pressed, the treadmill will be damaged. serted, the manual mode will automatically adjust to the off the demo mode. Note: If the console remains lit after ...
... is folded to the speed and incline settings for the program. The walking belt will reach a maximum speed of 4 mph and a maximum incline of different lengths. When the program has ended, make sure that the treadmill will then slow to step 5 on the console. The Time/ Incline/Seg...and the four displays. peatedly until the Time/Incline/Seg Time display counts down to flash. A moment after the key is pressed, the treadmill will be damaged. serted, the manual mode will automatically adjust to the off the demo mode. Note: If the console remains lit after ...
User Manual
Page 16
The treadmill will not respond to move at 1 mph. After a moment, the walking belt will change to change when a "chirp" is heard: • Make sure that the... CD or video program, press the Stop button or remove the key and go to the next settings of the treadmill is pressed, your progress with the LED track and the four displays. See step 5 on page 12. CAUTION:...or incline of the CD or video program. See step 6 on the console. • Adjust the volume of the treadmill does not change . 4 Press the Play button on page 15. Note: If the speed or incline of your CD ...
The treadmill will not respond to move at 1 mph. After a moment, the walking belt will change to change when a "chirp" is heard: • Make sure that the... CD or video program, press the Stop button or remove the key and go to the next settings of the treadmill is pressed, your progress with the LED track and the four displays. See step 5 on page 12. CAUTION:...or incline of the CD or video program. See step 6 on the console. • Adjust the volume of the treadmill does not change . 4 Press the Play button on page 15. Note: If the speed or incline of your CD ...
User Manual
Page 17
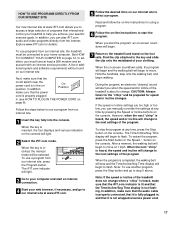
... on-line instructions for speed and/or incline changes. Find the clip attached to the key and slide the clip onto the waistband of the treadmill does not change when a "chirp" is heard, make sure that the on/off switch near the power cord is in , and that it is fully... use a program from our internet site, the treadmill must have at least a 56K modem and an account with an internet service provider. When the key is inserted, the four displays and various indicators on -screen countdown ends, the program will begin and the walking belt will alert you achieve your specific exercise...
... on-line instructions for speed and/or incline changes. Find the clip attached to the key and slide the clip onto the waistband of the treadmill does not change when a "chirp" is heard, make sure that the on/off switch near the power cord is in , and that it is fully... use a program from our internet site, the treadmill must have at least a 56K modem and an account with an internet service provider. When the key is inserted, the four displays and various indicators on -screen countdown ends, the program will begin and the walking belt will alert you achieve your specific exercise...
User Manual
Page 18
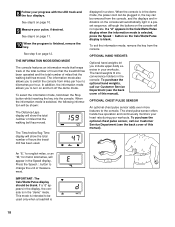
... per hour to change the unit of miles that the walking belt has moved. To purchase the optional chest pulse sensor, call our Customer Service Department (see the back cover of hours the treadmill has been used only when a treadmill is 18 Press the Speed v button to kilometres per hour....Measure your workouts. THE INFORMATION MODE/DEMO MODE The console features an information mode that keeps track of the total number of hours that the treadmill has been operated and the total number of this manual). The information mode also allows you include upper-body exercise in your pulse, if...
... per hour to change the unit of miles that the walking belt has moved. To purchase the optional chest pulse sensor, call our Customer Service Department (see the back cover of hours the treadmill has been used only when a treadmill is 18 Press the Speed v button to kilometres per hour....Measure your workouts. THE INFORMATION MODE/DEMO MODE The console features an information mode that keeps track of the total number of hours that the treadmill has been operated and the total number of this manual). The information mode also allows you include upper-body exercise in your pulse, if...

User Manual
Page 21
.... ment bolt counterclockwise, and the right bolt clock- If the walking belt slips when walked on the treadmill for a few minutes. PROBLEM: The incline of the Incline buttons. When the walking belt is properly tightened. b 5-7 cm Rear Roller Adjustment Bolts c. Plug ... the key and UNPLUG THE POWER CORD. Repeat until the walking belt is centred. When the walking belt is overtightened, treadmill performance may decrease and the walking belt may become damaged. If the walking belt still slows when walked on SOLUTION: a. Using the a allen wrench...
.... ment bolt counterclockwise, and the right bolt clock- If the walking belt slips when walked on the treadmill for a few minutes. PROBLEM: The incline of the Incline buttons. When the walking belt is properly tightened. b 5-7 cm Rear Roller Adjustment Bolts c. Plug ... the key and UNPLUG THE POWER CORD. Repeat until the walking belt is centred. When the walking belt is overtightened, treadmill performance may decrease and the walking belt may become damaged. If the walking belt still slows when walked on SOLUTION: a. Using the a allen wrench...


