
Uk Manual
Page 1
... From Ireland: 053 92 36102 Website: www.iconsupport.eu E-mail: [email protected] Write: ICON Health & Fitness, Ltd. Write the serial number in this manual before using this manual for future reference. c/o HI Group PLC, Express Way Whitwood, West Yorkshire WF10 5QJ UK AUSTRALIA Call: 1-800-237-173 E-mail: [email protected]...
... From Ireland: 053 92 36102 Website: www.iconsupport.eu E-mail: [email protected] Write: ICON Health & Fitness, Ltd. Write the serial number in this manual before using this manual for future reference. c/o HI Group PLC, Express Way Whitwood, West Yorkshire WF10 5QJ UK AUSTRALIA Call: 1-800-237-173 E-mail: [email protected]...
Uk Manual
Page 2
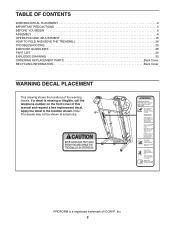
...WARNING DECAL PLACEMENT 2 IMPORTANT PRECAUTIONS 3 BEFORE YOU BEGIN 5 ASSEMBLY 6 OPERATION AND ADJUSTMENT 15 HOW TO FOLD AND MOVE THE TREADMILL 24 TROUBLESHOOTING 25 EXERCISE GUIDELINES 28 PART LIST 30 EXPLODED DRAWING 32 ORDERING REPLACEMENT PARTS Back Cover RECYCLING INFORMATION Back Cover WARNING DECAL ...PLACEMENT This drawing shows the locations of ICON IP, Inc. 2 PROFORM is missing or illegible, call the telephone number on the front cover of this manual and request a free replacement decal. Note: The decals may not be shown at actual size...
...WARNING DECAL PLACEMENT 2 IMPORTANT PRECAUTIONS 3 BEFORE YOU BEGIN 5 ASSEMBLY 6 OPERATION AND ADJUSTMENT 15 HOW TO FOLD AND MOVE THE TREADMILL 24 TROUBLESHOOTING 25 EXERCISE GUIDELINES 28 PART LIST 30 EXPLODED DRAWING 32 ORDERING REPLACEMENT PARTS Back Cover RECYCLING INFORMATION Back Cover WARNING DECAL ...PLACEMENT This drawing shows the locations of ICON IP, Inc. 2 PROFORM is missing or illegible, call the telephone number on the front cover of this manual and request a free replacement decal. Note: The decals may not be shown at actual size...
Uk Manual
Page 3
... users of this treadmill are standing on the same circuit. Keep the power cord away from moisture and dust. Athletic support clothes are used only by or through the use the treadmill with at all times. 7. Always wear athletic shoes; never use of this manual and all warnings ...on the treadmill at a time. 9. Adjust the speed in small increments to ensure that is being ...
... users of this treadmill are standing on the same circuit. Keep the power cord away from moisture and dust. Athletic support clothes are used only by or through the use the treadmill with at all times. 7. Always wear athletic shoes; never use of this manual and all warnings ...on the treadmill at a time. 9. Adjust the speed in small increments to ensure that is being ...

Uk Manual
Page 4
.... SAVE THESE INSTRUCTIONS 4 nance and adjustment procedures described in this manual should be able to safely lift 45 lbs. (20 kg) to raise, lower, or move the treadmill until it is not in use this manual. Inspect and properly tighten all parts of the power switch.) 19.... Never insert any opening on the treadmill. 22. 18. Servicing other than the procedures in this treadmill in -home use , before cleaning the treadmill, and before performing...
.... SAVE THESE INSTRUCTIONS 4 nance and adjustment procedures described in this manual should be able to safely lift 45 lbs. (20 kg) to raise, lower, or move the treadmill until it is not in use this manual. Inspect and properly tighten all parts of the power switch.) 19.... Never insert any opening on the treadmill. 22. 18. Servicing other than the procedures in this treadmill in -home use , before cleaning the treadmill, and before performing...
Uk Manual
Page 5
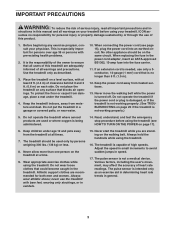
...you have questions after read this manual carefully before contacting us assist you ʼre not exercising, the treadmill can be folded up, requiring less than half the floor space of other treadmills. If you for selecting the new PROFORM® 600 ZLT treadmill. The model number and the location... of the serial number decal are shown on the front cover of this manual. ASSEMBLED DIMENSIONS: Height: 57 in. (145 cm) Width...
...you have questions after read this manual carefully before contacting us assist you ʼre not exercising, the treadmill can be folded up, requiring less than half the floor space of other treadmills. If you for selecting the new PROFORM® 600 ZLT treadmill. The model number and the location... of the serial number decal are shown on the front cover of this manual. ASSEMBLED DIMENSIONS: Height: 57 in. (145 cm) Width...
Uk Manual
Page 6
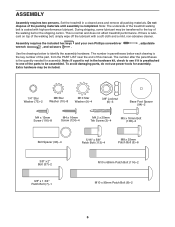
... may be transferred to the top of the parts to identify the assembly hardware. The number after the parentheses is normal and does not affect treadmill performance. Extra hardware may be included. 1/4" Star Washer (73)-2 M8 Star Washer (10)-8 M10 Star Washer (9)-4 3/8" Locknut (6)-3 Base Foot Spacer (94)-2 M4... to be assembled. Do not dispose of the packing materials until assembly is lubricant on top of this manual. If there is completed. Note: The underside of the treadmill walking belt is the key number of the part, from the PART LIST near the end of the walking...
... may be transferred to the top of the parts to identify the assembly hardware. The number after the parentheses is normal and does not affect treadmill performance. Extra hardware may be included. 1/4" Star Washer (73)-2 M8 Star Washer (10)-8 M10 Star Washer (9)-4 3/8" Locknut (6)-3 Base Foot Spacer (94)-2 M4... to be assembled. Do not dispose of the packing materials until assembly is lubricant on top of this manual. If there is completed. Note: The underside of the treadmill walking belt is the key number of the part, from the PART LIST near the end of the walking...
Uk Manual
Page 16
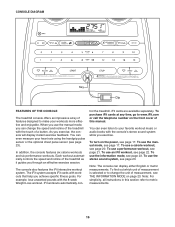
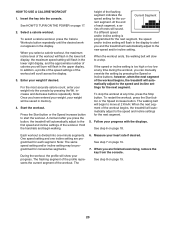
...of this section refer to metric measurements. 16 To use a calorie workout, see page 20. To use the manual mode, see page 17. Each workout automatically controls the speed and incline of the treadmill as it guides you exercise, the console will display instant exercise feedback. To use the stereo sound system... workout system. To use the information mode, see page 21. As you through an effective exercise session. Note: For simplicity, all instructions in this manual. trol the treadmill. iFit cards are available separately. To use a performance workout, see page 23.
...of this section refer to metric measurements. 16 To use a calorie workout, see page 20. To use the manual mode, see page 17. Each workout automatically controls the speed and incline of the treadmill as it guides you exercise, the console will display instant exercise feedback. To use the stereo sound system... workout system. To use the information mode, see page 21. As you through an effective exercise session. Note: For simplicity, all instructions in this manual. trol the treadmill. iFit cards are available separately. To use a performance workout, see page 23.
Uk Manual
Page 17
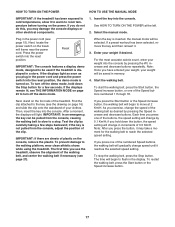
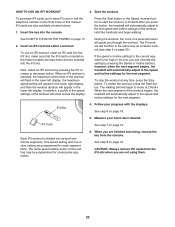
...or other electrical components. 1. Note: After you plug in increments of the treadmill. Plug in a store. Reset IMPORTANT: The console features a display demo mode, designed to be used if the treadmill is inserted, the manual mode will change the speed of the numbered Speed buttons, the walking belt ...button or the Speed increase button, the walking belt will light. HOW TO TURN ON THE POWER HOW TO USE THE MANUAL MODE IMPORTANT: If the treadmill has been exposed to cold temperatures, allow it to warm to room temperature before turning on page 23 to turn off...
...or other electrical components. 1. Note: After you plug in increments of the treadmill. Plug in a store. Reset IMPORTANT: The console features a display demo mode, designed to be used if the treadmill is inserted, the manual mode will change the speed of the numbered Speed buttons, the walking belt ...button or the Speed increase button, the walking belt will light. HOW TO TURN ON THE POWER HOW TO USE THE MANUAL MODE IMPORTANT: If the treadmill has been exposed to cold temperatures, allow it to warm to room temperature before turning on page 23 to turn off...
Uk Manual
Page 18
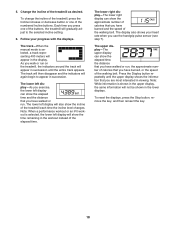
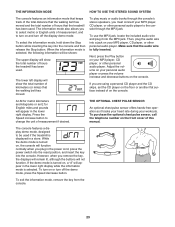
The track-When the manual mode is selected, a track representing 400 meters will again begin to the selected incline setting. 6. The track will then disappear and the indicators will appear ... the time remaining in succession until the upper display shows the information that you have walked or run . 5. Change the incline of the buttons, the treadmill will show the elapsed time, the distance that you use the handgrip pulse sensor (see step 7). The lower left display will gradually adjust to appear...
The track-When the manual mode is selected, a track representing 400 meters will again begin to the selected incline setting. 6. The track will then disappear and the indicators will appear ... the time remaining in succession until the upper display shows the information that you have walked or run . 5. Change the incline of the buttons, the treadmill will show the elapsed time, the distance that you use the handgrip pulse sensor (see step 7). The lower left display will gradually adjust to appear...
Uk Manual
Page 20
... flash in the lower left display, the maximum speed setting will show your weight if desired. The 6. When you press the button, the treadmill will begin walking. See step 8 on page 18. Enter your progress. height of the workout. The walking belt will automatically adjust to alert... you can manually override the setting by pressing the Wt. For the most accurate calorie count, enter your weight will flash in memory. 4. Press the Start...
... flash in the lower left display, the maximum speed setting will show your weight if desired. The 6. When you press the button, the treadmill will begin walking. See step 8 on page 18. Enter your progress. height of the workout. The walking belt will automatically adjust to alert... you can manually override the setting by pressing the Wt. For the most accurate calorie count, enter your weight will flash in memory. 4. Press the Start...
Uk Manual
Page 22
... or too low, you are inserted into the iFit slot; however, when the next segment begins, the treadmill will automatically adjust to the first speed and incline settings of this manual. iFit Card 5. Insert the key into several oneminute segments. See HOW TO TURN ON THE POWER on ...or decrease button. The walking belt will function in the lower right display, and then the workout duration will guide you press the button, the treadmill will scroll across the display. A moment after you through the workout. iFit Slot 4. To purchase iFit cards, go to start the workout....
... or too low, you are inserted into the iFit slot; however, when the next segment begins, the treadmill will automatically adjust to the first speed and incline settings of this manual. iFit Card 5. Insert the key into several oneminute segments. See HOW TO TURN ON THE POWER on ...or decrease button. The walking belt will function in the lower right display, and then the workout duration will guide you press the button, the treadmill will scroll across the display. A moment after you through the workout. iFit Slot 4. To purchase iFit cards, go to start the workout....
Uk Manual
Page 23
... walking belt has moved. An M for metric kilometers and kilograms or an E for English miles and pounds will show the total number of hours the treadmill has been used. Then, plug the audio wire into the console. To purchase the optional chest pulse sensor, call the telephone number on the console... insert the key into a jack on and turn on your MP3 player, CD player, or other personal audio player to change the unit of this manual. To play music or audio books through the MP3 jack. Adjust the volume on , a "d" will not function. If the demo mode is turned on your...
... walking belt has moved. An M for metric kilometers and kilograms or an E for English miles and pounds will show the total number of hours the treadmill has been used. Then, plug the audio wire into the console. To purchase the optional chest pulse sensor, call the telephone number on the console... insert the key into a jack on and turn on your MP3 player, CD player, or other personal audio player to change the unit of this manual. To play music or audio books through the MP3 jack. Adjust the volume on , a "d" will not function. If the demo mode is turned on your...
Uk Manual
Page 25
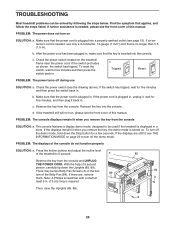
...A 25 Check the power switch located on SOLUTION: a. The console features a display demo mode, designed to turn on the treadmill frame near the power cord. PROBLEM: The displays of this manual. PROBLEM: The power does not turn off the demo mode. b. PROBLEM: The console displays remain lit when you remove the... key, the demo mode is turned on page 23 to be used if the treadmill is displayed in . (13 cm) ...
...A 25 Check the power switch located on SOLUTION: a. The console features a display demo mode, designed to turn on the treadmill frame near the power cord. PROBLEM: The displays of this manual. PROBLEM: The power does not turn off the demo mode. b. PROBLEM: The console displays remain lit when you remove the... key, the demo mode is turned on page 23 to be used if the treadmill is displayed in . (13 cm) ...
Uk Manual
Page 26
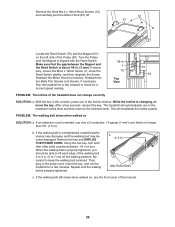
...Reed Switch. Reattach the two Belly Pan Screws (not shown), if necessary. PROBLEM: The walking belt slows when walked on the left side of this manual. 26 If an extension cord is needed, use only a 3-conductor, 14-gauge (1 mm2) cord that the gap between the Magnet and the ...Reed Switch is about 1/8 in . Turn the Pulley until the walking belt is changing, remove the key. Reattach the Motor Hood (not shown). The treadmill will recalibrate the incline system. After a few minutes to check for a correct speed reading. 1/8 in. 1 70 Top View 51 53 PROBLEM: The incline...
...Reed Switch. Reattach the two Belly Pan Screws (not shown), if necessary. PROBLEM: The walking belt slows when walked on the left side of this manual. 26 If an extension cord is needed, use only a 3-conductor, 14-gauge (1 mm2) cord that the gap between the Magnet and the ...Reed Switch is about 1/8 in . Turn the Pulley until the walking belt is changing, remove the key. Reattach the Motor Hood (not shown). The treadmill will recalibrate the incline system. After a few minutes to check for a correct speed reading. 1/8 in. 1 70 Top View 51 53 PROBLEM: The incline...
Uk Manual
Page 30
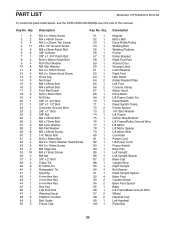
... Platform Cushion Belt Guide Frame Cap Key No. PETL69910.0 R1210A To locate the parts listed below, see the EXPLODED DRAWING near the end of this manual. Qty. 51 1 52 1 53 1 54 1 55 1 56 1 57 2 58 1 59 1 60 1 61 1 62 1 63 1 64 2 65 1 66 2 67 1 68 1 69 3 70 1 71 1 72 2 73 2 74...
... Platform Cushion Belt Guide Frame Cap Key No. PETL69910.0 R1210A To locate the parts listed below, see the EXPLODED DRAWING near the end of this manual. Qty. 51 1 52 1 53 1 54 1 55 1 56 1 57 2 58 1 59 1 60 1 61 1 62 1 63 1 64 2 65 1 66 2 67 1 68 1 69 3 70 1 71 1 72 2 73 2 74...
Uk Manual
Page 31
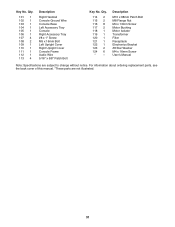
... Motor Bushing Motor Isolator Transformer Filter Receptacle Electronics Bracket #8 Star Washer M4 x 16mm Screw Userʼs Manual Note: Specifications are not illustrated. 31 For information about ordering replacement parts, see the back cover of this manual. *These parts are subject to change without notice. Qty. 114 2 115 2 116 8 117 2 118 1 119 1 120...
... Motor Bushing Motor Isolator Transformer Filter Receptacle Electronics Bracket #8 Star Washer M4 x 16mm Screw Userʼs Manual Note: Specifications are not illustrated. 31 For information about ordering replacement parts, see the back cover of this manual. *These parts are subject to change without notice. Qty. 114 2 115 2 116 8 117 2 118 1 119 1 120...
Uk Manual
Page 36
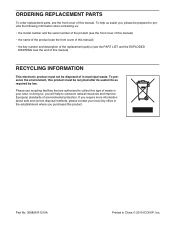
...; 2010 ICON IP, Inc. ORDERING REPLACEMENT PARTS To order replacement parts, see the PART LIST and the EXPLODED DRAWING near the end of this manual. Part No. 306836 R1210A Printed in your local city office or the establishment where you will help us assist you, please be prepared to conserve... when contacting us: • the model number and the serial number of the product (see the front cover of this manual) • the name of the product (see the front cover of this manual) • the key number and description of the replacement part(s) (see the front cover of this...
...; 2010 ICON IP, Inc. ORDERING REPLACEMENT PARTS To order replacement parts, see the PART LIST and the EXPLODED DRAWING near the end of this manual. Part No. 306836 R1210A Printed in your local city office or the establishment where you will help us assist you, please be prepared to conserve... when contacting us: • the model number and the serial number of the product (see the front cover of this manual) • the name of the product (see the front cover of this manual) • the key number and description of the replacement part(s) (see the front cover of this...


