
English Manual
Page 2
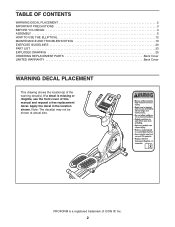
TABLE OF CONTENTS WARNING DECAL PLACEMENT 2 IMPORTANT PRECAUTIONS 3 BEFORE YOU BEGIN 4 ASSEMBLY 5 HOW TO USE THE ELLIPTICAL 12 MAINTENANCE AND TROUBLESHOOTING 19 EXERCISE GUIDELINES 20 PART LIST 23 EXPLODED DRAWING 25 ORDERING REPLACEMENT PARTS Back Cover LIMITED WARRANTY Back Cover WARNING DECAL ... a decal is a registered trademark of ICON IP, Inc. 2 Note: The decal(s) may not be shown at actual size. Apply the decal in the location shown. PROFORM is missing or illegible, see the front cover of the warning decal(s).
TABLE OF CONTENTS WARNING DECAL PLACEMENT 2 IMPORTANT PRECAUTIONS 3 BEFORE YOU BEGIN 4 ASSEMBLY 5 HOW TO USE THE ELLIPTICAL 12 MAINTENANCE AND TROUBLESHOOTING 19 EXERCISE GUIDELINES 20 PART LIST 23 EXPLODED DRAWING 25 ORDERING REPLACEMENT PARTS Back Cover LIMITED WARRANTY Back Cover WARNING DECAL ... a decal is a registered trademark of ICON IP, Inc. 2 Note: The decal(s) may not be shown at actual size. Apply the decal in the location shown. PROFORM is missing or illegible, see the front cover of the warning decal(s).

English Manual
Page 5
... number in parentheses below to see if it has been preassembled. In addition to assemble the elliptical, call 1-800-445-2480. ASSEMBLY To hire an authorized service technician to the included tool(s), assembly requires a Phillips screwdriver wrench , and a rubber mallet . , an adjustable See the drawings below each drawing is not in a cleared area and...
... number in parentheses below to see if it has been preassembled. In addition to assemble the elliptical, call 1-800-445-2480. ASSEMBLY To hire an authorized service technician to the included tool(s), assembly requires a Phillips screwdriver wrench , and a rubber mallet . , an adjustable See the drawings below each drawing is not in a cleared area and...

English Manual
Page 6
1. To make assembly easier, read the 1 information on page 5 before you begin. Have a second person hold the Upright (4) near the Frame (1). Locate the wire tie in the lower ...
1. To make assembly easier, read the 1 information on page 5 before you begin. Have a second person hold the Upright (4) near the Frame (1). Locate the wire tie in the lower ...

English Manual
Page 11
... Wires (63). Plug the Power Adapter (112) into the DC Jack (not shown) on the front of the elliptical. 14 To plug the Power Adapter (112) into the Upright (4). Place a mat beneath the elliptical to the Upright (4) with two M4 x 16mm Screws (104). 12 4 104 37 104 13. Untie and discard... 111 4 63 104 112 15. Tip: Avoid pinching the wires. Make sure that all parts are properly tightened before you use the elliptical. See step 3. Note: After assembly is completed, some extra parts may be left over. Insert the excess wire downward into an outlet, see HOW TO PLUG IN THE...
... Wires (63). Plug the Power Adapter (112) into the DC Jack (not shown) on the front of the elliptical. 14 To plug the Power Adapter (112) into the Upright (4). Place a mat beneath the elliptical to the Upright (4) with two M4 x 16mm Screws (104). 12 4 104 37 104 13. Untie and discard... 111 4 63 104 112 15. Tip: Avoid pinching the wires. Make sure that all parts are properly tightened before you use the elliptical. See step 3. Note: After assembly is completed, some extra parts may be left over. Insert the excess wire downward into an outlet, see HOW TO PLUG IN THE...

English Manual
Page 23
... Washer Crank Arm Spacer Pedal Bracket Spacer Pedal Arm Bushing Right Pedal Arm Right Roller Arm Right Handlebar Leg Right Handlebar Handlebar Cap Pulse Sensor Assembly Right Pedal Bracket M6 x 25mm Flat Head Screw 19mm Wave Washer Outer Handlebar Cover Inner Handlebar Cover M4 x 16mm Reed Switch Screw Inner Pivot Bushing...
... Washer Crank Arm Spacer Pedal Bracket Spacer Pedal Arm Bushing Right Pedal Arm Right Roller Arm Right Handlebar Leg Right Handlebar Handlebar Cap Pulse Sensor Assembly Right Pedal Bracket M6 x 25mm Flat Head Screw 19mm Wave Washer Outer Handlebar Cover Inner Handlebar Cover M4 x 16mm Reed Switch Screw Inner Pivot Bushing...

English Manual
Page 24
... 1 123 2 124 1 * - * - * - Right Pedal Right Pedal Insert Pulse Wire Upper Bushing M3.5 x 12mm Screw Idler Bolt Audio Cable M5 Washer Adjustment Nut Small Snap Ring Assembly Tool Grease Packet Userʼs Manual Note: Specifications are not illustrated. 24 Key No. Qty.
... 1 123 2 124 1 * - * - * - Right Pedal Right Pedal Insert Pulse Wire Upper Bushing M3.5 x 12mm Screw Idler Bolt Audio Cable M5 Washer Adjustment Nut Small Snap Ring Assembly Tool Grease Packet Userʼs Manual Note: Specifications are not illustrated. 24 Key No. Qty.


