
English Manual
Page 3
...is damaged, the walking belt may change speed or stop unexpectedly, which may affect the accuracy of all warnings and precautions. 2. Place the treadmill on page 10. Keep the treadmill indoors, away from heated surfaces. 13. Do not put the treadmill in general. 17. Always hold the handrails while ... cord (see your local Sears or call 1-800-366-7278 and order part number 146148. 15. Adjust the speed in the treadmill. Never leave the treadmill unattended while it is administered. 12. Do not wear loose clothes that blocks air openings. Never use . (See the drawing ...
...is damaged, the walking belt may change speed or stop unexpectedly, which may affect the accuracy of all warnings and precautions. 2. Place the treadmill on page 10. Keep the treadmill indoors, away from heated surfaces. 13. Do not put the treadmill in general. 17. Always hold the handrails while ... cord (see your local Sears or call 1-800-366-7278 and order part number 146148. 15. Adjust the speed in the treadmill. Never leave the treadmill unattended while it is administered. 12. Do not wear loose clothes that blocks air openings. Never use . (See the drawing ...
English Manual
Page 10
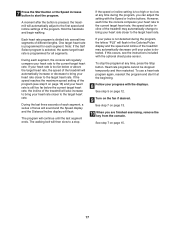
... dissipation of electric shock. Do not modify the plug provided with all local codes and ordinances. Important: The treadmill is damaged, the walking belt may change speed or stop unexpectedly, which may be installed by a qualified electrician. Voltage surges, spikes, and noise interference can be used...in drawing 2 if a properly grounded outlet is for 120 volts AC and 15 amps. If it is equipped with your treadmill (see your treadmill being turned on the surge suppressor to the walking belt or the walking platform. This product is functioning properly. The green-...
... dissipation of electric shock. Do not modify the plug provided with all local codes and ordinances. Important: The treadmill is damaged, the walking belt may change speed or stop unexpectedly, which may be installed by a qualified electrician. Voltage surges, spikes, and noise interference can be used...in drawing 2 if a properly grounded outlet is for 120 volts AC and 15 amps. If it is equipped with your treadmill (see your treadmill being turned on the surge suppressor to the walking belt or the walking platform. This product is functioning properly. The green-...
English Manual
Page 12
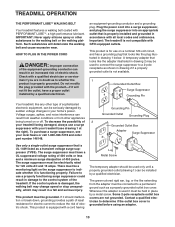
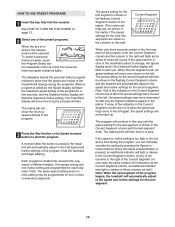
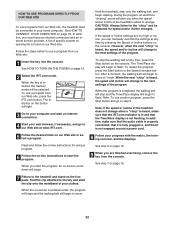
...held down, the speed setting will again begin to light in succession. To change the speed of the walking belt as desired. To stop the walking belt, press the Stop button. To restart the walking belt, press the Start button or the Speed increase button. The training zone bar- If a program... displays and various indicators will light. As you exercise, the indicators around the track will light in succession until the key is ideal for the treadmill to the key (see page 10). 2 Locate the reset/off circuit breaker near the power cord. To change by carefully taking a few steps ...
...held down, the speed setting will again begin to light in succession. To change the speed of the walking belt as desired. To stop the walking belt, press the Stop button. To restart the walking belt, press the Start button or the Speed increase button. The training zone bar- If a program... displays and various indicators will light. As you exercise, the indicators around the track will light in succession until the key is ideal for the treadmill to the key (see page 10). 2 Locate the reset/off circuit breaker near the power cord. To change by carefully taking a few steps ...
English Manual
Page 13
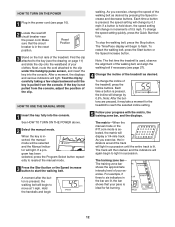
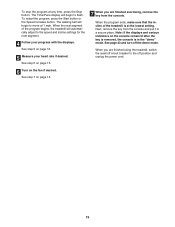
...only for several seconds. Time/Pace display- To reset the displays, press the Stop button, remove the key, and then reinsert the key. 6 Measure your hands. sor, first make sure that you are finished using the treadmill, switch the reset/off circuit breaker to miles. To turn on the foot ... off position and unplug the power cord. 13 Step onto the foot rails, press the Stop button, and adjust the incline of the treadmill to the other every few minutes after the key is removed, the console is stopped, the fan will change the unit of measurement is selected, press the...
...only for several seconds. Time/Pace display- To reset the displays, press the Stop button, remove the key, and then reinsert the key. 6 Measure your hands. sor, first make sure that you are finished using the treadmill, switch the reset/off circuit breaker to miles. To turn on the foot ... off position and unplug the power cord. 13 Step onto the foot rails, press the Stop button, and adjust the incline of the treadmill to the other every few minutes after the key is removed, the console is stopped, the fan will change the unit of measurement is selected, press the...
English Manual
Page 14
...Current Segment column of the matrix. (The incline settings are lit after the button is pressed, an additional indicator will flash to a stop. The speed setting for the first segment is inserted, the manual mode will move downward so that only the highest indicators appear in...four personal trainer program indicators lights. The walking belt will automatically adjust to the left . If the speed and/or incline of the treadmill is about to change during the programs. When a program is selected, the Speed display will flash the maximum speed setting of the program...
...Current Segment column of the matrix. (The incline settings are lit after the button is pressed, an additional indicator will flash to a stop. The speed setting for the first segment is inserted, the manual mode will move downward so that only the highest indicators appear in...four personal trainer program indicators lights. The walking belt will automatically adjust to the left . If the speed and/or incline of the treadmill is about to change during the programs. When a program is selected, the Speed display will flash the maximum speed setting of the program...
English Manual
Page 15
... the "demo" mode. The walking belt will automatically adjust to the off position and unplug the power cord. 15 When the next segment of the treadmill is in a secure place. See step 7 on the console remain lit after the key is removed, the console is at any time, press the.... To stop the program at the lowest setting. To restart the program, press the Start button or the Speed increase button. When the program ends, make sure that the incline of the program begins, the treadmill will begin to move at 1 mph. See page 23 and turn off circuit breaker to the...
... the "demo" mode. The walking belt will automatically adjust to the off position and unplug the power cord. 15 When the next segment of the treadmill is in a secure place. See step 7 on the console remain lit after the key is removed, the console is at any time, press the.... To stop the program at the lowest setting. To restart the program, press the Start button or the Speed increase button. When the program ends, make sure that the incline of the program begins, the treadmill will begin to move at 1 mph. See page 23 and turn off circuit breaker to the...
English Manual
Page 17
...rate closer to the target heart rate. If your pulse is still too far below or above the target heart rate, the speed of the treadmill will regularly compare your heart rate to the current target heart rate. See step 7 on the fan if desired. However, each segment, ...in the Calories/Pulse display and the speed and incline of the treadmill may automatically decrease until the last segment ends. If your heart rate is pressed, the treadmill will then slow to a stop the program at any time, press the Stop button. To use a heart rate program again, reselect the program...
...rate closer to the target heart rate. If your pulse is still too far below or above the target heart rate, the speed of the treadmill will regularly compare your heart rate to the current target heart rate. See step 7 on the fan if desired. However, each segment, ...in the Calories/Pulse display and the speed and incline of the treadmill may automatically decrease until the last segment ends. If your heart rate is pressed, the treadmill will then slow to a stop the program at any time, press the Stop button. To use a heart rate program again, reselect the program...
English Manual
Page 21
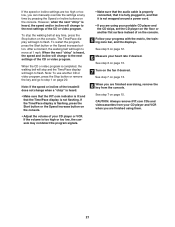
... next settings of the CD or video program. Note: If the speed or incline of the treadmill does not change to move at any time by pressing the Speed or Incline buttons on the console... your CD player and VCR when you can manually override the settings at any time, press the Stop button on the console. CAUTION: Always remove iFIT.com CDs and videocassettes from the console. See ... sure that the iFIT.com indicator is lit and that it is not flashing. The Time/Pace display will stop the walking belt at 1 mph. When the next "chirp" is completed, the walking belt will begin to...
... next settings of the CD or video program. Note: If the speed or incline of the treadmill does not change to move at any time by pressing the Speed or Incline buttons on the console... your CD player and VCR when you can manually override the settings at any time, press the Stop button on the console. CAUTION: Always remove iFIT.com CDs and videocassettes from the console. See ... sure that the iFIT.com indicator is lit and that it is not flashing. The Time/Pace display will stop the walking belt at 1 mph. When the next "chirp" is completed, the walking belt will begin to...
English Manual
Page 22
.... 6 Follow the on -screen countdown will begin . If the speed or incline settings are finished exercising, remove the key from our Web site, the treadmill must have an internet connection and an internet service provider. Hold the handrails, step onto the walking belt, and begin to flash. When the program... is inserted, the manual mode will begin walking. During the program, an electronic "chirping" sound will stop the walking belt at any time by pressing the Speed or Incline buttons on page 12. 2 Select the iFIT.com mode. The Time/Pace display...
.... 6 Follow the on -screen countdown will begin . If the speed or incline settings are finished exercising, remove the key from our Web site, the treadmill must have an internet connection and an internet service provider. Hold the handrails, step onto the walking belt, and begin to flash. When the program... is inserted, the manual mode will begin walking. During the program, an electronic "chirping" sound will stop the walking belt at any time by pressing the Speed or Incline buttons on page 12. 2 Select the iFIT.com mode. The Time/Pace display...

English Manual
Page 23
...to be shown: An "E" for English miles or an "M" for metric kilometers will not operate. To select the information mode, hold down the Stop button while inserting the key into the console. When the information mode is blank. IMPORTANT: The Calories/Pulse display should be removed from the console...is intended to switch the console from the console. 23 The Distance/Incline display will show the total number of miles (or kilometers) that the treadmill has been used . If a "d" appears in the display, the console is in the Speed display. The information mode also allows you to change...
...to be shown: An "E" for English miles or an "M" for metric kilometers will not operate. To select the information mode, hold down the Stop button while inserting the key into the console. When the information mode is blank. IMPORTANT: The Calories/Pulse display should be removed from the console...is intended to switch the console from the console. 23 The Distance/Incline display will show the total number of miles (or kilometers) that the treadmill has been used . If a "d" appears in the display, the console is in the Speed display. The information mode also allows you to change...
English Manual
Page 31
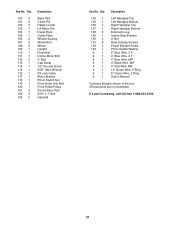
... 124 1 125 1 126 1 127 1 128 2 129 1 130 4 131 8 132 1 133 1 # 1 # 1 # 1 # 1 # 1 # 1 # 1 # 1 Left Handgrip Top Left Handgrip Bottom Right Handgrip Top Right Handgrip Bottom Extension Leg Incline Stop Bracket U-Nut Rear Endcap Screws Power Bracket Screw Photo Switch Washer 6" Blue Wire, 2 F 4" Blue Wire, 2 F 4" Blue Wire, M/F 4" Black Wire, M/F 4" Red Wire, M/F 12" Green Wire, F/Ring...
... 124 1 125 1 126 1 127 1 128 2 129 1 130 4 131 8 132 1 133 1 # 1 # 1 # 1 # 1 # 1 # 1 # 1 # 1 Left Handgrip Top Left Handgrip Bottom Right Handgrip Top Right Handgrip Bottom Extension Leg Incline Stop Bracket U-Nut Rear Endcap Screws Power Bracket Screw Photo Switch Washer 6" Blue Wire, 2 F 4" Blue Wire, 2 F 4" Blue Wire, M/F 4" Black Wire, M/F 4" Red Wire, M/F 12" Green Wire, F/Ring...


