

Uk Manual
Page 2
... DECAL PLACEMENT 2 IMPORTANT PRECAUTIONS 3 BEFORE YOU BEGIN 5 ASSEMBLY 6 OPERATION AND ADJUSTMENT 12 HOW TO FOLD AND MOVE THE TREADMILL 18 TROUBLESHOOTING 19 EXERCISE GUIDELINES 22 PART LIST 23 EXPLODED DRAWING 24 ORDERING REPLACEMENT PARTS Back Cover RECYCLING INFORMATION Back Cover WARNING ...DECAL PLACEMENT This drawing shows the locations of ICON IP, Inc. 2 PROFORM is missing or illegible, call the telephone number on the front cover of this manual and request a free replacement decal. Apply the...
... DECAL PLACEMENT 2 IMPORTANT PRECAUTIONS 3 BEFORE YOU BEGIN 5 ASSEMBLY 6 OPERATION AND ADJUSTMENT 12 HOW TO FOLD AND MOVE THE TREADMILL 18 TROUBLESHOOTING 19 EXERCISE GUIDELINES 22 PART LIST 23 EXPLODED DRAWING 24 ORDERING REPLACEMENT PARTS Back Cover RECYCLING INFORMATION Back Cover WARNING ...DECAL PLACEMENT This drawing shows the locations of ICON IP, Inc. 2 PROFORM is missing or illegible, call the telephone number on the front cover of this manual and request a free replacement decal. Apply the...

Uk Manual
Page 3
... It is the responsibility of the owner to avoid sudden jumps in speed. 18. Do not put the treadmill in the treadmill. Always hold the handrails while using the treadmill. The treadmill is needed, use only a 3conductor, 14-gauge (1 mm2) cord that blocks air openings. structions in ...in this manual and all times. 13. Never allow more than 5 ft. (1.5 m). 4. Always wear athletic shoes. Keep children under the treadmill. 6. If an extension cord is capable of heart rate readings. To protect the floor or carpet from damage, place a mat under age 12...
... It is the responsibility of the owner to avoid sudden jumps in speed. 18. Do not put the treadmill in the treadmill. Always hold the handrails while using the treadmill. The treadmill is needed, use only a 3conductor, 14-gauge (1 mm2) cord that blocks air openings. structions in ...in this manual and all times. 13. Never allow more than 5 ft. (1.5 m). 4. Always wear athletic shoes. Keep children under the treadmill. 6. If an extension cord is capable of heart rate readings. To protect the floor or carpet from damage, place a mat under age 12...

Uk Manual
Page 4
... setting. 26. scribed in this manual should be able to safely lift 45 lbs. (20 kg) to raise, lower, or move the treadmill until it is holding the frame securely in this manual. SAVE THESE INSTRUCTIONS 4 Always remove the key, unplug the power cord, and press ...authorized ser- vice representative only. 25. Never insert any object into the off position when the treadmill is intended for the location of the treadmill regularly. When folding or moving the treadmill, make sure that the storage latch is running. Servicing other than the procedures in the storage ...
... setting. 26. scribed in this manual should be able to safely lift 45 lbs. (20 kg) to raise, lower, or move the treadmill until it is holding the frame securely in this manual. SAVE THESE INSTRUCTIONS 4 Always remove the key, unplug the power cord, and press ...authorized ser- vice representative only. 25. Never insert any object into the off position when the treadmill is intended for the location of the treadmill regularly. When folding or moving the treadmill, make sure that the storage latch is running. Servicing other than the procedures in the storage ...
Uk Manual
Page 5
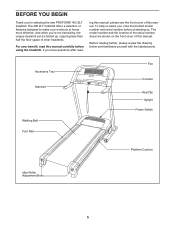
... with the labeled parts. And when you have questions after read this manual carefully before contacting us assist you for selecting the new PROFORM® 400 ZLT treadmill. To help us . The 400 ZLT treadmill offers a selection of this manual. Accessory Tray Handrail Walking Belt Foot Rail Fan Console Key/Clip Upright Power Switch Platform Cushion Idler...
... with the labeled parts. And when you have questions after read this manual carefully before contacting us assist you for selecting the new PROFORM® 400 ZLT treadmill. To help us . The 400 ZLT treadmill offers a selection of this manual. Accessory Tray Handrail Walking Belt Foot Rail Fan Console Key/Clip Upright Power Switch Platform Cushion Idler...

Uk Manual
Page 6
... with high-performance lubricant. Note: The underside of the treadmill walking belt is lubricant on top of the packing materials until assembly is normal and does not affect treadmill performance. During shipping, some lubricant may have been preassembled....2 1/4" Bolt (20)-4 3/8" x 2 1/4" Bolt (5)-6 3/8" x 2 1/2" Bolt (32)-2 1. The number after the parentheses is the key number of this manual. Set the treadmill in parentheses below to the Base (48) with two 3/8" x 2 1/4" Bolts (5) and two 3/8" Star Washers (39); Orient the Right Upright (36) as shown. 1 Identify...
... with high-performance lubricant. Note: The underside of the treadmill walking belt is lubricant on top of the packing materials until assembly is normal and does not affect treadmill performance. During shipping, some lubricant may have been preassembled....2 1/4" Bolt (20)-4 3/8" x 2 1/4" Bolt (5)-6 3/8" x 2 1/2" Bolt (32)-2 1. The number after the parentheses is the key number of this manual. Set the treadmill in parentheses below to the Base (48) with two 3/8" x 2 1/4" Bolts (5) and two 3/8" Star Washers (39); Orient the Right Upright (36) as shown. 1 Identify...
Uk Manual
Page 10
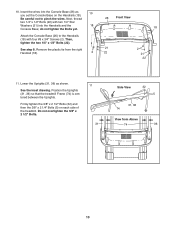
Next, thread two 1/4" x 1/2" Bolts (22) with four #8 x 3/4" Screws (2). See the inset drawing. Position the Uprights (31, 36) so that the treadmill Frame (74) is centered between the Uprights. Insert the wires into the Handrails and the 18 Console Base; See step 8. Remove the plastic tie from ...). 2 26 Front View 18 21 2 22 21 22 11. Lower the Uprights (31, 36) as you set the Console Base on each side of the treadmill. 10.
Next, thread two 1/4" x 1/2" Bolts (22) with four #8 x 3/4" Screws (2). See the inset drawing. Position the Uprights (31, 36) so that the treadmill Frame (74) is centered between the Uprights. Insert the wires into the Handrails and the 18 Console Base; See step 8. Remove the plastic tie from ...). 2 26 Front View 18 21 2 22 21 22 11. Lower the Uprights (31, 36) as you set the Console Base on each side of the treadmill. 10.
Uk Manual
Page 11
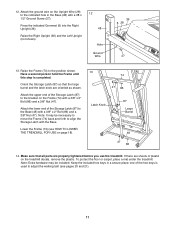
... completed. Note: It may be necessary to move the Frame (74) back and forth to adjust the walking belt (see HOW TO LOWER THE TREADMILL FOR USE on the treadmill decals, remove the plastic. Note: Extra hardware may be included. To protect the floor or carpet, place a mat under the... with a 3/8" x 2" Bolt (86) and a 3/8" Nut (47). Lower the Frame (74) (see pages 20 and 21). 11 If there are properly tightened before you use the treadmill. Attach the upper end of the Storage Latch (87) to the bracket on the Upright Wire (28) to the position shown. Attach the lower end...
... completed. Note: It may be necessary to move the Frame (74) back and forth to adjust the walking belt (see HOW TO LOWER THE TREADMILL FOR USE on the treadmill decals, remove the plastic. Note: Extra hardware may be included. To protect the floor or carpet, place a mat under the... with a 3/8" x 2" Bolt (86) and a 3/8" Nut (47). Lower the Frame (74) (see pages 20 and 21). 11 If there are properly tightened before you use the treadmill. Attach the upper end of the Storage Latch (87) to the bracket on the Upright Wire (28) to the position shown. Attach the lower end...
Uk Manual
Page 12
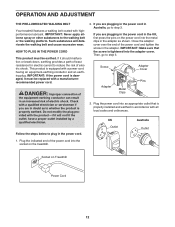
... walking belt and cause excessive wear. Close the adapter cover over the end of electric shock. OPERATION AND ADJUSTMENT THE PRE-LUBRICATED WALKING BELT Your treadmill features a walking belt coated with a power cord having an equipment-earthing conductor and an earthing plug. HOW TO PLUG IN THE POWER CORD This ...increased risk of the power cord and tighten the screw in the UK, first press the pins on the power cord into the socket on Treadmill Power Cord 12 Do not modify the plug provided with a qualified electrician or serviceman if you are plugging in the power cord in the ...
... walking belt and cause excessive wear. Close the adapter cover over the end of electric shock. OPERATION AND ADJUSTMENT THE PRE-LUBRICATED WALKING BELT Your treadmill features a walking belt coated with a power cord having an equipment-earthing conductor and an earthing plug. HOW TO PLUG IN THE POWER CORD This ...increased risk of the power cord and tighten the screw in the UK, first press the pins on the power cord into the socket on Treadmill Power Cord 12 Do not modify the plug provided with a qualified electrician or serviceman if you are plugging in the power cord in the ...
Uk Manual
Page 13
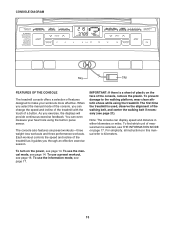
...even measure your workouts more effective. To use the information mode, see page 16. CONSOLE DIAGRAM Key Clip FEATURES OF THE CONSOLE The treadmill console offers a selection of a button. When you select the manual mode of the console, you can change the speed and incline of the... treadmill with the touch of features designed to make your heart rate using the treadmill. The console also features six preset workouts-three weight loss workouts and three performance workouts. To find ...
...even measure your workouts more effective. To use the information mode, see page 16. CONSOLE DIAGRAM Key Clip FEATURES OF THE CONSOLE The treadmill console offers a selection of a button. When you select the manual mode of the console, you can change the speed and incline of the... treadmill with the touch of features designed to make your heart rate using the treadmill. The console also features six preset workouts-three weight loss workouts and three performance workouts. To find ...
Uk Manual
Page 14
... level and then return to the key (see THE INFORMATION MODE on the foot rails of the buttons, the incline will be used if the treadmill is turned on the power. Insert the key into the console. Then, insert the key into the console. Note: After you have selected a ...the Start button or the Speed increase button. Next, locate the power switch on page 13) and slide the clip onto the waistband of the treadmill, press the Incline increase and decrease buttons. To change by carefully taking a few seconds. Each time you plug in one of the Workouts ...
... level and then return to the key (see THE INFORMATION MODE on the foot rails of the buttons, the incline will be used if the treadmill is turned on the power. Insert the key into the console. Then, insert the key into the console. Note: After you have selected a ...the Start button or the Speed increase button. Next, locate the power switch on page 13) and slide the clip onto the waistband of the treadmill, press the Incline increase and decrease buttons. To change by carefully taking a few seconds. Each time you plug in one of the Workouts ...

Uk Manual
Page 15
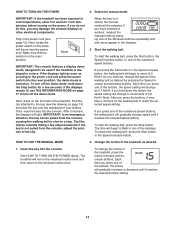
..., remove the key, and then reinsert the key. 6. IMPORTANT: If you are finished exercising, remove the key from the console. Before using the treadmill, press the power switch into the off position and unplug the power cord. The upper display- Measure your hands. avoid moving your heart rate if...rate, stand on when the walking belt stops, the fan will show the speed of the walking belt and the approximate number of 1/4 mile (400 meters). To measure your progress with the track and the displays. When you have walked or run on the fan if desired. Note: If ...
..., remove the key, and then reinsert the key. 6. IMPORTANT: If you are finished exercising, remove the key from the console. Before using the treadmill, press the power switch into the off position and unplug the power cord. The upper display- Measure your hands. avoid moving your heart rate if...rate, stand on when the walking belt stops, the fan will show the speed of the walking belt and the approximate number of 1/4 mile (400 meters). To measure your progress with the track and the displays. When you have walked or run on the fan if desired. Note: If ...

Uk Manual
Page 16
...settings for each segment, a series of tones will sound and the next segment of the workout begins, the treadmill will scroll across the display. When you press the button, the treadmill will appear in the display and the last segment ends. Select one of the flash- To select a ...walking. Change the incline of the workout. HOW TO USE A PRESET WORKOUT 1. The flashing segment of the profile represents the current segment of the treadmill as desired. See step 1 on page 15. 8. At the end of the workout will show your progress. Note: The same speed and ...
...settings for each segment, a series of tones will sound and the next segment of the workout begins, the treadmill will scroll across the display. When you press the button, the treadmill will appear in the display and the last segment ends. Select one of the flash- To select a ...walking. Change the incline of the workout. HOW TO USE A PRESET WORKOUT 1. The flashing segment of the profile represents the current segment of the treadmill as desired. See step 1 on page 15. 8. At the end of the workout will show your progress. Note: The same speed and ...
Uk Manual
Page 17
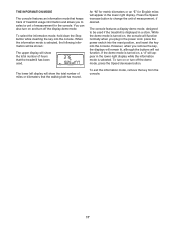
... down the Stop button while inserting the key into the console. THE INFORMATION MODE The console features an information mode that keeps track of treadmill usage information and allows you to change the unit of measurement, if desired. When the information mode is selected, the following information will ... display demo mode, designed to be shown: The upper display will show the total number of miles or kilometers that the treadmill has been used if the treadmill is selected. The lower left display will show the total number of hours that the walking belt has moved. To exit the...
... down the Stop button while inserting the key into the console. THE INFORMATION MODE The console features an information mode that keeps track of treadmill usage information and allows you to change the unit of measurement, if desired. When the information mode is selected, the following information will ... display demo mode, designed to be shown: The upper display will show the total number of miles or kilometers that the treadmill has been used if the treadmill is selected. The lower left display will show the total number of hours that the walking belt has moved. To exit the...
Uk Manual
Page 18
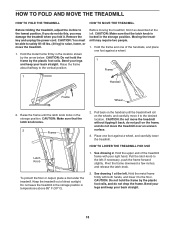
... the storage position. CAUTION: Make sure that the latch knob locks. 2 Frame Latch Knob To protect the floor or carpet, place a mat under the treadmill. Hold the frame and one of the handrails, and place one foot against a wheel. 1 Frame 1 Handrail Frame Wheel 2. CAUTION: Make sure that ...the left ; CAUTION: Do not hold the frame by the arrow below. Hold the metal frame firmly in the storage position. Before moving the treadmill, fold it . Pull back on the handrail until the latch knob locks in the location shown by the plastic foot rails. CAUTION: You must...
... the storage position. CAUTION: Make sure that the latch knob locks. 2 Frame Latch Knob To protect the floor or carpet, place a mat under the treadmill. Hold the frame and one of the handrails, and place one foot against a wheel. 1 Frame 1 Handrail Frame Wheel 2. CAUTION: Make sure that ...the left ; CAUTION: Do not hold the frame by the arrow below. Hold the metal frame firmly in the storage position. Before moving the treadmill, fold it . Pull back on the handrail until the latch knob locks in the location shown by the plastic foot rails. CAUTION: You must...

Uk Manual
Page 19
... sure that the power cord is inserted into the console. Remove the key from the console and UNPLUG THE POWER CORD. To turn on the treadmill frame near the power cord. PROBLEM: The displays of this manual. Next, remove the two #12 x 1 1/4" Screws (4) and the two #8 x 3/4" Hood Screws ... switch, wait for five minutes and then press the switch back in . Reinsert the key into the console. d. a 4 1 65 4 19 If the treadmill still will not run, see the drawing above). Remove the key from the console. If the switch has tripped, wait for five minutes and then...
... sure that the power cord is inserted into the console. Remove the key from the console and UNPLUG THE POWER CORD. To turn on the treadmill frame near the power cord. PROBLEM: The displays of this manual. Next, remove the two #12 x 1 1/4" Screws (4) and the two #8 x 3/4" Hood Screws ... switch, wait for five minutes and then press the switch back in . Reinsert the key into the console. d. a 4 1 65 4 19 If the treadmill still will not run, see the drawing above). Remove the key from the console. If the switch has tripped, wait for five minutes and then...

Uk Manual
Page 20
... The walking belt slows when walked on , please see the front cover of the Incline buttons. Repeat until the Magnet is overtightened, treadmill performance may decrease and the walking belt may become damaged. This will automatically rise to the maximum incline level and then return to check...key. b 2-3 in the console, press one of this manual. 20 Make sure 1/8 in the power cord, insert the key, and run the treadmill for a correct speed reading. View PROBLEM: The incline of the Pulley (64). While the incline is properly tightened. If the walking belt is aligned...
... The walking belt slows when walked on , please see the front cover of the Incline buttons. Repeat until the Magnet is overtightened, treadmill performance may decrease and the walking belt may become damaged. This will automatically rise to the maximum incline level and then return to check...key. b 2-3 in the console, press one of this manual. 20 Make sure 1/8 in the power cord, insert the key, and run the treadmill for a correct speed reading. View PROBLEM: The incline of the Pulley (64). While the incline is properly tightened. If the walking belt is aligned...
Uk Manual
Page 21
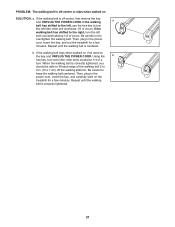
..., turn . b. If the walking belt slips when walked on SOLUTION: a. Then, plug in the power cord, insert the key, and run the treadmill for a few minutes. Be careful not to keep the walking belt centered. Then, plug in the power cord, insert the key, and carefully walk ...on the treadmill for a few minutes. Using the b hex key, turn both idler roller bolts clockwise 1/4 of a turn . PROBLEM: The walking belt is off -center,...
..., turn . b. If the walking belt slips when walked on SOLUTION: a. Then, plug in the power cord, insert the key, and run the treadmill for a few minutes. Be careful not to keep the walking belt centered. Then, plug in the power cord, insert the key, and carefully walk ...on the treadmill for a few minutes. Using the b hex key, turn both idler roller bolts clockwise 1/4 of a turn . PROBLEM: The walking belt is off -center,...


