
User Manual
Page 1
....proformservice.com USER'S MANUAL CAUTION Read all precautions and instructions in the space above for future reference. Save this equipment. Visit our website at www.proform.com new products, prizes, fitness tips, and much more! Write the serial number in this manual before using this manual for future reference. As a manufacturer...
....proformservice.com USER'S MANUAL CAUTION Read all precautions and instructions in the space above for future reference. Save this equipment. Visit our website at www.proform.com new products, prizes, fitness tips, and much more! Write the serial number in this manual before using this manual for future reference. As a manufacturer...

User Manual
Page 2
PROFORM is attached in the center of ICON IP, Inc. 2 TABLE OF CONTENTS IMPORTANT PRECAUTIONS 3 BEFORE YOU BEGIN 6 ASSEMBLY 7 TREADMILL OPERATION 10 HOW TO FOLD AND MOVE THE TREADMILL 22 TROUBLESHOOTING 23 EXERCISE GUIDELINES 25 PART LIST 26 HOW TO ORDER REPLACEMENT PARTS Back Cover LIMITED WARRANTY Back Cover Note: An EXPLODED DRAWING is a registered trademark of this manual.
PROFORM is attached in the center of ICON IP, Inc. 2 TABLE OF CONTENTS IMPORTANT PRECAUTIONS 3 BEFORE YOU BEGIN 6 ASSEMBLY 7 TREADMILL OPERATION 10 HOW TO FOLD AND MOVE THE TREADMILL 22 TROUBLESHOOTING 23 EXERCISE GUIDELINES 25 PART LIST 26 HOW TO ORDER REPLACEMENT PARTS Back Cover LIMITED WARRANTY Back Cover Note: An EXPLODED DRAWING is a registered trademark of this manual.
User Manual
Page 3
... the treadmill. Do not place the treadmill on any surface that all users of this manual and order part number 146148, or see your local PROFORM dealer or call the toll-free telephone number on a level surface, with bare feet, wearing only stockings, or in general. 19. Keep the treadmill indoors...
... the treadmill. Do not place the treadmill on any surface that all users of this manual and order part number 146148, or see your local PROFORM dealer or call the toll-free telephone number on a level surface, with bare feet, wearing only stockings, or in general. 19. Keep the treadmill indoors...
User Manual
Page 4
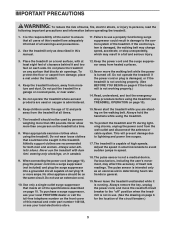
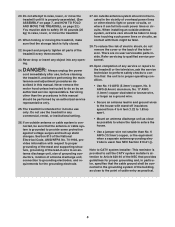
DANGER: 24. tenance and adjustment procedures de- Servicing other electric light or power circuits, or where it is provided to call the CATV system installer's attention to raise, lower, or move the treadmill until it can fall into any object into such power lines or circuits. There are no user serviceable parts inside. See NEC Section 810-21 (j). Do not use , before cleaning the treadmill, and before performing the main- Section 810 of the National Electrical Code, ANSI/NFPA No. 70-1984, provides information with them might be able to safely lift 45 pounds (20 kg) to ...
DANGER: 24. tenance and adjustment procedures de- Servicing other electric light or power circuits, or where it is provided to call the CATV system installer's attention to raise, lower, or move the treadmill until it can fall into any object into such power lines or circuits. There are no user serviceable parts inside. See NEC Section 810-21 (j). Do not use , before cleaning the treadmill, and before performing the main- Section 810 of the National Electrical Code, ANSI/NFPA No. 70-1984, provides information with them might be able to safely lift 45 pounds (20 kg) to ...
User Manual
Page 5
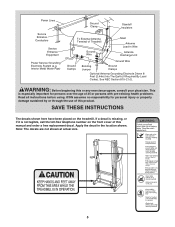
ICON assumes no responsibility for persons over the age of this manual and order a free replacement decal. WARNING: Before beginning this product. SAVE THESE INSTRUCTIONS The decals shown here have been placed on the front cover of 35 or persons with pre-existing health problems. Read all instructions before using. If a decal is missing, or if it is especially important for personal injury or property damage sustained by or through the use of Treadmill Ground Wire Mast Antenna Lead-in the location shown. This is not legible, call the toll-free telephone number on the ...
ICON assumes no responsibility for persons over the age of this manual and order a free replacement decal. WARNING: Before beginning this product. SAVE THESE INSTRUCTIONS The decals shown here have been placed on the front cover of 35 or persons with pre-existing health problems. Read all instructions before using. If a decal is missing, or if it is especially important for personal injury or property damage sustained by or through the use of Treadmill Ground Wire Mast Antenna Lead-in the location shown. This is not legible, call the toll-free telephone number on the ...
User Manual
Page 6
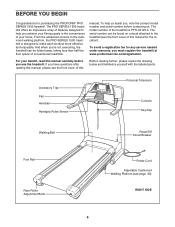
...see the front cover of features designed to help us . To avoid a registration fee for purchasing the PROFORM® PRO SERIES 1500 treadmill. manual. The PRO SERIES 1500 treadmill offers an impressive array of this manual for the location). If you have questions after reading this manual...you must register the treadmill at www.proformservice.com/registration. From the advanced console to the cushioned walking platform, the PRO SERIES 1500 treadmill is PFTL94105.0. To help you achieve your fitness goals in the convenience of conventional treadmills. The serial number can be found...
...see the front cover of features designed to help us . To avoid a registration fee for purchasing the PROFORM® PRO SERIES 1500 treadmill. manual. The PRO SERIES 1500 treadmill offers an impressive array of this manual for the location). If you have questions after reading this manual...you must register the treadmill at www.proformservice.com/registration. From the advanced console to the cushioned walking platform, the PRO SERIES 1500 treadmill is PFTL94105.0. To help you achieve your fitness goals in the convenience of conventional treadmills. The serial number can be found...
User Manual
Page 7
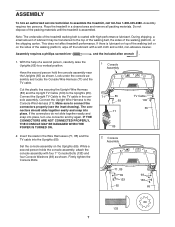
Do not dispose of the packing materials until the treadmill is lubricant on top of the walking belt or on the Uprights (65). Connect the Upright Wire Harness to a vertical position. Insert the slack in a cleared area and remove all packing materials. Assembly requires two persons. With the help of the walking platform, wipe off the lubricant with a soft cloth and a mild, non-abrasive cleaner. Look under the console assembly and locate the Console Wire Harness (71) and the TV cable. IF THE CONNECTORS ARE NOT CONNECTED PROPERLY, THE CONSOLE MAY BE DAMAGED WHEN THE ...
Do not dispose of the packing materials until the treadmill is lubricant on top of the walking belt or on the Uprights (65). Connect the Upright Wire Harness to a vertical position. Insert the slack in a cleared area and remove all packing materials. Assembly requires two persons. With the help of the walking platform, wipe off the lubricant with a soft cloth and a mild, non-abrasive cleaner. Look under the console assembly and locate the Console Wire Harness (71) and the TV cable. IF THE CONNECTORS ARE NOT CONNECTED PROPERLY, THE CONSOLE MAY BE DAMAGED WHEN THE ...

User Manual
Page 8
Remove the knob from the pin. For the television to operate properly, an 4 antenna, a CATV cable, or a VCR must be connected to protect the floor or carpet. Keep the included allen wrench in place as you tighten two 1/2" Tek Screws (114) into the hole. Loosely thread the two blunt-tipped 1/2" Screws (132) into the Latch Housing (68), and tighten the knob back onto it. Do not tighten the Screws yet. Then, tighten the 1/2" Screws (132). Make sure that all parts are on the knob to adjust the walking belt (see page 9). 75 Ohm Antenna Terminal 5. Insert the pin...
Remove the knob from the pin. For the television to operate properly, an 4 antenna, a CATV cable, or a VCR must be connected to protect the floor or carpet. Keep the included allen wrench in place as you tighten two 1/2" Tek Screws (114) into the hole. Loosely thread the two blunt-tipped 1/2" Screws (132) into the Latch Housing (68), and tighten the knob back onto it. Do not tighten the Screws yet. Then, tighten the 1/2" Screws (132). Make sure that all parts are on the knob to adjust the walking belt (see page 9). 75 Ohm Antenna Terminal 5. Insert the pin...

User Manual
Page 9
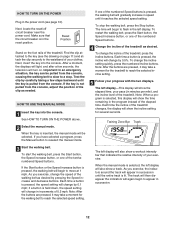
Push the 300 ohm to the video output jack on your VCR. See the drawing near the bottom of a 75 ohm CATV cable to 75 ohm adapter onto the 75 ohm antenna terminal on the treadmill frame. See the drawing near the power cord. Connect one end of this page. Before the personal television can reduce signal quality. HOW TO CONNECT AN ANTENNA 300 Ohm Flat Wire Indoor Antenna 1. Place a VHF antenna in wiring before connecting the antenna. 1. Push the 300 ohm to the 75 ohm antenna terminal on the treadmill frame near the power cord. 75 Ohm CATV Cable 1. Note: No antenna,...
Push the 300 ohm to the video output jack on your VCR. See the drawing near the bottom of a 75 ohm CATV cable to 75 ohm adapter onto the 75 ohm antenna terminal on the treadmill frame. See the drawing near the power cord. Connect one end of this page. Before the personal television can reduce signal quality. HOW TO CONNECT AN ANTENNA 300 Ohm Flat Wire Indoor Antenna 1. Place a VHF antenna in wiring before connecting the antenna. 1. Push the 300 ohm to the 75 ohm antenna terminal on the treadmill frame near the power cord. 75 Ohm CATV Cable 1. Note: No antenna,...

User Manual
Page 10
Important: The treadmill is not compatible with all local codes and ordinances. Your treadmill, like the adapter illustrated in drawing 2 may result in your local PROFORM dealer or call the toll-free telephone number on the surge suppressor to indicate whether it is not available. 1 Grounded Outlet Box Surge Suppressor Grounding ...
Important: The treadmill is not compatible with all local codes and ordinances. Your treadmill, like the adapter illustrated in drawing 2 may result in your local PROFORM dealer or call the toll-free telephone number on the surge suppressor to indicate whether it is not available. 1 Grounded Outlet Box Surge Suppressor Grounding ...
User Manual
Page 11
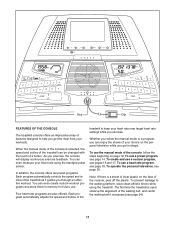
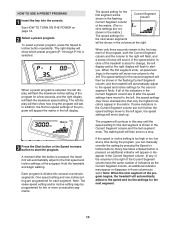
In addition, the console offers ten preset programs. Each program automatically controls the speed and incline of the treadmill as it guides you exercise. Four heart rate programs are also offered. To use . Note: If there is selected, the speed and incline of the treadmill can even create custom workout programs and store them in shape. To prevent damage to help you get in memory for future use a preset program, see page 14. You can be changed with the touch of a button. To use a custom program, see page 24). 11 You can enjoy the shows of your workouts. Each program ...
In addition, the console offers ten preset programs. Each program automatically controls the speed and incline of the treadmill as it guides you exercise. Four heart rate programs are also offered. To use . Note: If there is selected, the speed and incline of the treadmill can even create custom workout programs and store them in shape. To prevent damage to help you get in memory for future use a preset program, see page 14. You can be changed with the touch of a button. To use a custom program, see page 24). 11 You can enjoy the shows of your workouts. Each program ...
User Manual
Page 12
Find the clip attached to the key (see page 10). Test the clip by 0.1 mph; To stop . Each time a button is pulled from the console. Each time the incline of the treadmill changes, the display will begin to move at 1 mph. To start the walking belt, press the Start button, the Speed increase button, or one of the numbered Speed buttons. 4 Change the incline of the treadmill as desired. When the manual mode is in the reset position. Make sure that indicates the relative intensity of your clothes. If one of the numbered Speed buttons is pressed, the walking belt ...
Find the clip attached to the key (see page 10). Test the clip by 0.1 mph; To stop . Each time a button is pulled from the console. Each time the incline of the treadmill changes, the display will begin to move at 1 mph. To start the walking belt, press the Start button, the Speed increase button, or one of the numbered Speed buttons. 4 Change the incline of the treadmill as desired. When the manual mode is in the reset position. Make sure that indicates the relative intensity of your clothes. If one of the numbered Speed buttons is pressed, the walking belt ...

User Manual
Page 13
Heart Rate Bar Note: The console can display speed and distance in this section refer to the "off after the key is removed, the console is selected. To turn on the fan at the lowest setting when the treadmill is detected, the heart-shaped indicator in a secure place. Step onto the foot rails, press the Stop button, and adjust the incline of the treadmill to be used only for support when you are clean. Note: If the displays remain lit after a few minutes. 8 When you are finished using the handgrip pulse sensor, remove the sheets of clear plastic from the ...
Heart Rate Bar Note: The console can display speed and distance in this section refer to the "off after the key is removed, the console is selected. To turn on the fan at the lowest setting when the treadmill is detected, the heart-shaped indicator in a secure place. Step onto the foot rails, press the Stop button, and adjust the incline of the treadmill to be used only for support when you are clean. Note: If the displays remain lit after a few minutes. 8 When you are finished using the handgrip pulse sensor, remove the sheets of clear plastic from the ...
User Manual
Page 14
Matrix 3 Press the Start button or the Speed increase button to the left, the speed settings may move downward so that only the highest indicators appear in the matrix. cline settings are lit after the button is shown in - When the first segment ends, all of the indicators in the Current Segment column are not shown in the matrix.) The speed settings for the last segment is pressed, the treadmill will automatically adjust to the first speed and incline settings of the matrix. (The in the Current Segment column and the last segment ends. The program will continue in this way...
Matrix 3 Press the Start button or the Speed increase button to the left, the speed settings may move downward so that only the highest indicators appear in the matrix. cline settings are lit after the button is shown in - When the first segment ends, all of the indicators in the Current Segment column are not shown in the matrix.) The speed settings for the last segment is pressed, the treadmill will automatically adjust to the first speed and incline settings of the matrix. (The in the Current Segment column and the last segment ends. The program will continue in this way...

User Manual
Page 15
To restart the program, press the Start button or the Speed increase button. When the program ends, make sure that the incline of the program begins, the treadmill will begin to flash in the left display. Note: If the displays and various indicators remain lit after the key is removed, the console is at any time, press the Stop button. The walking belt will begin to move at 1 mph. See step 5 on the fan if desired. When you are finished using the treadmill, switch the reset/off circuit breaker to the speed and incline settings for the next segment. 4 Follow your heart ...
To restart the program, press the Start button or the Speed increase button. When the program ends, make sure that the incline of the program begins, the treadmill will begin to flash in the left display. Note: If the displays and various indicators remain lit after the key is removed, the console is at any time, press the Stop button. The walking belt will begin to move at 1 mph. See step 5 on the fan if desired. When you are finished using the treadmill, switch the reset/off circuit breaker to the speed and incline settings for the next segment. 4 Follow your heart ...

User Manual
Page 16
If the custom program has not yet been defined, three columns of indicators will then move . One speed setting and one -minute segments. ting for the second segment will appear in the matrix in the flashing Current Segment column. The three columns of indicators will be stored in the matrix.) To program a speed setting and an incline setting for as many segments as described above. HOW TO CREATE A CUSTOM PROGRAM 1 Insert the key into Current Segment Column one incline setting can have programmed will begin walking. Matrix 3 Press the Start ...
If the custom program has not yet been defined, three columns of indicators will then move . One speed setting and one -minute segments. ting for the second segment will appear in the matrix in the flashing Current Segment column. The three columns of indicators will be stored in the matrix.) To program a speed setting and an incline setting for as many segments as described above. HOW TO CREATE A CUSTOM PROGRAM 1 Insert the key into Current Segment Column one incline setting can have programmed will begin walking. Matrix 3 Press the Start ...

User Manual
Page 17
The left display will then show how long the program will appear in the matrix in the columns to a stop the program at any time, press the Stop button. Note: If only three columns of the program will last. ting are programmed for as many segments as desired. In addition, the first ten speed settings of indicators appear, see HOW TO CREATE A CUSTOM PROGRAM on the fan if desired. To change the speed or incline setting during the current segment, simply press the Speed or Incline buttons. When you have added as many additional segments as desired, press the Stop...
The left display will then show how long the program will appear in the matrix in the columns to a stop the program at any time, press the Stop button. Note: If only three columns of the program will last. ting are programmed for as many segments as desired. In addition, the first ten speed settings of indicators appear, see HOW TO CREATE A CUSTOM PROGRAM on the fan if desired. To change the speed or incline setting during the current segment, simply press the Speed or Incline buttons. When you have added as many additional segments as desired, press the Stop...

User Manual
Page 18
Follow the steps below to flash in the right display. If desired, change the target heart rate setting by pressing the + or - If heart rate program 11 is changed, the intensity level of your age, press the + or - If heart rate program 12, 13, or 14 is selected, the letters "PLS" and the target heart rate setting for the program will begin to find whether the medication will scroll across the matrix in the right display. Then, press the Enter button. If heart rate program 11 is selected, the letters "PLS" and the maximum target heart rate setting for the program. Then, ...
Follow the steps below to flash in the right display. If desired, change the target heart rate setting by pressing the + or - If heart rate program 11 is changed, the intensity level of your age, press the + or - If heart rate program 12, 13, or 14 is selected, the letters "PLS" and the target heart rate setting for the program will begin to find whether the medication will scroll across the matrix in the right display. Then, press the Enter button. If heart rate program 11 is selected, the letters "PLS" and the maximum target heart rate setting for the program. Then, ...

User Manual
Page 19
however, you must hold the handgrip pulse sensor continuously during a pulse program; Each time you are not holding the handgrip pulse sensor, the letters "PLS" will appear in the display instead of tones will be shown in the first segment of the program, both the Current Segment column and the column to the first speed and incline settings of the walking belt will regularly compare your heart rate is too far below or above the target heart rate setting, the speed of the program. Note: When you hold the handgrip pulse sensor, keep your heart rate. 6 Press the Start button or ...
however, you must hold the handgrip pulse sensor continuously during a pulse program; Each time you are not holding the handgrip pulse sensor, the letters "PLS" will appear in the display instead of tones will be shown in the first segment of the program, both the Current Segment column and the column to the first speed and incline settings of the walking belt will regularly compare your heart rate is too far below or above the target heart rate setting, the speed of the program. Note: When you hold the handgrip pulse sensor, keep your heart rate. 6 Press the Start button or ...

User Manual
Page 20
The information mode also allows you to adjust the settings of miles or kilometers that was selected. Follow the steps below to be used . The right display will show the last channel that the walking belt has moved. To select a different channel, press the Channel buttons. The selected channel number will appear on the screen for metric kilometers. Next, press the Channel buttons until the contrast, color, sharpness, or hue level indicator appears. When the television is turned on, the screen will show the total number of the television and to use earphones ...
The information mode also allows you to adjust the settings of miles or kilometers that was selected. Follow the steps below to be used . The right display will show the last channel that the walking belt has moved. To select a different channel, press the Channel buttons. The selected channel number will appear on the screen for metric kilometers. Next, press the Channel buttons until the contrast, color, sharpness, or hue level indicator appears. When the television is turned on, the screen will show the total number of the television and to use earphones ...