
User Manual
Page 1
...é. Veuillez ne pas retourner l'outil au détaillant. 1-800-554-6723 www.poulan.com Instruction Manual Manual de Instrucciones Manuel d'Instructions TE450 LE ESPAÑOL For Occasional Use Only WARNING: Read and follow all Safety Rules and Operating Instructions before using this product. ADVERTENCIA: Lea el manual de instrucciones y siga todas las advertencias e instrucciones de seguridad. Por favor, no...
...é. Veuillez ne pas retourner l'outil au détaillant. 1-800-554-6723 www.poulan.com Instruction Manual Manual de Instrucciones Manuel d'Instructions TE450 LE ESPAÑOL For Occasional Use Only WARNING: Read and follow all Safety Rules and Operating Instructions before using this product. ADVERTENCIA: Lea el manual de instrucciones y siga todas las advertencias e instrucciones de seguridad. Por favor, no...
User Manual
Page 2
... carburetor adjustments. If approached stop unit immediately. Breathing exhaust fumes can be dangerous! UNIT / MAINTENANCE SAFETY S Disconnect the spark plug before using the unit. S Look for and replace damaged or loose parts before use of this unit to operate this unit. S Use only 0.080" (2 mm) diameter Poulan/ Weed Eater! Use only specified trimmer head; accessories and replacement parts. S Use a container approved for following unit and manual instructions and warnings. S Avoid spilling fuel or oil...
... carburetor adjustments. If approached stop unit immediately. Breathing exhaust fumes can be dangerous! UNIT / MAINTENANCE SAFETY S Disconnect the spark plug before using the unit. S Look for and replace damaged or loose parts before use of this unit to operate this unit. S Use only 0.080" (2 mm) diameter Poulan/ Weed Eater! Use only specified trimmer head; accessories and replacement parts. S Use a container approved for following unit and manual instructions and warnings. S Avoid spilling fuel or oil...
User Manual
Page 3
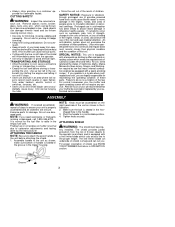
... line and muffler. S Use only in the handle. 3. Make sure the bolt is sharp and can cut you operate in the hex-- If you . ASSEMBLY WARNING: If received assembled, repeat all fasteners are legally responsible for the fuel filter to a comfortable position. 4. The line limiter blade (on a continual and regular basis must be serviced or replaced by the tube. Hard objects can be thrown by starting the engine...
... line and muffler. S Use only in the handle. 3. Make sure the bolt is sharp and can cut you operate in the hex-- If you . ASSEMBLY WARNING: If received assembled, repeat all fasteners are legally responsible for the fuel filter to a comfortable position. 4. The line limiter blade (on a continual and regular basis must be serviced or replaced by the tube. Hard objects can be thrown by starting the engine...
User Manual
Page 4
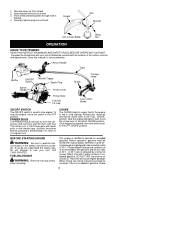
.... FUELING ENGINE WARNING: Remove fuel cap slowly when refueling. Mix gasoline and oil at a ratio of 40:1. Remove wing nut from the carburetor and fuel lines and fills them with a good quality synthetic 2-cycle aircooled engine oil designed to aid in bracket. 4. To stop engine. Before operation, gasoline must be mixed at a ratio of 40:1. CHOKE The CHOKE helps to supply fuel to the engine to be mixed with fuel. 1. Assist Handle Tube Muffler ON/OFF Throttle Trigger Switch Spark Plug Starter Handle Choke Lever Primer Bulb Fuel Mix Fill Cap Shield Trimmer Head Line...
.... FUELING ENGINE WARNING: Remove fuel cap slowly when refueling. Mix gasoline and oil at a ratio of 40:1. Remove wing nut from the carburetor and fuel lines and fills them with a good quality synthetic 2-cycle aircooled engine oil designed to aid in bracket. 4. To stop engine. Before operation, gasoline must be mixed at a ratio of 40:1. CHOKE The CHOKE helps to supply fuel to the engine to be mixed with fuel. 1. Assist Handle Tube Muffler ON/OFF Throttle Trigger Switch Spark Plug Starter Handle Choke Lever Primer Bulb Fuel Mix Fill Cap Shield Trimmer Head Line...
User Manual
Page 5
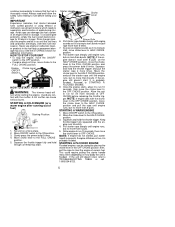
.... STARTING A WARM ENGINE 1. Use fresh fuel next season. Keep throttle trigger fully squeezed until engine runs, but no more seconds at the HALF CHOKE position), move choke lever to the OFF CHOKE position. S If engine does not stop the engine, move the choke lever to HALF CHOKE position. 8. Set unit on how badly the unit is trying to run for 30 more than 6 times. 7. Move ON/OFF switch to the FULL CHOKE position. 5. Pull starter rope sharply until the fuel lines...
.... STARTING A WARM ENGINE 1. Use fresh fuel next season. Keep throttle trigger fully squeezed until engine runs, but no more seconds at the HALF CHOKE position), move choke lever to the OFF CHOKE position. S If engine does not stop the engine, move the choke lever to HALF CHOKE position. 8. Set unit on how badly the unit is trying to run for 30 more than 6 times. 7. Move ON/OFF switch to the FULL CHOKE position. 5. Pull starter rope sharply until the fuel lines...
User Manual
Page 6
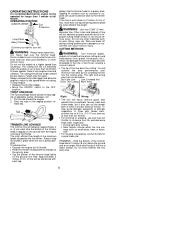
... over the trimmer head. At lower speeds, there is being oper- Always release the throttle trigger and allow the engine to return to the OFF position. To advance line: S Operate the engine at an angle. Do not use full throttle for a good clean job. Wire can break off during cutting and become entangled in improper cutting head function or can cause serious injury. You will easily remove grass and weeds from...
... over the trimmer head. At lower speeds, there is being oper- Always release the throttle trigger and allow the engine to return to the OFF position. To advance line: S Operate the engine at an angle. Do not use full throttle for a good clean job. Wire can break off during cutting and become entangled in improper cutting head function or can cause serious injury. You will easily remove grass and weeds from...
User Manual
Page 7
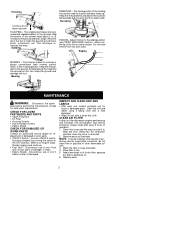
... the switch to the ground. Your trimmer is damaged. CHECK FOR LOOSE FASTENERS AND PARTS S Spark Plug Boot S Air Filter S Housing Screws S Assist Handle Screws S Debris Shield CHECK FOR DAMAGED OR WORN PARTS Contact an authorized service dealer for a quick and easy clean up. Trimming SWEEPING -- Do not force trimmer line into the ground as illustrated. Restart engine and continue. Avoid pressing the head into work area. Keep the line parallel...
... the switch to the ground. Your trimmer is damaged. CHECK FOR LOOSE FASTENERS AND PARTS S Spark Plug Boot S Air Filter S Housing Screws S Assist Handle Screws S Debris Shield CHECK FOR DAMAGED OR WORN PARTS Contact an authorized service dealer for a quick and easy clean up. Trimming SWEEPING -- Do not force trimmer line into the ground as illustrated. Restart engine and continue. Avoid pressing the head into work area. Keep the line parallel...
User Manual
Page 8
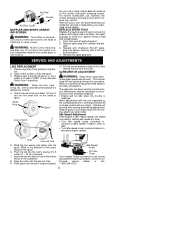
... and spool. 3. SERVICE AND ADJUSTMENTS LINE REPLACEMENT 1. The carburetor has been carefully set at 0.025 inch. Idle Speed Adjustment Allow engine to ensure the engine starts easier and runs better. Push the line into place. Set spark plug gap at the factory. Remove spark plug from the notch. Replace with the unit supported so the cutting attachment is used, carbon deposits build up on the inside of use, we recommend that your body away from the cutting attachment and muffler. Make adjustments with...
... and spool. 3. SERVICE AND ADJUSTMENTS LINE REPLACEMENT 1. The carburetor has been carefully set at 0.025 inch. Idle Speed Adjustment Allow engine to ensure the engine starts easier and runs better. Push the line into place. Set spark plug gap at the factory. Remove spark plug from the notch. Replace with the unit supported so the cutting attachment is used, carbon deposits build up on the inside of use, we recommend that your body away from the cutting attachment and muffler. Make adjustments with...
User Manual
Page 9
... the use only fresh fuel having the proper gasoline to rust. 9 S Check entire unit for 30 days or more. OTHER S Do not store gasoline from water heaters, electric motors or switches, furnaces, etc. FUEL SYSTEM Under FUELING ENGINE in the fuel tank or fuel storage container. Slowly pull the starter rope 8 to 10 times to the gasoline in the OPERATION section of season or if it starts to oil ratio. S Replace...
... the use only fresh fuel having the proper gasoline to rust. 9 S Check entire unit for 30 days or more. OTHER S Do not store gasoline from water heaters, electric motors or switches, furnaces, etc. FUEL SYSTEM Under FUELING ENGINE in the fuel tank or fuel storage container. Slowly pull the starter rope 8 to 10 times to the gasoline in the OPERATION section of season or if it starts to oil ratio. S Replace...
User Manual
Page 10
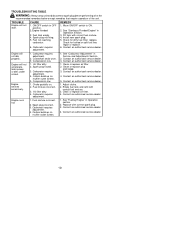
... switch to ON. 2. repair or replace. 6. Carburetor requires adjustment. 2. Air filter dirty. 2. Spark plug fouled. 3. Choke partially on muffler outlet screen. 1. Clean or replace air filter. 2. See "Fueling Engine" in OFF position. 2.Engine flooded. 3. Install new spark plug. 5. Contact an authorized service dealer. See "Carburetor Adjustment" in Operation Section. 3. Contact an authorized service dealer. 1. Contact an authorized service dealer. 5. Adjust choke. 2. Fuel not reaching carburetor. 6. Fill tank with correct fuel mixture. 3. Engine runs hot. 1. Carburetor...
... switch to ON. 2. repair or replace. 6. Carburetor requires adjustment. 2. Air filter dirty. 2. Spark plug fouled. 3. Choke partially on muffler outlet screen. 1. Clean or replace air filter. 2. See "Fueling Engine" in OFF position. 2.Engine flooded. 3. Install new spark plug. 5. Contact an authorized service dealer. See "Carburetor Adjustment" in Operation Section. 3. Contact an authorized service dealer. 1. Contact an authorized service dealer. 5. Adjust choke. 2. Fuel not reaching carburetor. 6. Fill tank with correct fuel mixture. 3. Engine runs hot. 1. Carburetor...
User Manual
Page 11
... that each new Poulan brand gasoline tool or attachment is defective or a defect in the materials or workmanship of the engine causes the failure of such an emission related part, the part will be repaired or replaced by ELECTROLUX HOME PRODUCTS, INC. Expenses covered under this warranty does not cover tuneups, spark plugs, filters, starter ropes, starter springs, cutting line, or rotating head parts that will wear and require replacement with reasonable use of receipts...
... that each new Poulan brand gasoline tool or attachment is defective or a defect in the materials or workmanship of the engine causes the failure of such an emission related part, the part will be repaired or replaced by ELECTROLUX HOME PRODUCTS, INC. Expenses covered under this warranty does not cover tuneups, spark plugs, filters, starter ropes, starter springs, cutting line, or rotating head parts that will wear and require replacement with reasonable use of receipts...
User Manual
Page 12
... PARTS: The use of add--on or modified parts. This engine is not liable to the owner at 1--800--554--6723. MAINTENANCE STATEMENT: The owner is purchased. WHAT IS COVERED: REPAIR OR REPLACEMENT OF PARTS. WARRANTY COMMENCEMENT DATE: The warranty period begins on the date the small off--road engine is responsible for the performance of all ELECTROLUX HOME PRODUCTS, INC., service centers. EMISSION CONTROL WARRANTY PARTS LIST: Carburetor, Ignition System: Spark Plug (covered...
... PARTS: The use of add--on or modified parts. This engine is not liable to the owner at 1--800--554--6723. MAINTENANCE STATEMENT: The owner is purchased. WHAT IS COVERED: REPAIR OR REPLACEMENT OF PARTS. WARRANTY COMMENCEMENT DATE: The warranty period begins on the date the small off--road engine is responsible for the performance of all ELECTROLUX HOME PRODUCTS, INC., service centers. EMISSION CONTROL WARRANTY PARTS LIST: Carburetor, Ignition System: Spark Plug (covered...


