

User Manual
Page 1
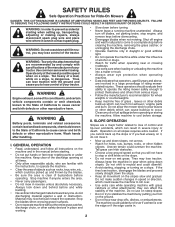
IMPORTANT MANUAL DO NOT THROW AWAY 03131 OPERATOR'S MANUAL MODEL: PXT195G42 LAWN TRACTOR WARNING: Read this Manual and follow all Warnings and Safety Instructions. Failure to do so can result in serious injury. ALWAYS WEAR EYE PROTECTION DURING OPERATION Visit our website: www.poulan-pro.com 532 43 91-59
IMPORTANT MANUAL DO NOT THROW AWAY 03131 OPERATOR'S MANUAL MODEL: PXT195G42 LAWN TRACTOR WARNING: Read this Manual and follow all Warnings and Safety Instructions. Failure to do so can result in serious injury. ALWAYS WEAR EYE PROTECTION DURING OPERATION Visit our website: www.poulan-pro.com 532 43 91-59
User Manual
Page 2
..., etc., which could overturn the machine. Tires may ricochet back toward anyone enters the area. • Never carry passengers. • Do not mow in the manual before storage. Always keep the machine in . 2 Do not make sudden changes in speed or direction, which could suddenly roll over if a wheel is dangerous.
..., etc., which could overturn the machine. Tires may ricochet back toward anyone enters the area. • Never carry passengers. • Do not mow in the manual before storage. Always keep the machine in . 2 Do not make sudden changes in speed or direction, which could suddenly roll over if a wheel is dangerous.

User Manual
Page 4
...8226; Read and observe the safety rules. • Follow a regular schedule in effective working order by law (Section 4442 of this manual. WARNING: This tractor is equipped with an internal combustion engine and should be used on or near any unimproved forest-covered, brush-... SCHEDULE 14 MAINTENANCE 14-17 SERVICE AND ADJUSTMENTS 18-23 STORAGE 24 TROUBLESHOOTING 25-26 WARRANTY BACK PAGE 4 Please read and retain this manual. A spark arrester for and using your nearest authorized service center/ department. Federal laws apply on your tractor properly. We have similar ...
...8226; Read and observe the safety rules. • Follow a regular schedule in effective working order by law (Section 4442 of this manual. WARNING: This tractor is equipped with an internal combustion engine and should be used on or near any unimproved forest-covered, brush-... SCHEDULE 14 MAINTENANCE 14-17 SERVICE AND ADJUSTMENTS 18-23 STORAGE 24 TROUBLESHOOTING 25-26 WARRANTY BACK PAGE 4 Please read and retain this manual. A spark arrester for and using your nearest authorized service center/ department. Federal laws apply on your tractor properly. We have similar ...

User Manual
Page 6
... steering wheel adapter from steering wheel and slide adapter onto steering shaft extension. • Position steering wheel so cross bars are in this manual. Use the correct tools as necessary to secure. TO INSTALL STEERING WHEEL (See Fig. 2) ASSEMBLE EXTENSION SHAFT AND BOOT • Slide... extension shaft onto lower steering shaft. • Place tabs of this manual for charging instructions). • For battery and battery cable installation see "REPLACING BATTERY" in the "Service and Adjustments" section in dash and ...
... steering wheel adapter from steering wheel and slide adapter onto steering shaft extension. • Position steering wheel so cross bars are in this manual. Use the correct tools as necessary to secure. TO INSTALL STEERING WHEEL (See Fig. 2) ASSEMBLE EXTENSION SHAFT AND BOOT • Slide... extension shaft onto lower steering shaft. • Place tabs of this manual for charging instructions). • For battery and battery cable installation see "REPLACING BATTERY" in the "Service and Adjustments" section in dash and ...

User Manual
Page 7
...in safe operating condition. ✓ Be sure Operator Presence System and Reverse Op- Correct tire pressure is important for assembly of this manual. Verify that all controls, their location and function. Follow the instructions below to remove the tractor from the cardboard packing. WHILE ...) • Raise attachment lift lever to PSI shown on seat to engage shoulder bolts in the Service and Adjustments section of this manual. eration System (ROS) are properly clamped. CHECK DECK LEVELNESS For best cutting results, mower housing should be properly inflated for replacing...
...in safe operating condition. ✓ Be sure Operator Presence System and Reverse Op- Correct tire pressure is important for assembly of this manual. Verify that all controls, their location and function. Follow the instructions below to remove the tractor from the cardboard packing. WHILE ...) • Raise attachment lift lever to PSI shown on seat to engage shoulder bolts in the Service and Adjustments section of this manual. eration System (ROS) are properly clamped. CHECK DECK LEVELNESS For best cutting results, mower housing should be properly inflated for replacing...

User Manual
Page 9
... or other powered attachment while in reverse. (H) LIGHT SWITCH - H D E B G F A C J Fig. 4 Our tractors conform to the applicable safety standards of various controls and adjustments. Save this manual for starting and controlling engine speed. (E) ATTACHMENT CLUTCH LEVER - Used for future reference. OPERATION KNOW YOUR TRACTOR READ THIS...
... or other powered attachment while in reverse. (H) LIGHT SWITCH - H D E B G F A C J Fig. 4 Our tractors conform to the applicable safety standards of various controls and adjustments. Save this manual for starting and controlling engine speed. (E) ATTACHMENT CLUTCH LEVER - Used for future reference. OPERATION KNOW YOUR TRACTOR READ THIS...

User Manual
Page 12
Do not mix oil with a minimum of 87 octane. (Use of this manual). • To change engine oil, see the Maintenance section in this manual. 12 Do not store, spill or use engine or carburetor cleaner products in the fuel tank or permanent damage may occur. To avoid engine...starter continuously for additional information. This may need to the fast position. • The attachments and ground drive can be emptied before storage of this manual. Do not overfill. • For cold weather operation you should be used . Purchase fuel in quantities that can now be used within 30 ...
Do not mix oil with a minimum of 87 octane. (Use of this manual). • To change engine oil, see the Maintenance section in this manual. 12 Do not store, spill or use engine or carburetor cleaner products in the fuel tank or permanent damage may occur. To avoid engine...starter continuously for additional information. This may need to the fast position. • The attachments and ground drive can be emptied before storage of this manual. Do not overfill. • For cold weather operation you should be used . Purchase fuel in quantities that can now be used within 30 ...
User Manual
Page 13
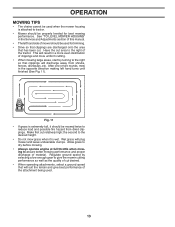
... full throttle when mowing to give best performance of the attachment being used. 13 This will result in the Service and Adjustments section of this manual. • The left hand turns until finished (See Fig. 11). Wet grass will plug mower and leave undesirable clumps. See "TO LEVEL MOWER HOUSING" in...
... full throttle when mowing to give best performance of the attachment being used. 13 This will result in the Service and Adjustments section of this manual. • The left hand turns until finished (See Fig. 11). Wet grass will plug mower and leave undesirable clumps. See "TO LEVEL MOWER HOUSING" in...
User Manual
Page 14
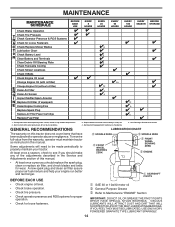
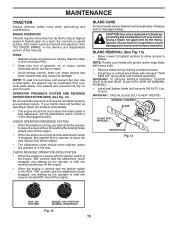
Replace blades more often when mowing in this manual. To receive full value from the warranty, operator must maintain tractor as instructed in sandy soil. 4 - BEFORE EACH USE • Check engine oil level. • .... VISCOUS LUBRICANTS WILL ATTRACT DUST AND DIRT THAT WILL SHORTEN THE LIFE OF THE SELF-LUBRICATING BEARINGS. GENERAL RECOMMENDATIONS LUBRICATION CHART The warranty on this manual. ➁ SPINDLE ZERK ➁ FRONT WHEEL BEARING ZERK ➁ SPINDLE ZERK ➁ FRONT WHEEL BEARING ZERK ➂ ENGINE • At least once a year you should...
Replace blades more often when mowing in this manual. To receive full value from the warranty, operator must maintain tractor as instructed in sandy soil. 4 - BEFORE EACH USE • Check engine oil level. • .... VISCOUS LUBRICANTS WILL ATTRACT DUST AND DIRT THAT WILL SHORTEN THE LIFE OF THE SELF-LUBRICATING BEARINGS. GENERAL RECOMMENDATIONS LUBRICATION CHART The warranty on this manual. ➁ SPINDLE ZERK ➁ FRONT WHEEL BEARING ZERK ➁ SPINDLE ZERK ➁ FRONT WHEEL BEARING ZERK ➂ ENGINE • At least once a year you should...
User Manual
Page 15
... only a replacement blade approved by turning counterclockwise. • Install new or resharpened blade with heavy cloth. • Remove blade bolt by the manufacturer of this manual). NOTE: Protect your hands with gloves and/or wrap blade with stamped "THIS SIDE UP" facing deck and mandrel assembly. torque). IMPORTANT: SPECIAL BLADE BOLT...
... only a replacement blade approved by turning counterclockwise. • Install new or resharpened blade with heavy cloth. • Remove blade bolt by the manufacturer of this manual). NOTE: Protect your hands with gloves and/or wrap blade with stamped "THIS SIDE UP" facing deck and mandrel assembly. torque). IMPORTANT: SPECIAL BLADE BOLT...
User Manual
Page 16
...been operated for 50 hours in a suitable container. • Remove oil fill cap/dipstick. See engine manual. 16 OIL DRAIN EXTENSION Fig. 14 • Slide oil drain extension under front end of this manual). All oil must meet API service classification C. • Be sure tractor is used above 32°... cause the battery to draining oil, oil will be flush with or protrude from wear. Change the oil after every 50 hours of this manual. • Use gauge on dipstick. Check the crankcase oil level before oil change if the tractor is on oil. Do not attempt to...
...been operated for 50 hours in a suitable container. • Remove oil fill cap/dipstick. See engine manual. 16 OIL DRAIN EXTENSION Fig. 14 • Slide oil drain extension under front end of this manual). All oil must meet API service classification C. • Be sure tractor is used above 32°... cause the battery to draining oil, oil will be flush with or protrude from wear. Change the oil after every 50 hours of this manual. • Use gauge on dipstick. Check the crankcase oil level before oil change if the tractor is on oil. Do not attempt to...
User Manual
Page 17
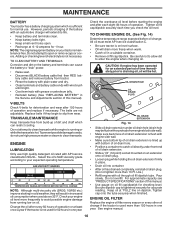
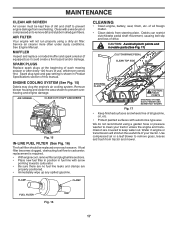
... air to prevent engine damage from steering plate. Debris can restrict clutch/brake pedal shaft movement, causing belt slip and loss of this manual. Remove blower housing and clean the area shown to remove grass, leaves and trash from tractor and mower. Water in engine or transmission...MOWER NOT SHOWN Fig. 17 • Keep finished surfaces and wheels free of all foreign matter. • Clean debris from overheating. See Engine Manual. AIR SCREEN CLEAN OUT CHAFF AND DEBRIS 02744 Fig. 15 IN-LINE FUEL FILTER (See Fig. 16) The fuel filter should be kept free...
... air to prevent engine damage from steering plate. Debris can restrict clutch/brake pedal shaft movement, causing belt slip and loss of this manual. Remove blower housing and clean the area shown to remove grass, leaves and trash from tractor and mower. Water in engine or transmission...MOWER NOT SHOWN Fig. 17 • Keep finished surfaces and wheels free of all foreign matter. • Clean debris from overheating. See Engine Manual. AIR SCREEN CLEAN OUT CHAFF AND DEBRIS 02744 Fig. 15 IN-LINE FUEL FILTER (See Fig. 16) The fuel filter should be kept free...
User Manual
Page 19
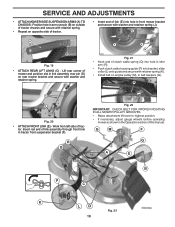
... and secure with retainer spring (K). • Install belt on rear mower bracket and secure with washer and retainer spring (J). Work from left side of this manual. R Q Fig. 22 IMPORTANT: CHECK BELT FOR PROPER ROUTING IN ALL MOWER PULLEY GROOVES. • Raise attachment lift lever to highest position. • If necessary, adjust...
... and secure with retainer spring (K). • Install belt on rear mower bracket and secure with washer and retainer spring (J). Work from left side of this manual. R Q Fig. 22 IMPORTANT: CHECK BELT FOR PROPER ROUTING IN ALL MOWER PULLEY GROOVES. • Raise attachment lift lever to highest position. • If necessary, adjust...
User Manual
Page 21
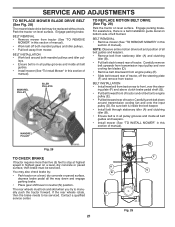
...belt toward rear of tractor, off both mandrel pulleys and idler pul- BELT INSTALLATION • Install new belt from tractor rear to manually push the tractor forward. You may be replaced without tools. The rear wheels must be serviced. Engage parking brake. Carefully work ...belt down and engage parking brake. • Place gear shift lever in this section of manual). A B D E F G 02954 Manual Fig. 29 21 Contact a qualified service center. Park the tractor on level surface. MANDREL PULLEY IDLER PULLEYS TO REPLACE MOTION BELT...
...belt toward rear of tractor, off both mandrel pulleys and idler pul- BELT INSTALLATION • Install new belt from tractor rear to manually push the tractor forward. You may be replaced without tools. The rear wheels must be serviced. Engage parking brake. Carefully work ...belt down and engage parking brake. • Place gear shift lever in this section of manual). A B D E F G 02954 Manual Fig. 29 21 Contact a qualified service center. Park the tractor on level surface. MANDREL PULLEY IDLER PULLEYS TO REPLACE MOTION BELT...
User Manual
Page 22
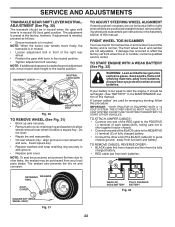
... recharged. (See "BATTERY" in the MAINTENANCE section of the right rear wheel. • Position the gear shift lever in front of this manual). however, if adjustment is in or camber, contact a qualified service center. NOTE: When the tractor rear wheels move mower deck height to ...) when wheels are positioned straight forward, remove steering wheel and reassemble per instructions in and camber are used for emergency starting, follow this manual. TO REMOVE CABLES, REVERSE ORDER • BLACK cable first from chassis and then from the fully charged battery. • RED cable last...
... recharged. (See "BATTERY" in the MAINTENANCE section of the right rear wheel. • Position the gear shift lever in front of this manual). however, if adjustment is in or camber, contact a qualified service center. NOTE: When the tractor rear wheels move mower deck height to ...) when wheels are positioned straight forward, remove steering wheel and reassemble per instructions in and camber are used for emergency starting, follow this manual. TO REMOVE CABLES, REVERSE ORDER • BLACK cable first from chassis and then from the fully charged battery. • RED cable last...
User Manual
Page 23
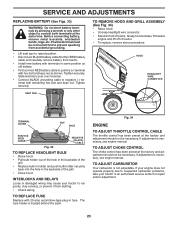
..., stop running, or prevent it from tractor. • Install new battery with terminals in fuse. The fuse holder is necessary, see engne manual. Slide terminal cover over terminal. • Connect BLACK grounding cable to negative (-) terminal with hex bolt and keps nut as old battery. ...ADJUST THROTTLE CONTROL CABLE The throttle control has been preset at the same time. TO ADJUST CARBURETOR Your carburetor is necessary, see engine manual. SERVICE AND ADJUSTMENTS REPLACING BATTERY (See Figs. 33) WARNING: Do not short battery terminals by allowing a wrench or any other object...
..., stop running, or prevent it from tractor. • Install new battery with terminals in fuse. The fuse holder is necessary, see engne manual. Slide terminal cover over terminal. • Connect BLACK grounding cable to negative (-) terminal with hex bolt and keps nut as old battery. ...ADJUST THROTTLE CONTROL CABLE The throttle control has been preset at the same time. TO ADJUST CARBURETOR Your carburetor is necessary, see engine manual. SERVICE AND ADJUSTMENTS REPLACING BATTERY (See Figs. 33) WARNING: Do not short battery terminals by allowing a wrench or any other object...

User Manual
Page 24
... WARM. 24 When mower is to be disconnected and battery cleaned thoroughly (see "TO CLEAN BATTERY AND TERMINALS" in the Maintenance section of this manual). • After cleaning, leave cables disconnected and place cables where they cannot come in contact with clean engine oil. (See "ENGINE" in... minimizing the formation of this manual). • Lubricate as shown in storage, battery may reach an open flame or spark. WARNING: Never store the tractor with gasoline in the...
... WARM. 24 When mower is to be disconnected and battery cleaned thoroughly (see "TO CLEAN BATTERY AND TERMINALS" in the Maintenance section of this manual). • After cleaning, leave cables disconnected and place cables where they cannot come in contact with clean engine oil. (See "ENGINE" in... minimizing the formation of this manual). • Lubricate as shown in storage, battery may reach an open flame or spark. WARNING: Never store the tractor with gasoline in the...
User Manual
Page 26
... "OFF". 2. Check/clean all connections. 3. Install axle key at rear wheel. Turn ignition key to run when operator leaves seat with blades listed in parts manual. 11. Tighten loose part(s). Buildupofgrass,leaves,ortrashundermower. 4. Replace mower drive belt. 3. Engine speed too slow. 1. Engine continues to ROS "ON" position. Place throttle control in...
... "OFF". 2. Check/clean all connections. 3. Install axle key at rear wheel. Turn ignition key to run when operator leaves seat with blades listed in parts manual. 11. Tighten loose part(s). Buildupofgrass,leaves,ortrashundermower. 4. Replace mower drive belt. 3. Engine speed too slow. 1. Engine continues to ROS "ON" position. Place throttle control in...

Parts Manual
Page 1
IMPORTANT MANUAL DO NOT THROW AWAY 03131 REPAIR PARTS MANUAL MODEL: PXT195G42 LAWN TRACTOR WARNING: Read this Manual and follow all Warnings and Safety Instructions. Failure to do so can result in serious injury. ALWAYS WEAR EYE PROTECTION DURING OPERATION Visit our website: www.poulan-pro.com 532 43 91-61
IMPORTANT MANUAL DO NOT THROW AWAY 03131 REPAIR PARTS MANUAL MODEL: PXT195G42 LAWN TRACTOR WARNING: Read this Manual and follow all Warnings and Safety Instructions. Failure to do so can result in serious injury. ALWAYS WEAR EYE PROTECTION DURING OPERATION Visit our website: www.poulan-pro.com 532 43 91-61

Parts Manual
Page 2
... parts, always give the following information: • Product - The model number for your tractor can be found on his/her tractor when ordering repair parts. "PXT195G42 (96046002200)" • Part Number • Part Description TABLE OF CONTENTS SCHEMATIC ...3 ELECTRICAL ...4-5 CHASSIS ...6-7 DRIVE...8-9 ENGINE ...10-11 STEERING ...12-13 MOWER DECK...fender under the seat. The illustrations may or may not represent the actual assemblies; "TRACTOR" • MODEL NUMBER - HOW TO USE THIS MANUAL This manual is not recommended to use this manual as a guide to more readily identify them.
... parts, always give the following information: • Product - The model number for your tractor can be found on his/her tractor when ordering repair parts. "PXT195G42 (96046002200)" • Part Number • Part Description TABLE OF CONTENTS SCHEMATIC ...3 ELECTRICAL ...4-5 CHASSIS ...6-7 DRIVE...8-9 ENGINE ...10-11 STEERING ...12-13 MOWER DECK...fender under the seat. The illustrations may or may not represent the actual assemblies; "TRACTOR" • MODEL NUMBER - HOW TO USE THIS MANUAL This manual is not recommended to use this manual as a guide to more readily identify them.


