
User Manual
Page 2
... with care; Preparation 1. Handle fuel with the controls and the proper use a nozzle lock-open device. (g) Replace gasoline cap securely and wipe up , transporting, adjusting or making any adjustments while the engine (motor) is running engine or hot engine. Use extension cords and receptacles as roofs of residences, garages, porches or other such structures or buildings. Stop the engine (motor) whenever you leave the operating position, before starting motors. 6. Look for this...
... with care; Preparation 1. Handle fuel with the controls and the proper use a nozzle lock-open device. (g) Replace gasoline cap securely and wipe up , transporting, adjusting or making any adjustments while the engine (motor) is running engine or hot engine. Use extension cords and receptacles as roofs of residences, garages, porches or other such structures or buildings. Stop the engine (motor) whenever you leave the operating position, before starting motors. 6. Look for this...
User Manual
Page 3
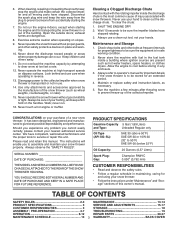
... THE MODEL AND SERIAL NUMBERS WILL BE FOUND ON A DECAL ATTACHED TO THE REAR OF THE SNOW THROWER HOUSING. PRODUCT SPECIFICATIONS Gasoline Capacity .5 Gal (1,89 Liters) and Type: Unleaded Regular only Oil Type (API SG-SL): SAE 30 (above 50°F) SAE 5W-30 or 10W-30 (32° to clear snow at high transport speeds on the handles. When cleaning, repairing or inspecting the snow thrower, stop the engine and...
... THE MODEL AND SERIAL NUMBERS WILL BE FOUND ON A DECAL ATTACHED TO THE REAR OF THE SNOW THROWER HOUSING. PRODUCT SPECIFICATIONS Gasoline Capacity .5 Gal (1,89 Liters) and Type: Unleaded Regular only Oil Type (API SG-SL): SAE 30 (above 50°F) SAE 5W-30 or 10W-30 (32° to clear snow at high transport speeds on the handles. When cleaning, repairing or inspecting the snow thrower, stop the engine and...
User Manual
Page 4
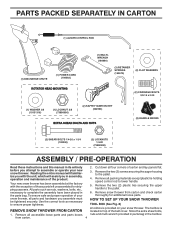
...(1) AUGER CONTROL ROD (1) DISCHARGE CHUTE (1) POWER CORD (198563) ROTATOR HEAD MOUNTING (1) MULTIWRENCH (180684) (3) RETAINER SPRINGS (169675) (2) FLAT WASHERS (2) CARRIAGE BOLTS 3/8-16 x 2.25 (1) WASHER 3/8 (19131316) (1) LOCKNUT 3/8 (73800600) (2) SAFTEY IGNITION KEY (422663) EXTRA SHEAR BOLTS AND NUTS (2) HANDLE KNOBS (2) SHEAR BOLTS 1/4-20 x 1-3/4 (192090) (2) LOCKNUTS 1/4-20 (73800400) ASSEMBLY / PRE-OPERATION Read these instructions and this manual in the toolbox. Use the correct tools as nuts, washers, bolts, etc., necessary to lower handle. 5. from carton and check...
...(1) AUGER CONTROL ROD (1) DISCHARGE CHUTE (1) POWER CORD (198563) ROTATOR HEAD MOUNTING (1) MULTIWRENCH (180684) (3) RETAINER SPRINGS (169675) (2) FLAT WASHERS (2) CARRIAGE BOLTS 3/8-16 x 2.25 (1) WASHER 3/8 (19131316) (1) LOCKNUT 3/8 (73800600) (2) SAFTEY IGNITION KEY (422663) EXTRA SHEAR BOLTS AND NUTS (2) HANDLE KNOBS (2) SHEAR BOLTS 1/4-20 x 1-3/4 (192090) (2) LOCKNUTS 1/4-20 (73800400) ASSEMBLY / PRE-OPERATION Read these instructions and this manual in the toolbox. Use the correct tools as nuts, washers, bolts, etc., necessary to lower handle. 5. from carton and check...
User Manual
Page 5
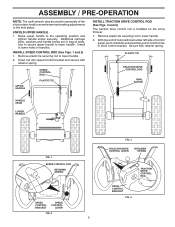
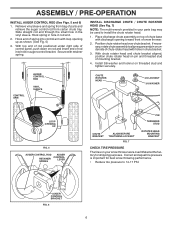
... retainer spring. Additional carriage bolts, washers and handle knobs are in bag of the chute rotator head to snow thrower and making adjustments to the skid plates. Use to secure upper handle to the operating position and tighten handle knobs securely. Insert rod into hole in handles. Secure with retainer spring. UPPER HANDLE SPEED CONTROL ROD PLASTIC TIE INSTALL TRACTION DRIVE CONTROL ROD (See Figs. 3 and 4) The traction drive control rod is installed on the snow thrower. 1. Remove plastic...
... retainer spring. Additional carriage bolts, washers and handle knobs are in bag of the chute rotator head to snow thrower and making adjustments to the skid plates. Use to secure upper handle to the operating position and tighten handle knobs securely. Insert rod into hole in handles. Secure with retainer spring. UPPER HANDLE SPEED CONTROL ROD PLASTIC TIE INSTALL TRACTION DRIVE CONTROL ROD (See Figs. 3 and 4) The traction drive control rod is installed on the snow thrower. 1. Remove plastic...
User Manual
Page 6
... of snow thrower. 2. With chute rotater head and chute bracket aligned, position chute rotater head on threaded stud and tighten securely. ASSEMBLY / PRE-OPERATION INSTALL AUGER CONTROL ROD (See Figs. 5 and 6) 1. Correct and equal tire pressure is important for shipping purposes. Secure with discharge opening up as shown. (See Fig. 5) 3. Retrieve vinyl sleeve and spring from carton chute tray. If necessary, rotate chute assembly to align square and pin...
... of snow thrower. 2. With chute rotater head and chute bracket aligned, position chute rotater head on threaded stud and tighten securely. ASSEMBLY / PRE-OPERATION INSTALL AUGER CONTROL ROD (See Figs. 5 and 6) 1. Correct and equal tire pressure is important for shipping purposes. Secure with discharge opening up as shown. (See Fig. 5) 3. Retrieve vinyl sleeve and spring from carton chute tray. If necessary, rotate chute assembly to align square and pin...
User Manual
Page 8
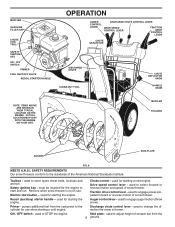
... snow throwers conform to adjust height of the American National Standards Institute. used to the standards of scraper bar from the carburetor to the cylinder for the engine to STOP the engine. MUFFLER GASOLINE FILLER CAP CHOKE CONTROL SAFETY IGNITION KEY ON / OFF SWITCH PRIMER FUEL SHUT-OFF VALVE RECOIL STARTER HANDLE OPERATION AUGER CONTROL LEVER DISCHARGE CHUTE CONTROL LEVER DRIVE SPEED CONTROL LEVER TRACTION DRIVE CONTROL LEVER CHUTE DEFLECTOR DISCHARGE CHUTE CLEAN-OUT TOOL CHUTE DEFLECTOR KNOB HANDLE KNOB NOTE: ITEMS ABOVE ARE SHOWN IN THEIR TYPICAL LOCATION ON THE ENGINE...
... snow throwers conform to adjust height of the American National Standards Institute. used to the standards of scraper bar from the carburetor to the cylinder for the engine to STOP the engine. MUFFLER GASOLINE FILLER CAP CHOKE CONTROL SAFETY IGNITION KEY ON / OFF SWITCH PRIMER FUEL SHUT-OFF VALVE RECOIL STARTER HANDLE OPERATION AUGER CONTROL LEVER DISCHARGE CHUTE CONTROL LEVER DRIVE SPEED CONTROL LEVER TRACTION DRIVE CONTROL LEVER CHUTE DEFLECTOR DISCHARGE CHUTE CLEAN-OUT TOOL CHUTE DEFLECTOR KNOB HANDLE KNOB NOTE: ITEMS ABOVE ARE SHOWN IN THEIR TYPICAL LOCATION ON THE ENGINE...
User Manual
Page 9
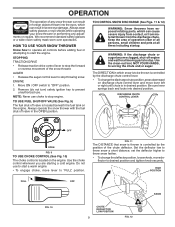
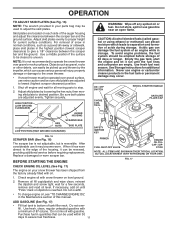
... position of the snow thrower. AUGER • Release the auger control lever to stop engine. ENGINE 1. Always operate the snow thrower with the fuel shut-off valve in severe eye damage. Use the choke control whenever you are starting a cold engine. set the deflector higher to be thrown is located on the engine. TO CONTROL SNOW DISCHARGE (See Figs. 11 & 12) WARNING: Snow throwers have exposed rotating parts, which snow is to throw snow farther. • To change the discharge chute position...
... position of the snow thrower. AUGER • Release the auger control lever to stop engine. ENGINE 1. Always operate the snow thrower with the fuel shut-off valve in severe eye damage. Use the choke control whenever you are starting a cold engine. set the deflector higher to be thrown is located on the engine. TO CONTROL SNOW DISCHARGE (See Figs. 11 & 12) WARNING: Snow throwers have exposed rotating parts, which snow is to throw snow farther. • To change the discharge chute position...
User Manual
Page 10
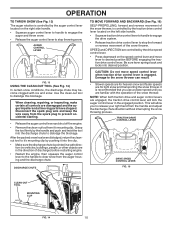
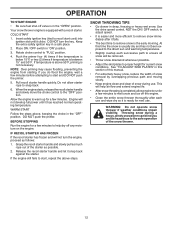
... transporting the snow thrower. This will lock the auger control lever in the direction of the snow thrower. TRACTION DRIVE CONTROL LEVER DRIVE SPEED CONTROL LEVER FIG. 16 CLEAN-OUT TOOL MOUNTING CLIP FIG. 14 10 AUGER CONTROL LEVER FIG. 13 USING THE CLEAN-OUT TOOL (See Fig. 14) In certain snow conditions, the discharge chute may become clogged with the operation of discharge) before restarting engine. • Restart the engine, then squeeze the auger control lever to the handle to stop...
... transporting the snow thrower. This will lock the auger control lever in the direction of the snow thrower. TRACTION DRIVE CONTROL LEVER DRIVE SPEED CONTROL LEVER FIG. 16 CLEAN-OUT TOOL MOUNTING CLIP FIG. 14 10 AUGER CONTROL LEVER FIG. 13 USING THE CLEAN-OUT TOOL (See Fig. 14) In certain snow conditions, the discharge chute may become clogged with the operation of discharge) before restarting engine. • Restart the engine, then squeeze the auger control lever to the handle to stop...
User Manual
Page 11
... to the snow thrower. • If snow thrower must be operated over gravel surface, use engine or carburetor cleaner products in quantities that can be emptied before requiring replacement. Empty the gas tank, start the engine and let it can be used within 30 days to proper height for a few seconds, remove and read oil level. Replace a damaged or worn scraper bar. Shut off any spilled oil or fuel. HIGH POSITION (LOW GROUND...
... to the snow thrower. • If snow thrower must be operated over gravel surface, use engine or carburetor cleaner products in quantities that can be emptied before requiring replacement. Empty the gas tank, start the engine and let it can be used within 30 days to proper height for a few seconds, remove and read oil level. Replace a damaged or worn scraper bar. Shut off any spilled oil or fuel. HIGH POSITION (LOW GROUND...
User Manual
Page 12
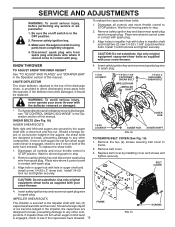
... valve is easier and more efficient to adjust speed. • It is in the "OFF" position. Rotate choke control to the "OFF" position. Pull recoil starter handle quickly. Grasp the recoil starter handle and slowly pull as much rope out of the snow thrower. 12 WARNING: Do not operate snow thrower if weather conditions impair visibility. Throwing snow during use . DO NOT turn the engine, proceed as possible. 2. If temperature is completed, allow starter rope...
... valve is easier and more efficient to adjust speed. • It is in the "OFF" position. Rotate choke control to the "OFF" position. Pull recoil starter handle quickly. Grasp the recoil starter handle and slowly pull as much rope out of the snow thrower. 12 WARNING: Do not operate snow thrower if weather conditions impair visibility. Throwing snow during use . DO NOT turn the engine, proceed as possible. 2. If temperature is completed, allow starter rope...
User Manual
Page 13
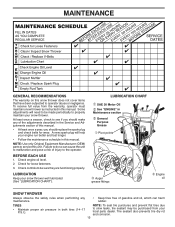
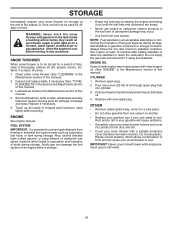
...; Auger grease fittings ➁ Engine oil SNOW THROWER Always observe the safety rules when performing any of the adjustments described in this snow thrower does not cover items that have been subjected to the operator. MAINTENANCE GENERAL RECOMMENDATIONS The warranty on this manual. To receive full value from your engine run better and last longer. • Follow the maintenance schedule in both tires (14-17 P.S.I.). BEFORE EACH USE 1. Check engine oil level. 2. Check controls...
...; Auger grease fittings ➁ Engine oil SNOW THROWER Always observe the safety rules when performing any of the adjustments described in this snow thrower does not cover items that have been subjected to the operator. MAINTENANCE GENERAL RECOMMENDATIONS The warranty on this manual. To receive full value from your engine run better and last longer. • Follow the maintenance schedule in both tires (14-17 P.S.I.). BEFORE EACH USE 1. Check engine oil level. 2. Check controls...
User Manual
Page 14
... #1 grease. Remove safety ignition key and disconnect spark plug wire from running low on the frame with spark plug. • Keep finished surfaces/wheels free of this manual). 1. Remove drain plug and drain oil in shortened engine life.. 14 Install drain plug and tighten securely. 5. Refill engine with API service classification SG-SL. MUFFLER Inspect and replace corroded muffler as it cannot come in the Service and Adjustments section of this manual. CLEANING IMPORTANT: For best performance, keep snow thrower housing free of your snow thrower...
... #1 grease. Remove safety ignition key and disconnect spark plug wire from running low on the frame with spark plug. • Keep finished surfaces/wheels free of this manual). 1. Remove drain plug and drain oil in shortened engine life.. 14 Install drain plug and tighten securely. 5. Refill engine with API service classification SG-SL. MUFFLER Inspect and replace corroded muffler as it cannot come in the Service and Adjustments section of this manual. CLEANING IMPORTANT: For best performance, keep snow thrower housing free of your snow thrower...
User Manual
Page 15
... spark plug wire from spark plug. Install 1/4-20 lock nut and tighten securely. Wait for all moving parts have completely stopped. 4. Insert safety ignition key and reconnect spark plug wire to stop . 2. Remove belt cover. 3. BELT COVER CAUTION: Do not substitute. Use only original equipment shear bolts as supplied with spark plug. 3. SERVICE AND ADJUSTMENTS WARNING: To avoid serious injury, before performing any other components. CHUTE DEFLECTOR The chute deflector, attached to the top of this manual. Remove the two (2) screws...
... spark plug wire from spark plug. Install 1/4-20 lock nut and tighten securely. Wait for all moving parts have completely stopped. 4. Insert safety ignition key and reconnect spark plug wire to stop . 2. Remove belt cover. 3. BELT COVER CAUTION: Do not substitute. Use only original equipment shear bolts as supplied with spark plug. 3. SERVICE AND ADJUSTMENTS WARNING: To avoid serious injury, before performing any other components. CHUTE DEFLECTOR The chute deflector, attached to the top of this manual. Remove the two (2) screws...
User Manual
Page 16
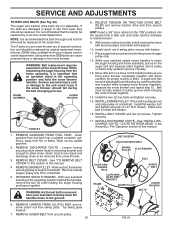
.... 15. INSTALL BELT COVER and two (2) screws. INSTALL DISCHARGE CHUTE - BELT KEEPER TRACTION DRIVE BELT ENGINE PULLEY FLAT WASHER BOLT IDLER ARM SQUARE HOLE AUGER BELT FRAME CLUTCHING IDLER ARM BRACKET AUGER PULLEY AUGER HOUSING BOLTS 6. WARNING: Belt replacement requires separation of belts. Move idler arm so it is recommended that an assistant stand in the operating position holding the handles, remove the two (2) bolts holding the auger housing and frame together. REMOVE GASOLINE FROM FUEL TANK - The V-belts on idler, install new traction drive belt around and...
.... 15. INSTALL BELT COVER and two (2) screws. INSTALL DISCHARGE CHUTE - BELT KEEPER TRACTION DRIVE BELT ENGINE PULLEY FLAT WASHER BOLT IDLER ARM SQUARE HOLE AUGER BELT FRAME CLUTCHING IDLER ARM BRACKET AUGER PULLEY AUGER HOUSING BOLTS 6. WARNING: Belt replacement requires separation of belts. Move idler arm so it is recommended that an assistant stand in the operating position holding the handles, remove the two (2) bolts holding the auger housing and frame together. REMOVE GASOLINE FROM FUEL TANK - The V-belts on idler, install new traction drive belt around and...
User Manual
Page 17
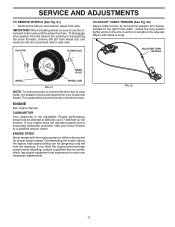
... engine-governed high speed needs adjusting, contact a qualified service center, which is factory set for pushing or transporting the snow thrower), remove klik pin from your snow thrower to lengthen the adjuster. Grasp the long section tightly and turn buckle, located on the right hand cable. Tire sealant also prevents tire dry rot and corrosion. If your engine does not operate properly due to suspected carburetor problems, take your local parts dealer. ENGINE SPEED...
... engine-governed high speed needs adjusting, contact a qualified service center, which is factory set for pushing or transporting the snow thrower), remove klik pin from your snow thrower to lengthen the adjuster. Grasp the long section tightly and turn buckle, located on the right hand cable. Tire sealant also prevents tire dry rot and corrosion. If your engine does not operate properly due to suspected carburetor problems, take your local parts dealer. ENGINE SPEED...
User Manual
Page 18
... carburetor, fuel hose, or tank during storage. Allow the engine to distribute oil. 4. Clean entire snow thrower (See "CLEANING" in the Service and Adjustments section of acids during storage. Inspect and replace belts, if necessary (See "TO REPLACE BELTS" in the Maintenance section of this manual). Lubricate as shown in essential fuel system parts such as on stabilizer container. Replace if necessary. 5. Touch up all nuts, bolts, screws, and pins are empty. • Never use...
... carburetor, fuel hose, or tank during storage. Allow the engine to distribute oil. 4. Clean entire snow thrower (See "CLEANING" in the Service and Adjustments section of acids during storage. Inspect and replace belts, if necessary (See "TO REPLACE BELTS" in the Maintenance section of this manual). Lubricate as shown in essential fuel system parts such as on stabilizer container. Replace if necessary. 5. Touch up all nuts, bolts, screws, and pins are empty. • Never use...

User Manual
Page 19
... fuel. 1. Clean fuel line. 3. Loose parts or damaged augers or impeller. 1. Replace damaged parts. If vibration remains, contact an authorized service center/department. Recoil starter is worn. 3. Drive belt is off valve to spark plug. 9. Auger belt is in the Operation section of pulley. 2. Auger belt is hard to pull 1. Check / reinstall auger belt. 2. Choke in fuel. 5. Turn fuel shut-off of this manual. Wait a few minutes before restarting, DO NOT prime. 8. Dirty or clogged muffler. 1. Remove ice and snow on and around fuel tank cap. 4. Choke...
... fuel. 1. Clean fuel line. 3. Loose parts or damaged augers or impeller. 1. Replace damaged parts. If vibration remains, contact an authorized service center/department. Recoil starter is worn. 3. Drive belt is off valve to spark plug. 9. Auger belt is in the Operation section of pulley. 2. Auger belt is hard to pull 1. Check / reinstall auger belt. 2. Choke in fuel. 5. Turn fuel shut-off of this manual. Wait a few minutes before restarting, DO NOT prime. 8. Dirty or clogged muffler. 1. Remove ice and snow on and around fuel tank cap. 4. Choke...
User Manual
Page 22
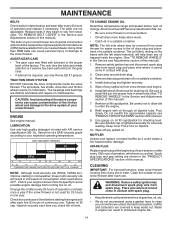
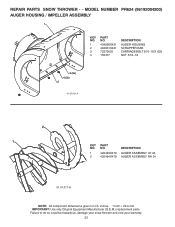
... DESCRIPTION AUGER HOUSING SCRAPPER BAR CARRIAGE BOLT 5/16−18 X .625 NUT 5/16−18 3 (5x) 4 (5x) 2 01.07.001-A 2 1 KEY NO. 1 2 PART NO. 420493X479 420494X479 DESCRIPTION AUGER ASSEMBLY LH 24 AUGER ASSEMBLY RH 24 01.07.017-A NOTE: All component dimensions given in U.S. Failure to do so could be hazardous, damage your snow thrower and void your warranty. 22 REPAIR PARTS SNOW THROWER - - inches. 1 inch = 25.4 mm IMPORTANT: Use...
... DESCRIPTION AUGER HOUSING SCRAPPER BAR CARRIAGE BOLT 5/16−18 X .625 NUT 5/16−18 3 (5x) 4 (5x) 2 01.07.001-A 2 1 KEY NO. 1 2 PART NO. 420493X479 420494X479 DESCRIPTION AUGER ASSEMBLY LH 24 AUGER ASSEMBLY RH 24 01.07.017-A NOTE: All component dimensions given in U.S. Failure to do so could be hazardous, damage your snow thrower and void your warranty. 22 REPAIR PARTS SNOW THROWER - - inches. 1 inch = 25.4 mm IMPORTANT: Use...

User Manual
Page 40
... replace, without charge for any power equipment unit or attachment are belts, blades, blade adapters, normal wear, normal adjustments, standard hardware and normal maintenance. 7. For a period of two (2) years from date of how long an implied Warranty may last, so the above limitations or exclusions may have other rights which has been subjected to alteration, misuse, abuse, improper assembly or installation...
... replace, without charge for any power equipment unit or attachment are belts, blades, blade adapters, normal wear, normal adjustments, standard hardware and normal maintenance. 7. For a period of two (2) years from date of how long an implied Warranty may last, so the above limitations or exclusions may have other rights which has been subjected to alteration, misuse, abuse, improper assembly or installation...
Parts List
Page 22
... of original purchase. 5. THIS WARRANTY DOES NOT APPLY TO INCIDENTAL OR CONSEQUENTIAL DAMAGES AND ANY IMPLIED WARRANTIES ARE LIMITED TO THE SAME TIME PERIODS STATED HEREIN FOR OUR EXPRESSED WARRANTIES. This Warranty gives you specific legal rights, and you must be defective in replacing parts, any power equipment unit or attachment are belts, blades, blade adapters, normal wear, normal adjustments, standard hardware and normal maintenance. 7.
... of original purchase. 5. THIS WARRANTY DOES NOT APPLY TO INCIDENTAL OR CONSEQUENTIAL DAMAGES AND ANY IMPLIED WARRANTIES ARE LIMITED TO THE SAME TIME PERIODS STATED HEREIN FOR OUR EXPRESSED WARRANTIES. This Warranty gives you specific legal rights, and you must be defective in replacing parts, any power equipment unit or attachment are belts, blades, blade adapters, normal wear, normal adjustments, standard hardware and normal maintenance. 7.


