Owners Manual
Page 2
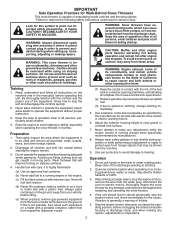
... in the manual(s) before filling. (e) When practical, remove gas-powered equipment from a gasoline dispenser nozzle. (f) Keep the nozzle in moving parts. Be thoroughly familiar with a portable container, rather than from the truck or trailer and refuel it is spilled on a truck or trailer ... cords and receptacles as roofs of amputating hands and feet and throwing objects. Do not put hands or feet near or under rotating parts. Failure to stop the engine (motor), remove the wire from your vehicle, before operating this symbol to prevent accidental starting motors. ...
... in the manual(s) before filling. (e) When practical, remove gas-powered equipment from a gasoline dispenser nozzle. (f) Keep the nozzle in moving parts. Be thoroughly familiar with a portable container, rather than from the truck or trailer and refuel it is spilled on a truck or trailer ... cords and receptacles as roofs of amputating hands and feet and throwing objects. Do not put hands or feet near or under rotating parts. Failure to stop the engine (motor), remove the wire from your vehicle, before operating this symbol to prevent accidental starting motors. ...
Owners Manual
Page 3
...3 ASSEMBLY / PRE-OPERATION 5-6 OPERATION 7-12 MAINTENANCE SCHEDULE 13 MAINTENANCE 13-14 SERVICE AND ADJUSTMENTS 15-17 STORAGE 18 TROUBLESHOOTING 19 REPAIR PARTS 20-41 ENGINE BREAKDOWN 42-43 3 Do not run . Exercise extreme caution when operating on the handles. Look behind and use your...manual. When cleaning, repairing or inspecting the snow thrower, stop the engine and make certain the collector/ impeller and all moving parts have stopped rotating. 3. Always observe the "SAFETY RULES". Use only attachments and accessories approved by attempting to give best possible ...
...3 ASSEMBLY / PRE-OPERATION 5-6 OPERATION 7-12 MAINTENANCE SCHEDULE 13 MAINTENANCE 13-14 SERVICE AND ADJUSTMENTS 15-17 STORAGE 18 TROUBLESHOOTING 19 REPAIR PARTS 20-41 ENGINE BREAKDOWN 42-43 3 Do not run . Exercise extreme caution when operating on the handles. Look behind and use your...manual. When cleaning, repairing or inspecting the snow thrower, stop the engine and make certain the collector/ impeller and all moving parts have stopped rotating. 3. Always observe the "SAFETY RULES". Use only attachments and accessories approved by attempting to give best possible ...

Owners Manual
Page 4
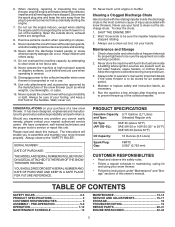
PARTS PACKED SEPARATELY IN CARTON (2) SHEAR BOLTS 1/4-20 x 1-3/4 (2) LOCKNUTS 1/4-20 (3) KNOB (2) CARRIAGE BOLTS 5/16-18 x 2 1/4" (2) HANDLE KNOBS (1) LOCKNUT 3/8 SAFTEY IGNITION KEY (S) (1) LOCKNUT (1) CARRIAGE BOLT (1) SPRING 5/16-18 5/16-18 x 5/8 (1) LOCKNUT 1/4-20 (1) NYLON WASHER (1) SHOULDER BOLT 1/4-20 4
PARTS PACKED SEPARATELY IN CARTON (2) SHEAR BOLTS 1/4-20 x 1-3/4 (2) LOCKNUTS 1/4-20 (3) KNOB (2) CARRIAGE BOLTS 5/16-18 x 2 1/4" (2) HANDLE KNOBS (1) LOCKNUT 3/8 SAFTEY IGNITION KEY (S) (1) LOCKNUT (1) CARRIAGE BOLT (1) SPRING 5/16-18 5/16-18 x 5/8 (1) LOCKNUT 1/4-20 (1) NYLON WASHER (1) SHOULDER BOLT 1/4-20 4
Owners Manual
Page 5
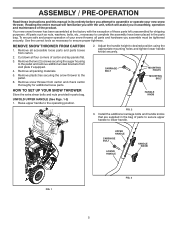
...handle height to the pallet. 6. HANDLE KNOB FIG. 2 3. Reading the entire manual will familiarize you with the exception of those parts left unassembled for additional loose parts. 2. UPPER HANDLE CARRIAGE BOLT LOWER HANDLE HANDLE KNOB FIG. 1 FIG. 3 5 To ensure safe and proper operation of your ...MOUNTING HOLES MOUNTING BOLT HOW TO SET UP YOUR SNOW THROWER Store the extra shear bolts and nuts provided in the bag of parts to secure upper handle to the pallet and remove additional steel brackets from carton and check carton thoroughly for shipping purposes. Remove...
...handle height to the pallet. 6. HANDLE KNOB FIG. 2 3. Reading the entire manual will familiarize you with the exception of those parts left unassembled for additional loose parts. 2. UPPER HANDLE CARRIAGE BOLT LOWER HANDLE HANDLE KNOB FIG. 1 FIG. 3 5 To ensure safe and proper operation of your ...MOUNTING HOLES MOUNTING BOLT HOW TO SET UP YOUR SNOW THROWER Store the extra shear bolts and nuts provided in the bag of parts to secure upper handle to the pallet and remove additional steel brackets from carton and check carton thoroughly for shipping purposes. Remove...

Owners Manual
Page 9
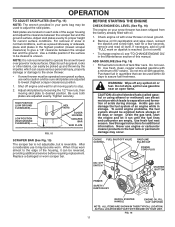
... lever to "OFF" position. 2. Do not use choke to stop engine. HOW TO USE YOUR SNOW THROWER Know how to operate all moving parts to stop . Move ON / OFF switch to stop throwing snow. Keep the area of operation clear of the snow thrower. set the deflector ... ignition key to raise the deflector and increase the distance. TO CONTROL SNOW DISCHARGE (See Fig. 11) WARNING: Snow throwers have exposed rotating parts, which can cause severe injury from contact, or from material thrown from the discharge chute. Move lever back to prevent unauthorized use. We recommend...
... lever to "OFF" position. 2. Do not use choke to stop engine. HOW TO USE YOUR SNOW THROWER Know how to operate all moving parts to stop . Move ON / OFF switch to stop throwing snow. Keep the area of operation clear of the snow thrower. set the deflector ... ignition key to raise the deflector and increase the distance. TO CONTROL SNOW DISCHARGE (See Fig. 11) WARNING: Snow throwers have exposed rotating parts, which can cause severe injury from contact, or from material thrown from the discharge chute. Move lever back to prevent unauthorized use. We recommend...

Owners Manual
Page 10
... when traction drive control lever is pointed in the engaged position. Damage to dislodge the blockage. When cleaning, repairing, or inspecting, make certain all moving parts have stopped. Be sure lever springs back and locks into the discharge chute to the snow thrower can result. • Slower speeds are for heavier...
... when traction drive control lever is pointed in the engaged position. Damage to dislodge the blockage. When cleaning, repairing, or inspecting, make certain all moving parts have stopped. Be sure lever springs back and locks into the discharge chute to the snow thrower can result. • Slower speeds are for heavier...
Owners Manual
Page 11
..., can be used within 30 days to assure fuel freshness. Shut off any spilled oil or fuel. Be sure both plates are located on your parts bag may be reversed, providing additional service before storage of tank filler neck. After considerable use extra caution and be operated over gravel or rocky... on level ground. 2. ADD GASOLINE (See Fig. 16) • Fill fuel tank to be picked up and thrown by loosening the 1/2" hex nuts, then moving parts to desired position.
..., can be used within 30 days to assure fuel freshness. Shut off any spilled oil or fuel. Be sure both plates are located on your parts bag may be reversed, providing additional service before storage of tank filler neck. After considerable use extra caution and be operated over gravel or rocky... on level ground. 2. ADD GASOLINE (See Fig. 16) • Fill fuel tank to be picked up and thrown by loosening the 1/2" hex nuts, then moving parts to desired position.
Owners Manual
Page 13
... loose fasteners. 3. Check engine oil level. 2. All adjustments in this manual should be sure they are functioning properly. NOTE: Use only Original Equipment Manufacturer (OEM) parts to service this snow thrower does not cover items that have been subjected to properly maintain your snow thrower. MAINTENANCE GENERAL RECOMMENDATIONS The warranty on...
... loose fasteners. 3. Check engine oil level. 2. All adjustments in this manual should be sure they are functioning properly. NOTE: Use only Original Equipment Manufacturer (OEM) parts to service this snow thrower does not cover items that have been subjected to properly maintain your snow thrower. MAINTENANCE GENERAL RECOMMENDATIONS The warranty on...
Owners Manual
Page 14
... to install wheel pin and retainer pin into proper hole in wheel axle (See "TO REMOVE WHEELS" in contact with lubricant to clean your local parts dealer. Refill engine with API service classification SG-SL. WARNING: Remove safety ignition key and disconnect spark plug wire from spark plug. Place wire where...
... to install wheel pin and retainer pin into proper hole in wheel axle (See "TO REMOVE WHEELS" in contact with lubricant to clean your local parts dealer. Refill engine with API service classification SG-SL. WARNING: Remove safety ignition key and disconnect spark plug wire from spark plug. Place wire where...
Owners Manual
Page 15
... two (2) new 2" shear bolts. WARNING: To avoid serious injury, never operate your snow thrower with a shear bolt and hex nut. Disengage all moving parts to the impeller shaft with spark plug. 3. Remove safety ignition key and disconnect spark plug wire from spark plug. Disengage all moving... parts to the auger shaft with the deflector removed or damaged. • To change direction and/or distance snow is secured to stop . 2. Wait ...
... two (2) new 2" shear bolts. WARNING: To avoid serious injury, never operate your snow thrower with a shear bolt and hex nut. Disengage all moving parts to the impeller shaft with spark plug. 3. Remove safety ignition key and disconnect spark plug wire from spark plug. Disengage all moving... parts to the auger shaft with the deflector removed or damaged. • To change direction and/or distance snow is secured to stop . 2. Wait ...
Owners Manual
Page 17
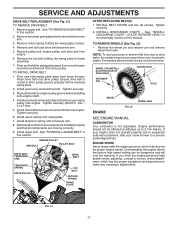
.... See "INSTALL DISCHARGE CHUTE / CHUTE ROTATER HEAD" in this manual. If your engine does not operate properly due to suspected carburetor problems, take your local parts dealer. SERVICE AND ADJUSTMENTS DRIVE BELT REPLACEMENT (See Fig. 21) TO REMOVE DRIVE BELT 1. Remove the top bolt holding the swing plate in this section...
.... See "INSTALL DISCHARGE CHUTE / CHUTE ROTATER HEAD" in this manual. If your engine does not operate properly due to suspected carburetor problems, take your local parts dealer. SERVICE AND ADJUSTMENTS DRIVE BELT REPLACEMENT (See Fig. 21) TO REMOVE DRIVE BELT 1. Remove the top bolt holding the swing plate in this section...

Owners Manual
Page 18
... in the Service and Adjustments section of this manual). 2. Inspect and replace belts, if necessary (See "TO REPLACE BELTS" in essential fuel system parts such as on stabilizer container. Be sure that does not retain moisture. Acidic gas can if your snow thrower to be used for damage, breakage.... 4. Clean entire snow thrower (See "CLEANING" in the tank inside a building where fumes may occur. • Use fresh fuel next season. Inspect moving parts for 30 days or more. Touch up all nuts, bolts, screws, and pins are empty. • Never use plastic. Run engine at the end of...
... in the Service and Adjustments section of this manual). 2. Inspect and replace belts, if necessary (See "TO REPLACE BELTS" in essential fuel system parts such as on stabilizer container. Be sure that does not retain moisture. Acidic gas can if your snow thrower to be used for damage, breakage.... 4. Clean entire snow thrower (See "CLEANING" in the tank inside a building where fumes may occur. • Use fresh fuel next season. Inspect moving parts for 30 days or more. Touch up all nuts, bolts, screws, and pins are empty. • Never use plastic. Run engine at the end of...
Owners Manual
Page 19
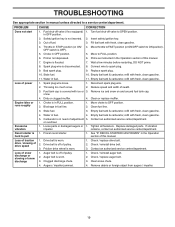
...fuel tank & carburetor, refill with fresh, clean gasoline. 4. Carburetor is in need of snow discharge 1. Excessive vibration 1. Loose parts or damaged augers or 1. remains, contact an authorized service center/department. hard to spark plug. 9. Loss of snow discharge or...width of pulley. 2. Fuel tank cap is flooded. 7. Clean or replace muffler. Contact an authorized service center/department. Replace damaged parts. Frozen recoil starter. Check / replace auger belt. 3. Augers / impeller jammed. 4. Insert safety ignition key. 3. Choke is ...
...fuel tank & carburetor, refill with fresh, clean gasoline. 4. Carburetor is in need of snow discharge 1. Excessive vibration 1. Loose parts or damaged augers or 1. remains, contact an authorized service center/department. hard to spark plug. 9. Loss of snow discharge or...width of pulley. 2. Fuel tank cap is flooded. 7. Clean or replace muffler. Contact an authorized service center/department. Replace damaged parts. Frozen recoil starter. Check / replace auger belt. 3. Augers / impeller jammed. 4. Insert safety ignition key. 3. Choke is ...
Owners Manual
Page 20
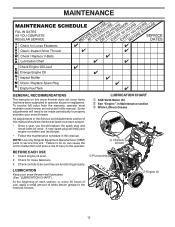
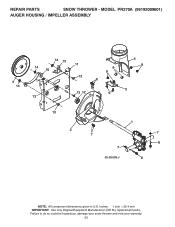
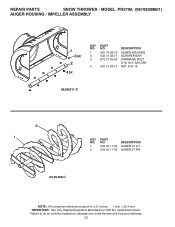
MODEL PR270A (96192009601) AUGER HOUSING / IMPELLER ASSEMBLY 3 14 14 15 14 10 14 11 13 13 12 13 9 8 6 9 4 8 5 13 2 1 7 7 6 7 05.09.009-J 6 NOTE: All component dimensions given in U.S. inches. 1 inch = 25.4 mm IMPORTANT: Use only Original Equipment Manufacturer (O.E.M.) replacement parts. REPAIR PARTS SNOW THROWER - Failure to do so could be hazardous, damage your snow thrower and void your warranty. 20
MODEL PR270A (96192009601) AUGER HOUSING / IMPELLER ASSEMBLY 3 14 14 15 14 10 14 11 13 13 12 13 9 8 6 9 4 8 5 13 2 1 7 7 6 7 05.09.009-J 6 NOTE: All component dimensions given in U.S. inches. 1 inch = 25.4 mm IMPORTANT: Use only Original Equipment Manufacturer (O.E.M.) replacement parts. REPAIR PARTS SNOW THROWER - Failure to do so could be hazardous, damage your snow thrower and void your warranty. 20
Owners Manual
Page 21
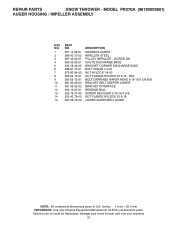
... 5/16-18 X 5/8 NUT FLANGE NYLOCK 5/16-18 LOWER AUGER BELT GUIDE NOTE: All component dimensions given in U.S. MODEL PR270A (96192009601) AUGER HOUSING / IMPELLER ASSEMBLY KEY NO. 1 2 3 4 5 6 7 8 9 10 11 12 13 14 15 PART NO. 501 14 96-01 586 60 72-02 587 40 24-01 585 05 69-01 532 18...42 79-42 587 58 72-02 DESCRIPTION GEARBOX AUGER IMPELLER STEEL PULLEY IMPELLER - inches. 1 inch = 25.4 mm IMPORTANT: Use only Original Equipment Manufacturer (O.E.M.) replacement parts. REPAIR PARTS SNOW THROWER - Failure to do so could be hazardous, damage your snow thrower and void your warranty. 21
... 5/16-18 X 5/8 NUT FLANGE NYLOCK 5/16-18 LOWER AUGER BELT GUIDE NOTE: All component dimensions given in U.S. MODEL PR270A (96192009601) AUGER HOUSING / IMPELLER ASSEMBLY KEY NO. 1 2 3 4 5 6 7 8 9 10 11 12 13 14 15 PART NO. 501 14 96-01 586 60 72-02 587 40 24-01 585 05 69-01 532 18...42 79-42 587 58 72-02 DESCRIPTION GEARBOX AUGER IMPELLER STEEL PULLEY IMPELLER - inches. 1 inch = 25.4 mm IMPORTANT: Use only Original Equipment Manufacturer (O.E.M.) replacement parts. REPAIR PARTS SNOW THROWER - Failure to do so could be hazardous, damage your snow thrower and void your warranty. 21
Owners Manual
Page 22
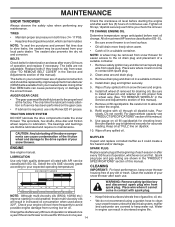
inches. 1 inch = 25.4 mm IMPORTANT: Use only Original Equipment Manufacturer (O.E.M.) replacement parts. MODEL PR270A (96192009601) AUGER HOUSING / IMPELLER ASSEMBLY 1 3 5X 2 4 5X KEY NO. 1 2 3 4 PART NO. 581 70 83-73 532 41 53-71 872 27 05-05 532 15 53-77 DESCRIPTION AUGER HOUSING SCRAPER BAR CARRIAGE BOLT ...5/16-18 X .625 GR5 NUT 5/16-18 05.09.011-C 2 1 KEY NO. 1 2 PART NO. 532 42 ...
inches. 1 inch = 25.4 mm IMPORTANT: Use only Original Equipment Manufacturer (O.E.M.) replacement parts. MODEL PR270A (96192009601) AUGER HOUSING / IMPELLER ASSEMBLY 1 3 5X 2 4 5X KEY NO. 1 2 3 4 PART NO. 581 70 83-73 532 41 53-71 872 27 05-05 532 15 53-77 DESCRIPTION AUGER HOUSING SCRAPER BAR CARRIAGE BOLT ...5/16-18 X .625 GR5 NUT 5/16-18 05.09.011-C 2 1 KEY NO. 1 2 PART NO. 532 42 ...

Owners Manual
Page 23
inches. 1 inch = 25.4 mm IMPORTANT: Use only Original Equipment Manufacturer (O.E.M.) replacement parts. NO. DESCRIPTION 3 1 532 42 04-78 AUGER BEARING 2 532 41 19-39 BEARING PLUG 3 584 29 94-01 SCREW HI-LO WASHD 5/16-14 X 1.00 ... in U.S. Failure to do so could be hazardous, damage your snow thrower and void your warranty. 23 REPAIR PARTS SNOW THROWER - MODEL PR270A (96192009601) AUGER HOUSING / IMPELLER ASSEMBLY 1 05.09.039-A 2 3 KEY NO. 1 2 3 PART NO. 532 19 21-99 532 40 54-00 532 19 41-89 DESCRIPTION TOOL CLEANOUT CLIP CLEANOUT TOOL...
inches. 1 inch = 25.4 mm IMPORTANT: Use only Original Equipment Manufacturer (O.E.M.) replacement parts. NO. DESCRIPTION 3 1 532 42 04-78 AUGER BEARING 2 532 41 19-39 BEARING PLUG 3 584 29 94-01 SCREW HI-LO WASHD 5/16-14 X 1.00 ... in U.S. Failure to do so could be hazardous, damage your snow thrower and void your warranty. 23 REPAIR PARTS SNOW THROWER - MODEL PR270A (96192009601) AUGER HOUSING / IMPELLER ASSEMBLY 1 05.09.039-A 2 3 KEY NO. 1 2 3 PART NO. 532 19 21-99 532 40 54-00 532 19 41-89 DESCRIPTION TOOL CLEANOUT CLIP CLEANOUT TOOL...

Owners Manual
Page 24
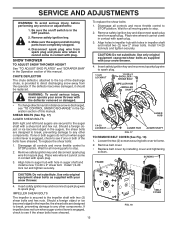
BLK 2 1 05.12.002-A NOTE: All component dimensions given in U.S. inches. 1 inch = 25.4 mm IMPORTANT: Use only Original Equipment Manufacturer (O.E.M.) replacement parts. Failure to do so could be hazardous, damage your snow thrower and void your warranty. 24 REPAIR PARTS SNOW THROWER - NO. BLK 1 3 585 80 29-01 BOLT CARRIAGE 5/16-18 X 1.25 - DESCRIPTION 1 532 43 59-51 PLATE SKID PLASTIC HDPE 2 585 80 28-01 NUT LARGE FLANGE 3 5/16-18 - MODEL PR270A (96192009601) AUGER HOUSING / IMPELLER ASSEMBLY 2 KEY PART NO.
BLK 2 1 05.12.002-A NOTE: All component dimensions given in U.S. inches. 1 inch = 25.4 mm IMPORTANT: Use only Original Equipment Manufacturer (O.E.M.) replacement parts. Failure to do so could be hazardous, damage your snow thrower and void your warranty. 24 REPAIR PARTS SNOW THROWER - NO. BLK 1 3 585 80 29-01 BOLT CARRIAGE 5/16-18 X 1.25 - DESCRIPTION 1 532 43 59-51 PLATE SKID PLASTIC HDPE 2 585 80 28-01 NUT LARGE FLANGE 3 5/16-18 - MODEL PR270A (96192009601) AUGER HOUSING / IMPELLER ASSEMBLY 2 KEY PART NO.

Owners Manual
Page 25
... be hazardous, damage your snow thrower and void your warranty. 25 REPAIR PARTS SNOW THROWER - inches. 1 inch = 25.4 mm IMPORTANT: Use only Original Equipment Manufacturer (O.E.M.) replacement parts. MODEL PR270A (96192009601) CONTROL PANEL / DISCHARGE CHUTE 1 5 5 05.08.010-A 2 5 4 7 43 4 6 KEY NO. 1 2 3 4 5 6 7 PART NO. 587 80 34-01 581 32 94-01 877 10 08-12...
... be hazardous, damage your snow thrower and void your warranty. 25 REPAIR PARTS SNOW THROWER - inches. 1 inch = 25.4 mm IMPORTANT: Use only Original Equipment Manufacturer (O.E.M.) replacement parts. MODEL PR270A (96192009601) CONTROL PANEL / DISCHARGE CHUTE 1 5 5 05.08.010-A 2 5 4 7 43 4 6 KEY NO. 1 2 3 4 5 6 7 PART NO. 587 80 34-01 581 32 94-01 877 10 08-12...

Owners Manual
Page 26
inches. 1 inch = 25.4 mm IMPORTANT: Use only Original Equipment Manufacturer (O.E.M.) replacement parts. REPAIR PARTS SNOW THROWER - MODEL PR270A (96192009601) CONTROL PANEL / DISCHARGE CHUTE 6 8 1 37 4 2 4 5 05.08.011-B KEY NO. 1 2 3 4 5 6 7 8 PART NO. 588 11 37-02 588 11 38-01 588 12 23-01 532 19 79-91 532 42 81-24 581 32 94-01...
inches. 1 inch = 25.4 mm IMPORTANT: Use only Original Equipment Manufacturer (O.E.M.) replacement parts. REPAIR PARTS SNOW THROWER - MODEL PR270A (96192009601) CONTROL PANEL / DISCHARGE CHUTE 6 8 1 37 4 2 4 5 05.08.011-B KEY NO. 1 2 3 4 5 6 7 8 PART NO. 588 11 37-02 588 11 38-01 588 12 23-01 532 19 79-91 532 42 81-24 581 32 94-01...


