Owners Manual
Page 2
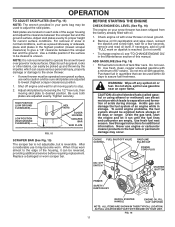
.... Use ear protectors to avoid damage to clear gravel or crushed rock surface. 7. Stop the engine (motor) whenever you leave the operating position, before starting the engine (motor). 3. Training 1. WARNING: Snow throwers have exposed rotating parts, which can get caught in order to make any adjustments while the engine (motor) is generally a warning of California to stop the engine (motor), remove the wire from the spark plug, disconnect the cord on...
.... Use ear protectors to avoid damage to clear gravel or crushed rock surface. 7. Stop the engine (motor) whenever you leave the operating position, before starting the engine (motor). 3. Training 1. WARNING: Snow throwers have exposed rotating parts, which can get caught in order to make any adjustments while the engine (motor) is generally a warning of California to stop the engine (motor), remove the wire from the spark plug, disconnect the cord on...
Owners Manual
Page 3
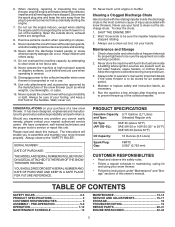
... engine or muffler. To clear the chute: 1. Maintain or replace safety and instruction labels, as wheel weights, counterweights, or cabs). 15. TABLE OF CONTENTS SAFETY RULES 2-3 PRODUCT SPECIFICATIONS 3 CUSTOMER RESPONSIBILITIES 3 ASSEMBLY / PRE-OPERATION 5-6 OPERATION 7-12 MAINTENANCE SCHEDULE 13 MAINTENANCE 13-14 SERVICE AND ADJUSTMENTS 15-17 STORAGE 18 TROUBLESHOOTING 19 REPAIR PARTS 20-41 ENGINE BREAKDOWN 42-43 3 Exercise extreme caution when operating on the handles. Never store the machine with snow throwers...
... engine or muffler. To clear the chute: 1. Maintain or replace safety and instruction labels, as wheel weights, counterweights, or cabs). 15. TABLE OF CONTENTS SAFETY RULES 2-3 PRODUCT SPECIFICATIONS 3 CUSTOMER RESPONSIBILITIES 3 ASSEMBLY / PRE-OPERATION 5-6 OPERATION 7-12 MAINTENANCE SCHEDULE 13 MAINTENANCE 13-14 SERVICE AND ADJUSTMENTS 15-17 STORAGE 18 TROUBLESHOOTING 19 REPAIR PARTS 20-41 ENGINE BREAKDOWN 42-43 3 Exercise extreme caution when operating on the handles. Never store the machine with snow throwers...
Owners Manual
Page 5
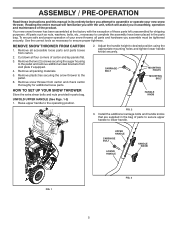
... MOUNTING BOLT HOW TO SET UP YOUR SNOW THROWER Store the extra shear bolts and nuts provided in assembly, operation and maintenance of your new snow thrower. UPPER HANDLE CARRIAGE BOLT LOWER HANDLE HANDLE KNOB FIG. 1 FIG. 3 5 Remove the two (2) screws securing the auger housing to desired position using the appropriate mounting holes and tighten lower handle knobs securely. Adjust the handle height to the pallet and remove additional steel brackets from skid plate if equipped. 4. HANDLE KNOB FIG. 2 3. All parts such...
... MOUNTING BOLT HOW TO SET UP YOUR SNOW THROWER Store the extra shear bolts and nuts provided in assembly, operation and maintenance of your new snow thrower. UPPER HANDLE CARRIAGE BOLT LOWER HANDLE HANDLE KNOB FIG. 1 FIG. 3 5 Remove the two (2) screws securing the auger housing to desired position using the appropriate mounting holes and tighten lower handle knobs securely. Adjust the handle height to the pallet and remove additional steel brackets from skid plate if equipped. 4. HANDLE KNOB FIG. 2 3. All parts such...

Owners Manual
Page 6
... head on top of snow thrower. 2. CHUTE ROTATOR HEAD LOCKNUT PIN THREADED STUD CHUTE BRACKET ROTATOR HEAD ALIGN BEFORE MOUNTING TIGHTENING LOCKNUT BRACKET FIG. 4 5. Tighten securely. 2. Install remote cable eyelet to chute deflector with discharge opening toward front of chute base with 1/4-20 shoulder bolt, nylon washer and 1/4-20 locknut as shown. Position chute rotator head over chute bracket. Tighten nut securely. KNOB KNOB DOUBLE CLIP ROTATOR CABLES FIG. 5 CONTROL LEVER FIG. 7 CHECK TIRE PRESSURE...
... head on top of snow thrower. 2. CHUTE ROTATOR HEAD LOCKNUT PIN THREADED STUD CHUTE BRACKET ROTATOR HEAD ALIGN BEFORE MOUNTING TIGHTENING LOCKNUT BRACKET FIG. 4 5. Tighten securely. 2. Install remote cable eyelet to chute deflector with discharge opening toward front of chute base with 1/4-20 shoulder bolt, nylon washer and 1/4-20 locknut as shown. Position chute rotator head over chute bracket. Tighten nut securely. KNOB KNOB DOUBLE CLIP ROTATOR CABLES FIG. 5 CONTROL LEVER FIG. 7 CHECK TIRE PRESSURE...

Owners Manual
Page 7
... PEOPLE IGNITION KEY. Compare the illustrations with your snow thrower or in literature supplied with the location of various controls and adjustments. DANGER OR WARNING EAR PROTECTION RECOMMENDED READ AND FOLLOW ALL SAFETY INFORMATION AND INSTRUCTIONS BEFORE USE OF THIS PRODUCT. PULL OUT TO STOP DANGER DO NOT PLACE HANDS NEAR BLADES DANGER, KEEP FEET AWAY REMOVE SPARK PLUG WIRE BEFORE PERFORMING MAINTENANCE DANGER READ OPERATORS MANUAL...
... PEOPLE IGNITION KEY. Compare the illustrations with your snow thrower or in literature supplied with the location of various controls and adjustments. DANGER OR WARNING EAR PROTECTION RECOMMENDED READ AND FOLLOW ALL SAFETY INFORMATION AND INSTRUCTIONS BEFORE USE OF THIS PRODUCT. PULL OUT TO STOP DANGER DO NOT PLACE HANDS NEAR BLADES DANGER, KEEP FEET AWAY REMOVE SPARK PLUG WIRE BEFORE PERFORMING MAINTENANCE DANGER READ OPERATORS MANUAL...

Owners Manual
Page 8
... FILLER CAP CHOKE CONTROL ON / OFF SWITCH OPERATION POWER CORD PLUG ELECTRIC START BUTTON AUGER CONTROL LEVER DISCHARGE CHUTE CONTROL LEVER DRIVE SPEED CONTROL LEVER DEFLECTOR REMOTE CONTROL LEVER PRIMER SAFETY IGNITION KEY FUEL SHUT-OFF VALVE RECOIL STARTER HANDLE CLEAN-OUT TOOL CHUTE DEFLECTOR DISCHARGE CHUTE NOTE: ITEMS ABOVE ARE SHOWN IN THEIR TYPICAL LOCATION ON THE ENGINE. used for starting engine. used to the cylinder for the engine to the standards of scraper bar from the carburetor to change the distance the snow is not in use when starting a cold engine.
... FILLER CAP CHOKE CONTROL ON / OFF SWITCH OPERATION POWER CORD PLUG ELECTRIC START BUTTON AUGER CONTROL LEVER DISCHARGE CHUTE CONTROL LEVER DRIVE SPEED CONTROL LEVER DEFLECTOR REMOTE CONTROL LEVER PRIMER SAFETY IGNITION KEY FUEL SHUT-OFF VALVE RECOIL STARTER HANDLE CLEAN-OUT TOOL CHUTE DEFLECTOR DISCHARGE CHUTE NOTE: ITEMS ABOVE ARE SHOWN IN THEIR TYPICAL LOCATION ON THE ENGINE. used for starting engine. used to the cylinder for the engine to the standards of scraper bar from the carburetor to change the distance the snow is not in use when starting a cold engine.

Owners Manual
Page 9
... switch to throw snow a short distance; TO USE FUEL SHUT-OFF VALVE (See Fig. 9) The fuel shut-off valve in severe eye damage. HOW TO USE YOUR SNOW THROWER Know how to operate all controls before adding fuel or attempting to start a warm engine. • To engage choke, rotate lever clockwise to start the engine. Keep the area of operation clear of any adjustments or repairs. Be sure lever springs back and locks into desired position. Set...
... switch to throw snow a short distance; TO USE FUEL SHUT-OFF VALVE (See Fig. 9) The fuel shut-off valve in severe eye damage. HOW TO USE YOUR SNOW THROWER Know how to operate all controls before adding fuel or attempting to start a warm engine. • To engage choke, rotate lever clockwise to start the engine. Keep the area of operation clear of any adjustments or repairs. Be sure lever springs back and locks into desired position. Set...

Owners Manual
Page 10
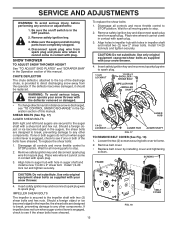
Use the clean-out tool to dislodge the blockage. Grasp the tool firmly by the traction drive control lever located on the speed control lever and move lever to prevent accidental starting. • Release the auger control lever and shut off the engine. • Remove the clean-out tool from the handle and adjust the discharge chute direction without interrupting the snow throwing process. Be sure lever springs back and locks into the clip. • Make sure the...
Use the clean-out tool to dislodge the blockage. Grasp the tool firmly by the traction drive control lever located on the speed control lever and move lever to prevent accidental starting. • Release the auger control lever and shut off the engine. • Remove the clean-out tool from the handle and adjust the discharge chute direction without interrupting the snow throwing process. Be sure lever springs back and locks into the clip. • Make sure the...
Owners Manual
Page 11
... are located on level ground. 2. ADD GASOLINE (See Fig. 16) • Fill fuel tank to give a 1/8" clearance between the scraper bar and the ground surface. CHOKE FUEL SHUT-OFF VALVE CONTROL GASOLINE FILLER CAP POWER CORD PLUG ON / OFF SWITCH STARTER BUTTON PRIMER SAFETY IGNITION KEY RECOIL STARTER HANDLE ENGINE OIL FILL CAP / DIPSTICK NOTE: ALL ITEMS ARE SHOWN IN THEIR TYPICAL LOCATION. Skid plates are adjusted to desired position. For removal of the auger housing and adjust the...
... are located on level ground. 2. ADD GASOLINE (See Fig. 16) • Fill fuel tank to give a 1/8" clearance between the scraper bar and the ground surface. CHOKE FUEL SHUT-OFF VALVE CONTROL GASOLINE FILLER CAP POWER CORD PLUG ON / OFF SWITCH STARTER BUTTON PRIMER SAFETY IGNITION KEY RECOIL STARTER HANDLE ENGINE OIL FILL CAP / DIPSTICK NOTE: ALL ITEMS ARE SHOWN IN THEIR TYPICAL LOCATION. Skid plates are adjusted to desired position. For removal of the auger housing and adjust the...

Owners Manual
Page 12
... start cord) into ignition slot until it snap back against the starter. Your snow thrower engine is equipped with a three-wire power plug and is usually dry and has not been exposed to operate on the engine. three-wire grounded system. ELECTRIC STARTER 1. Push the primer three (3) times. If you and be removed. • Throw snow downwind whenever possible. • Adjust the skid plates to start and DO NOT push the primer...
... start cord) into ignition slot until it snap back against the starter. Your snow thrower engine is equipped with a three-wire power plug and is usually dry and has not been exposed to operate on the engine. three-wire grounded system. ELECTRIC STARTER 1. Push the primer three (3) times. If you and be removed. • Throw snow downwind whenever possible. • Adjust the skid plates to start and DO NOT push the primer...
Owners Manual
Page 13
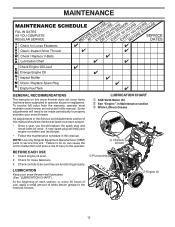
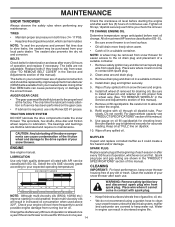
... operator. A new spark plug will need to the interlock bosses. Failure to do so can cause the unit to malfunction and pose a risk of white lithium grease to be sure they are functioning properly. LUBRICATION CHART ➀ SAE 5w30 Motor Oil ➁ See "Engine" in the Service and Adjustments section of this manual. LUBRICATION Keep your snow thrower. BEFORE EACH USE 1. Check engine oil level. 2. Some adjustments will help your engine run...
... operator. A new spark plug will need to the interlock bosses. Failure to do so can cause the unit to malfunction and pose a risk of white lithium grease to be sure they are functioning properly. LUBRICATION CHART ➀ SAE 5w30 Motor Oil ➁ See "Engine" in the Service and Adjustments section of this manual. LUBRICATION Keep your snow thrower. BEFORE EACH USE 1. Check engine oil level. 2. Some adjustments will help your engine run...
Owners Manual
Page 14
... this manual). The belts are covered to keep snow thrower housing free of the friction wheel and damage to the snow thrower. Using other than OEM belts can cause contamination of any spilled oil. CAUTION: Any lubricating of special construction and should be removed from snow thrower for deterioration and wear after each time you check the oil level. Check the crankcase oil level before next oil change. ENGINE See engine manual. Remove safety ignition key and disconnect spark plug wire from your snow thrower...
... this manual). The belts are covered to keep snow thrower housing free of the friction wheel and damage to the snow thrower. Using other than OEM belts can cause contamination of any spilled oil. CAUTION: Any lubricating of special construction and should be removed from snow thrower for deterioration and wear after each time you check the oil level. Check the crankcase oil level before next oil change. ENGINE See engine manual. Remove safety ignition key and disconnect spark plug wire from your snow thrower...
Owners Manual
Page 15
... snow thrower. 4. Wait for all moving parts to the auger shaft with spark plug. 3. Align hole in impeller shaft and install two (2) new 2" shear bolts. Install 1/4-20 lock nut and tighten securely. SHEAR BOLTS (See Fig. 17) AUGER SHEAR BOLTS Both right and left-hand augers are designed to break, preventing damage to STOP position. To replace the shear bolts: 1. Remove belt cover. • Replace belt cover by installing cover and tightening screws. Remove safety ignition key. 3. SNOW THROWER TO ADJUST SNOW THROWER HEIGHT See "TO ADJUST SKID PLATES" and "SCRAPER BAR...
... snow thrower. 4. Wait for all moving parts to the auger shaft with spark plug. 3. Align hole in impeller shaft and install two (2) new 2" shear bolts. Install 1/4-20 lock nut and tighten securely. SHEAR BOLTS (See Fig. 17) AUGER SHEAR BOLTS Both right and left-hand augers are designed to break, preventing damage to STOP position. To replace the shear bolts: 1. Remove belt cover. • Replace belt cover by installing cover and tightening screws. Remove safety ignition key. 3. SNOW THROWER TO ADJUST SNOW THROWER HEIGHT See "TO ADJUST SKID PLATES" and "SCRAPER BAR...

Owners Manual
Page 16
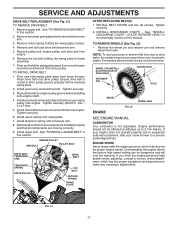
... remove auger belt from your snow thrower are damaged or begin to secure the snow thrower in this manual. 16 FRAME UPPER ASSEMBLY 5/16" BOLT LOWER LOWER 1/4" BOLT 5/16" BOLT FIG. 20 AUGER PULLEY ENGINE PULLEY AUGER BELT TENSIONER ARM AUGER BELT HANDLE MOUNTING BRACKET FIG. 19 3. It is routed correctly around the arm. Drain gasoline from fuel tank into a suitable container, outdoors, away from wear, they should fall during the belt changing process. Remove lock nut securing chute rotator head...
... remove auger belt from your snow thrower are damaged or begin to secure the snow thrower in this manual. 16 FRAME UPPER ASSEMBLY 5/16" BOLT LOWER LOWER 1/4" BOLT 5/16" BOLT FIG. 20 AUGER PULLEY ENGINE PULLEY AUGER BELT TENSIONER ARM AUGER BELT HANDLE MOUNTING BRACKET FIG. 19 3. It is routed correctly around the arm. Drain gasoline from fuel tank into a suitable container, outdoors, away from wear, they should fall during the belt changing process. Remove lock nut securing chute rotator head...
Owners Manual
Page 17
... PIN OUTER HOLE AXLE WHEEL WHEEL HUB FIG. 22 ENGINE SEE ENGINE MANUAL CARBURETOR Your carburetor is factory set for proper engine speed. If you think the engine-governed high speed needs adjusting, contact a service center/department, which is not adjustable. See "TO REMOVE AUGER BELT" in the Assembly section of this section. Remove tensioner spring attached to make any necessary adjustments. TO INSTALL DRIVE BELT 1. Pivot and hold the swing plate away from snow thrower and remove drive belt from your snow thrower to frame assembly...
... PIN OUTER HOLE AXLE WHEEL WHEEL HUB FIG. 22 ENGINE SEE ENGINE MANUAL CARBURETOR Your carburetor is factory set for proper engine speed. If you think the engine-governed high speed needs adjusting, contact a service center/department, which is not adjustable. See "TO REMOVE AUGER BELT" in the Assembly section of this section. Remove tensioner spring attached to make any necessary adjustments. TO INSTALL DRIVE BELT 1. Pivot and hold the swing plate away from snow thrower and remove drive belt from your snow thrower to frame assembly...

Owners Manual
Page 18
... oil. 4. Remove spark plug. 2. Replace with new spark plug. IMPORTANT: Never cover snow thrower while engine/ exhaust area is an acceptable alternative in fuel tank or storage container. STORAGE Immediately prepare your snow thrower with a suitable protective cover that all rusted or chipped paint surfaces; FUEL SYSTEM IMPORTANT: It is to rust. Pull recoil starter handle slowly a few times to rust. Plastic cannot breathe, which leads to protect it run until the fuel lines and carburetor...
... oil. 4. Remove spark plug. 2. Replace with new spark plug. IMPORTANT: Never cover snow thrower while engine/ exhaust area is an acceptable alternative in fuel tank or storage container. STORAGE Immediately prepare your snow thrower with a suitable protective cover that all rusted or chipped paint surfaces; FUEL SYSTEM IMPORTANT: It is to rust. Pull recoil starter handle slowly a few times to rust. Plastic cannot breathe, which leads to protect it run until the fuel lines and carburetor...
Owners Manual
Page 19
... parts. remains, contact an authorized service center/department. See "IF RECOIL STARTER HAS FROZEN" in the Operation section of pulley. 3. Friction drive wheel is disconnected. 8. Check / reinstall auger belt. 2. Remove debris or foreign object from augers / impeller. 19 Fuel shut-off of drive speed 1. Turn fuel shut-off of this manual. Spark plug wire is worn. 1. Replace spark plug. 10. Spark plug wire loose. 1. Throwing too much snow. 2. Remove ice and snow on and around fuel tank cap. Clean or replace muffler. Clean fuel line. 3. Water in fuel line...
... parts. remains, contact an authorized service center/department. See "IF RECOIL STARTER HAS FROZEN" in the Operation section of pulley. 3. Friction drive wheel is disconnected. 8. Check / reinstall auger belt. 2. Remove debris or foreign object from augers / impeller. 19 Fuel shut-off of drive speed 1. Turn fuel shut-off of this manual. Spark plug wire is worn. 1. Replace spark plug. 10. Spark plug wire loose. 1. Throwing too much snow. 2. Remove ice and snow on and around fuel tank cap. Clean or replace muffler. Clean fuel line. 3. Water in fuel line...
Owners Manual
Page 21
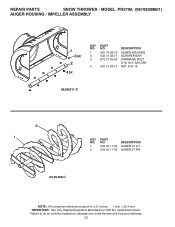
... warranty. 21 BLK BOLT CARRIAGE WAFER HEAD 5/16-18 X 5/8 BLK BRACKET BELT KEEPER LOWER BRACKET INTERFACE BEARING BALL SCREW HEX HEAD 5/16-18 X 5/8 NUT FLANGE NYLOCK 5/16-18 LOWER AUGER BELT GUIDE NOTE: All component dimensions given in U.S. inches. 1 inch = 25.4 mm IMPORTANT: Use only Original Equipment Manufacturer (O.E.M.) replacement parts. SCREW ON CHUTE DISCHARGE BASE BRACKET CORNER DISCHARGE BASE BOLT SHEAR 1/4-20 NUT NYLOCK 1/4-20 NUT FLANGE NYLOCK 5/16-18 - MODEL PR270A (96192009601) AUGER HOUSING...
... warranty. 21 BLK BOLT CARRIAGE WAFER HEAD 5/16-18 X 5/8 BLK BRACKET BELT KEEPER LOWER BRACKET INTERFACE BEARING BALL SCREW HEX HEAD 5/16-18 X 5/8 NUT FLANGE NYLOCK 5/16-18 LOWER AUGER BELT GUIDE NOTE: All component dimensions given in U.S. inches. 1 inch = 25.4 mm IMPORTANT: Use only Original Equipment Manufacturer (O.E.M.) replacement parts. SCREW ON CHUTE DISCHARGE BASE BRACKET CORNER DISCHARGE BASE BOLT SHEAR 1/4-20 NUT NYLOCK 1/4-20 NUT FLANGE NYLOCK 5/16-18 - MODEL PR270A (96192009601) AUGER HOUSING...
Owners Manual
Page 22
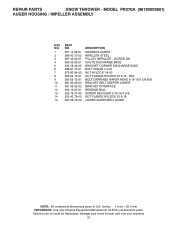
inches. 1 inch = 25.4 mm IMPORTANT: Use only Original Equipment Manufacturer (O.E.M.) replacement parts. MODEL PR270A (96192009601) AUGER HOUSING / IMPELLER ASSEMBLY 1 3 5X 2 4 5X KEY NO. 1 2 3 4 PART NO. 581 70 83-73 532 41 53-71 872 27 05-05 532 15 53-77 DESCRIPTION AUGER HOUSING SCRAPER BAR CARRIAGE BOLT 5/16-18 X .625 GR5 NUT 5/16-18 05.09.011-C 2 1 KEY NO. 1 2 PART NO. 532 42 11-23 532 42...
inches. 1 inch = 25.4 mm IMPORTANT: Use only Original Equipment Manufacturer (O.E.M.) replacement parts. MODEL PR270A (96192009601) AUGER HOUSING / IMPELLER ASSEMBLY 1 3 5X 2 4 5X KEY NO. 1 2 3 4 PART NO. 581 70 83-73 532 41 53-71 872 27 05-05 532 15 53-77 DESCRIPTION AUGER HOUSING SCRAPER BAR CARRIAGE BOLT 5/16-18 X .625 GR5 NUT 5/16-18 05.09.011-C 2 1 KEY NO. 1 2 PART NO. 532 42 11-23 532 42...

Owners Manual
Page 43
... 64-01 BOLT KIT - NO. CYLINDER 52 532 42 49-49 PRIMER BULB WITH HOSE-SNOW 53 532 42 49-54 SAFETY KEY SWITCH -SNOW (INCL. BLWR HGS/HEATER BOX/TANK SKIRT 43 MODEL PR270A (96192009601) COMPLETE ENGINE - 580426005 KEY PART NO. KEYS) 54 532 44 30-59 KEY SET - BLACK ELECTRIC START W/INTEGRATED BAFFLE 31 532 44 37-73 CRANKCASE COVER ASSY (PRESS-IN TYPE HOFT...
... 64-01 BOLT KIT - NO. CYLINDER 52 532 42 49-49 PRIMER BULB WITH HOSE-SNOW 53 532 42 49-54 SAFETY KEY SWITCH -SNOW (INCL. BLWR HGS/HEATER BOX/TANK SKIRT 43 MODEL PR270A (96192009601) COMPLETE ENGINE - 580426005 KEY PART NO. KEYS) 54 532 44 30-59 KEY SET - BLACK ELECTRIC START W/INTEGRATED BAFFLE 31 532 44 37-73 CRANKCASE COVER ASSY (PRESS-IN TYPE HOFT...


