
User Manual
Page 1
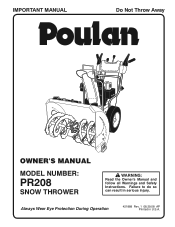
Failure to do so can result in U.S.A. Always Wear Eye Protection During Operation 421888 Rev. 1 08.29.08 AP Printed in serious injury. IMPORTANT MANUAL Do Not Throw Away OWNER'S MANUAL MODEL NUMBER: PR208 SNOW THROWER WARNING: Read the Owner's Manual and follow all Warnings and Safety Instructions.
Failure to do so can result in U.S.A. Always Wear Eye Protection During Operation 421888 Rev. 1 08.29.08 AP Printed in serious injury. IMPORTANT MANUAL Do Not Throw Away OWNER'S MANUAL MODEL NUMBER: PR208 SNOW THROWER WARNING: Read the Owner's Manual and follow all Warnings and Safety Instructions.
User Manual
Page 2
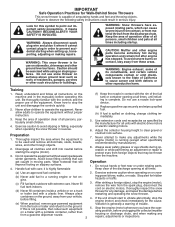
...a gasoline dispenser nozzle. 2 5. WARNING: Always disconnect spark plug wire and place it where it on sloping surfaces. WARNING: Snow throwers have exposed rotating parts, which can get caught in order to prevent accidental starting motors. 6. Avoid loose fitting clothing that will ... (motor) is for hidden hazards or traffic. (c) Fill fuel tank outdoors with a plastic liner. Preparation 1. Do not use snow thrower on clothing, change clothing immediately. 5. Thoroughly inspect the area where the equipment is spilled on surfaces above ground level such as specified...
...a gasoline dispenser nozzle. 2 5. WARNING: Always disconnect spark plug wire and place it where it on sloping surfaces. WARNING: Snow throwers have exposed rotating parts, which can get caught in order to prevent accidental starting motors. 6. Avoid loose fitting clothing that will ... (motor) is for hidden hazards or traffic. (c) Fill fuel tank outdoors with a plastic liner. Preparation 1. Do not use snow thrower on clothing, change clothing immediately. 5. Thoroughly inspect the area where the equipment is spilled on surfaces above ground level such as specified...
User Manual
Page 3
...transported or not in safe working . 10. Should you to prevent someone from accidentally starting the engine and for and using your snow thrower. • Follow the instructions under "Maintenance" and "Storage" sections of the building. We have competent, well-trained technicians ...3. Never operate the machine at frequent intervals for an extended period. 4. Run the machine a few minutes after throwing snow to the collector/impeller when snow thrower is the most common cause of the collector/impeller. Always observe the "SAFETY RULES". Maintenance and Storage 1. TABLE OF...
...transported or not in safe working . 10. Should you to prevent someone from accidentally starting the engine and for and using your snow thrower. • Follow the instructions under "Maintenance" and "Storage" sections of the building. We have competent, well-trained technicians ...3. Never operate the machine at frequent intervals for an extended period. 4. Run the machine a few minutes after throwing snow to the collector/impeller when snow thrower is the most common cause of the collector/impeller. Always observe the "SAFETY RULES". Maintenance and Storage 1. TABLE OF...
User Manual
Page 4
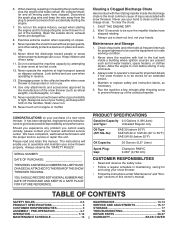
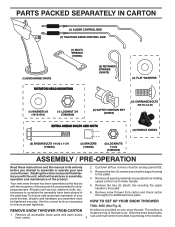
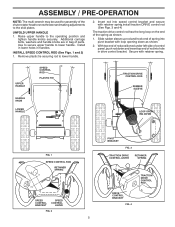
... Remove the two (2) plastic ties securing the upper handle to the pallet. 4. Remove snow thrower from carton. 4 located on your snow thrower. The toolbox is provided on top of your new snow thrower. To ensure safe and proper operation of the belt cover. Store the extra shear bolts...Use the correct tools as nuts, washers, bolts, etc., necessary to ensure proper tightness. 2. HOW TO SET UP YOUR SNOW THROWER TOOL BOX (See Fig. 8) REMOVE SNOW THROWER FROM CARTON A toolbox is 1. Reading the entire manual will assist you in assembly, operation and maintenance of carton and lay...
... Remove the two (2) plastic ties securing the upper handle to the pallet. 4. Remove snow thrower from carton. 4 located on your snow thrower. The toolbox is provided on top of your new snow thrower. To ensure safe and proper operation of the belt cover. Store the extra shear bolts...Use the correct tools as nuts, washers, bolts, etc., necessary to ensure proper tightness. 2. HOW TO SET UP YOUR SNOW THROWER TOOL BOX (See Fig. 8) REMOVE SNOW THROWER FROM CARTON A toolbox is 1. Reading the entire manual will assist you in assembly, operation and maintenance of carton and lay...
User Manual
Page 5
... rod into hole in drive control bracket. ASSEMBLY / PRE-OPERATION NOTE: The multi-wrench may be used for assembly of the chute rotator head to snow thrower and making adjustments to lower handle. UNFOLD UPPER HANDLE 1. Install in lower holes in bag of parts. INSTALL SPEED CONTROL ROD (See Figs. 1 and 2) 1. Use...
... rod into hole in drive control bracket. ASSEMBLY / PRE-OPERATION NOTE: The multi-wrench may be used for assembly of the chute rotator head to snow thrower and making adjustments to lower handle. UNFOLD UPPER HANDLE 1. Install in lower holes in bag of parts. INSTALL SPEED CONTROL ROD (See Figs. 1 and 2) 1. Use...

User Manual
Page 6
...CONTROL ROD RUBBER SLEEVE INSTALL DISCHARGE CHUTE / CHUTE ROTATER HEAD (See Fig. 7) NOTE: The multi-wrench provided in your snow thrower were overinflated at the factory for best snow throwing performance. • Reduce tire pressure to 14-17 PSI (19-24.5 N-m). CHUTE ROTATER HEAD 3/8 LOCKNUT 3/8 WASHER...tires on your parts bag may be used to align square and pin on underside of chute rotater head with loop opening toward front of snow thrower. 2. Secure with discharge opening up rod and hook end of mounting bracket. 4. ASSEMBLY / PRE-OPERATION INSTALL AUGER CONTROL ROD (See...
...CONTROL ROD RUBBER SLEEVE INSTALL DISCHARGE CHUTE / CHUTE ROTATER HEAD (See Fig. 7) NOTE: The multi-wrench provided in your snow thrower were overinflated at the factory for best snow throwing performance. • Reduce tire pressure to 14-17 PSI (19-24.5 N-m). CHUTE ROTATER HEAD 3/8 LOCKNUT 3/8 WASHER...tires on your parts bag may be used to align square and pin on underside of chute rotater head with loop opening toward front of snow thrower. 2. Secure with discharge opening up rod and hook end of mounting bracket. 4. ASSEMBLY / PRE-OPERATION INSTALL AUGER CONTROL ROD (See...
User Manual
Page 7
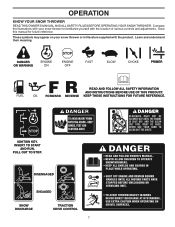
... THIS OWNER'S MANUAL AND ALL SAFETY RULES BEFORE OPERATING YOUR SNOW THROWER. Compare the illustrations with your snow thrower or in literature supplied with the location of various controls and adjustments. DANGER OR WARNING PRIMER FORWARD REVERSE READ AND FOLLOW ALL SAFETY .... IGNITION KEY. INSERT TO START AND RUN, PULL OUT TO STOP. Save this manual for future reference. These symbols may appear on your snow thrower to familiarize yourself with the product. DISENGAGED ENGAGED SNOW DISCHARGE TRACTION DRIVE CONTROL 7 KEEP THESE INSTRUCTIONS FOR FUTURE REFERENCE.
... THIS OWNER'S MANUAL AND ALL SAFETY RULES BEFORE OPERATING YOUR SNOW THROWER. Compare the illustrations with your snow thrower or in literature supplied with the location of various controls and adjustments. DANGER OR WARNING PRIMER FORWARD REVERSE READ AND FOLLOW ALL SAFETY .... IGNITION KEY. INSERT TO START AND RUN, PULL OUT TO STOP. Save this manual for future reference. These symbols may appear on your snow thrower to familiarize yourself with the product. DISENGAGED ENGAGED SNOW DISCHARGE TRACTION DRIVE CONTROL 7 KEEP THESE INSTRUCTIONS FOR FUTURE REFERENCE.
User Manual
Page 8
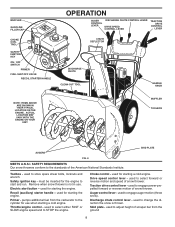
... Institute. Throttle/engine control - used for starting a cold engine. Skid plate - used to engage auger motion (throw snow). SAFETY REQUIREMENTS Our snow throwers conform to store spare shear bolts, locknuts and wrench. Traction drive control lever - ACTUAL LOCATION MAY VARY WITH THE ENGINE... ON YOUR UNIT. used for use . Remove when snow thrower is thrown. Primer - Electric start and run. Choke control - MUFFLER GASOLINE FILLER CAP CHOKE CONTROL SAFETY IGNITION KEY ON / OFF...
... Institute. Throttle/engine control - used for starting a cold engine. Skid plate - used to engage auger motion (throw snow). SAFETY REQUIREMENTS Our snow throwers conform to store spare shear bolts, locknuts and wrench. Traction drive control lever - ACTUAL LOCATION MAY VARY WITH THE ENGINE... ON YOUR UNIT. used for use . Remove when snow thrower is thrown. Primer - Electric start and run. Choke control - MUFFLER GASOLINE FILLER CAP CHOKE CONTROL SAFETY IGNITION KEY ON / OFF...
User Manual
Page 9
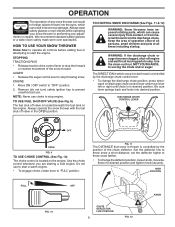
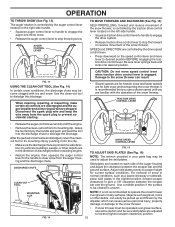
...starting a cold engine. Do not use to start the engine. Always wear safety glasses or eye shields while operating your snow thrower or performing any snow thrower can result in foreign objects thrown into desired position. ENGINE 1. Remove (do not turn) safety ignition key to unclog ... 12 KNOB Move ON / OFF switch to stop the forward or reverse movement of the snow thrower. TO CONTROL SNOW DISCHARGE (See Figs. 11 & 12) WARNING: Snow throwers have exposed rotating parts, which snow is controlled by the position of the chute deflector. WARNING: If the discharge chute or auger...
...starting a cold engine. Do not use to start the engine. Always wear safety glasses or eye shields while operating your snow thrower or performing any snow thrower can result in foreign objects thrown into desired position. ENGINE 1. Remove (do not turn) safety ignition key to unclog ... 12 KNOB Move ON / OFF switch to stop the forward or reverse movement of the snow thrower. TO CONTROL SNOW DISCHARGE (See Figs. 11 & 12) WARNING: Snow throwers have exposed rotating parts, which snow is controlled by the position of the chute deflector. WARNING: If the discharge chute or auger...
User Manual
Page 10
... vehicles, buildings, people, or other debris, can easily be used to adjust the skid plates. Skid plates are for light snow and transporting the snow thrower. Disconnect the spark plug wire and keep the wire away from the spark plug to dislodge the blockage. CAUTION: Do not ...rocky surfaces. SPEED and DIRECTION are adjusted to lowest (highest scraper clearance) position. Use a middle position if the surface to operate the snow thrower over gravel surface, use a slower speed until you use extra caution and be sure skid plates are controlled by the drive speed control...
... vehicles, buildings, people, or other debris, can easily be used to adjust the skid plates. Skid plates are for light snow and transporting the snow thrower. Disconnect the spark plug wire and keep the wire away from the spark plug to dislodge the blockage. CAUTION: Do not ...rocky surfaces. SPEED and DIRECTION are adjusted to lowest (highest scraper clearance) position. Use a middle position if the surface to operate the snow thrower over gravel surface, use a slower speed until you use extra caution and be sure skid plates are controlled by the drive speed control...
User Manual
Page 11
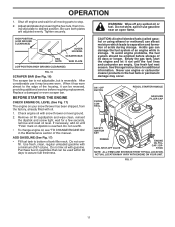
... leads to the edge of the housing, it has worn almost to separation and formation of 30 days or longer. Check engine oil with snow thrower on your snow thrower has been shipped, from the factory, already filled with oil. 1. CAUTION: Alcohol blended fuels (called gasohol or using ethanol or methanol) can be reversed...
... leads to the edge of the housing, it has worn almost to separation and formation of 30 days or longer. Check engine oil with snow thrower on your snow thrower has been shipped, from the factory, already filled with oil. 1. CAUTION: Alcohol blended fuels (called gasohol or using ethanol or methanol) can be reversed...
User Manual
Page 12
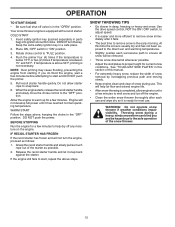
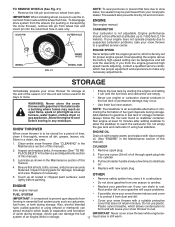
... snap back. 6. See "TO ADJUST SKID PLATES" in the "OFF" position. This will help dry off the engine. • Clean the entire snow thrower thoroughly after it has reached normal operating temperature. Place ON / OFF switch in a safe place. 2. If temperature is above 50°F, priming is.... DO NOT push the primer. Release the recoil starter handle and let it is in the "OPEN" position. WARNING: Do not operate snow thrower if weather conditions impair visibility. Keep the extra safety ignition key in "ON" position. 3. When the engine starts, release the recoil starter...
... snap back. 6. See "TO ADJUST SKID PLATES" in the "OFF" position. This will help dry off the engine. • Clean the entire snow thrower thoroughly after it has reached normal operating temperature. Place ON / OFF switch in a safe place. 2. If temperature is above 50°F, priming is.... DO NOT push the primer. Release the recoil starter handle and let it is in the "OPEN" position. WARNING: Do not operate snow thrower if weather conditions impair visibility. Keep the extra safety ignition key in "ON" position. 3. When the engine starts, release the recoil starter...
User Manual
Page 13
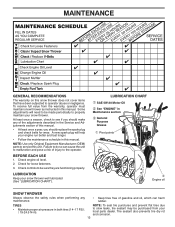
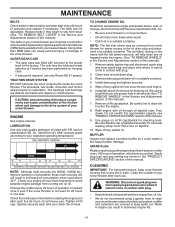
... negligence. LUBRICATION Keep your local parts dealer. LUBRICATION CHART ➀ SAE 5W-30 Motor Oil ➁ See "ENGINE" in this snow thrower does not cover items that have been subjected to properly maintain your engine run better and last longer. • Follow the maintenance schedule.... NOTE: To seal tire punctures and prevent flat tires due to service this manual. Check engine oil level. 2. Some adjustments will help your snow thrower. Check for wear. Check controls to malfunction and pose a risk of this manual. • At least once a year, you should make ...
... negligence. LUBRICATION Keep your local parts dealer. LUBRICATION CHART ➀ SAE 5W-30 Motor Oil ➁ See "ENGINE" in this snow thrower does not cover items that have been subjected to properly maintain your engine run better and last longer. • Follow the maintenance schedule.... NOTE: To seal tire punctures and prevent flat tires due to service this manual. Check engine oil level. 2. Some adjustments will help your snow thrower. Check for wear. Check controls to malfunction and pose a risk of this manual. • At least once a year, you should make ...
User Manual
Page 14
...ENGINE See engine manual. Check the crankcase oil level before next oil change. Be careful not to allow dirt to your snow thrower. Wipe off any spilled oil from snow thrower for easier access to install klick pin into proper hole in wheel axle (See "TO REMOVE WHEELS" in the Service... hex shafts, drive disc and friction wheel require no maintenance. All oil must meet API service classification SG-SL. • Be sure snow thrower is tightened securely for accurate reading. Remove safety ignition key and disconnect spark plug wire from spark plug and place wire where it cannot ...
...ENGINE See engine manual. Check the crankcase oil level before next oil change. Be careful not to allow dirt to your snow thrower. Wipe off any spilled oil from snow thrower for easier access to install klick pin into proper hole in wheel axle (See "TO REMOVE WHEELS" in the Service... hex shafts, drive disc and friction wheel require no maintenance. All oil must meet API service classification SG-SL. • Be sure snow thrower is tightened securely for accurate reading. Remove safety ignition key and disconnect spark plug wire from spark plug and place wire where it cannot ...
User Manual
Page 15
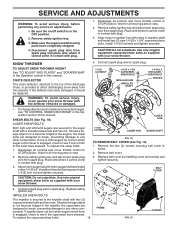
... ADJUSTMENTS WARNING: To avoid serious injury, before performing any other components. Remove safety ignition key. 3. CAUTION: Do not substitute. SNOW THROWER TO ADJUST SNOW THROWER HEIGHT See "TO ADJUST SKID PLATES" and "SCRAPER BAR" in the Operation section of the bolts have sheared. WARNING: To ...avoid serious injury, never operate your snow thrower with your snow thrower. Connect spark plug wire to the auger shaft with plug. 3. SHEAR BOLTS (See Fig. 18) AUGER SHEAR BOLTS ...
... ADJUSTMENTS WARNING: To avoid serious injury, before performing any other components. Remove safety ignition key. 3. CAUTION: Do not substitute. SNOW THROWER TO ADJUST SNOW THROWER HEIGHT See "TO ADJUST SKID PLATES" and "SCRAPER BAR" in the Operation section of the bolts have sheared. WARNING: To ...avoid serious injury, never operate your snow thrower with your snow thrower. Connect spark plug wire to the auger shaft with plug. 3. SHEAR BOLTS (See Fig. 18) AUGER SHEAR BOLTS ...
User Manual
Page 16
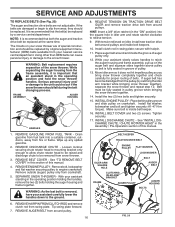
...pulley. 13. INSTALL BELT COVER and two (2) screws. INSTALL DISCHARGE CHUTE - See "TO REMOVE BELT COVER" in pulley groove when bringing the snow thrower together. 14. Remove bolt, lockwasher and flat washer securing pulley to relieve tension. 9. WARNING: As the last bolt is fully seated in swing... plate; Tip swing plate forward. 7. RELIEVE TENSION ON TRACTION DRIVE BELT IDLER and remove traction drive belt from snow thrower. 3. Install the two (2) hex bolts and tighten securely. 15. Place auger belt around pulleys and inside belt keeper. 16. Belt must...
...pulley. 13. INSTALL BELT COVER and two (2) screws. INSTALL DISCHARGE CHUTE - See "TO REMOVE BELT COVER" in pulley groove when bringing the snow thrower together. 14. Remove bolt, lockwasher and flat washer securing pulley to relieve tension. 9. WARNING: As the last bolt is fully seated in swing... plate; Tip swing plate forward. 7. RELIEVE TENSION ON TRACTION DRIVE BELT IDLER and remove traction drive belt from snow thrower. 3. Install the two (2) hex bolts and tighten securely. 15. Place auger belt around pulleys and inside belt keeper. 16. Belt must...
User Manual
Page 17
...performance should not be stored for storage at least 10 minutes after adding stabilizer to allow the stabilizer to make any enclosure. SNOW THROWER When snow thrower is not adjustable. Replace with clean engine oil. (See "ENGINE" in axle and the wheel hub hole. Plastic cannot ...manual. • Replace your gasoline can if your local parts dealer. IMPORTANT: When installing wheel, be dangerous and will cause your snow thrower to gasoline in the Service and Adjustments section of this manual). 3. Add stabilizer to a qualified service center. Always follow the mix...
...performance should not be stored for storage at least 10 minutes after adding stabilizer to allow the stabilizer to make any enclosure. SNOW THROWER When snow thrower is not adjustable. Replace with clean engine oil. (See "ENGINE" in axle and the wheel hub hole. Plastic cannot ...manual. • Replace your gasoline can if your local parts dealer. IMPORTANT: When installing wheel, be dangerous and will cause your snow thrower to gasoline in the Service and Adjustments section of this manual). 3. Add stabilizer to a qualified service center. Always follow the mix...
User Manual
Page 20
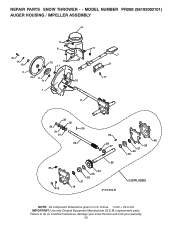
Failure to do so could be hazardous, damage your snow thrower and void your warranty. 20 REPAIR PARTS SNOW THROWER - - MODEL NUMBER PR208 (96192002101) AUGER HOUSING / IMPELLER ASSEMBLY 5 11 6 15 14 13 4 12 16 11 12 3 11 1 9 10 2 11 7 8 17 33 32 34 30 31 31 29 26 28 27 35 18 25 24 23 22 21 19 01.07.004-B 36 20 21 22 23 2 (EXPLODED) NOTE: All component dimensions given in U.S. inches. 1 inch = 25.4 mm IMPORTANT: Use only Original Equipment Manufacturer (O.E.M.) replacement parts.
Failure to do so could be hazardous, damage your snow thrower and void your warranty. 20 REPAIR PARTS SNOW THROWER - - MODEL NUMBER PR208 (96192002101) AUGER HOUSING / IMPELLER ASSEMBLY 5 11 6 15 14 13 4 12 16 11 12 3 11 1 9 10 2 11 7 8 17 33 32 34 30 31 31 29 26 28 27 35 18 25 24 23 22 21 19 01.07.004-B 36 20 21 22 23 2 (EXPLODED) NOTE: All component dimensions given in U.S. inches. 1 inch = 25.4 mm IMPORTANT: Use only Original Equipment Manufacturer (O.E.M.) replacement parts.
User Manual
Page 21
Failure to do so could be hazardous, damage your snow thrower and void your warranty. 21 REPAIR PARTS SNOW THROWER - - DESCRIPTION 175321X479 196710 188909 191079 175322 178675X008 192199 405400 73800400 74780426 155377 163183 19111507 10040500 74940516 180355 194189 407760 407761...X .750 GEARBOX COVER LH NOTE: All component dimensions given in U.S. inches. 1 inch = 25.4 mm IMPORTANT: Use only Original Equipment Manufacturer (O.E.M.) replacement parts. MODEL NUMBER PR208 (96192002101) AUGER HOUSING / IMPELLER ASSEMBLY KEY NO. 1 2 3 4 5 6 7 8 9 10 11 12 13 14 15 16 17 18 19 20 21 22 ...
Failure to do so could be hazardous, damage your snow thrower and void your warranty. 21 REPAIR PARTS SNOW THROWER - - DESCRIPTION 175321X479 196710 188909 191079 175322 178675X008 192199 405400 73800400 74780426 155377 163183 19111507 10040500 74940516 180355 194189 407760 407761...X .750 GEARBOX COVER LH NOTE: All component dimensions given in U.S. inches. 1 inch = 25.4 mm IMPORTANT: Use only Original Equipment Manufacturer (O.E.M.) replacement parts. MODEL NUMBER PR208 (96192002101) AUGER HOUSING / IMPELLER ASSEMBLY KEY NO. 1 2 3 4 5 6 7 8 9 10 11 12 13 14 15 16 17 18 19 20 21 22 ...

User Manual
Page 22
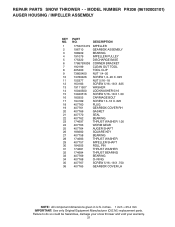
...PR208 (96192002101) AUGER HOUSING / IMPELLER ASSEMBLY 1 3 (5x) 4 (5x) 2 01.07.001-A KEY NO. 1 2 3 4 PART NO. 404928X428 404931X479 72270505 155377 DESCRIPTION AUGER HOUSING SCRAPPER BAR CARRIAGE BOLT 5/16−18 X .625 NUT 5/16−18 2 3 1 1 2 KEY PART NO. Failure to do so could be hazardous, damage your snow thrower... and void your warranty. 22 DESCRIPTION 1 420478 AUGER BEARING 3 2 411939 BEARING PLUG 3 179582 SCREW 5/16−18 X 1.00 01.07.024-B NOTE: All component dimensions given in U.S. REPAIR PARTS SNOW THROWER - -
...PR208 (96192002101) AUGER HOUSING / IMPELLER ASSEMBLY 1 3 (5x) 4 (5x) 2 01.07.001-A KEY NO. 1 2 3 4 PART NO. 404928X428 404931X479 72270505 155377 DESCRIPTION AUGER HOUSING SCRAPPER BAR CARRIAGE BOLT 5/16−18 X .625 NUT 5/16−18 2 3 1 1 2 KEY PART NO. Failure to do so could be hazardous, damage your snow thrower... and void your warranty. 22 DESCRIPTION 1 420478 AUGER BEARING 3 2 411939 BEARING PLUG 3 179582 SCREW 5/16−18 X 1.00 01.07.024-B NOTE: All component dimensions given in U.S. REPAIR PARTS SNOW THROWER - -

