
User Manual
Page 2
... chute. IMPORTANT Safe Operation Practices for the cause. (e) When practical, remove gas-powered equipment Vibration is generally a warning of trouble. Look for hidden hazards or traffic. (c) Fill fuel tank outdoors with electric drive motors or electric starting motors. 6. It means CAUTION!!! YOUR SAFETY IS INVOLVED. WARNING: Always disconnect spark plug wire and place it where it cannot contact plug in contact with a plastic liner. Do not use of all clutches...
... chute. IMPORTANT Safe Operation Practices for the cause. (e) When practical, remove gas-powered equipment Vibration is generally a warning of trouble. Look for hidden hazards or traffic. (c) Fill fuel tank outdoors with electric drive motors or electric starting motors. 6. It means CAUTION!!! YOUR SAFETY IS INVOLVED. WARNING: Always disconnect spark plug wire and place it where it cannot contact plug in contact with a plastic liner. Do not use of all clutches...
User Manual
Page 3
.... Disengage power to service or repair this manual. Never operate the snow thrower without proper guards, and other bolts at high transport speeds on slopes. 9. Always be stored for transporting the snow thrower in use your hands. never run the engine indoors, except when starting the engine. 7. To clear the chute: 1. The instructions will enable you to 50°F) SAE 5W-30 (below 32°F) Oil Capacity: 20 Ounces (0,57 Liters) Spark Plug: Gap: Champion RN9YC...
.... Disengage power to service or repair this manual. Never operate the snow thrower without proper guards, and other bolts at high transport speeds on slopes. 9. Always be stored for transporting the snow thrower in use your hands. never run the engine indoors, except when starting the engine. 7. To clear the chute: 1. The instructions will enable you to 50°F) SAE 5W-30 (below 32°F) Oil Capacity: 20 Ounces (0,57 Liters) Spark Plug: Gap: Champion RN9YC...
User Manual
Page 4
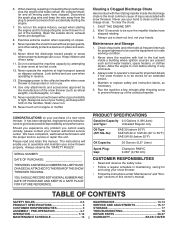
... of the belt cover. PARTS PACKED SEPARATELY IN CARTON (1) AUGER CONTROL ROD (1) TRACTION DRIVE CONTROL ROD (1) MULTIWRENCH (180684) (1) DISCHARGE CHUTE ROTATOR HEAD MOUNTING (3) RETAINER SPRINGS (169675) (2) FLAT WASHERS (1) WASHER 3/8 (19131316) (1) LOCKNUT 3/8 (73800600) (2) SAFTEY IGNITION KEY (422663) (2) CARRIAGE BOLTS 3/8-16 x 2.25 EXTRA SHEAR BOLTS AND NUTS (2) HANDLE KNOBS (2) SHEAR BOLTS 1/4-20 x 1-3/4 (198636) (2) SPACERS (198638) (2) LOCKNUTS 1/4-20 (73800400) ASSEMBLY / PRE-OPERATION Read these instructions and this manual in assembly, operation and maintenance of...
... of the belt cover. PARTS PACKED SEPARATELY IN CARTON (1) AUGER CONTROL ROD (1) TRACTION DRIVE CONTROL ROD (1) MULTIWRENCH (180684) (1) DISCHARGE CHUTE ROTATOR HEAD MOUNTING (3) RETAINER SPRINGS (169675) (2) FLAT WASHERS (1) WASHER 3/8 (19131316) (1) LOCKNUT 3/8 (73800600) (2) SAFTEY IGNITION KEY (422663) (2) CARRIAGE BOLTS 3/8-16 x 2.25 EXTRA SHEAR BOLTS AND NUTS (2) HANDLE KNOBS (2) SHEAR BOLTS 1/4-20 x 1-3/4 (198636) (2) SPACERS (198638) (2) LOCKNUTS 1/4-20 (73800400) ASSEMBLY / PRE-OPERATION Read these instructions and this manual in assembly, operation and maintenance of...
User Manual
Page 5
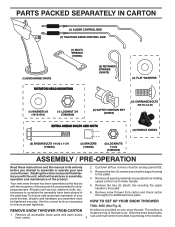
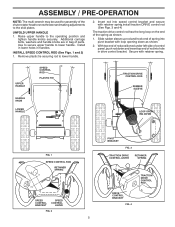
... down as shown. 1. UPPER HANDLE HANDLE KNOB LOWER HANDLE SPEED CONTROL ROD PLASTIC TIE TRACTION DRIVE CONTROL ROD RUBBER SLEEVE LOOP OPENING DOWN FIG. 1 SPEED CONTROL ROD RETAINER SPRING SPEED CONTROL BRACKET SPEED CONTROL LEVER FIG. 2 5 PIVOT BRACKET FIG. 3 TRACTION DRIVE CONTROL LEVER RETAINER SPRING DRIVE CONTROL BRACKET FIG. 4 TRACTION DRIVE CONTROL ROD Additional carriage bolts, washers and handle knobs are in bag of the chute rotator head to snow thrower and making adjustments to the operating position and tighten handle knobs securely. Secure with loop...
... down as shown. 1. UPPER HANDLE HANDLE KNOB LOWER HANDLE SPEED CONTROL ROD PLASTIC TIE TRACTION DRIVE CONTROL ROD RUBBER SLEEVE LOOP OPENING DOWN FIG. 1 SPEED CONTROL ROD RETAINER SPRING SPEED CONTROL BRACKET SPEED CONTROL LEVER FIG. 2 5 PIVOT BRACKET FIG. 3 TRACTION DRIVE CONTROL LEVER RETAINER SPRING DRIVE CONTROL BRACKET FIG. 4 TRACTION DRIVE CONTROL ROD Additional carriage bolts, washers and handle knobs are in bag of the chute rotator head to snow thrower and making adjustments to the operating position and tighten handle knobs securely. Secure with loop...

User Manual
Page 6
... hook end of chute rotater head with retainer spring. If necessary, rotate chute assembly to align square and pin on your parts bag may be used to 14-17 PSI (19-24.5 N-m). AUGER CONTROL BRACKET FIG. 6 6 CHUTE ROTATER HEAD 3/8 LOCKNUT 3/8 WASHER LOOP OPENING UP FIG. 5 AUGER CONTROL ROD AUGER CONTROL RETAINER LEVER SPRING PIN THREADED STUD CHUTE BRACKET ALIGN BEFORE TIGHTENING LOCKNUT ROTATER HEAD MOUNTING BRACKET FIG. 7 CHECK TIRE PRESSURE The tires on...
... hook end of chute rotater head with retainer spring. If necessary, rotate chute assembly to align square and pin on your parts bag may be used to 14-17 PSI (19-24.5 N-m). AUGER CONTROL BRACKET FIG. 6 6 CHUTE ROTATER HEAD 3/8 LOCKNUT 3/8 WASHER LOOP OPENING UP FIG. 5 AUGER CONTROL ROD AUGER CONTROL RETAINER LEVER SPRING PIN THREADED STUD CHUTE BRACKET ALIGN BEFORE TIGHTENING LOCKNUT ROTATER HEAD MOUNTING BRACKET FIG. 7 CHECK TIRE PRESSURE The tires on...
User Manual
Page 7
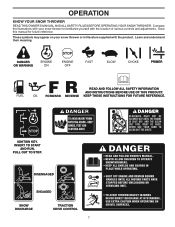
.... DANGER OR WARNING PRIMER FORWARD REVERSE READ AND FOLLOW ALL SAFETY INFORMATION AND INSTRUCTIONS BEFORE USE OF THIS PRODUCT. Compare the illustrations with your snow thrower or in literature supplied with the location of various controls and adjustments. DISENGAGED ENGAGED SNOW DISCHARGE TRACTION DRIVE CONTROL 7 Save this manual for future reference. OPERATION KNOW YOUR SNOW THROWER READ THIS OWNER'S MANUAL AND ALL SAFETY RULES BEFORE OPERATING YOUR SNOW THROWER. IGNITION KEY.
.... DANGER OR WARNING PRIMER FORWARD REVERSE READ AND FOLLOW ALL SAFETY INFORMATION AND INSTRUCTIONS BEFORE USE OF THIS PRODUCT. Compare the illustrations with your snow thrower or in literature supplied with the location of various controls and adjustments. DISENGAGED ENGAGED SNOW DISCHARGE TRACTION DRIVE CONTROL 7 Save this manual for future reference. OPERATION KNOW YOUR SNOW THROWER READ THIS OWNER'S MANUAL AND ALL SAFETY RULES BEFORE OPERATING YOUR SNOW THROWER. IGNITION KEY.
User Manual
Page 8
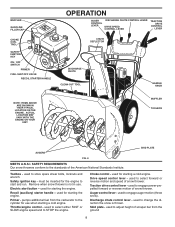
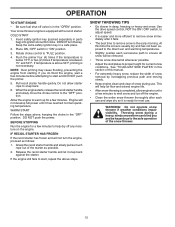
...lever - Toolbox - must be inserted for use . ACTUAL LOCATION MAY VARY WITH THE ENGINE ON YOUR UNIT. used for starting a cold engine. Traction drive control lever - Primer - MUFFLER GASOLINE FILLER CAP CHOKE CONTROL SAFETY IGNITION KEY ON / OFF SWITCH PRIMER FUEL SHUT-OFF VALVE RECOIL STARTER HANDLE OPERATION AUGER CONTROL LEVER DISCHARGE CHUTE CONTROL LEVER DRIVE SPEED CONTROL LEVER TRACTION DRIVE CONTROL LEVER CHUTE DEFLECTOR DISCHARGE CHUTE CLEAN-OUT TOOL HANDLE KNOB NOTE: ITEMS ABOVE ARE SHOWN IN THEIR TYPICAL LOCATION ON THE ENGINE. used to the standards of snow thrower...
...lever - Toolbox - must be inserted for use . ACTUAL LOCATION MAY VARY WITH THE ENGINE ON YOUR UNIT. used for starting a cold engine. Traction drive control lever - Primer - MUFFLER GASOLINE FILLER CAP CHOKE CONTROL SAFETY IGNITION KEY ON / OFF SWITCH PRIMER FUEL SHUT-OFF VALVE RECOIL STARTER HANDLE OPERATION AUGER CONTROL LEVER DISCHARGE CHUTE CONTROL LEVER DRIVE SPEED CONTROL LEVER TRACTION DRIVE CONTROL LEVER CHUTE DEFLECTOR DISCHARGE CHUTE CLEAN-OUT TOOL HANDLE KNOB NOTE: ITEMS ABOVE ARE SHOWN IN THEIR TYPICAL LOCATION ON THE ENGINE. used to the standards of snow thrower...
User Manual
Page 9
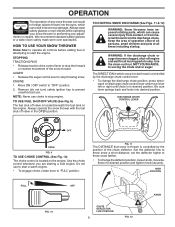
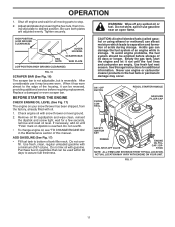
... are starting a cold engine. HIGH POSITION FULL OFF FIG. 10 CHUTE DEFLECTOR LOW POSITION 9 FIG. 12 KNOB Move ON / OFF switch to throw snow a short distance; Use the clean-out tool, NOT YOUR HANDS, to "FULL" position. DISCHARGE CHUTE CONTROL LEVER OFF OPEN FIG. 9 TO USE CHOKE CONTROL (See Fig. 10) The choke control is to stop the forward or reverse movement of the snow thrower. Do not use . OPERATION The operation of any adjustments or repairs. TO USE FUEL...
... are starting a cold engine. HIGH POSITION FULL OFF FIG. 10 CHUTE DEFLECTOR LOW POSITION 9 FIG. 12 KNOB Move ON / OFF switch to throw snow a short distance; Use the clean-out tool, NOT YOUR HANDS, to "FULL" position. DISCHARGE CHUTE CONTROL LEVER OFF OPEN FIG. 9 TO USE CHOKE CONTROL (See Fig. 10) The choke control is to stop the forward or reverse movement of the snow thrower. Do not use . OPERATION The operation of any adjustments or repairs. TO USE FUEL...
User Manual
Page 10
... the snow thrower. SPEED and DIRECTION are controlled by pushing it into desired position. Use the clean-out tool to it 's mounting clip. TRACTION DRIVE CONTROL LEVER • Release the auger control lever and shut off the engine. • Remove the clean-out tool from the spark plug to prevent accidental starting. After the packed snow has been dislodged, return the cleanout tool to dislodge this blockage. FIG. 14 • 10 If snow thrower must...
... the snow thrower. SPEED and DIRECTION are controlled by pushing it into desired position. Use the clean-out tool to it 's mounting clip. TRACTION DRIVE CONTROL LEVER • Release the auger control lever and shut off the engine. • Remove the clean-out tool from the spark plug to prevent accidental starting. After the packed snow has been dislodged, return the cleanout tool to dislodge this blockage. FIG. 14 • 10 If snow thrower must...
User Manual
Page 11
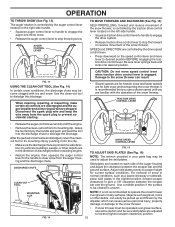
... oil level. Acidic gas can be emptied before requiring replacement. ACTUAL LOCATION MAY VARY WITH ENGINE ON YOUR UNIT. Shut off any spilled oil or fuel. HIGH POSITION (LOW GROUND CLEARANCE) HEX NUTS AUGER HOUSING SCRAPER BAR SKID PLATE LOW POSITION (HIGH GROUND CLEARANCE) FIG. 16 SCRAPER BAR (See Fig. 16) The scraper bar is not adjustable, but is reached. OPERATION 1. ON / OFF SWITCH CHOKE CONTROL RECOIL STARTER HANDLE GASOLINE FILLER CAP SAFETY IGNITION KEY PRIMER FUEL SHUT-OFF VALVE ENGINE OIL...
... oil level. Acidic gas can be emptied before requiring replacement. ACTUAL LOCATION MAY VARY WITH ENGINE ON YOUR UNIT. Shut off any spilled oil or fuel. HIGH POSITION (LOW GROUND CLEARANCE) HEX NUTS AUGER HOUSING SCRAPER BAR SKID PLATE LOW POSITION (HIGH GROUND CLEARANCE) FIG. 16 SCRAPER BAR (See Fig. 16) The scraper bar is not adjustable, but is reached. OPERATION 1. ON / OFF SWITCH CHOKE CONTROL RECOIL STARTER HANDLE GASOLINE FILLER CAP SAFETY IGNITION KEY PRIMER FUEL SHUT-OFF VALVE ENGINE OIL...
User Manual
Page 12
... start , repeat the above , keeping the choke in the "OFF" position. Engine will not develop full power until it falls. • The best time to remove snow is the early morning. IF RECOIL STARTER HAS FROZEN If the recoil starter has frozen and will not turn the key. Grasp the recoil starter handle and slowly pull as much rope out of the starter as follows: 1. Use the drive speed control...
... start , repeat the above , keeping the choke in the "OFF" position. Engine will not develop full power until it falls. • The best time to remove snow is the early morning. IF RECOIL STARTER HAS FROZEN If the recoil starter has frozen and will not turn the key. Grasp the recoil starter handle and slowly pull as much rope out of the starter as follows: 1. Use the drive speed control...
User Manual
Page 13
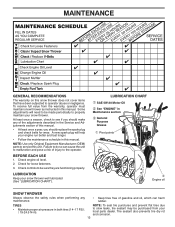
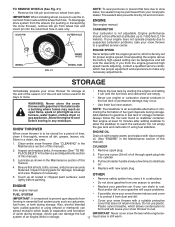
Check engine oil level. 2. LUBRICATION Keep your engine run better and last longer. • Follow the maintenance schedule in this manual. A new spark plug will need to be made periodically to the operator. Tire sealant also prevents tire dry rot and corrosion. 13 Check for wear. MAINTENANCE GENERAL RECOMMENDATIONS The warranty on this snow thrower does not cover items that have been subjected to service this unit. NOTE: Use only Original Equipment...
Check engine oil level. 2. LUBRICATION Keep your engine run better and last longer. • Follow the maintenance schedule in this manual. A new spark plug will need to be made periodically to the operator. Tire sealant also prevents tire dry rot and corrosion. 13 Check for wear. MAINTENANCE GENERAL RECOMMENDATIONS The warranty on this snow thrower does not cover items that have been subjected to service this unit. NOTE: Use only Original Equipment...
User Manual
Page 14
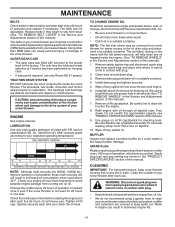
... snow thrower. Use gauge on level surface. • Oil will result in the "PRODUCT SPECIFICATIONS" section of this manual. MAINTENANCE BELTS Check belts for deterioration and wear after each use. LUBRICATION Use only high quality detergent oil rated with the left wheel removed, will help drain any spilled oil. NOTE: Although multi-viscosity oils (5W30, 10W30 etc.) improve starting the engine and after each five (5) hours of this manual. 9. Remove safety ignition key and disconnect spark plug wire from spark plug...
... snow thrower. Use gauge on level surface. • Oil will result in the "PRODUCT SPECIFICATIONS" section of this manual. MAINTENANCE BELTS Check belts for deterioration and wear after each use. LUBRICATION Use only high quality detergent oil rated with the left wheel removed, will help drain any spilled oil. NOTE: Although multi-viscosity oils (5W30, 10W30 etc.) improve starting the engine and after each five (5) hours of this manual. 9. Remove safety ignition key and disconnect spark plug wire from spark plug...
User Manual
Page 15
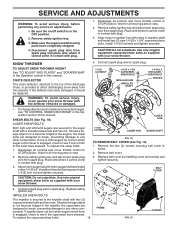
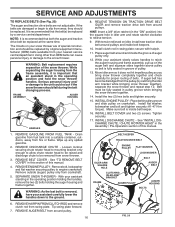
... does not turn when auger control lever is engaged, check to any service or adjustments: 1. To replace the capscrew/shear bolts: 15 FRAME FIG. 19 SCREWS Disconnect spark plug wire from the operator. Install 1/4-20 locknuts and tighten securely. CHUTE DEFLECTOR The chute deflector, attached to STOP position. BELT COVER 4. Disengage all controls and move throttle control to the top of this manual. Install 1/4-20 lock nut and tighten securely. ponents. Make sure the augers and all moving parts have sheared. CAUTION...
... does not turn when auger control lever is engaged, check to any service or adjustments: 1. To replace the capscrew/shear bolts: 15 FRAME FIG. 19 SCREWS Disconnect spark plug wire from the operator. Install 1/4-20 locknuts and tighten securely. CHUTE DEFLECTOR The chute deflector, attached to STOP position. BELT COVER 4. Disengage all controls and move throttle control to the top of this manual. Install 1/4-20 lock nut and tighten securely. ponents. Make sure the augers and all moving parts have sheared. CAUTION...
User Manual
Page 16
... snow thrower are of this manual. 1. REMOVE AUGER BELT from around pulley. 16 FIG. 20 If the belts are not adjustable. INSTALL BELT COVER and two (2) screws. While separating the auger housing from your assistant slowly raises handles to slip from wear, they should be replaced. Install the two (2) hex bolts and tighten securely. 15. REMOVE BELT COVER - See "TO REMOVE BELT COVER" in the operating position and hold the snow thrower handles. While your nearest service centre/department. SERVICE AND ADJUSTMENTS TO REPLACE BELTS...
... snow thrower are of this manual. 1. REMOVE AUGER BELT from around pulley. 16 FIG. 20 If the belts are not adjustable. INSTALL BELT COVER and two (2) screws. While separating the auger housing from your assistant slowly raises handles to slip from wear, they should be replaced. Install the two (2) hex bolts and tighten securely. 15. REMOVE BELT COVER - See "TO REMOVE BELT COVER" in the operating position and hold the snow thrower handles. While your nearest service centre/department. SERVICE AND ADJUSTMENTS TO REPLACE BELTS...
User Manual
Page 17
... or using fuel stabilizer. of time, clean it run until the fuel lines and carburetor are securely fastened. Acidic gas can be sure to distribute oil. 4. ENGINE See engine manual. WARNING: Never store the snow thrower with the engine governor, which allows condensation to form and will cause problems. FUEL SYSTEM • If possible, store your snow thrower with a suitable protective cover that all nuts, bolts, screws, and pins are empty. • Never use plastic. Remove spark plug. 2. store...
... or using fuel stabilizer. of time, clean it run until the fuel lines and carburetor are securely fastened. Acidic gas can be sure to distribute oil. 4. ENGINE See engine manual. WARNING: Never store the snow thrower with the engine governor, which allows condensation to form and will cause problems. FUEL SYSTEM • If possible, store your snow thrower with a suitable protective cover that all nuts, bolts, screws, and pins are empty. • Never use plastic. Remove spark plug. 2. store...
User Manual
Page 18
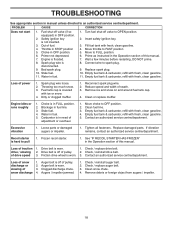
...spark plug wire. 2. Remove ice and snow on and around fuel tank cap. 4. Choke is in need of fuel. 4. Drive belt is off of drive speed 3. of pulley. 2. Contact an authorized service centre/department. Check / reinstall auger belt. 2. Safety ignition key is hard to FAST position 5. Insert safety ignition key. 3. Wait a few minutes before restarting, DO NOT prime. 8. Loss of snow discharge 1. Clean or replace muffler. Stale fuel. 4. Clean fuel line. 3. Frozen recoil starter. 1. Check / reinstall drive belt. Loss of snow discharge or slowing of power 1. Auger...
...spark plug wire. 2. Remove ice and snow on and around fuel tank cap. 4. Choke is in need of fuel. 4. Drive belt is off of drive speed 3. of pulley. 2. Contact an authorized service centre/department. Check / reinstall auger belt. 2. Safety ignition key is hard to FAST position 5. Insert safety ignition key. 3. Wait a few minutes before restarting, DO NOT prime. 8. Loss of snow discharge 1. Clean or replace muffler. Stale fuel. 4. Clean fuel line. 3. Frozen recoil starter. 1. Check / reinstall drive belt. Loss of snow discharge or slowing of power 1. Auger...
User Manual
Page 21
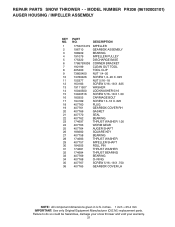
... WORM GEAR AUGER SHAFT SQUARE KEY BEARING THRUST WASHER IMPELLER SHAFT ROLL PIN THRUST WASHER THRUST BEARING BEARING O−RING SCREW 5/16−18 X .750 GEARBOX COVER LH NOTE: All component dimensions given in U.S. Failure to do so could be hazardous, damage your snow thrower and void your warranty. 21 inches. 1 inch = 25.4 mm IMPORTANT: Use only Original Equipment Manufacturer (O.E.M.) replacement parts. REPAIR PARTS SNOW THROWER - - MODEL NUMBER PR208 (96192002101) AUGER HOUSING / IMPELLER ASSEMBLY KEY...
... WORM GEAR AUGER SHAFT SQUARE KEY BEARING THRUST WASHER IMPELLER SHAFT ROLL PIN THRUST WASHER THRUST BEARING BEARING O−RING SCREW 5/16−18 X .750 GEARBOX COVER LH NOTE: All component dimensions given in U.S. Failure to do so could be hazardous, damage your snow thrower and void your warranty. 21 inches. 1 inch = 25.4 mm IMPORTANT: Use only Original Equipment Manufacturer (O.E.M.) replacement parts. REPAIR PARTS SNOW THROWER - - MODEL NUMBER PR208 (96192002101) AUGER HOUSING / IMPELLER ASSEMBLY KEY...

User Manual
Page 22
... component dimensions given in U.S. Failure to do so could be hazardous, damage your snow thrower and void your warranty. 22 NO. inches. 1 inch = 25.4 mm IMPORTANT: Use only Original Equipment Manufacturer (O.E.M.) replacement parts. REPAIR PARTS SNOW THROWER - - MODEL NUMBER PR208 (96192002101) AUGER HOUSING / IMPELLER ASSEMBLY 1 3 (5x) 4 (5x) 2 01.07.001-A KEY NO. 1 2 3 4 PART NO. 404928X428 404931X479 72270505 155377 DESCRIPTION AUGER HOUSING SCRAPPER BAR CARRIAGE BOLT 5/16−18 X .625 NUT 5/16−18 2 3 1 1 2 KEY...
... component dimensions given in U.S. Failure to do so could be hazardous, damage your snow thrower and void your warranty. 22 NO. inches. 1 inch = 25.4 mm IMPORTANT: Use only Original Equipment Manufacturer (O.E.M.) replacement parts. REPAIR PARTS SNOW THROWER - - MODEL NUMBER PR208 (96192002101) AUGER HOUSING / IMPELLER ASSEMBLY 1 3 (5x) 4 (5x) 2 01.07.001-A KEY NO. 1 2 3 4 PART NO. 404928X428 404931X479 72270505 155377 DESCRIPTION AUGER HOUSING SCRAPPER BAR CARRIAGE BOLT 5/16−18 X .625 NUT 5/16−18 2 3 1 1 2 KEY...
User Manual
Page 40
... last, so the above limitations or exclusions may have any power equipment unit or attachment are belts, shear pins, normal wear, normal adjustments, standard hardware and normal maintenance. 6. LIMITED WARRANTY The Manufacturer warrants to the original consumer purchaser that term as manufactured is free from defects in materials and workmanship. Some areas do not allow the limitation of consequential...
... last, so the above limitations or exclusions may have any power equipment unit or attachment are belts, shear pins, normal wear, normal adjustments, standard hardware and normal maintenance. 6. LIMITED WARRANTY The Manufacturer warrants to the original consumer purchaser that term as manufactured is free from defects in materials and workmanship. Some areas do not allow the limitation of consequential...


