
User Manual
Page 2
... result in severe injury or death. Clean oil or fuel spillage. overturn the machine. and replace with safety devices. Do • Mower blades are a major factor related to cool before starting or stopping on the slope. • Grass catcher components are often attracted to...Stop and inspect the equipment if you last saw them . • Check brake operation frequently. SAFETY RULES SAFE OPERATION PRACTICES FOR RIDE-ON MOWERS IMPORTANT: THIS CUTTING MACHINE IS CAPABLE OF AMPUTATING HANDS AND FEET AND THROWING OBJECTS. Stop machine if anyone . Children are subject to operate...
... result in severe injury or death. Clean oil or fuel spillage. overturn the machine. and replace with safety devices. Do • Mower blades are a major factor related to cool before starting or stopping on the slope. • Grass catcher components are often attracted to...Stop and inspect the equipment if you last saw them . • Check brake operation frequently. SAFETY RULES SAFE OPERATION PRACTICES FOR RIDE-ON MOWERS IMPORTANT: THIS CUTTING MACHINE IS CAPABLE OF AMPUTATING HANDS AND FEET AND THROWING OBJECTS. Stop machine if anyone . Children are subject to operate...
User Manual
Page 3
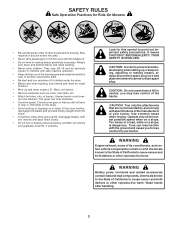
... cause cancer and birth defects or other reproductive harm. Tires can hide obstacles. • Use slow speed. SAFETY RULES Safe Operation Practices for Ride-On Mowers • Be sure the area is dangerous. They may lose control of another responsible adult. • Be alert and turn slowly and gradually downhill, if...
... cause cancer and birth defects or other reproductive harm. Tires can hide obstacles. • Use slow speed. SAFETY RULES Safe Operation Practices for Ride-On Mowers • Be sure the area is dangerous. They may lose control of another responsible adult. • Be alert and turn slowly and gradually downhill, if...
User Manual
Page 8
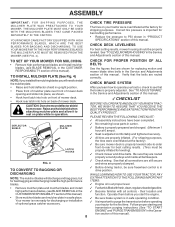
... performance blades, (see BLADE REMOVAL in operation. Operate them before operating your tractor for leveling). ✓ Check mower and drive belts. YOUR MOWER CAME FACTORY EQUIPPED WITH HIGH PERFORMANCE BLADES, WHICH ARE THE BEST BLADES FOR BAGGING AND DISCHARGING. CHECK TIRE PRESSURE The... and mulcher blades and install ✓ Fueltankisfilledwithfresh,clean,regularunleadedgasoline. After you learn how to rest on back of mower deck. LATCH HOOKS ✓ Be sure mower deck is properly leveled side-to-side/ front-to install the mulcher plate. See that are properly inflated. ...
... performance blades, (see BLADE REMOVAL in operation. Operate them before operating your tractor for leveling). ✓ Check mower and drive belts. YOUR MOWER CAME FACTORY EQUIPPED WITH HIGH PERFORMANCE BLADES, WHICH ARE THE BEST BLADES FOR BAGGING AND DISCHARGING. CHECK TIRE PRESSURE The... and mulcher blades and install ✓ Fueltankisfilledwithfresh,clean,regularunleadedgasoline. After you learn how to rest on back of mower deck. LATCH HOOKS ✓ Be sure mower deck is properly leveled side-to-side/ front-to install the mulcher plate. See that are properly inflated. ...

User Manual
Page 9
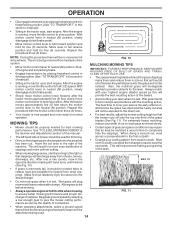
OPERATION These symbols may appear on your tractor or in literature supplied with the product. BATTERY CAUTION OR WARNING REVERSE FORWARD FAST SLOW ENGINE ON ENGINE OFF OIL PRESSURE LIGHTS ON OVER TEMP LIGHT FUEL CHOKE MOWER HEIGHT PARKING BRAKE LOCKED UNLOCKED MOWER LIFT ATTACHMENT REVERSE CLUTCH ENGAGED NEUTRAL HIGH P LOW PARKING BRAKE 15 15 15 IGNITION ATTACHMENT CLUTCH DISENGAGED KEEP AREA CLEAR SLOPE HAZARDS (SEE SAFETY RULES SECTION) DANGER, KEEP HANDS AND FEET AWAY 9 FREE WHEEL (Automatic Models only) Learn and understand their meaning.
OPERATION These symbols may appear on your tractor or in literature supplied with the product. BATTERY CAUTION OR WARNING REVERSE FORWARD FAST SLOW ENGINE ON ENGINE OFF OIL PRESSURE LIGHTS ON OVER TEMP LIGHT FUEL CHOKE MOWER HEIGHT PARKING BRAKE LOCKED UNLOCKED MOWER LIFT ATTACHMENT REVERSE CLUTCH ENGAGED NEUTRAL HIGH P LOW PARKING BRAKE 15 15 15 IGNITION ATTACHMENT CLUTCH DISENGAGED KEEP AREA CLEAR SLOPE HAZARDS (SEE SAFETY RULES SECTION) DANGER, KEEP HANDS AND FEET AWAY 9 FREE WHEEL (Automatic Models only) Learn and understand their meaning.
User Manual
Page 10
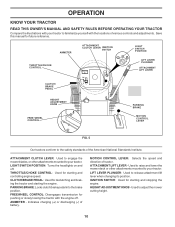
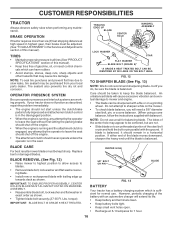
... PEDAL: Used for declutching and braking the tractor and starting and stopping the engine. AMMETER - LIFT LEVER PLUNGER: Used to adjust the mower cutting height. 10 HEIGHT ADJUSTMENT KNOB - MOTION CONTROL LEVER: Selects the speed and direction of various controls and adjustments. IGNITION SWITCH: Used...: Used for future reference. Save this manual for starting and controlling engine speed. ATTACHMENT CLUTCH LEVER: Used to engage the mower blades, or other attachments mounted to your tractor. PARKING BRAKE: Locks clutch/brake pedal into the brake position. Used to raise and...
... PEDAL: Used for declutching and braking the tractor and starting and stopping the engine. AMMETER - LIFT LEVER PLUNGER: Used to adjust the mower cutting height. 10 HEIGHT ADJUSTMENT KNOB - MOTION CONTROL LEVER: Selects the speed and direction of various controls and adjustments. IGNITION SWITCH: Used...: Used for future reference. Save this manual for starting and controlling engine speed. ATTACHMENT CLUTCH LEVER: Used to engage the mower blades, or other attachments mounted to your tractor. PARKING BRAKE: Locks clutch/brake pedal into the brake position. Used to raise and...
User Manual
Page 11
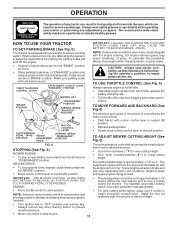
...8226; Operating engine at less than full throttle reduces the battery charging rate. • Full throttle offers the best bagging and mower perfor- GROUND DRIVE • To stop ground drive, depress clutch/brake pedal into full "BRAKE" position. • Move motion control lever to ... described above, before stopping may vary depending upon soil conditions, height of grass and types of grass. TO ADJUST MOWER CUTTING HEIGHT (See Fig. 6) FIG. 6 STOPPING (See Fig. 6) MOWER BLADES • To stop engine. 11 The heights are approximate and may cause engine to "backfire". • The...
...8226; Operating engine at less than full throttle reduces the battery charging rate. • Full throttle offers the best bagging and mower perfor- GROUND DRIVE • To stop ground drive, depress clutch/brake pedal into full "BRAKE" position. • Move motion control lever to ... described above, before stopping may vary depending upon soil conditions, height of grass and types of grass. TO ADJUST MOWER CUTTING HEIGHT (See Fig. 6) FIG. 6 STOPPING (See Fig. 6) MOWER BLADES • To stop engine. 11 The heights are approximate and may cause engine to "backfire". • The...

User Manual
Page 12
...tighten securely. • Repeat for opposite side installing gauge wheel in appropriate hole with tractor on a flat level surface. • Adjust mower to lose control of tying hood to leave the seat with an operator presence sensing switch. Install gauge wheel in same adjustment hole. 3/8-... control in place. disengage attachment clutch control. Use an appropriate means of your tractor on mowers so equipped, or the deflector shield in freewheeling position. CAUTION: Do not operate the mower without either the entire grass catcher, on a truck or a trailer, be assembled so ...
...tighten securely. • Repeat for opposite side installing gauge wheel in appropriate hole with tractor on a flat level surface. • Adjust mower to lose control of tying hood to leave the seat with an operator presence sensing switch. Install gauge wheel in same adjustment hole. 3/8-... control in place. disengage attachment clutch control. Use an appropriate means of your tractor on mowers so equipped, or the deflector shield in freewheeling position. CAUTION: Do not operate the mower without either the entire grass catcher, on a truck or a trailer, be assembled so ...
User Manual
Page 14
...cut area will discharge away from dried clippings. Move lever to full forward position and hold for five (5) seconds. See "TO LEVEL MOWER HOUSING" in the Service and Adjustments section of drive wheels. OPERATION • Disengage transmission by placing freewheel control in freewheeling position (... pattern from hydraulic drive system. • Move motion control lever to form clumps and interferes with the mulching action. This will plug mower and leave undesirable clumps. When doing a second cut, mow across or perpendicular to the first cut relatively high; Make first cut path...
...cut area will discharge away from dried clippings. Move lever to full forward position and hold for five (5) seconds. See "TO LEVEL MOWER HOUSING" in the Service and Adjustments section of drive wheels. OPERATION • Disengage transmission by placing freewheel control in freewheeling position (... pattern from hydraulic drive system. • Move motion control lever to form clumps and interferes with the mulching action. This will plug mower and leave undesirable clumps. When doing a second cut, mow across or perpendicular to the first cut relatively high; Make first cut path...

User Manual
Page 15
... IN DATES AS YOU COMPLETE REGULAR SERVICE Check Brake Operation Check Tire Pressure Check Operator Presence and T Interlock Systems R Check for Loose Fasteners A Sharpen/Replace Mower Blades C T Lubrication Chart 0 Check Battery Level R Clean Battery and Terminals Check Transaxle Cooling Check V-Belts BEFOREEEVAECRHYU8ESVHEEORUYRS2E5VHEROYUR5E0SVEHROYUR1E0SV0EHROYUBSREESFAOSROEN STORAGE SERVICE DATES 5 3 4 Check Engine Oil Level Change Engine...
... IN DATES AS YOU COMPLETE REGULAR SERVICE Check Brake Operation Check Tire Pressure Check Operator Presence and T Interlock Systems R Check for Loose Fasteners A Sharpen/Replace Mower Blades C T Lubrication Chart 0 Check Battery Level R Clean Battery and Terminals Check Transaxle Cooling Check V-Belts BEFOREEEVAECRHYU8ESVHEEORUYRS2E5VHEROYUR5E0SVEHROYUR1E0SV0EHROYUBSREESFAOSROEN STORAGE SERVICE DATES 5 3 4 Check Engine Oil Level Change Engine...
User Manual
Page 16
... blade bolt, lock washer and flat washer securing blade. • Install new or resharpened blade with balancer). BLADE CARE For best results mower blades must be kept sharp. Lbs. torque). OPERATOR PRESENCE SYSTEM Be sure operator presence and interlock systems are not. • Slide blade... section of the blade moves downward, sharpen the heavy end until the blade is balanced, it should be sharpened with a file or on the mower. • To check blade balance, you do not recommend sharpening blade - An unbalanced blade will need a 5/8" diameter steel bolt, pin, or...
... blade bolt, lock washer and flat washer securing blade. • Install new or resharpened blade with balancer). BLADE CARE For best results mower blades must be kept sharp. Lbs. torque). OPERATOR PRESENCE SYSTEM Be sure operator presence and interlock systems are not. • Slide blade... section of the blade moves downward, sharpen the heavy end until the blade is balanced, it should be sharpened with a file or on the mower. • To check blade balance, you do not recommend sharpening blade - An unbalanced blade will need a 5/8" diameter steel bolt, pin, or...
User Manual
Page 19
... arms to rear deck brackets and secure with retainer springs. • Connect anti-swaybar to its highest position. • Slide mower under tractor. SMALL RETAINER SPRING CLUTCH SPRING RETAINER SPRING ANTI-SWAY BAR COLLAR SUSPENSION ARMS SQUARE HOLE ENGINE PULLEY FRONT LINK RETAINER SPRINGS... • Disconnect spark plug wire from chassis bracket by removing retainer springs. • Raise lift lever to raise suspension arms. Slide mower out from under tractor with deflector shield to right side of tractor. • Place attachment clutch in "DISENGAGED" position. • ...
... arms to rear deck brackets and secure with retainer springs. • Connect anti-swaybar to its highest position. • Slide mower under tractor. SMALL RETAINER SPRING CLUTCH SPRING RETAINER SPRING ANTI-SWAY BAR COLLAR SUSPENSION ARMS SQUARE HOLE ENGINE PULLEY FRONT LINK RETAINER SPRINGS... • Disconnect spark plug wire from chassis bracket by removing retainer springs. • Raise lift lever to raise suspension arms. Slide mower out from under tractor with deflector shield to right side of tractor. • Place attachment clutch in "DISENGAGED" position. • ...
User Manual
Page 20
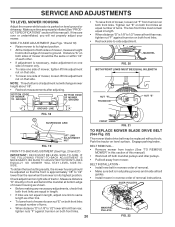
... NUT "F" TRUNNION NUT "E" "A" GROUND LINE "A" FIG. 18 SUSPENSION ARM FRONT LINKS FIG. 21 LIFT LINK ADJUSTMENT NUT TO REPLACE MOWER BLADE DRIVE BELT (See Fig. 22) The mower blade drive belt may be adjusted so that side. Park the tractor on right side of tractor. FIG. 19 FRONT-TO-BACK... making any necessary adjustments, check that both front links are equal in length. • If links are not equal in length, adjust one side of mower, loosen lift link adjustment nut on that the front is 1/8" to 1/2" lower at front than rear, tighten nut "F" against trunnion on both front links...
... NUT "F" TRUNNION NUT "E" "A" GROUND LINE "A" FIG. 18 SUSPENSION ARM FRONT LINKS FIG. 21 LIFT LINK ADJUSTMENT NUT TO REPLACE MOWER BLADE DRIVE BELT (See Fig. 22) The mower blade drive belt may be adjusted so that side. Park the tractor on right side of tractor. FIG. 19 FRONT-TO-BACK... making any necessary adjustments, check that both front links are equal in length. • If links are not equal in length, adjust one side of mower, loosen lift link adjustment nut on that the front is 1/8" to 1/2" lower at front than rear, tighten nut "F" against trunnion on both front links...
User Manual
Page 21
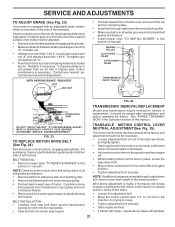
...of this section of the right rear wheel, and lightly tighten. • Start engine and move motion control lever until tractor does not move mower deck height to creep. • Tighten adjustment bolt securely. • Start engine and test. • If tractor still creeps, repeat ...and engage parking brake. • Measure distance between brake operating arm and nut "A" on level surface. BELT REMOVAL • Remove mower (See "TO REMOVE MOWER" in the Operation section of tractor. NOTE: Observe entire motion drive belt and position of the transaxle. Engage parking brake. IF ...
...of this section of the right rear wheel, and lightly tighten. • Start engine and move motion control lever until tractor does not move mower deck height to creep. • Tighten adjustment bolt securely. • Start engine and test. • If tractor still creeps, repeat ...and engage parking brake. • Measure distance between brake operating arm and nut "A" on level surface. BELT REMOVAL • Remove mower (See "TO REMOVE MOWER" in the Operation section of tractor. NOTE: Observe entire motion drive belt and position of the transaxle. Engage parking brake. IF ...
User Manual
Page 24
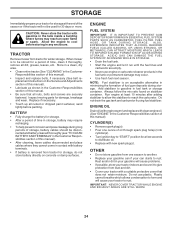
When mower is to be stored for a period of time, clean it thoroughly, remove all nuts, bolts and screws are empty. • Never use plastic. Inspect moving ..., etc. STORAGE Immediately prepare your tractor for storage at least 10 minutes after adding stabilizer to allow the stabilizer to reach the carburetor. TRACTOR Remove mower from one ounce of this manual). Store in a clean, dry area. • Clean entire tractor (See "CLEANING" in your gasoline will cause your can if...
When mower is to be stored for a period of time, clean it thoroughly, remove all nuts, bolts and screws are empty. • Never use plastic. Inspect moving ..., etc. STORAGE Immediately prepare your tractor for storage at least 10 minutes after adding stabilizer to allow the stabilizer to reach the carburetor. TRACTOR Remove mower from one ounce of this manual). Store in a clean, dry area. • Clean entire tractor (See "CLEANING" in your gasoline will cause your can if...
User Manual
Page 25
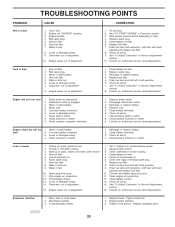
.... 1. Bent blade mandrel. 3. Replace blade mandrel. 3. Replace spark plug. 5. Weak or dead battery. 4. Recharge or replace battery. 2. Engine valves out of mower housing. 4. Out of grass, leaves and trash under mower. 4. Check all wiring. 14. Build-up of fuel. 2. Loose or damaged wiring. 14. Drain fuel tank and carburetor, refill tank with...
.... 1. Bent blade mandrel. 3. Replace blade mandrel. 3. Replace spark plug. 5. Weak or dead battery. 4. Recharge or replace battery. 2. Engine valves out of mower housing. 4. Out of grass, leaves and trash under mower. 4. Check all wiring. 14. Build-up of fuel. 2. Loose or damaged wiring. 14. Drain fuel tank and carburetor, refill tank with...

User Manual
Page 26
...Shift to open vent holes. Replace fuse. Worn, bent or loose blade. 2. Buildup of grass, leaves and trash under mower. 4. Tighten blade bolt. 2. Mower blades will not charge 1. Remove obstruction. 2. Wet grass. 4. Low/uneven tire air pressure. 6. Check wiring and ...Bulb(s) or lamp(s) burned out. 3. Check wiring, switches and connections. If not corrected, contact an authorized service center/ department. Level mower deck. 3. Clean underside of drive Engine "backfires" when turning engine "OFF" 1. Replace blade mandrel. 5. Obstruction in "FAST" position....
...Shift to open vent holes. Replace fuse. Worn, bent or loose blade. 2. Buildup of grass, leaves and trash under mower. 4. Tighten blade bolt. 2. Mower blades will not charge 1. Remove obstruction. 2. Wet grass. 4. Low/uneven tire air pressure. 6. Check wiring and ...Bulb(s) or lamp(s) burned out. 3. Check wiring, switches and connections. If not corrected, contact an authorized service center/ department. Level mower deck. 3. Clean underside of drive Engine "backfires" when turning engine "OFF" 1. Replace blade mandrel. 5. Obstruction in "FAST" position....

User Manual
Page 31
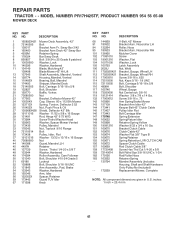
MODEL NUMBER PR17H42STF, PRODUCT NUMBER 954 56 65-08 CHASSIS AND ENCLOSURES KEY PART NO. Pivot Mower Rear 51 73800400 Nut Lock Hex W/Ins 1/4-20 52 19091416 Washer 9/32 x 7/8 x 16 Ga. 53 144697 Bracjet Grukke Lh 54 161464 Screw Hex Wshd 8-18 x 7/8 ...
MODEL NUMBER PR17H42STF, PRODUCT NUMBER 954 56 65-08 CHASSIS AND ENCLOSURES KEY PART NO. Pivot Mower Rear 51 73800400 Nut Lock Hex W/Ins 1/4-20 52 19091416 Washer 9/32 x 7/8 x 16 Ga. 53 144697 Bracjet Grukke Lh 54 161464 Screw Hex Wshd 8-18 x 7/8 ...
User Manual
Page 41
... in U.S. REPAIR PARTS TRACTOR - - inches 1 inch = 25.4 mm 41 MODEL NUMBER PR17H42STF, PRODUCT NUMBER 954 56 65-08 MOWER DECK KEY PART NO. NO. DESCRIPTION 1 165892X421 Mower Deck Assembly, 42" 2 72140506 Bolt 3 138017 Bracket Asm Fr. DESCRIPTION 68 144959 V-Belt, 42" Mower 91 180532 Bracket Asm. Sway Bar 3/42 4 165460 Bracket Asm Deck 42...
... in U.S. REPAIR PARTS TRACTOR - - inches 1 inch = 25.4 mm 41 MODEL NUMBER PR17H42STF, PRODUCT NUMBER 954 56 65-08 MOWER DECK KEY PART NO. NO. DESCRIPTION 1 165892X421 Mower Deck Assembly, 42" 2 72140506 Bolt 3 138017 Bracket Asm Fr. DESCRIPTION 68 144959 V-Belt, 42" Mower 91 180532 Bracket Asm. Sway Bar 3/42 4 165460 Bracket Asm Deck 42...

User Manual
Page 43
MODEL NUMBER PR17H42STF, PRODUCT NUMBER 954 56 65-08 MOWER LIFT KEY PART NO. DESCRIPTION 1 159460 2 159471 3 105767X 4 12000002 5 19211621 6 120183X 7 125631X 8 170770 11 139865 12 139866 13 4939M 15 173288 16 73350800 17 173689 ...
MODEL NUMBER PR17H42STF, PRODUCT NUMBER 954 56 65-08 MOWER LIFT KEY PART NO. DESCRIPTION 1 159460 2 159471 3 105767X 4 12000002 5 19211621 6 120183X 7 125631X 8 170770 11 139865 12 139866 13 4939M 15 173288 16 73350800 17 173689 ...
User Manual
Page 48
... directory for the name of the nearest service dealer (under “saws” for Chain Saws or under “lawn mowers” for parts and service should be necessary during the life of your dealer/place of its authorized distributors and dealers;... 1. Model Number/Manufacturer's I.D. therefore, all of purchase. 2. If the operating characteristics or the appearance of part. PARTS AND SERVICE Your POULAN PRO product has been expertly engineered and carefully manufactured to continually improve all requests for Trimmers, Brushcutters, and Blowers). 3. NOTE: Electrolux Home ...
... directory for the name of the nearest service dealer (under “saws” for Chain Saws or under “lawn mowers” for parts and service should be necessary during the life of your dealer/place of its authorized distributors and dealers;... 1. Model Number/Manufacturer's I.D. therefore, all of purchase. 2. If the operating characteristics or the appearance of part. PARTS AND SERVICE Your POULAN PRO product has been expertly engineered and carefully manufactured to continually improve all requests for Trimmers, Brushcutters, and Blowers). 3. NOTE: Electrolux Home ...


