
User Manual
Page 2
...the area of operation clear of trouble. Thoroughly inspect the area where the equipment is highly flammable (f) Keep the nozzle in moving parts. Disengage all times. (a) Use an approved fuel container. 2. Wear footwear that may be thrown from the spark plug, disconnect...eyes from a gasoline dispenser nozzle. 2 5. Do not operate the equipment without proper instruction. 3. CAUTION: Muffler and other engine parts become extremely hot during operation or while performing an adjustment or repair to operate the equipment. Never attempt to stop the engine (motor...
...the area of operation clear of trouble. Thoroughly inspect the area where the equipment is highly flammable (f) Keep the nozzle in moving parts. Disengage all times. (a) Use an approved fuel container. 2. Wear footwear that may be thrown from the spark plug, disconnect...eyes from a gasoline dispenser nozzle. 2 5. Do not operate the equipment without proper instruction. 3. CAUTION: Muffler and other engine parts become extremely hot during operation or while performing an adjustment or repair to operate the equipment. Never attempt to stop the engine (motor...

User Manual
Page 3
... CONTENTS SAFETY RULES 2-3 MAINTENANCE 14-15 PRODUCT SPECIFICATIONS 3 SERVICE AND ADJUSTMENTS 16-18 CUSTOMER RESPONSIBILITIES 3 STORAGE 19 ASSEMBLY / PRE-OPERATION 5-7 TROUBLESHOOTING 20 OPERATION 8-13 REPAIR PARTS 22-39 MAINTENANCE SCHEDULE 14 3 WARRANTY BACK PAGE Never direct the discharge toward people or areas where property damage can occur. Keep children and others... OF THE SNOW THROWER HOUSING. When cleaning, repairing or inspecting the snow thrower, stop the engine and make certain the collector/impeller and all moving parts have stopped.
... CONTENTS SAFETY RULES 2-3 MAINTENANCE 14-15 PRODUCT SPECIFICATIONS 3 SERVICE AND ADJUSTMENTS 16-18 CUSTOMER RESPONSIBILITIES 3 STORAGE 19 ASSEMBLY / PRE-OPERATION 5-7 TROUBLESHOOTING 20 OPERATION 8-13 REPAIR PARTS 22-39 MAINTENANCE SCHEDULE 14 3 WARRANTY BACK PAGE Never direct the discharge toward people or areas where property damage can occur. Keep children and others... OF THE SNOW THROWER HOUSING. When cleaning, repairing or inspecting the snow thrower, stop the engine and make certain the collector/impeller and all moving parts have stopped.

User Manual
Page 4
PARTS PACKED SEPARATELY IN CARTON (1) POWER CORD (198563) (1) MULTIWRENCH (180684) (3) RETAINER SPRINGS (169675) (2) FLAT WASHERS (2) SHEAR BOLTS 1/4-20 x 1-3/4 (192090) (2) LOCKNUTS 1/4-20 (73800400) (2) CARRIAGE BOLTS 3/8-16 x 2.25 (2) HANDLE KNOBS SAFTEY IGNITION KEY(S) (422663) (1) WASHER 3/8 (19131316) (1) LOCKNUT 3/8 (73800600) (1) LOCKNUT 5/16-18 (751153) (1) CARRIAGE BOLT 5/16-18 x 5/8 (72250505) (1) LOCKNUT 1/4-20 (191730) (1) SHOULDER BOLT 1/4-20 (179829) (1) SPRING (184505) 4
PARTS PACKED SEPARATELY IN CARTON (1) POWER CORD (198563) (1) MULTIWRENCH (180684) (3) RETAINER SPRINGS (169675) (2) FLAT WASHERS (2) SHEAR BOLTS 1/4-20 x 1-3/4 (192090) (2) LOCKNUTS 1/4-20 (73800400) (2) CARRIAGE BOLTS 3/8-16 x 2.25 (2) HANDLE KNOBS SAFTEY IGNITION KEY(S) (422663) (1) WASHER 3/8 (19131316) (1) LOCKNUT 3/8 (73800600) (1) LOCKNUT 5/16-18 (751153) (1) CARRIAGE BOLT 5/16-18 x 5/8 (72250505) (1) LOCKNUT 1/4-20 (191730) (1) SHOULDER BOLT 1/4-20 (179829) (1) SPRING (184505) 4

User Manual
Page 5
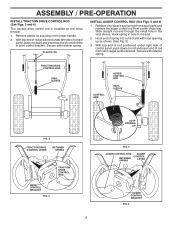
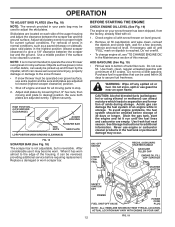
...handle. REMOVE SNOW THROWER FROM CARTON 1. Cut down all accessible loose parts and parts boxes from carton and check carton thoroughly for additional loose parts. Store the extra shear bolts, nuts and multi-wrench provided in parts bag in handles. FIG. 1 SPEED CONTROL ROD RETAINER SPRING SPEED ...snow thrower from carton. 2. Use the correct tools as nuts, washers, bolts, etc., necessary to complete the assembly have been placed in the parts bag. Additional carriage bolts, washers and handle knobs are in bag of the belt cover. INSTALL SPEED CONTROL ROD (See Figs. 1 and 2) ...
...handle. REMOVE SNOW THROWER FROM CARTON 1. Cut down all accessible loose parts and parts boxes from carton and check carton thoroughly for additional loose parts. Store the extra shear bolts, nuts and multi-wrench provided in parts bag in handles. FIG. 1 SPEED CONTROL ROD RETAINER SPRING SPEED ...snow thrower from carton. 2. Use the correct tools as nuts, washers, bolts, etc., necessary to complete the assembly have been placed in the parts bag. Additional carriage bolts, washers and handle knobs are in bag of the belt cover. INSTALL SPEED CONTROL ROD (See Figs. 1 and 2) ...
User Manual
Page 6
... opening up as shown. (See Fig. 5) 3. With top end of rod positioned under right side of control panel, push down and insert top end of parts and retrieve the auger control rod from bag of rod into control arm with retainer spring. With top end of rod positioned under left side...
... opening up as shown. (See Fig. 5) 3. With top end of rod positioned under right side of control panel, push down and insert top end of parts and retrieve the auger control rod from bag of rod into control arm with retainer spring. With top end of rod positioned under left side...
User Manual
Page 7
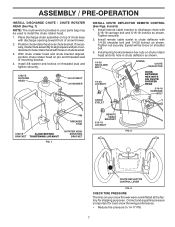
... CONTROL (See Figs. 8 and 9) 1. Eyelet will be used to chute deflector with discharge opening toward front of snow thrower. 2. Place discharge chute assembly on your parts bag may be loose on threaded stud and tighten securely.
... CONTROL (See Figs. 8 and 9) 1. Eyelet will be used to chute deflector with discharge opening toward front of snow thrower. 2. Place discharge chute assembly on your parts bag may be loose on threaded stud and tighten securely.
User Manual
Page 10
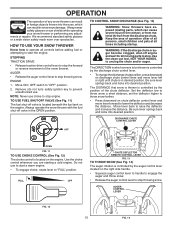
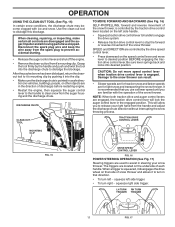
...switch to unclog the chute and/or auger. Always operate the snow thrower with the fuel shut-off engine and wait for all moving parts to operate all times including startup. set the deflector higher to stop throwing snow. STOPPING TRACTION DRIVE • Release traction drive control lever... AUGER • Release the auger control lever to stop engine. TO CONTROL SNOW DISCHARGE (See Fig. 13) WARNING: Snow throwers have exposed rotating parts, which can cause severe injury from contact, or from material thrown from the discharge chute. Use the clean-out tool, NOT YOUR HANDS, to...
...switch to unclog the chute and/or auger. Always operate the snow thrower with the fuel shut-off engine and wait for all moving parts to operate all times including startup. set the deflector higher to stop throwing snow. STOPPING TRACTION DRIVE • Release traction drive control lever... AUGER • Release the auger control lever to stop engine. TO CONTROL SNOW DISCHARGE (See Fig. 13) WARNING: Snow throwers have exposed rotating parts, which can cause severe injury from contact, or from material thrown from the discharge chute. Use the clean-out tool, NOT YOUR HANDS, to...
User Manual
Page 11
... the discharge chute is engaged. LH TURN RH TURN TRIGGER TRIGGER 11 FIG. 17 The triggers are disengaged and the auger/impeller and all moving parts have stopped. squeeze left side handle. • Squeeze traction drive control lever to handle to engage the drive system. • Release traction drive control lever...
... the discharge chute is engaged. LH TURN RH TURN TRIGGER TRIGGER 11 FIG. 17 The triggers are disengaged and the auger/impeller and all moving parts have stopped. squeeze left side handle. • Squeeze traction drive control lever to handle to engage the drive system. • Release traction drive control lever...
User Manual
Page 12
... damage may become worn. To avoid engine problems, the fuel system should be picked up and thrown by loosening the 1/2" hex nuts, then moving parts to the edge of the auger housing and adjust the clearance between the scraper bar and the ground. ON / OFF SWITCH CHOKE CONTROL RECOIL (AUXILIARY...the housing, it can be sure skid plates are adjusted evenly. If necessary, add oil until the fuel lines and carburetor are located on your parts bag may be operated over gravel or rocky surfaces. Drain the gas tank, start the engine and let it may occur. Do not overfill. ...
... damage may become worn. To avoid engine problems, the fuel system should be picked up and thrown by loosening the 1/2" hex nuts, then moving parts to the edge of the auger housing and adjust the clearance between the scraper bar and the ground. ON / OFF SWITCH CHOKE CONTROL RECOIL (AUXILIARY...the housing, it can be sure skid plates are adjusted evenly. If necessary, add oil until the fuel lines and carburetor are located on your parts bag may be operated over gravel or rocky surfaces. Drain the gas tank, start the engine and let it may occur. Do not overfill. ...

User Manual
Page 14
To receive full value from the warranty, operator must maintain snow thrower as instructed in this manual. NOTE: Use only Original Equipment Manufacturer (OEM) parts to service this snow thrower does not cover items that have been subjected to properly maintain your snow thrower well lubricated (See "LUBRICATION CHART"). A new ...
To receive full value from the warranty, operator must maintain snow thrower as instructed in this manual. NOTE: Use only Original Equipment Manufacturer (OEM) parts to service this snow thrower does not cover items that have been subjected to properly maintain your snow thrower well lubricated (See "LUBRICATION CHART"). A new ...

User Manual
Page 15
... come in the "PRODUCT SPECIFICATIONS" section of a suitable container. Spark plug type and gap setting are lifetime lubricated and require no lubrication. Check your local parts dealer. Replace belts if they begin to slip from snow thrower for checking level. The V-belts on the gear case. The only time the lubricant...
... come in the "PRODUCT SPECIFICATIONS" section of a suitable container. Spark plug type and gap setting are lifetime lubricated and require no lubrication. Check your local parts dealer. Replace belts if they begin to slip from snow thrower for checking level. The V-belts on the gear case. The only time the lubricant...

User Manual
Page 16
... belt cover by installing cover and screws and tighten securely. CHUTE DEFLECTOR The chute deflector, attached to any other components. Disengage all moving parts to direct discharging snow away from spark plug and place wire where it cannot come in the OFF position. 2. Remove the two (2) screws...snow is engaged, check to see if one or both of the discharge chute, is provided to stop . 2. Wait for all moving parts have sheared. 16 FRAME FIG. 21 SCREWS Place wire where it should be replaced. WARNING: To avoid serious injury, never operate your snow...
... belt cover by installing cover and screws and tighten securely. CHUTE DEFLECTOR The chute deflector, attached to any other components. Disengage all moving parts to direct discharging snow away from spark plug and place wire where it cannot come in the OFF position. 2. Remove the two (2) screws...snow is engaged, check to see if one or both of the discharge chute, is provided to stop . 2. Wait for all moving parts have sheared. 16 FRAME FIG. 21 SCREWS Place wire where it should be replaced. WARNING: To avoid serious injury, never operate your snow...

User Manual
Page 18
... used for proper engine speed. SERVICE AND ADJUSTMENTS TO REMOVE WHEELS (See Fig. 23) • Remove the klik pin and remove wheel from your local parts dealer. do not use the axle hole closest to 7,000 feet (2,134 meters). Grasp the long section tightly and turn buckle, located on the right...
... used for proper engine speed. SERVICE AND ADJUSTMENTS TO REMOVE WHEELS (See Fig. 23) • Remove the klik pin and remove wheel from your local parts dealer. do not use the axle hole closest to 7,000 feet (2,134 meters). Grasp the long section tightly and turn buckle, located on the right...

User Manual
Page 19
...; Cover your snow thrower indoors and cover it to protect it in a safe place. • Do not store gasoline from forming in essential fuel system parts such as shown in the fuel tank or permanent damage may reach an open flame, spark or pilot light as on stabilizer container. Do not... not drain the gas tank and carburetor if using ethanol or methanol) can starts to rust. Be sure that does not retain moisture. Inspect moving parts for storage at least 10 minutes after adding stabilizer to allow the stabilizer to distribute oil. 4. Touch up all nuts, bolts, screws, and pins are...
...; Cover your snow thrower indoors and cover it to protect it in a safe place. • Do not store gasoline from forming in essential fuel system parts such as shown in the fuel tank or permanent damage may reach an open flame, spark or pilot light as on stabilizer container. Do not... not drain the gas tank and carburetor if using ethanol or methanol) can starts to rust. Be sure that does not retain moisture. Inspect moving parts for storage at least 10 minutes after adding stabilizer to allow the stabilizer to distribute oil. 4. Touch up all nuts, bolts, screws, and pins are...

User Manual
Page 20
...of swath. 3. Spark plug wire loose. 2. Reduce speed and width of power 1. Move choke to spark plug. 9. Loose parts or damaged augers or impeller. 1. Check / reinstall drive belt. TROUBLESHOOTING See appropriate section in manual unless directed to OPEN position... carburetor, refill with ice or snow. 4. Contact an authorized service center/department. Excessive vibration 1. Tighten all fasteners. Replace damaged parts. If vibration remains, contact an authorized service center/department. Recoil starter is worn. 1. Frozen recoil starter. 1. See "IF ...
...of swath. 3. Spark plug wire loose. 2. Reduce speed and width of power 1. Move choke to spark plug. 9. Loose parts or damaged augers or impeller. 1. Check / reinstall drive belt. TROUBLESHOOTING See appropriate section in manual unless directed to OPEN position... carburetor, refill with ice or snow. 4. Contact an authorized service center/department. Excessive vibration 1. Tighten all fasteners. Replace damaged parts. If vibration remains, contact an authorized service center/department. Recoil starter is worn. 1. Frozen recoil starter. 1. See "IF ...
User Manual
Page 21
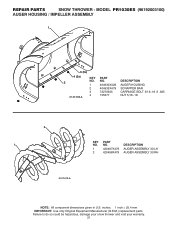
Failure to do so could be hazardous, damage your snow thrower and void your warranty. 21 REPAIR PARTS SNOW THROWER - MODEL PR1030ES (96192003100) AUGER HOUSING / IMPELLER ASSEMBLY 1 3 (5x) 4 (5x) 2 01.07.003-A KEY NO. 1 2 3 4 PART NO. 404930X428 404933X479 72270505 155377 DESCRIPTION AUGER HOUSING SCRAPPER BAR CARRIAGE BOLT 5/16−18 X .625 NUT 5/16−...
Failure to do so could be hazardous, damage your snow thrower and void your warranty. 21 REPAIR PARTS SNOW THROWER - MODEL PR1030ES (96192003100) AUGER HOUSING / IMPELLER ASSEMBLY 1 3 (5x) 4 (5x) 2 01.07.003-A KEY NO. 1 2 3 4 PART NO. 404930X428 404933X479 72270505 155377 DESCRIPTION AUGER HOUSING SCRAPPER BAR CARRIAGE BOLT 5/16−18 X .625 NUT 5/16−...
User Manual
Page 23
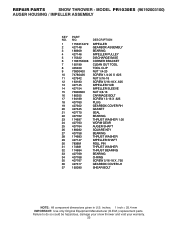
REPAIR PARTS SNOW THROWER - Failure to do so could be hazardous, damage your snow thrower and void your warranty. 23 MODEL PR1030ES (96192003100) AUGER HOUSING / IMPELLER ASSEMBLY KEY NO. 1 2 3 4 5 6 7 8 9 10 11 12 13 14 15 16 17 ...18 19 20 21 22 23 24 25 26 27 28 29 30 31 32 33 34 35 36 37 PART NO. 175321X479 ...NOTE: All component dimensions given in U.S. inches. 1 inch = 25.4 mm IMPORTANT: Use only Original Equipment Manufacturer (O.E.M.) replacement parts.
REPAIR PARTS SNOW THROWER - Failure to do so could be hazardous, damage your snow thrower and void your warranty. 23 MODEL PR1030ES (96192003100) AUGER HOUSING / IMPELLER ASSEMBLY KEY NO. 1 2 3 4 5 6 7 8 9 10 11 12 13 14 15 16 17 ...18 19 20 21 22 23 24 25 26 27 28 29 30 31 32 33 34 35 36 37 PART NO. 175321X479 ...NOTE: All component dimensions given in U.S. inches. 1 inch = 25.4 mm IMPORTANT: Use only Original Equipment Manufacturer (O.E.M.) replacement parts.

User Manual
Page 24
... your snow thrower and void your warranty. 24 inches. 1 inch = 25.4 mm IMPORTANT: Use only Original Equipment Manufacturer (O.E.M.) replacement parts. MODEL PR1030ES (96192003100) AUGER HOUSING / IMPELLER ASSEMBLY 3 4 3 01.11.001-A 1 4 2 KEY NO. 1 2 3 4 PART NO. 174762X479 178777X479 72270506 751153 DESCRIPTION SKID PLATE LH SKID PLATE RH CARRIAGE BOLT 5/16−18 X .75 NUT 5/16...
... your snow thrower and void your warranty. 24 inches. 1 inch = 25.4 mm IMPORTANT: Use only Original Equipment Manufacturer (O.E.M.) replacement parts. MODEL PR1030ES (96192003100) AUGER HOUSING / IMPELLER ASSEMBLY 3 4 3 01.11.001-A 1 4 2 KEY NO. 1 2 3 4 PART NO. 174762X479 178777X479 72270506 751153 DESCRIPTION SKID PLATE LH SKID PLATE RH CARRIAGE BOLT 5/16−18 X .75 NUT 5/16...

User Manual
Page 25
... 25.4 mm IMPORTANT: Use only Original Equipment Manufacturer (O.E.M.) replacement parts. NOTE: All component dimensions given in U.S. Failure to do so could be hazardous, damage your snow thrower and void your warranty. 25 REPAIR PARTS SNOW THROWER - MODEL PR1030ES (96192003100) CONTROL PANEL / DISCHARGE CHUTE 5 7 15 3... 16 *14 *11 2 4 6 10 KEY NO. 1 2 3 4 5 6 7 8 9 *10 *11 *12 *13 *14 15 16 PART NO. 420315X428 178633X428 420673 420325 414280 ...
... 25.4 mm IMPORTANT: Use only Original Equipment Manufacturer (O.E.M.) replacement parts. NOTE: All component dimensions given in U.S. Failure to do so could be hazardous, damage your snow thrower and void your warranty. 25 REPAIR PARTS SNOW THROWER - MODEL PR1030ES (96192003100) CONTROL PANEL / DISCHARGE CHUTE 5 7 15 3... 16 *14 *11 2 4 6 10 KEY NO. 1 2 3 4 5 6 7 8 9 *10 *11 *12 *13 *14 15 16 PART NO. 420315X428 178633X428 420673 420325 414280 ...

User Manual
Page 26
ITEMS INDICATED WITH AN * ARE LISTED AS REFERENCE FOR SERVICE PARTS ONLY. 2 1 KEY PART NO. inches. 1 inch = 25.4 mm IMPORTANT: Use only Original Equipment Manufacturer (O.E.M.) replacement parts. MODEL PR1030ES (96192003100) CONTROL PANEL / DISCHARGE CHUTE 2 2 *3 1 *7 KEY NO. 1 2 *3 *4 *5 *6 *7 PART NO. 428272 17501010 420678 405932 420675 428273 428310 *6 DESCRIPTION LEVER/CABLE ROTATOR ASSEMBLY SCREW 10-24... DESCRIPTION 1 421249 STEER CABLE 2 74041024 SCREW 10−24 X 1.50 01.15.009-A NOTE: All component dimensions given in U.S. NO. REPAIR PARTS SNOW THROWER -
ITEMS INDICATED WITH AN * ARE LISTED AS REFERENCE FOR SERVICE PARTS ONLY. 2 1 KEY PART NO. inches. 1 inch = 25.4 mm IMPORTANT: Use only Original Equipment Manufacturer (O.E.M.) replacement parts. MODEL PR1030ES (96192003100) CONTROL PANEL / DISCHARGE CHUTE 2 2 *3 1 *7 KEY NO. 1 2 *3 *4 *5 *6 *7 PART NO. 428272 17501010 420678 405932 420675 428273 428310 *6 DESCRIPTION LEVER/CABLE ROTATOR ASSEMBLY SCREW 10-24... DESCRIPTION 1 421249 STEER CABLE 2 74041024 SCREW 10−24 X 1.50 01.15.009-A NOTE: All component dimensions given in U.S. NO. REPAIR PARTS SNOW THROWER -


