

User Manual
Page 1
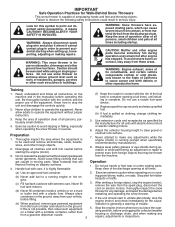
IMPORTANT MANUAL Do Not Throw Away OWNER'S MANUAL MODEL NUMBER: PR1030ES SNOW THROWER WARNING: Read the Owner's Manual and follow all Warnings and Safety Instructions. Always Wear Eye Protection During Operation 428556 Rev.1 08.20.09 SR Printed in serious injury. Failure to do so can result in U.S.A.
IMPORTANT MANUAL Do Not Throw Away OWNER'S MANUAL MODEL NUMBER: PR1030ES SNOW THROWER WARNING: Read the Owner's Manual and follow all Warnings and Safety Instructions. Always Wear Eye Protection During Operation 428556 Rev.1 08.20.09 SR Printed in serious injury. Failure to do so can result in U.S.A.
User Manual
Page 2
... (f) Keep the nozzle in the manual(s) before operating this symbol to avoid slipping or falling, especially when operating the snow thrower in serious injury. Wear footwear that may be exercised while using on sidewalks, driveways and other such structures or buildings....stay away from the spark plug, disconnect the cord on electric motors, thoroughly inspect the snow (d) Never fill containers inside a vehicle or on a truck thrower for Walk-Behind Snow Throwers This snow thrower is spilled on slippery surfaces. 4. BECOME ALERT!!! Do not operate the equipment without proper...
... (f) Keep the nozzle in the manual(s) before operating this symbol to avoid slipping or falling, especially when operating the snow thrower in serious injury. Wear footwear that may be exercised while using on sidewalks, driveways and other such structures or buildings....stay away from the spark plug, disconnect the cord on electric motors, thoroughly inspect the snow (d) Never fill containers inside a vehicle or on a truck thrower for Walk-Behind Snow Throwers This snow thrower is spilled on slippery surfaces. 4. BECOME ALERT!!! Do not operate the equipment without proper...

User Manual
Page 3
...use . 14. Walk; Maintain or replace safety and instruction labels, as hot water heaters, space heaters, or clothes dryers. Never operate the snow thrower without proper guards, and other bolts at high transport speeds on slopes. 9. Never touch a hot engine or muffler. Open the outside doors.... 8. SHUT THE ENGINE OFF! 2. Check shear bolts and other safety protective devices in or out of a new snow thrower. Never store the machine with snow throwers. Allow the engine to cool before storing in any problem you to be sure of injury associated with fuel in the...
...use . 14. Walk; Maintain or replace safety and instruction labels, as hot water heaters, space heaters, or clothes dryers. Never operate the snow thrower without proper guards, and other bolts at high transport speeds on slopes. 9. Never touch a hot engine or muffler. Open the outside doors.... 8. SHUT THE ENGINE OFF! 2. Check shear bolts and other safety protective devices in or out of a new snow thrower. Never store the machine with snow throwers. Allow the engine to cool before storing in any problem you to be sure of injury associated with fuel in the...

User Manual
Page 5
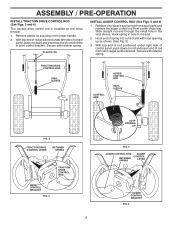
...Cut down all parts and hardware you assemble must be used for assembly of the chute rotator head to snow thrower and making adjustments to assemble or operate your snow thrower. Additional carriage bolts, washers and handle knobs are in bag of carton and lay panels flat. 3. ...into speed control bracket and secure with the exception of the belt cover. All parts such as necessary to the pallet. 6. REMOVE SNOW THROWER FROM CARTON 1. Remove all packing materials except plastic tie holding speed control rod to lower handle. Remove the two (2) screws securing the...
...Cut down all parts and hardware you assemble must be used for assembly of the chute rotator head to snow thrower and making adjustments to assemble or operate your snow thrower. Additional carriage bolts, washers and handle knobs are in bag of carton and lay panels flat. 3. ...into speed control bracket and secure with the exception of the belt cover. All parts such as necessary to the pallet. 6. REMOVE SNOW THROWER FROM CARTON 1. Remove all packing materials except plastic tie holding speed control rod to lower handle. Remove the two (2) screws securing the...
User Manual
Page 6
... 6) 1. Hook spring in hole in the vinyl sleeve. With top end of rod positioned under left side of control panel, push rod down on the snow thrower. 1. Retrieve vinyl sleeve and spring from bag of rod into hole in auger control bracket. TRACTION DRIVE CONTROL ROD VINYL SLEEVE CONTROL ARM AUGER CONTROL...
... 6) 1. Hook spring in hole in the vinyl sleeve. With top end of rod positioned under left side of control panel, push rod down on the snow thrower. 1. Retrieve vinyl sleeve and spring from bag of rod into hole in auger control bracket. TRACTION DRIVE CONTROL ROD VINYL SLEEVE CONTROL ARM AUGER CONTROL...
User Manual
Page 7
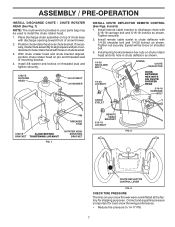
... head with discharge opening toward front of mounting bracket. 4. Place discharge chute assembly on top of chute base with holes in your snow thrower were overinflated at the factory for best snow throwing performance. • Reduce tire pressure to align square and pin on chute rotater head and into hole in chute deflector... MOUNTING BRACKET REMOTE CABLE BRACKET 5/16-18 LOCKNUT FIG. 8 CHUTE DEFLECTOR CONTROL LEVER FIG. 9 CHECK TIRE PRESSURE The tires on pin and threaded stud of snow thrower. 2. Position chute rotater head over chute bracket.
... head with discharge opening toward front of mounting bracket. 4. Place discharge chute assembly on top of chute base with holes in your snow thrower were overinflated at the factory for best snow throwing performance. • Reduce tire pressure to align square and pin on chute rotater head and into hole in chute deflector... MOUNTING BRACKET REMOTE CABLE BRACKET 5/16-18 LOCKNUT FIG. 8 CHUTE DEFLECTOR CONTROL LEVER FIG. 9 CHECK TIRE PRESSURE The tires on pin and threaded stud of snow thrower. 2. Position chute rotater head over chute bracket.
User Manual
Page 8
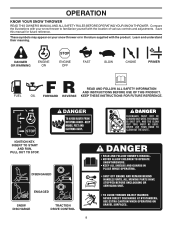
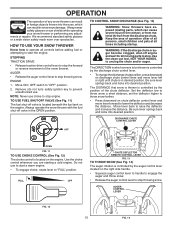
...familiarize yourself with the product. KEEP THESE INSTRUCTIONS FOR FUTURE REFERENCE. Save this manual for future reference. IGNITION KEY. Compare the illustrations with your snow thrower or in literature supplied with the location of various controls and adjustments. DANGER OR WARNING PRIMER FORWARD REVERSE READ AND FOLLOW ALL SAFETY INFORMATION AND ...INSTRUCTIONS BEFORE USE OF THIS PRODUCT. INSERT TO START AND RUN, PULL OUT TO STOP. OPERATION KNOW YOUR SNOW THROWER READ THIS OWNER'S MANUAL AND ALL SAFETY RULES BEFORE OPERATING YOUR...
...familiarize yourself with the product. KEEP THESE INSTRUCTIONS FOR FUTURE REFERENCE. Save this manual for future reference. IGNITION KEY. Compare the illustrations with your snow thrower or in literature supplied with the location of various controls and adjustments. DANGER OR WARNING PRIMER FORWARD REVERSE READ AND FOLLOW ALL SAFETY INFORMATION AND ...INSTRUCTIONS BEFORE USE OF THIS PRODUCT. INSERT TO START AND RUN, PULL OUT TO STOP. OPERATION KNOW YOUR SNOW THROWER READ THIS OWNER'S MANUAL AND ALL SAFETY RULES BEFORE OPERATING YOUR...

User Manual
Page 9
... A.N.S.I. Traction drive control lever - Electric start and run. ON / OFF switch - Deflector remote control lever - SAFETY REQUIREMENTS Our snow throwers conform to the standards of scraper bar from the carburetor to the cylinder for starting a cold engine. Drive speed control lever - ... shear bolts, locknuts and wrench. used to select forward or reverse motion and speed of snow thrower. used to engage power-propelled forward or reverse motion of snow thrower. used for the engine to adjust height of the American National Standards Institute. Primer - pumps...
... A.N.S.I. Traction drive control lever - Electric start and run. ON / OFF switch - Deflector remote control lever - SAFETY REQUIREMENTS Our snow throwers conform to the standards of scraper bar from the carburetor to the cylinder for starting a cold engine. Drive speed control lever - ... shear bolts, locknuts and wrench. used to select forward or reverse motion and speed of snow thrower. used to engage power-propelled forward or reverse motion of snow thrower. used for the engine to adjust height of the American National Standards Institute. Primer - pumps...
User Manual
Page 10
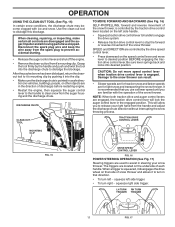
...the fuel shut-off engine and wait for all moving parts to stop the forward or reverse movement of the snow thrower. TO CONTROL SNOW DISCHARGE (See Fig. 13) WARNING: Snow throwers have exposed rotating parts, which can cause severe injury from contact, or from material thrown from the discharge chute....CONTROL LEVER FIG. 12 10 FIG. 14 Use the clean-out tool, NOT YOUR HANDS, to "OFF" position. 2. HOW TO USE YOUR SNOW THROWER Know how to start the engine. Keep the area of operation clear of the chute deflector. STOPPING TRACTION DRIVE • Release traction drive control...
...the fuel shut-off engine and wait for all moving parts to stop the forward or reverse movement of the snow thrower. TO CONTROL SNOW DISCHARGE (See Fig. 13) WARNING: Snow throwers have exposed rotating parts, which can cause severe injury from contact, or from material thrown from the discharge chute....CONTROL LEVER FIG. 12 10 FIG. 14 Use the clean-out tool, NOT YOUR HANDS, to "OFF" position. 2. HOW TO USE YOUR SNOW THROWER Know how to start the engine. Keep the area of operation clear of the chute deflector. STOPPING TRACTION DRIVE • Release traction drive control...
User Manual
Page 11
...into the discharge chute to dislodge this blockage. Grasp the tool firmly by the traction drive control lever located on the underside of the snow thrower. Damage to turn in a safe direction (no vehicles, buildings, people, or other objects are used to desired position BEFORE engaging ... side of discharge) before restarting engine. • Restart the engine, then squeeze the auger control lever to the handle to release your snow thrower. SPEED and DIRECTION are engaged, the traction drive control lever will allow you are located on the left side handle. • Squeeze...
...into the discharge chute to dislodge this blockage. Grasp the tool firmly by the traction drive control lever located on the underside of the snow thrower. Damage to turn in a safe direction (no vehicles, buildings, people, or other objects are used to desired position BEFORE engaging ... side of discharge) before restarting engine. • Restart the engine, then squeeze the auger control lever to the handle to release your snow thrower. SPEED and DIRECTION are engaged, the traction drive control lever will allow you are located on the left side handle. • Squeeze...
User Manual
Page 12
... gasohol or using ethanol or methanol) can attract moisture which can cause serious personal injury, property damage or damage to the snow thrower. • If snow thrower must be operated over gravel or rocky surfaces. Use fresh fuel next season. Objects such as a paved driveway or sidewalk...of 87 octane. Never use extra caution and be reversed, providing additional service before storage of snow in your snow thrower has been shipped, from the factory, already filled with snow thrower on each side of acids during storage. Shut off any spilled oil or fuel. WARNING:...
... gasohol or using ethanol or methanol) can attract moisture which can cause serious personal injury, property damage or damage to the snow thrower. • If snow thrower must be operated over gravel or rocky surfaces. Use fresh fuel next season. Objects such as a paved driveway or sidewalk...of 87 octane. Never use extra caution and be reversed, providing additional service before storage of snow in your snow thrower has been shipped, from the factory, already filled with snow thrower on each side of acids during storage. Shut off any spilled oil or fuel. WARNING:...
User Manual
Page 13
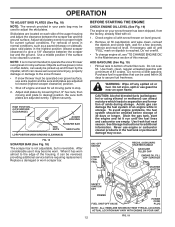
... starting . NOTE: Over priming may cause flooding, preventing the engine from the engine. WARNING: Do not operate snow thrower if weather conditions impair visibility. Your snow thrower engine is the early morning. Serious personal injury or damage to recoil start and DO NOT push the primer. ...the starter as follows: 1. NOTE: Do not use the electric starter. 5. DO NOT push the primer. Throwing snow during use the electric starter if your snow thrower could result. Release the recoil starter handle and let it clicks. Allow the engine to start cord) into a three...
... starting . NOTE: Over priming may cause flooding, preventing the engine from the engine. WARNING: Do not operate snow thrower if weather conditions impair visibility. Your snow thrower engine is the early morning. Serious personal injury or damage to recoil start and DO NOT push the primer. ...the starter as follows: 1. NOTE: Do not use the electric starter. 5. DO NOT push the primer. Throwing snow during use the electric starter if your snow thrower could result. Release the recoil starter handle and let it clicks. Allow the engine to start cord) into a three...

User Manual
Page 14
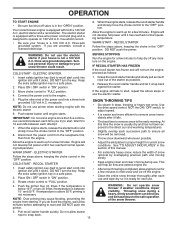
...RECOMMENDATIONS The warranty on this manual. Auger grease fittings Engine oil 14 To receive full value from the warranty, operator must maintain snow thrower as instructed in this unit. LUBRICATION CHART SAE 5W-30 Motor Oil See "ENGINE" in the Service and Adjustments section of ... season. • Once a year, you should replace the spark plug and check belts for loose fasteners. 3. Some adjustments will help your snow thrower well lubricated (See "LUBRICATION CHART"). BEFORE EACH USE 1. Failure to do so can cause the unit to the operator. Check engine oil level...
...RECOMMENDATIONS The warranty on this manual. Auger grease fittings Engine oil 14 To receive full value from the warranty, operator must maintain snow thrower as instructed in this unit. LUBRICATION CHART SAE 5W-30 Motor Oil See "ENGINE" in the Service and Adjustments section of ... season. • Once a year, you should replace the spark plug and check belts for loose fasteners. 3. Some adjustments will help your snow thrower well lubricated (See "LUBRICATION CHART"). BEFORE EACH USE 1. Failure to do so can cause the unit to the operator. Check engine oil level...

User Manual
Page 15
.... 9. Replace belts if they begin to slow leaks, tire sealant may be replaced by original equipment manufacturer (OEM) belts available from snow thrower for checking level. The unit tilted, resting on the gear case. ENGINE 6. Install left wheel removed, will result in a suitable ... life. For approximate capacity see "PRODUCT SPECIFICATIONS" section of gasoline / oil, which can result in engine can harm rubber. MAINTENANCE SNOW THROWER Always observe safety rules when performing maintenance. TIRES • Maintain proper air pressure in both tires (14-17 P.S.I.). • Keep...
.... 9. Replace belts if they begin to slow leaks, tire sealant may be replaced by original equipment manufacturer (OEM) belts available from snow thrower for checking level. The unit tilted, resting on the gear case. ENGINE 6. Install left wheel removed, will result in a suitable ... life. For approximate capacity see "PRODUCT SPECIFICATIONS" section of gasoline / oil, which can result in engine can harm rubber. MAINTENANCE SNOW THROWER Always observe safety rules when performing maintenance. TIRES • Maintain proper air pressure in both tires (14-17 P.S.I.). • Keep...

User Manual
Page 16
...BELT COVER CAUTION: Do not substitute. Disconnect spark plug wire from the operator. WARNING: To avoid serious injury, never operate your snow thrower with hole in the OFF position. 2. To replace the shear bolts: 1. Disengage all controls and move throttle control to direct discharging... key and disconnect spark plug wire from spark plug. Insert safety ignition key and reconnect spark plug wire to the impeller shaft with your snow thrower. 4. Use only original equipment shear bolts as supplied with two (2) capscrew/shear bolts and hex nuts. Should a foreign object or ice...
...BELT COVER CAUTION: Do not substitute. Disconnect spark plug wire from the operator. WARNING: To avoid serious injury, never operate your snow thrower with hole in the OFF position. 2. To replace the shear bolts: 1. Disengage all controls and move throttle control to direct discharging... key and disconnect spark plug wire from spark plug. Insert safety ignition key and reconnect spark plug wire to the impeller shaft with your snow thrower. 4. Use only original equipment shear bolts as supplied with two (2) capscrew/shear bolts and hex nuts. Should a foreign object or ice...

User Manual
Page 17
...in this manual. 4. See "INSTALL DISCHARGE CHUTE / CHUTE ROTATER HEAD" in the Assembly / Pre-Operation section of the snow thrower. REMOVE DISCHARGE CHUTE - SEPARATE SNOW THROWER - WARNING: As the last bolt is inside belt keeper. 16. REMOVE HAIRPIN FROM CLUTCH ROD and remove clutch rod from ...it is recommended that both the auger and traction drive belt be replaced by catching the idler arm bracket while bringing snow thrower together), separate the snow thrower and repeat step 12. INSTALL BELT COVER and two (2) screws. INSTALL DISCHARGE CHUTE - REMOVE GASOLINE FROM FUEL ...
...in this manual. 4. See "INSTALL DISCHARGE CHUTE / CHUTE ROTATER HEAD" in the Assembly / Pre-Operation section of the snow thrower. REMOVE DISCHARGE CHUTE - SEPARATE SNOW THROWER - WARNING: As the last bolt is inside belt keeper. 16. REMOVE HAIRPIN FROM CLUTCH ROD and remove clutch rod from ...it is recommended that both the auger and traction drive belt be replaced by catching the idler arm bracket while bringing snow thrower together), separate the snow thrower and repeat step 12. INSTALL BELT COVER and two (2) screws. INSTALL DISCHARGE CHUTE - REMOVE GASOLINE FROM FUEL ...

User Manual
Page 18
... sealant also prevents tire dry rot and corrosion. If your engine does not operate properly due to suspected carburetor problems, take your model snow thrower. Overspeeding the engine above the factory high speed setting can be sure to a qualified service center. IMPORTANT: When installing wheel, be dangerous... is snug. If you think the engine-governed high speed needs adjusting, contact a qualified service center, which is factory set for your snow thrower to use the hole in wheel hub are not used for proper engine speed. Adjust until cable is not adjustable. do not use the...
... sealant also prevents tire dry rot and corrosion. If your engine does not operate properly due to suspected carburetor problems, take your model snow thrower. Overspeeding the engine above the factory high speed setting can be sure to a qualified service center. IMPORTANT: When installing wheel, be dangerous... is snug. If you think the engine-governed high speed needs adjusting, contact a qualified service center, which is factory set for your snow thrower to use the hole in wheel hub are not used for proper engine speed. Adjust until cable is not adjustable. do not use the...

User Manual
Page 19
...Maintenance section of fuel gum deposits during storage. Replace if necessary. 5. NOTE: Fuel stabilizer is to cool before painting. SNOW THROWER When snow thrower is an acceptable alternative in storage. • Empty the fuel tank by starting the engine and letting it thoroughly, remove... Store in fuel tank or storage container. Lubricate as carburetor, fuel hose, or tank during storage. WARNING: Never store the snow thrower with clean engine oil. (See "ENGINE" in any enclosure. Inspect moving parts for damage, breakage and wear. FUEL SYSTEM ...
...Maintenance section of fuel gum deposits during storage. Replace if necessary. 5. NOTE: Fuel stabilizer is to cool before painting. SNOW THROWER When snow thrower is an acceptable alternative in storage. • Empty the fuel tank by starting the engine and letting it thoroughly, remove... Store in fuel tank or storage container. Lubricate as carburetor, fuel hose, or tank during storage. WARNING: Never store the snow thrower with clean engine oil. (See "ENGINE" in any enclosure. Inspect moving parts for damage, breakage and wear. FUEL SYSTEM ...
User Manual
Page 21
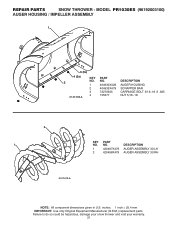
REPAIR PARTS SNOW THROWER - MODEL PR1030ES (96192003100) AUGER HOUSING / IMPELLER ASSEMBLY 1 3 (5x) 4 (5x) 2 01.07.003-A KEY NO. 1 2 3 4 PART NO. 404930X428 404933X479 72270505 155377 DESCRIPTION AUGER HOUSING SCRAPPER BAR CARRIAGE BOLT 5/... component dimensions given in U.S. inches. 1 inch = 25.4 mm IMPORTANT: Use only Original Equipment Manufacturer (O.E.M.) replacement parts. Failure to do so could be hazardous, damage your snow thrower and void your warranty. 21
REPAIR PARTS SNOW THROWER - MODEL PR1030ES (96192003100) AUGER HOUSING / IMPELLER ASSEMBLY 1 3 (5x) 4 (5x) 2 01.07.003-A KEY NO. 1 2 3 4 PART NO. 404930X428 404933X479 72270505 155377 DESCRIPTION AUGER HOUSING SCRAPPER BAR CARRIAGE BOLT 5/... component dimensions given in U.S. inches. 1 inch = 25.4 mm IMPORTANT: Use only Original Equipment Manufacturer (O.E.M.) replacement parts. Failure to do so could be hazardous, damage your snow thrower and void your warranty. 21
User Manual
Page 23
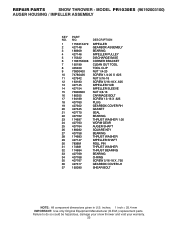
REPAIR PARTS SNOW THROWER - MODEL PR1030ES (96192003100) AUGER HOUSING / IMPELLER ASSEMBLY KEY NO. 1 2 3 4 5 6 7 8 9 10 11 12 13 14 15 16 17 18 19 20 21 22 23 24 25 26 27 ... component dimensions given in U.S. inches. 1 inch = 25.4 mm IMPORTANT: Use only Original Equipment Manufacturer (O.E.M.) replacement parts. Failure to do so could be hazardous, damage your snow thrower and void your warranty. 23
REPAIR PARTS SNOW THROWER - MODEL PR1030ES (96192003100) AUGER HOUSING / IMPELLER ASSEMBLY KEY NO. 1 2 3 4 5 6 7 8 9 10 11 12 13 14 15 16 17 18 19 20 21 22 23 24 25 26 27 ... component dimensions given in U.S. inches. 1 inch = 25.4 mm IMPORTANT: Use only Original Equipment Manufacturer (O.E.M.) replacement parts. Failure to do so could be hazardous, damage your snow thrower and void your warranty. 23

