
User Manual
Page 2
... contact plug in the manual(s) before starting the engine (motor). 3. To avoid severe burns on the machine and in order to make any repairs, adjustments or inspections. 2 Handle fuel with extreme care. If the unit should be used and remove all doormats, sleds, boards, wires, and other ground level surfaces. Look for the cause. Read, understand and follow all times including startup. Do not use snow thrower...
... contact plug in the manual(s) before starting the engine (motor). 3. To avoid severe burns on the machine and in order to make any repairs, adjustments or inspections. 2 Handle fuel with extreme care. If the unit should be used and remove all doormats, sleds, boards, wires, and other ground level surfaces. Look for the cause. Read, understand and follow all times including startup. Do not use snow thrower...
User Manual
Page 3
... not run . 16. Never operate the snow thrower without good visibility or light. never run the engine indoors, except when starting the engine. 7. Wait 10 seconds to be stored for an extended period. 4. Check shear bolts and other safety protective devices in use a clean-out tool, not your snow thrower properly. Allow the engine to assemble and maintain your hands. It has been designed, engineered and manufactured to service or repair...
... not run . 16. Never operate the snow thrower without good visibility or light. never run the engine indoors, except when starting the engine. 7. Wait 10 seconds to be stored for an extended period. 4. Check shear bolts and other safety protective devices in use a clean-out tool, not your snow thrower properly. Allow the engine to assemble and maintain your hands. It has been designed, engineered and manufactured to service or repair...
User Manual
Page 4
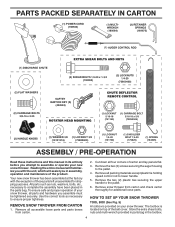
... purposes. Remove snow thrower from carton. 2. Use the correct tools as nuts, washers, bolts, etc., necessary to the pallet. 4. The toolbox is provided on top of your new snow thrower. Remove all packing materials except plastic tie holding speed control rod to assemble or operate your snow thrower, all four corners of those parts left unassembled for additional loose parts. PARTS PACKED SEPARATELY IN CARTON (1) POWER CORD (198563) (1) MULTIWRENCH (180684) (3) RETAINER SPRINGS (169675...
... purposes. Remove snow thrower from carton. 2. Use the correct tools as nuts, washers, bolts, etc., necessary to the pallet. 4. The toolbox is provided on top of your new snow thrower. Remove all packing materials except plastic tie holding speed control rod to assemble or operate your snow thrower, all four corners of those parts left unassembled for additional loose parts. PARTS PACKED SEPARATELY IN CARTON (1) POWER CORD (198563) (1) MULTIWRENCH (180684) (3) RETAINER SPRINGS (169675...
User Manual
Page 5
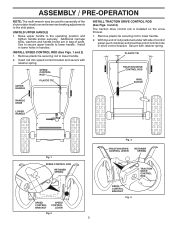
... TIE TRACTION DRIVE CONTROL ROD VINYL SLEEVE HANDLE KNOB LOWER HANDLE Fig. 1 SPEED CONTROL ROD RETAINER SPRING SPEED CONTROL BRACKET SPEED CONTROL LEVER Fig. 2 5 Fig. 3 TRACTION DRIVE CONTROL LEVER RETAINER SPRING DRIVE CONTROL BRACKET Fig. 4 TRACTION DRIVE CONTROL ROD UPPER HANDLE SPEED CONTROL ROD PLASTIC TIE INSTALL TRACTION DRIVE CONTROL ROD (See Figs. 3 and 4) The traction drive control rod is installed on the snow thrower. 1. ASSEMBLY / PRE-OPERATION NOTE: The multi-wrench may be used for assembly of the chute rotator head to snow thrower and making adjustments to lower...
... TIE TRACTION DRIVE CONTROL ROD VINYL SLEEVE HANDLE KNOB LOWER HANDLE Fig. 1 SPEED CONTROL ROD RETAINER SPRING SPEED CONTROL BRACKET SPEED CONTROL LEVER Fig. 2 5 Fig. 3 TRACTION DRIVE CONTROL LEVER RETAINER SPRING DRIVE CONTROL BRACKET Fig. 4 TRACTION DRIVE CONTROL ROD UPPER HANDLE SPEED CONTROL ROD PLASTIC TIE INSTALL TRACTION DRIVE CONTROL ROD (See Figs. 3 and 4) The traction drive control rod is installed on the snow thrower. 1. ASSEMBLY / PRE-OPERATION NOTE: The multi-wrench may be used for assembly of the chute rotator head to snow thrower and making adjustments to lower...
User Manual
Page 6
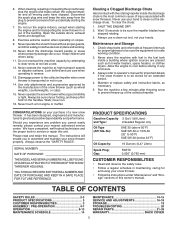
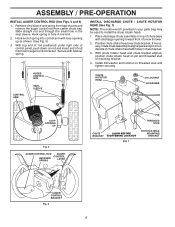
ASSEMBLY / PRE-OPERATION INSTALL AUGER CONTROL ROD (See Figs. 5 and 6) 1. Secure with holes in chute bracket. 3. With chute rotator head and chute bracket aligned, position chute rotator head on pin and threaded stud of spring into hole in your parts bag may be used to align square and pin on threaded stud and tighten securely. Install 3/8 washer and locknut on underside of rod into control arm with discharge opening up...
ASSEMBLY / PRE-OPERATION INSTALL AUGER CONTROL ROD (See Figs. 5 and 6) 1. Secure with holes in chute bracket. 3. With chute rotator head and chute bracket aligned, position chute rotator head on pin and threaded stud of spring into hole in your parts bag may be used to align square and pin on threaded stud and tighten securely. Install 3/8 washer and locknut on underside of rod into control arm with discharge opening up...
User Manual
Page 7
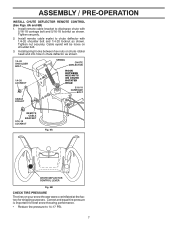
... CHECK TIRE PRESSURE The tires on shoulder bolt. 3. Correct and equal tire pressure is important for shipping purposes. Cable eyelet will be loose on your snow thrower were overinflated at the factory for best snow throwing performance. • Reduce tire pressure to 14-17 PSI. 7 ASSEMBLY / PRE-OPERATION INSTALL CHUTE DEFLECTOR REMOTE CONTROL (See Figs. 8A and 8B) 1. Install spring hooks between hex nuts on chute rotater head and...
... CHECK TIRE PRESSURE The tires on shoulder bolt. 3. Correct and equal tire pressure is important for shipping purposes. Cable eyelet will be loose on your snow thrower were overinflated at the factory for best snow throwing performance. • Reduce tire pressure to 14-17 PSI. 7 ASSEMBLY / PRE-OPERATION INSTALL CHUTE DEFLECTOR REMOTE CONTROL (See Figs. 8A and 8B) 1. Install spring hooks between hex nuts on chute rotater head and...

User Manual
Page 9
... FILLER CAP CHOKE CONTROL OPERATION ELECTRIC START BUTTON AUGER CONTROL LEVER POWER CORD PLUG DISCHARGE CHUTE CONTROL LEVER DRIVE SPEED CONTROL LEVER CHUTE DEFLECTOR DEFLECTOR REMOTE CONTROL LEVER TRACTION DRIVE CONTROL LEVER SAFETY IGNITION KEY ON / OFF SWITCH PRIMER FUEL SHUT-OFF VALVE RECOIL (AUXILIARY) STARTER HANDLE DISCHARGE CHUTE CLEAN-OUT TOOL LH TURN TRIGGER LIGHT HANDLE KNOB NOTE: ITEMS ABOVE ARE SHOWN IN THEIR TYPICAL LOCATION ON THE ENGINE. used to start button - Skid plate - Electric start and run. used for starting the engine. pumps additional fuel from...
... FILLER CAP CHOKE CONTROL OPERATION ELECTRIC START BUTTON AUGER CONTROL LEVER POWER CORD PLUG DISCHARGE CHUTE CONTROL LEVER DRIVE SPEED CONTROL LEVER CHUTE DEFLECTOR DEFLECTOR REMOTE CONTROL LEVER TRACTION DRIVE CONTROL LEVER SAFETY IGNITION KEY ON / OFF SWITCH PRIMER FUEL SHUT-OFF VALVE RECOIL (AUXILIARY) STARTER HANDLE DISCHARGE CHUTE CLEAN-OUT TOOL LH TURN TRIGGER LIGHT HANDLE KNOB NOTE: ITEMS ABOVE ARE SHOWN IN THEIR TYPICAL LOCATION ON THE ENGINE. used to start button - Skid plate - Electric start and run. used for starting the engine. pumps additional fuel from...
User Manual
Page 10
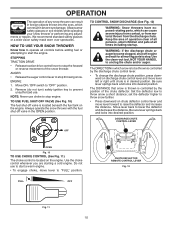
... snow thrower. Use the clean-out tool, NOT YOUR HANDS, to stop throwing snow. set the deflector higher to throw snow farther. • Press downward on discharge chute control lever and move lever left or right until chute is in the OPEN position. ENGINE 1. NOTE: Never use to start the engine. TO USE FUEL SHUT-OFF VALVE (See Fig. 10) The fuel shut-off valve in desired position. Be sure lever springs back and locks into desired position. AUGER...
... snow thrower. Use the clean-out tool, NOT YOUR HANDS, to stop throwing snow. set the deflector higher to throw snow farther. • Press downward on discharge chute control lever and move lever left or right until chute is in the OPEN position. ENGINE 1. NOTE: Never use to start the engine. TO USE FUEL SHUT-OFF VALVE (See Fig. 10) The fuel shut-off valve in desired position. Be sure lever springs back and locks into desired position. AUGER...

User Manual
Page 11
... spark plug to prevent accidental starting. • Release the auger control lever and shut off the engine. • Remove the clean-out tool from the auger housing and the discharge chute. NOTE: When both traction drive and auger control levers are disengaged and the auger/impeller and all controls are engaged, the traction drive control lever will allow you are controlled by the drive speed control lever. • Press downward on that side of the snow thrower. This will lock...
... spark plug to prevent accidental starting. • Release the auger control lever and shut off the engine. • Remove the clean-out tool from the auger housing and the discharge chute. NOTE: When both traction drive and auger control levers are disengaged and the auger/impeller and all controls are engaged, the traction drive control lever will allow you are controlled by the drive speed control lever. • Press downward on that side of the snow thrower. This will lock...
User Manual
Page 12
... necessary, add oil until the fuel lines and carburetor are adjusted to desired position. Acidic gas can attract moisture which can be reversed, providing additional service before storage of the housing, it may become worn. ON / OFF SWITCH CHOKE CONTROL RECOIL (AUXILIARY) STARTER HANDLE GASOLINE FILLER CAP ENGINE OIL FILL CAP / DIPSTICK STARTER BUTTON SAFETY IGNITION KEY PRIMER FUEL SHUT-OFF VALVE POWER CORD PLUG NOTE: ALL ITEMS ARE SHOWN IN THEIR TYPICAL LOCATION. BEFORE STARTING THE ENGINE CHECK ENGINE OIL LEVEL (See...
... necessary, add oil until the fuel lines and carburetor are adjusted to desired position. Acidic gas can attract moisture which can be reversed, providing additional service before storage of the housing, it may become worn. ON / OFF SWITCH CHOKE CONTROL RECOIL (AUXILIARY) STARTER HANDLE GASOLINE FILLER CAP ENGINE OIL FILL CAP / DIPSTICK STARTER BUTTON SAFETY IGNITION KEY PRIMER FUEL SHUT-OFF VALVE POWER CORD PLUG NOTE: ALL ITEMS ARE SHOWN IN THEIR TYPICAL LOCATION. BEFORE STARTING THE ENGINE CHECK ENGINE OIL LEVEL (See...
User Manual
Page 13
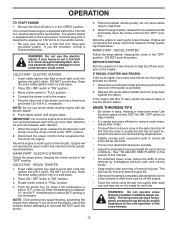
OPERATION TO START ENGINE • Be sure fuel shut-off valve is in the "OFF" position. Your snow thrower engine is equipped with the electric starter. 6. The electric starter is equipped with a three-wire power cord and plug and is the early morning. household current. • Be sure your snow thrower could result. IMPORTANT: Do not crank engine more efficient to remove snow is designed to operate on the engine. RECOIL STARTER 1. Push the primer four (4) times if...
OPERATION TO START ENGINE • Be sure fuel shut-off valve is in the "OFF" position. Your snow thrower engine is equipped with the electric starter. 6. The electric starter is equipped with a three-wire power cord and plug and is the early morning. household current. • Be sure your snow thrower could result. IMPORTANT: Do not crank engine more efficient to remove snow is designed to operate on the engine. RECOIL STARTER 1. Push the primer four (4) times if...
User Manual
Page 14
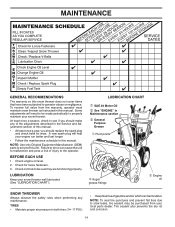
...; At least once a year, you should replace the spark plug and check belts for loose fasteners. 3. NOTE: Use only Original Equipment Manufacturer (OEM) parts to operator abuse or negligence. Check engine oil level. 2. LUBRICATION Keep your engine run better and last longer. • Follow the maintenance schedule in this manual. Failure to do so can harm rubber. Check controls to the operator. Tire sealant also prevents tire dry rot...
...; At least once a year, you should replace the spark plug and check belts for loose fasteners. 3. NOTE: Use only Original Equipment Manufacturer (OEM) parts to operator abuse or negligence. Check engine oil level. 2. LUBRICATION Keep your engine run better and last longer. • Follow the maintenance schedule in this manual. Failure to do so can harm rubber. Check controls to the operator. Tire sealant also prevents tire dry rot...
User Manual
Page 15
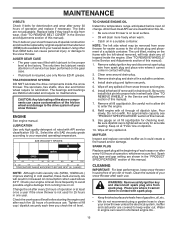
... covered to clean your engine oil level more freely when warm. • Catch oil in contact with spark plug. • Keep finished surfaces/wheels free of each use only Ronex ED #1 grease. MUFFLER Inspect and replace corroded muffler as it cannot come in one year. NOTE: The left wheel (if removed for checking level. ENGINE See engine manual. Check your snow thrower unless the electrical system, muffler and carburetor are not adjustable. Remove safety ignition key and disconnect spark plug wire from spark plug and place wire...
... covered to clean your engine oil level more freely when warm. • Catch oil in contact with spark plug. • Keep finished surfaces/wheels free of each use only Ronex ED #1 grease. MUFFLER Inspect and replace corroded muffler as it cannot come in one year. NOTE: The left wheel (if removed for checking level. ENGINE See engine manual. Check your snow thrower unless the electrical system, muffler and carburetor are not adjustable. Remove safety ignition key and disconnect spark plug wire from spark plug and place wire...
User Manual
Page 16
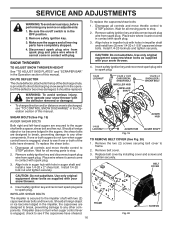
... in auger shaft and install a new 1/4-20 x 2" shear bolt. Remove safety ignition key and disconnect spark plug wire from spark plug. Use only original equipment shear bolts as supplied with two (2) capscrew/shear bolts and hex nuts. Should a foreign object or ice become lodged in contact with your snow thrower. 4. If one or both of this manual. Remove the two (2) screws securing belt cover to spark plug. Disconnect spark plug wire from the operator. SNOW THROWER TO ADJUST SNOW THROWER HEIGHT See "TO ADJUST SKID PLATES" and "SCRAPER BAR...
... in auger shaft and install a new 1/4-20 x 2" shear bolt. Remove safety ignition key and disconnect spark plug wire from spark plug. Use only original equipment shear bolts as supplied with two (2) capscrew/shear bolts and hex nuts. Should a foreign object or ice become lodged in contact with your snow thrower. 4. If one or both of this manual. Remove the two (2) screws securing belt cover to spark plug. Disconnect spark plug wire from the operator. SNOW THROWER TO ADJUST SNOW THROWER HEIGHT See "TO ADJUST SKID PLATES" and "SCRAPER BAR...
User Manual
Page 17
...FRAME ASSEMBLY AUGER HOUSING HANDLES 1. REMOVE BELT COVER - Remove outside (auger) pulley only from the pulley (by catching the idler arm bracket while bringing snow thrower together), separate the snow thrower and repeat step 12. With your assistant slowly raises handles to the snow thrower. See "INSTALL DISCHARGE CHUTE / CHUTE ROTATER HEAD" in this section of this manual. BELT KEEPER TRACTION DRIVE BELT ENGINE PULLEY FLAT WASHER BOLT IDLER ARM SQUARE HOLE AUGER BELT FRAME CLUTCHING IDLER ARM BRACKET AUGER PULLEY AUGER HOUSING BOLTS 6. REMOVE AUGER BELT from...
...FRAME ASSEMBLY AUGER HOUSING HANDLES 1. REMOVE BELT COVER - Remove outside (auger) pulley only from the pulley (by catching the idler arm bracket while bringing snow thrower together), separate the snow thrower and repeat step 12. With your assistant slowly raises handles to the snow thrower. See "INSTALL DISCHARGE CHUTE / CHUTE ROTATER HEAD" in this section of this manual. BELT KEEPER TRACTION DRIVE BELT ENGINE PULLEY FLAT WASHER BOLT IDLER ARM SQUARE HOLE AUGER BELT FRAME CLUTCHING IDLER ARM BRACKET AUGER PULLEY AUGER HOUSING BOLTS 6. REMOVE AUGER BELT from...
User Manual
Page 18
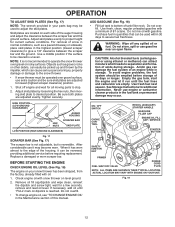
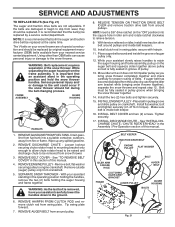
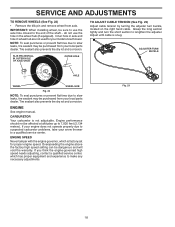
... not operate properly due to a qualified service center. Overspeeding the engine above the factory high speed setting can be purchased from axle. SERVICE AND ADJUSTMENTS TO REMOVE WHEELS (See Fig. 22) • Remove the klik pin and remove wheel from your snow thrower to suspected carburetor problems, take your local parts dealer. KLIK PIN (INSTALL IN OUTER HOLE OF AXLE ONLY) OUTER HOLE TO ADJUST CABLE TENSION (See Fig. 23) Adjust cable tension by turning the adjuster turn...
... not operate properly due to a qualified service center. Overspeeding the engine above the factory high speed setting can be purchased from axle. SERVICE AND ADJUSTMENTS TO REMOVE WHEELS (See Fig. 22) • Remove the klik pin and remove wheel from your snow thrower to suspected carburetor problems, take your local parts dealer. KLIK PIN (INSTALL IN OUTER HOLE OF AXLE ONLY) OUTER HOLE TO ADJUST CABLE TENSION (See Fig. 23) Adjust cable tension by turning the adjuster turn...
User Manual
Page 19
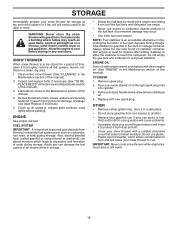
... of this manual). ENGINE See engine manual. Also, alcohol blended fuels (called gasohol or using fuel stabilizer. Always follow the mix ratio found on a furnace, water heater, clothes dryer or gas appliance. ENGINE OIL Drain oil (with engine warm) and replace with new spark plug. Pour one season to another. • Replace your gasoline can if your can damage the fuel system of acids during storage. Pull recoil starter handle slowly a few times to separation...
... of this manual). ENGINE See engine manual. Also, alcohol blended fuels (called gasohol or using fuel stabilizer. Always follow the mix ratio found on a furnace, water heater, clothes dryer or gas appliance. ENGINE OIL Drain oil (with engine warm) and replace with new spark plug. Pour one season to another. • Replace your gasoline can if your can damage the fuel system of acids during storage. Pull recoil starter handle slowly a few times to separation...
User Manual
Page 20
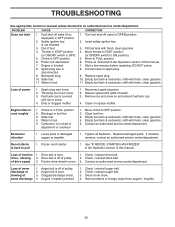
...pulley. 2. Auger belt is flooded. 8. Check / reinstall auger belt. 2. Out of power 1. Engine is worn. 3. Fill fuel tank with ice or snow. 4. Remove ice and snow on and around fuel tank cap. 4. Replace damaged parts. If vibration remains, contact an authorized service center/department. Recoil starter is worn. 3. Drive belt is off of pulley. 2. Check / reinstall drive belt. Fuel shut-off valve to OPEN position. 2. Throttle in the Operation section of this manual. 7. Empty fuel tank & carburetor, refill with fresh, clean gasoline. 5. Spark plug wire...
...pulley. 2. Auger belt is flooded. 8. Check / reinstall auger belt. 2. Out of power 1. Engine is worn. 3. Fill fuel tank with ice or snow. 4. Remove ice and snow on and around fuel tank cap. 4. Replace damaged parts. If vibration remains, contact an authorized service center/department. Recoil starter is worn. 3. Drive belt is off of pulley. 2. Check / reinstall drive belt. Fuel shut-off valve to OPEN position. 2. Throttle in the Operation section of this manual. 7. Empty fuel tank & carburetor, refill with fresh, clean gasoline. 5. Spark plug wire...
User Manual
Page 21
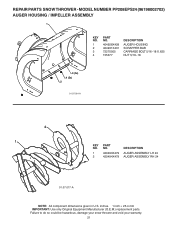
inches. 1 inch = 25.4 mm IMPORTANT: Use only Original Equipment Manufacturer (O.E.M.) replacement parts. MODEL NUMBER PP208EPS24 (96198002702) AUGER HOUSING / IMPELLER ASSEMBLY 1 KEY NO. 1 2 3 4 PART NO. 404928X428 404931X431 72270505 155377 DESCRIPTION AUGER HOUSING SCRAPPER BAR CARRIAGE BOLT 5/16−18 X .625 NUT 5/16−18 3 (5x) 4 (5x) 2 01.07.001-A 2 1 KEY NO. 1 2 PART NO. 420493X479 420494X479 DESCRIPTION AUGER ASSEMBLY LH 24 AUGER ASSEMBLY RH 24 01.07.017-A NOTE: All component dimensions given in U.S. REPAIR PARTS SNOW THROWER - Failure...
inches. 1 inch = 25.4 mm IMPORTANT: Use only Original Equipment Manufacturer (O.E.M.) replacement parts. MODEL NUMBER PP208EPS24 (96198002702) AUGER HOUSING / IMPELLER ASSEMBLY 1 KEY NO. 1 2 3 4 PART NO. 404928X428 404931X431 72270505 155377 DESCRIPTION AUGER HOUSING SCRAPPER BAR CARRIAGE BOLT 5/16−18 X .625 NUT 5/16−18 3 (5x) 4 (5x) 2 01.07.001-A 2 1 KEY NO. 1 2 PART NO. 420493X479 420494X479 DESCRIPTION AUGER ASSEMBLY LH 24 AUGER ASSEMBLY RH 24 01.07.017-A NOTE: All component dimensions given in U.S. REPAIR PARTS SNOW THROWER - Failure...
User Manual
Page 40
... warrants to the original consumer purchaser that term as manufactured is free from defects in materials and workmanship. Please refer to the engine or components parts thereof. Should you have any power equipment unit or attachment are belts, shear pins, normal wear, normal adjustments, standard hardware and normal maintenance. 6. ID#, serial number and date of purchase of your product and the name...
... warrants to the original consumer purchaser that term as manufactured is free from defects in materials and workmanship. Please refer to the engine or components parts thereof. Should you have any power equipment unit or attachment are belts, shear pins, normal wear, normal adjustments, standard hardware and normal maintenance. 6. ID#, serial number and date of purchase of your product and the name...


