
User Manual
Page 2
...). 8. Training 1. Operation 1. Look for all instructions on slippery surfaces. 4. Do not use of the discharge opening at all clutches and shift into neutral before starting when setting up spilled fuel. (h) If fuel is complete. Thoroughly inspect the area where the equipment is to vibrate abnormally, stop the engine (motor), remove the wire from the spark plug, disconnect the cord on electric motors, thoroughly inspect the snow (d) Never fill...
...). 8. Training 1. Operation 1. Look for all instructions on slippery surfaces. 4. Do not use of the discharge opening at all clutches and shift into neutral before starting when setting up spilled fuel. (h) If fuel is complete. Thoroughly inspect the area where the equipment is to vibrate abnormally, stop the engine (motor), remove the wire from the spark plug, disconnect the cord on electric motors, thoroughly inspect the snow (d) Never fill...
User Manual
Page 3
... speeds on slopes. 9. Never operate the snow thrower without proper guards, and other bolts at too fast a rate. 12. Always use care when operating in the fuel tank inside the discharge chute is in maintaining, caring for transporting the snow thrower in use your snow thrower properly. Check shear bolts and other safety protective devices in any problem you to assemble and maintain your hand to prevent someone from accidentally starting the engine...
... speeds on slopes. 9. Never operate the snow thrower without proper guards, and other bolts at too fast a rate. 12. Always use care when operating in the fuel tank inside the discharge chute is in maintaining, caring for transporting the snow thrower in use your snow thrower properly. Check shear bolts and other safety protective devices in any problem you to assemble and maintain your hand to prevent someone from accidentally starting the engine...
User Manual
Page 4
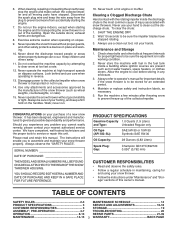
.... 2. Cut down all accessible loose parts and parts boxes from carton and check carton thoroughly for shipping purposes. Store the extra shear bolts, nuts and multi-wrench provided in parts bag in assembly, operation and maintenance of those parts left unassembled for additional loose parts. Remove all four corners of the belt cover. Reading the entire manual will assist you with the exception of the product. Your new snow thrower...
.... 2. Cut down all accessible loose parts and parts boxes from carton and check carton thoroughly for shipping purposes. Store the extra shear bolts, nuts and multi-wrench provided in parts bag in assembly, operation and maintenance of those parts left unassembled for additional loose parts. Remove all four corners of the belt cover. Reading the entire manual will assist you with the exception of the product. Your new snow thrower...
User Manual
Page 5
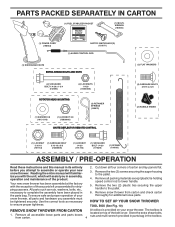
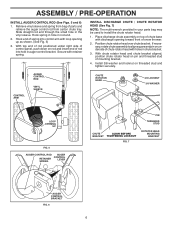
... speed control bracket and secure with retainer spring. ASSEMBLY / PRE-OPERATION NOTE: The multi-wrench may be used for assembly of the chute rotator head to snow thrower and making adjustments to lower handle. 2. Install in lower holes in drive control bracket. Use to secure upper handle to lower handle. 2. PLASTIC TIE TRACTION DRIVE CONTROL ROD VINYL SLEEVE HANDLE KNOB LOWER HANDLE FIG. 1 SPEED CONTROL ROD RETAINER SPRING SPEED CONTROL BRACKET SPEED CONTROL LEVER FIG. 2 5 FIG. 3 TRACTION DRIVE CONTROL LEVER RETAINER SPRING TRACTION DRIVE CONTROL ROD DRIVE CONTROL BRACKET...
... speed control bracket and secure with retainer spring. ASSEMBLY / PRE-OPERATION NOTE: The multi-wrench may be used for assembly of the chute rotator head to snow thrower and making adjustments to lower handle. 2. Install in lower holes in drive control bracket. Use to secure upper handle to lower handle. 2. PLASTIC TIE TRACTION DRIVE CONTROL ROD VINYL SLEEVE HANDLE KNOB LOWER HANDLE FIG. 1 SPEED CONTROL ROD RETAINER SPRING SPEED CONTROL BRACKET SPEED CONTROL LEVER FIG. 2 5 FIG. 3 TRACTION DRIVE CONTROL LEVER RETAINER SPRING TRACTION DRIVE CONTROL ROD DRIVE CONTROL BRACKET...
User Manual
Page 6
... hole in your parts bag may be used to align square and pin on underside of chute rotator head with loop opening toward front of chute base with retainer spring. Position chute rotator head over chute bracket. Retrieve vinyl sleeve and spring from bag of rod into control arm with holes in rod end. 2. ASSEMBLY / PRE-OPERATION INSTALL AUGER CONTROL ROD (See Figs. 5 and 6) 1. INSTALL DISCHARGE CHUTE / CHUTE ROTATOR HEAD (See Fig...
... hole in your parts bag may be used to align square and pin on underside of chute rotator head with loop opening toward front of chute base with retainer spring. Position chute rotator head over chute bracket. Retrieve vinyl sleeve and spring from bag of rod into control arm with holes in rod end. 2. ASSEMBLY / PRE-OPERATION INSTALL AUGER CONTROL ROD (See Figs. 5 and 6) 1. INSTALL DISCHARGE CHUTE / CHUTE ROTATOR HEAD (See Fig...
User Manual
Page 7
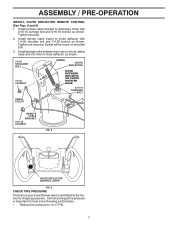
... for best snow throwing performance. • Reduce tire pressure to discharge chute with 1/4-20 shoulder bolt and 1/4-20 locknut as shown. 1/4-20 SHOULDER BOLT 1/4-20 LOCKNUT SPRING CHUTE DEFLECTOR HOOK BETWEEN HEX NUTS ON CHUTE ROTATER HEAD 5/16-18 CARRIAGE BOLT CABLE EYELET REMOTE CABLE BRACKET 5/16-18 LOCKNUT FIG. 8 CHUTE DEFLECTOR CONTROL LEVER FIG. 9 CHECK TIRE PRESSURE The tires on shoulder bolt. 3. Tighten securely. 2. ASSEMBLY / PRE-OPERATION INSTALL CHUTE DEFLECTOR REMOTE CONTROL (See...
... for best snow throwing performance. • Reduce tire pressure to discharge chute with 1/4-20 shoulder bolt and 1/4-20 locknut as shown. 1/4-20 SHOULDER BOLT 1/4-20 LOCKNUT SPRING CHUTE DEFLECTOR HOOK BETWEEN HEX NUTS ON CHUTE ROTATER HEAD 5/16-18 CARRIAGE BOLT CABLE EYELET REMOTE CABLE BRACKET 5/16-18 LOCKNUT FIG. 8 CHUTE DEFLECTOR CONTROL LEVER FIG. 9 CHECK TIRE PRESSURE The tires on shoulder bolt. 3. Tighten securely. 2. ASSEMBLY / PRE-OPERATION INSTALL CHUTE DEFLECTOR REMOTE CONTROL (See...
User Manual
Page 9
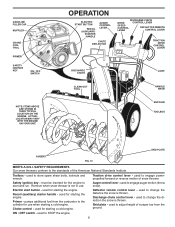
...(AUXILIARY) STARTER HANDLE AUGER CONTROL LEVER CHUTE DEFLECTOR DISCHARGE CHUTE DRIVE CONTROL LEVER SPEED CONTROL LEVER DEFLECTOR REMOTE CONTROL LEVER TRACTION DRIVE CONTROL LEVER DISCHARGE CHUTE CLEAN-OUT TOOL LIGHT HANDLE KNOB MUFFLER TOOLBOX SKID PLATE AUGERS FIG. 10 MEETS A.N.S.I. pumps additional fuel from the ground. 9 used to the cylinder for starting a cold engine. SAFETY REQUIREMENTS Our snow throwers conform to start button - used to store spare shear bolts, locknuts and wrench. used to engage auger motion (throw snow). used to change the...
...(AUXILIARY) STARTER HANDLE AUGER CONTROL LEVER CHUTE DEFLECTOR DISCHARGE CHUTE DRIVE CONTROL LEVER SPEED CONTROL LEVER DEFLECTOR REMOTE CONTROL LEVER TRACTION DRIVE CONTROL LEVER DISCHARGE CHUTE CLEAN-OUT TOOL LIGHT HANDLE KNOB MUFFLER TOOLBOX SKID PLATE AUGERS FIG. 10 MEETS A.N.S.I. pumps additional fuel from the ground. 9 used to the cylinder for starting a cold engine. SAFETY REQUIREMENTS Our snow throwers conform to start button - used to store spare shear bolts, locknuts and wrench. used to engage auger motion (throw snow). used to change the...
User Manual
Page 10
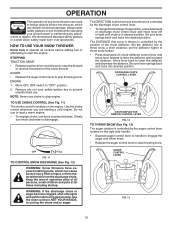
... desired position. The DISTANCE that snow is thrown is controlled by the auger control lever located on discharge chute control lever and move lever forward to start a warm engine. • To engage choke, turn knob clockwise to prevent unauthorized use choke to stop engine. set the deflector higher to throw snow farther. • Press downward on the engine. AUGER CONTROL LEVER FIG. 13 10 Always wear safety glasses or eye shields while operating 00155 your snow thrower or...
... desired position. The DISTANCE that snow is thrown is controlled by the auger control lever located on discharge chute control lever and move lever forward to start a warm engine. • To engage choke, turn knob clockwise to prevent unauthorized use choke to stop engine. set the deflector higher to throw snow farther. • Press downward on the engine. AUGER CONTROL LEVER FIG. 13 10 Always wear safety glasses or eye shields while operating 00155 your snow thrower or...
User Manual
Page 11
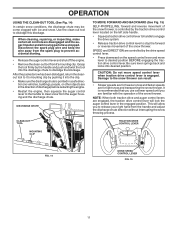
... operation of the snow thrower. Use the clean-out tool to release your right hand from the auger housing and the discharge chute. Grasp the tool firmly by the drive speed control lever. • Press downward on the left side handle. • Squeeze traction drive control lever to handle to engage the drive system. • Release traction drive control lever to prevent accidental starting. • Release the auger control lever and shut off the engine. • Remove the clean-out tool...
... operation of the snow thrower. Use the clean-out tool to release your right hand from the auger housing and the discharge chute. Grasp the tool firmly by the drive speed control lever. • Press downward on the left side handle. • Squeeze traction drive control lever to handle to engage the drive system. • Release traction drive control lever to prevent accidental starting. • Release the auger control lever and shut off the engine. • Remove the clean-out tool...
User Manual
Page 12
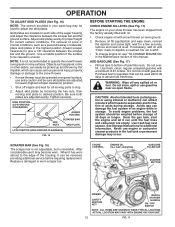
....trhrBseee,elyxbts.hounetruhnet HIGH POSITION (LOW GROUND CLEARANCE) HEX NUTS AUGER HOUSING SCRAPER BAR SKID PLATE LOW POSITION (HIGH GROUND CLEARANCE) FIG. 16 BEFORE STARTING THE ENGINE CHECK ENGINE OIL LEVEL (See Fig. 17) The engine on your snow thrower has been shipped from the factory already filled with snow thrower on dipstick is reversible. Do not overfill. • To change engine oil, see "TO CHANGE ENGINE OIL" in the Maintenance section of an engine while in...
....trhrBseee,elyxbts.hounetruhnet HIGH POSITION (LOW GROUND CLEARANCE) HEX NUTS AUGER HOUSING SCRAPER BAR SKID PLATE LOW POSITION (HIGH GROUND CLEARANCE) FIG. 16 BEFORE STARTING THE ENGINE CHECK ENGINE OIL LEVEL (See Fig. 17) The engine on your snow thrower has been shipped from the factory already filled with snow thrower on dipstick is reversible. Do not overfill. • To change engine oil, see "TO CHANGE ENGINE OIL" in the Maintenance section of an engine while in...
User Manual
Page 13
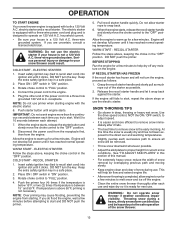
... to remove snow immediately after each time you do flood the engine, wait a few minutes. WARNING: Do not operate snow thrower if weather conditions impair visibility. Rotate choke control to recoil start cord) into ignition slot until it clicks. WARNING: Do not use the electric starter. Grasp the recoil starter handle and slowly pull as follows: 1. Insert safety ignition key (tied to "FULL" position. 4. The electric starter is equipped with the electric starter. 6. ELECTRIC STARTER 1. NOTE...
... to remove snow immediately after each time you do flood the engine, wait a few minutes. WARNING: Do not operate snow thrower if weather conditions impair visibility. Rotate choke control to recoil start cord) into ignition slot until it clicks. WARNING: Do not use the electric starter. Grasp the recoil starter handle and slowly pull as follows: 1. Insert safety ignition key (tied to "FULL" position. 4. The electric starter is equipped with the electric starter. 6. ELECTRIC STARTER 1. NOTE...
User Manual
Page 14
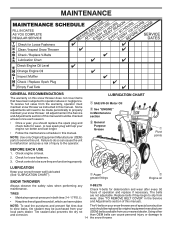
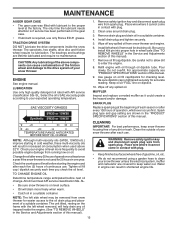
... BEFORE EACH USE 1. V-BELTS Check V-belts for loose fasteners. 3. Replace belts if they are functioning properly. The belts are not adjustable. Using other and corrosion. A new spark plug will need to be made periodically to properly maintain your snow thrower. NOTE: To seal tire punctures and prevent flat tires due The V-belts on this snow thrower does not cover items that have been subjected to operator abuse or negligence. Check engine oil level. 2. Check controls to...
... BEFORE EACH USE 1. V-BELTS Check V-belts for loose fasteners. 3. Replace belts if they are functioning properly. The belts are not adjustable. Using other and corrosion. A new spark plug will need to be made periodically to properly maintain your snow thrower. NOTE: To seal tire punctures and prevent flat tires due The V-belts on this snow thrower does not cover items that have been subjected to operator abuse or negligence. Check engine oil level. 2. Check controls to...
User Manual
Page 15
... manual. 9. NOTE: The left wheel (if removed for easier access to keep snow thrower housing free of each season or after each time you check the oil level. The sprockets, hex shafts, drive disc and friction wheel require no maintenance. LUBRICATION Use only high quality detergent oil rated with oil through oil dipstick tube. Pour slowly. Keep oil at the beginning of any spilled oil from running low on the frame with plug. 2. Spark plug type and gap setting...
... manual. 9. NOTE: The left wheel (if removed for easier access to keep snow thrower housing free of each season or after each time you check the oil level. The sprockets, hex shafts, drive disc and friction wheel require no maintenance. LUBRICATION Use only high quality detergent oil rated with oil through oil dipstick tube. Pour slowly. Keep oil at the beginning of any spilled oil from running low on the frame with plug. 2. Spark plug type and gap setting...
User Manual
Page 16
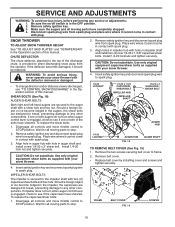
... spark plug and place wire where it cannot come in the augers, the shear bolts are secured to the impeller shaft with two (2) capscrew/shear bolts and hex nuts. Wait for all controls and move throttle control to the top of this manual. Remove belt cover. • Replace belt cover by installing cover and screws and tighten securely. CHUTE DEFLECTOR The chute deflector, attached to STOP position. To replace the capscrew/shear bolts: 1. Use only original equipment capscrew/shear bolts as supplied with a shear bolt...
... spark plug and place wire where it cannot come in the augers, the shear bolts are secured to the impeller shaft with two (2) capscrew/shear bolts and hex nuts. Wait for all controls and move throttle control to the top of this manual. Remove belt cover. • Replace belt cover by installing cover and screws and tighten securely. CHUTE DEFLECTOR The chute deflector, attached to STOP position. To replace the capscrew/shear bolts: 1. Use only original equipment capscrew/shear bolts as supplied with a shear bolt...
User Manual
Page 17
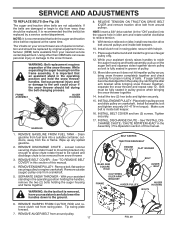
... same time. Install the two (2) hex bolts and tighten securely. 15. Place belt in groove of pulley. 13. Make sure belt is fully seated in pulley groove and slide pulley on idler, install new traction drive belt around and inside belt keeper. 16. INSTALL BELT COVER and two (2) screws. Drain gasoline from fuel tank into the square hole in the operating position and hold the snow thrower handles. Wipe up on your snow thrower are not adjustable. Remove bolt, flat...
... same time. Install the two (2) hex bolts and tighten securely. 15. Place belt in groove of pulley. 13. Make sure belt is fully seated in pulley groove and slide pulley on idler, install new traction drive belt around and inside belt keeper. 16. INSTALL BELT COVER and two (2) screws. Drain gasoline from fuel tank into the square hole in the operating position and hold the snow thrower handles. Wipe up on your snow thrower are not adjustable. Remove bolt, flat...
User Manual
Page 18
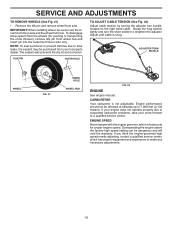
... the wheels (for proper engine speed. ENGINE SPEED Never tamper with the engine governor, which has proper equipment and experience to use the innermost hole in axle only. If you think the engine-governed high speed needs adjusting, contact a qualified service center, which is factory set for pushing or transporting the snow thrower), remove klik pin from axle. ADJUSTER TURN BUCKLE WHEEL FIG. 21 INNER HOLE WHEEL HUB FIG. 22 ENGINE See engine manual. CARBURETOR Your carburetor...
... the wheels (for proper engine speed. ENGINE SPEED Never tamper with the engine governor, which has proper equipment and experience to use the innermost hole in axle only. If you think the engine-governed high speed needs adjusting, contact a qualified service center, which is factory set for pushing or transporting the snow thrower), remove klik pin from axle. ADJUSTER TURN BUCKLE WHEEL FIG. 21 INNER HOLE WHEEL HUB FIG. 22 ENGINE See engine manual. CARBURETOR Your carburetor...
User Manual
Page 19
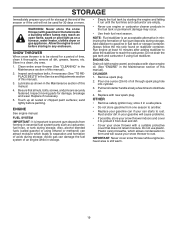
...: Never cover snow thrower while engine/exhaust area is important to prevent gum deposits from dust and dirt. • Cover your snow thrower with new spark plug. STORAGE Immediately prepare your unit for storage at least 10 minutes after adding stabilizer to allow the stabilizer to reach the carburetor. Clean entire snow thrower (See "CLEANING" in the Service and Adjustments section of time, clean it thoroughly, remove all dirt, grease, leaves...
...: Never cover snow thrower while engine/exhaust area is important to prevent gum deposits from dust and dirt. • Cover your snow thrower with new spark plug. STORAGE Immediately prepare your unit for storage at least 10 minutes after adding stabilizer to allow the stabilizer to reach the carburetor. Clean entire snow thrower (See "CLEANING" in the Service and Adjustments section of time, clean it thoroughly, remove all dirt, grease, leaves...
User Manual
Page 20
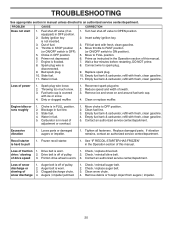
...valve to OPEN position. 2. Check / reinstall auger belt. 2. Throttle in STOP position (or ON/OFF switch is hard to an authorized service center/department. Stale fuel. 11. Turn fuel shut-off of pulley. 2. Connect wire to FULL position. 6. Empty fuel tank & carburetor, refill with fresh, clean gasoline. 4. Spark plug wire loose. 2. Clean or replace muffler. Empty fuel tank & carburetor, refill with fresh, clean gasoline. 4. Replace damaged parts. Loss of swath. 3. Drive belt is disconnected. 9. Safety ignition key is in the Operation section of drive speed...
...valve to OPEN position. 2. Check / reinstall auger belt. 2. Throttle in STOP position (or ON/OFF switch is hard to an authorized service center/department. Stale fuel. 11. Turn fuel shut-off of pulley. 2. Connect wire to FULL position. 6. Empty fuel tank & carburetor, refill with fresh, clean gasoline. 4. Spark plug wire loose. 2. Clean or replace muffler. Empty fuel tank & carburetor, refill with fresh, clean gasoline. 4. Replace damaged parts. Loss of swath. 3. Drive belt is disconnected. 9. Safety ignition key is in the Operation section of drive speed...
User Manual
Page 40
... of any power equipment unit or attachment are belts, blades, blade adapters, normal wear, normal adjustments, standard hardware and normal maintenance. 7. Battery must be defective in manufacture, during the first ninety (90) days of the purchaser. Battery Warranty: On products equipped with a Battery, we will replace, without charge for each full month from defects in replacing parts, any part which we will repair or replace, at our...
... of any power equipment unit or attachment are belts, blades, blade adapters, normal wear, normal adjustments, standard hardware and normal maintenance. 7. Battery must be defective in manufacture, during the first ninety (90) days of the purchaser. Battery Warranty: On products equipped with a Battery, we will replace, without charge for each full month from defects in replacing parts, any part which we will repair or replace, at our...

Parts List
Page 21
... rights, and you have a claim under this Warranty, you , any power equipment unit or attachment are belts, blades, blade adapters, normal wear, normal adjustments, standard hardware and normal maintenance. 7. This Warranty is requested by the manufacturer. 3. This warranty does not apply to the applicable manufacturer's warranty on these items. 2. Battery Warranty: On products equipped with the instructions furnished. 4. Exclusions: Excluded from whom it was...
... rights, and you have a claim under this Warranty, you , any power equipment unit or attachment are belts, blades, blade adapters, normal wear, normal adjustments, standard hardware and normal maintenance. 7. This Warranty is requested by the manufacturer. 3. This warranty does not apply to the applicable manufacturer's warranty on these items. 2. Battery Warranty: On products equipped with the instructions furnished. 4. Exclusions: Excluded from whom it was...


