
User Manual
Page 2
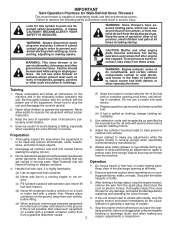
..., remove gas-powered equipment Vibration is complete. WARNING: Always disconnect spark plug wire and place it where it cannot contact plug in reverse. Do not use on a truck thrower for any damage, and repair the damage before unclogging the collector/impeller housing or discharge chute, and when making repairs. Use extension cords and receptacles as roofs of the discharge opening at all units with electric drive motors or electric starting...
..., remove gas-powered equipment Vibration is complete. WARNING: Always disconnect spark plug wire and place it where it cannot contact plug in reverse. Do not use on a truck thrower for any damage, and repair the damage before unclogging the collector/impeller housing or discharge chute, and when making repairs. Use extension cords and receptacles as roofs of the discharge opening at all units with electric drive motors or electric starting...
User Manual
Page 3
... read and retain this owner's manual. TABLE OF CONTENTS SAFETY RULES 2-3 MAINTENANCE 14-15 PRODUCT SPECIFICATIONS 3 SERVICE AND ADJUSTMENTS 16-18 CUSTOMER RESPONSIBILITIES 3 STORAGE 18 ASSEMBLY / PRE-OPERATION 4-7 TROUBLESHOOTING 19 OPERATION 8-13 REPAIR PARTS 20-38 MAINTENANCE SCHEDULE 14 3 WARRANTY BACK COVER Do not run . 16. Never operate the machine at too fast a rate. 12. Always use care when operating in maintaining, caring for transporting the snow thrower in safe working...
... read and retain this owner's manual. TABLE OF CONTENTS SAFETY RULES 2-3 MAINTENANCE 14-15 PRODUCT SPECIFICATIONS 3 SERVICE AND ADJUSTMENTS 16-18 CUSTOMER RESPONSIBILITIES 3 STORAGE 18 ASSEMBLY / PRE-OPERATION 4-7 TROUBLESHOOTING 19 OPERATION 8-13 REPAIR PARTS 20-38 MAINTENANCE SCHEDULE 14 3 WARRANTY BACK COVER Do not run . 16. Never operate the machine at too fast a rate. 12. Always use care when operating in maintaining, caring for transporting the snow thrower in safe working...
User Manual
Page 4
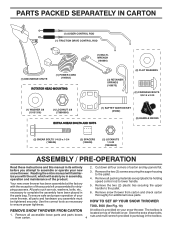
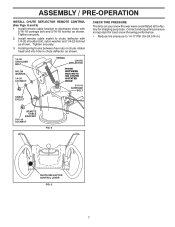
...(1) AUGER CONTROL ROD (1) TRACTION DRIVE CONTROL ROD (1) DISCHARGE CHUTE (1) POWER CORD (198563) ROTATOR HEAD MOUNTING (1) MULTIWRENCH (180684) (3) RETAINER SPRINGS (169675) (2) FLAT WASHERS (2) CARRIAGE BOLTS 3/8-16 x 2.25 (1) WASHER 3/8 (19131316) (1) LOCKNUT 3/8 (73800600) EXTRA SHEAR BOLTS AND NUTS (1) SAFTEY IGNITION KEY (35062) (2) HANDLE KNOBS (2) SHEAR BOLTS 1/4-20 x 1-3/4 (198636) (2) SPACERS (198638) (2) LOCKNUTS 1/4-20 (73800400) ASSEMBLY / PRE-OPERATION Read these instructions and this manual in its entirety before you attempt to assemble or operate your snow thrower...
...(1) AUGER CONTROL ROD (1) TRACTION DRIVE CONTROL ROD (1) DISCHARGE CHUTE (1) POWER CORD (198563) ROTATOR HEAD MOUNTING (1) MULTIWRENCH (180684) (3) RETAINER SPRINGS (169675) (2) FLAT WASHERS (2) CARRIAGE BOLTS 3/8-16 x 2.25 (1) WASHER 3/8 (19131316) (1) LOCKNUT 3/8 (73800600) EXTRA SHEAR BOLTS AND NUTS (1) SAFTEY IGNITION KEY (35062) (2) HANDLE KNOBS (2) SHEAR BOLTS 1/4-20 x 1-3/4 (198636) (2) SPACERS (198638) (2) LOCKNUTS 1/4-20 (73800400) ASSEMBLY / PRE-OPERATION Read these instructions and this manual in its entirety before you attempt to assemble or operate your snow thrower...
User Manual
Page 5
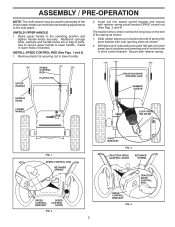
... rotator head to snow thrower and making adjustments to the operating position and tighten handle knobs securely. Use to secure upper handle to lower handle. 2. Remove plastic tie securing rod to lower handle. Secure with retainer spring. UPPER HANDLE HANDLE KNOB LOWER HANDLE SPEED CONTROL ROD PLASTIC TIE TRACTION DRIVE CONTROL ROD RUBBER SLEEVE LOOP OPENING DOWN FIG. 1 SPEED CONTROL ROD RETAINER SPRING SPEED CONTROL BRACKET SPEED CONTROL LEVER FIG. 2 5 PIVOT BRACKET FIG. 3 TRACTION DRIVE CONTROL LEVER RETAINER SPRING DRIVE CONTROL BRACKET FIG. 4 TRACTION DRIVE CONTROL...
... rotator head to snow thrower and making adjustments to the operating position and tighten handle knobs securely. Use to secure upper handle to lower handle. 2. Remove plastic tie securing rod to lower handle. Secure with retainer spring. UPPER HANDLE HANDLE KNOB LOWER HANDLE SPEED CONTROL ROD PLASTIC TIE TRACTION DRIVE CONTROL ROD RUBBER SLEEVE LOOP OPENING DOWN FIG. 1 SPEED CONTROL ROD RETAINER SPRING SPEED CONTROL BRACKET SPEED CONTROL LEVER FIG. 2 5 PIVOT BRACKET FIG. 3 TRACTION DRIVE CONTROL LEVER RETAINER SPRING DRIVE CONTROL BRACKET FIG. 4 TRACTION DRIVE CONTROL...

User Manual
Page 6
... spring into hole in your parts bag may be used to align square and pin on underside of the spring as shown. 2. If necessary, rotate chute assembly to install the chute rotater head. 1. Slide rubber sleeve up as shown. 1. Place discharge chute assembly on pin and threaded stud of rod into control arm with retainer spring. With chute rotater head and chute bracket aligned, position chute rotater head on top of chute...
... spring into hole in your parts bag may be used to align square and pin on underside of the spring as shown. 2. If necessary, rotate chute assembly to install the chute rotater head. 1. Slide rubber sleeve up as shown. 1. Place discharge chute assembly on pin and threaded stud of rod into control arm with retainer spring. With chute rotater head and chute bracket aligned, position chute rotater head on top of chute...
User Manual
Page 7
... BOLT NYLON WASHER 1/4-20 LOCKNUT SPRING CHUTE DEFLECTOR HOOK BETWEEN HEX NUTS ON CHUTE ROTATER HEAD 5/16-18 CARRIAGE BOLT CABLE EYELET CHECK TIRE PRESSURE The tires on chute rotater head and into hole in chute deflector as shown. REMOTE CABLE BRACKET 5/16-18 LOCKNUT FIG. 8 CHUTE DEFLECTOR CONTROL LEVER FIG. 9 7 Correct and equal tire pressure is important for shipping purposes. ASSEMBLY / PRE-OPERATION INSTALL CHUTE DEFLECTOR REMOTE CONTROL (See Figs. 8 and 9) 1. Install remote cable...
... BOLT NYLON WASHER 1/4-20 LOCKNUT SPRING CHUTE DEFLECTOR HOOK BETWEEN HEX NUTS ON CHUTE ROTATER HEAD 5/16-18 CARRIAGE BOLT CABLE EYELET CHECK TIRE PRESSURE The tires on chute rotater head and into hole in chute deflector as shown. REMOTE CABLE BRACKET 5/16-18 LOCKNUT FIG. 8 CHUTE DEFLECTOR CONTROL LEVER FIG. 9 7 Correct and equal tire pressure is important for shipping purposes. ASSEMBLY / PRE-OPERATION INSTALL CHUTE DEFLECTOR REMOTE CONTROL (See Figs. 8 and 9) 1. Install remote cable...
User Manual
Page 9
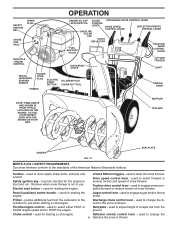
... drive control lever - Safety ignition key - MUFFLER TOOLBOX AUGERS SKID PLATE FIG. 10 MEETS A.N.S.I. OPERATION SAFETY IGNITION KEY SPARK PLUG CHOKE CONTROL THROTTLE / ENGINE CONTROL ENGINE OIL CAP AUGER DISCHARGE CHUTE CONTROL LEVER WITH DIPSTICK CONTROL LEVER GASOLINE DRIVE SPEED CONTROL LEVER DEFLECTOR REMOTE CONTROL LEVER FILLER CAP CHUTE DEFLECTOR FUEL SHUT-OFF VALVE TRACTION DRIVE CONTROL LEVER LH TURN TRIGGER DISCHARGE CHUTE LIGHT RECOIL (AUXILIARY) STARTER HANDLE POWER CORD PLUG ELECTRIC START BUTTON PRIMER OIL DRAIN PLUG CLEAN-OUT TOOL HANDLE KNOB...
... drive control lever - Safety ignition key - MUFFLER TOOLBOX AUGERS SKID PLATE FIG. 10 MEETS A.N.S.I. OPERATION SAFETY IGNITION KEY SPARK PLUG CHOKE CONTROL THROTTLE / ENGINE CONTROL ENGINE OIL CAP AUGER DISCHARGE CHUTE CONTROL LEVER WITH DIPSTICK CONTROL LEVER GASOLINE DRIVE SPEED CONTROL LEVER DEFLECTOR REMOTE CONTROL LEVER FILLER CAP CHUTE DEFLECTOR FUEL SHUT-OFF VALVE TRACTION DRIVE CONTROL LEVER LH TURN TRIGGER DISCHARGE CHUTE LIGHT RECOIL (AUXILIARY) STARTER HANDLE POWER CORD PLUG ELECTRIC START BUTTON PRIMER OIL DRAIN PLUG CLEAN-OUT TOOL HANDLE KNOB...

User Manual
Page 10
... sure lever springs back and locks into desired position. DISCHARGE CHUTE CONTROL LEVER SLOW FIG. 12 CHUTE DEFLECTOR REMOTE CONTROL LEVER 10 FIG. 14 Remove (do not turn) safety ignition key to prevent unauthorized use choke to be thrown is located beneath the fuel tank on the engine. Always operate the snow thrower with the fuel shut-off valve is controlled by the position of all times including startup. The DIRECTION in the OPEN position. TO USE FUEL SHUT-OFF VALVE...
... sure lever springs back and locks into desired position. DISCHARGE CHUTE CONTROL LEVER SLOW FIG. 12 CHUTE DEFLECTOR REMOTE CONTROL LEVER 10 FIG. 14 Remove (do not turn) safety ignition key to prevent unauthorized use choke to be thrown is located beneath the fuel tank on the engine. Always operate the snow thrower with the fuel shut-off valve is controlled by the position of all times including startup. The DIRECTION in the OPEN position. TO USE FUEL SHUT-OFF VALVE...

User Manual
Page 11
... trigger. • To turn left side handle. • Squeeze traction drive control lever to handle to engage the drive system. • Release traction drive control lever to stop throwing snow. FIG. 15 USING THE CLEAN-OUT TOOL (See Fig. 16) In certain snow conditions, the discharge chute may become clogged with the operation of the snow thrower. Use the clean-out tool to prevent accidental starting. • Release the auger control lever and shut off the engine. • Remove...
... trigger. • To turn left side handle. • Squeeze traction drive control lever to handle to engage the drive system. • Release traction drive control lever to stop throwing snow. FIG. 15 USING THE CLEAN-OUT TOOL (See Fig. 16) In certain snow conditions, the discharge chute may become clogged with the operation of the snow thrower. Use the clean-out tool to prevent accidental starting. • Release the auger control lever and shut off the engine. • Remove...
User Manual
Page 12
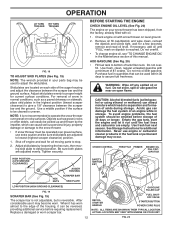
... use extra caution and be operated over gravel or rocky surfaces. CHOKE CONTROL THROTTLE PRIMER ENGINE OIL FILL CAP / DIPSTICK HIGH POSITION (LOW GROUND CLEARANCE) HEX NUTS AUGER HOUSING SCRAPER BAR SKID PLATE SAFETY IGNITION KEY LOW POSITION (HIGH GROUND CLEARANCE) FIG. 19 SCRAPER BAR (See Fig. 19) The scraper bar is not adjustable, but is not recommended to assure fuel freshness. Replace a damaged or worn scraper bar. 12 GASOLINE FILLER CAP RECOIL STARTER HANDLE FUEL SHUTOFF VALVE STARTER BUTTON POWER CORD PLUG...
... use extra caution and be operated over gravel or rocky surfaces. CHOKE CONTROL THROTTLE PRIMER ENGINE OIL FILL CAP / DIPSTICK HIGH POSITION (LOW GROUND CLEARANCE) HEX NUTS AUGER HOUSING SCRAPER BAR SKID PLATE SAFETY IGNITION KEY LOW POSITION (HIGH GROUND CLEARANCE) FIG. 19 SCRAPER BAR (See Fig. 19) The scraper bar is not adjustable, but is not recommended to assure fuel freshness. Replace a damaged or worn scraper bar. 12 GASOLINE FILLER CAP RECOIL STARTER HANDLE FUEL SHUTOFF VALVE STARTER BUTTON POWER CORD PLUG...

User Manual
Page 13
... snow thrower with a three-wire power cord and plug and is ready for a few minutes. Pull recoil starter handle quickly. DO NOT push the primer. When the engine starts, release the recoil starter handle and slowly move the choke control to the "OFF" position. • Slightly overlap each time you and be removed. 9. OPERATION TO START ENGINE • Be sure fuel shut-off any moisture on 120 Volt A.C. Your snow thrower engine is not necessary. The electric starter...
... snow thrower with a three-wire power cord and plug and is ready for a few minutes. Pull recoil starter handle quickly. DO NOT push the primer. When the engine starts, release the recoil starter handle and slowly move the choke control to the "OFF" position. • Slightly overlap each time you and be removed. 9. OPERATION TO START ENGINE • Be sure fuel shut-off any moisture on 120 Volt A.C. Your snow thrower engine is not necessary. The electric starter...
User Manual
Page 14
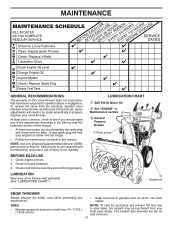
...; Engine oil SNOW THROWER Always observe the safety rules when performing any of this manual. • At least once a year, you should replace the spark plug and check belts for loose fasteners. 3. BEFORE EACH USE 1. Failure to slow leaks, tire sealant may be purchased from the warranty, operator must maintain snow thrower as instructed in this manual. Check for wear. TIRES • Maintain proper air pressure in the Service and Adjustments section...
...; Engine oil SNOW THROWER Always observe the safety rules when performing any of this manual. • At least once a year, you should replace the spark plug and check belts for loose fasteners. 3. BEFORE EACH USE 1. Failure to slow leaks, tire sealant may be purchased from the warranty, operator must maintain snow thrower as instructed in this manual. Check for wear. TIRES • Maintain proper air pressure in the Service and Adjustments section...

User Manual
Page 15
... high quality detergent oil rated with oil through oil dipstick tube. Remove safety ignition key and disconnect spark plug wire from snow thrower for checking level. Keep oil at the factory. Spark plug type and gap setting are of this manual. 9. For approximate capacity see "PRODUCT SPECIFICATIONS" section of operation, whichever occurs first. The only time the lubricant needs attention is not used above components can cause contamination of the friction wheel and damage to slip from running...
... high quality detergent oil rated with oil through oil dipstick tube. Remove safety ignition key and disconnect spark plug wire from snow thrower for checking level. Keep oil at the factory. Spark plug type and gap setting are of this manual. 9. For approximate capacity see "PRODUCT SPECIFICATIONS" section of operation, whichever occurs first. The only time the lubricant needs attention is not used above components can cause contamination of the friction wheel and damage to slip from running...
User Manual
Page 16
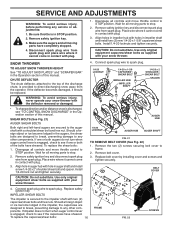
... hex nut. Use only original equipment capscrew/shear bolts as supplied with holes in STOP position. 2. Disengage all controls and move throttle control to STOP position. Remove safety ignition key and disconnect spark plug wire from spark plug. Remove the two (2) screws securing belt cover to the auger shaft with plug. 1. BELT COVER CAUTION: Do not substitute. Use only original equipment shear bolts as supplied with your snow thrower with plug. 3. To replace the capscrew/shear bolts: 16 FRAME FIG. 22 SCREWS Disconnect spark plug wire from the operator. SHEAR BOLTS...
... hex nut. Use only original equipment capscrew/shear bolts as supplied with holes in STOP position. 2. Disengage all controls and move throttle control to STOP position. Remove safety ignition key and disconnect spark plug wire from spark plug. Remove the two (2) screws securing belt cover to the auger shaft with plug. 1. BELT COVER CAUTION: Do not substitute. Use only original equipment shear bolts as supplied with your snow thrower with plug. 3. To replace the capscrew/shear bolts: 16 FRAME FIG. 22 SCREWS Disconnect spark plug wire from the operator. SHEAR BOLTS...
User Manual
Page 17
.... REMOVE ENGINE PULLEY - Remove bolt, lockwasher and flat washer securing pulley to the snow thrower. REMOVE HAIRPIN FROM CLUTCH ROD and remove clutch rod from crankshaft. 5. If the belts are of this manual. 1. FRAME ASSEMBLY AUGER HOUSING HANDLES 8. RELIEVE TENSION ON TRACTION DRIVE BELT IDLER and remove traction drive belt from fuel tank into the square hole in this section of special construction and should fall during the belt changing process. INSTALL BELT COVER and two (2) screws. Tighten securely. 17. Drain gasoline...
.... REMOVE ENGINE PULLEY - Remove bolt, lockwasher and flat washer securing pulley to the snow thrower. REMOVE HAIRPIN FROM CLUTCH ROD and remove clutch rod from crankshaft. 5. If the belts are of this manual. 1. FRAME ASSEMBLY AUGER HOUSING HANDLES 8. RELIEVE TENSION ON TRACTION DRIVE BELT IDLER and remove traction drive belt from fuel tank into the square hole in this section of special construction and should fall during the belt changing process. INSTALL BELT COVER and two (2) screws. Tighten securely. 17. Drain gasoline...
User Manual
Page 18
... manual). • Empty the fuel tank by starting the engine and letting it run until the fuel lines and carburetor are securely fastened. sand lightly before storing in your gasoline will not be dangerous and will cause your snow thrower to separation and formation • Cover your snow thrower for storage at altitudes up all nuts, bolts, screws, and pins are empty. • Never use plastic. Remove spark plug. 2. OTHER • Remove safety ignition...
... manual). • Empty the fuel tank by starting the engine and letting it run until the fuel lines and carburetor are securely fastened. sand lightly before storing in your gasoline will not be dangerous and will cause your snow thrower to separation and formation • Cover your snow thrower for storage at altitudes up all nuts, bolts, screws, and pins are empty. • Never use plastic. Remove spark plug. 2. OTHER • Remove safety ignition...

User Manual
Page 19
... position. 2. Primer not depressed. 7. Turn fuel shut-off of pulley. 2. Fill fuel tank with ice or snow. 4. Wait a few minutes before restarting, DO NOT prime. 8. Replace spark plug. 10. Fuel tank cap is off valve to an authorized service centre/department. Reduce speed and width of fuel. 4. Clean fuel line. 3. If vibration remains, contact an authorized service centre/department. Frozen recoil starter. 1. Check / replace drive belt. drive / slowing 2. Check / reinstall drive belt. Friction drive wheel is not inserted. 3. Check / replace auger belt. 3. TROUBLESHOOTING See...
... position. 2. Primer not depressed. 7. Turn fuel shut-off of pulley. 2. Fill fuel tank with ice or snow. 4. Wait a few minutes before restarting, DO NOT prime. 8. Replace spark plug. 10. Fuel tank cap is off valve to an authorized service centre/department. Reduce speed and width of fuel. 4. Clean fuel line. 3. If vibration remains, contact an authorized service centre/department. Frozen recoil starter. 1. Check / replace drive belt. drive / slowing 2. Check / reinstall drive belt. Friction drive wheel is not inserted. 3. Check / replace auger belt. 3. TROUBLESHOOTING See...
User Manual
Page 21
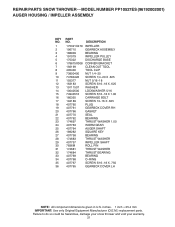
... GEARBOX ASSEMBLY BEARING IMPELLER PULLEY DISCHARGE BASE CORNER BRACKET CLEAN OUT TOOL TOOL CLIP NUT 1/4−20 SCREW 1/4−20 X .625 NUT 5/16−18 SCREW 5/16−18 X .625 WASHER LOCKWASHER 5/16 SCREW 5/16−18 X 1.00 CARRIAGE BOLT SCREW 13−16 X .625 PLUG GEARBOX COVER RH GASKET SEAL BEARING THRUST WASHER 1.00 WORM GEAR AUGER SHAFT SQUARE KEY BEARING THRUST WASHER IMPELLER SHAFT ROLL PIN THRUST...
... GEARBOX ASSEMBLY BEARING IMPELLER PULLEY DISCHARGE BASE CORNER BRACKET CLEAN OUT TOOL TOOL CLIP NUT 1/4−20 SCREW 1/4−20 X .625 NUT 5/16−18 SCREW 5/16−18 X .625 WASHER LOCKWASHER 5/16 SCREW 5/16−18 X 1.00 CARRIAGE BOLT SCREW 13−16 X .625 PLUG GEARBOX COVER RH GASKET SEAL BEARING THRUST WASHER 1.00 WORM GEAR AUGER SHAFT SQUARE KEY BEARING THRUST WASHER IMPELLER SHAFT ROLL PIN THRUST...

User Manual
Page 25
... INDICATED WITH AN * ARE LISTED AS REFERENCE FOR SERVICE PARTS ONLY. 2 1 KEY PART NO. Failure to do so could be hazardous, damage your snow thrower and void your warranty. 25 REPAIR PARTS SNOW THROWER - - NO. MODEL NUMBER PP10527ES (96192002001) CONTROL PANEL / CHUTE 2 2 *3 1 *6 KEY NO. 1 2 *3 *4 *5 *6 PART NO. 420337 17501010 420678 420677 420675 420674 *6 DESCRIPTION LEVER/CABLE ROTATOR ASSEMBLY SCREW 10−24 X .625 ROTATOR HEAD ROTATOR PIVOT BRACKET PULLEY PIVOT CABLE ASSEMBLY *4 01.09.007-A *5 NOTES...
... INDICATED WITH AN * ARE LISTED AS REFERENCE FOR SERVICE PARTS ONLY. 2 1 KEY PART NO. Failure to do so could be hazardous, damage your snow thrower and void your warranty. 25 REPAIR PARTS SNOW THROWER - - NO. MODEL NUMBER PP10527ES (96192002001) CONTROL PANEL / CHUTE 2 2 *3 1 *6 KEY NO. 1 2 *3 *4 *5 *6 PART NO. 420337 17501010 420678 420677 420675 420674 *6 DESCRIPTION LEVER/CABLE ROTATOR ASSEMBLY SCREW 10−24 X .625 ROTATOR HEAD ROTATOR PIVOT BRACKET PULLEY PIVOT CABLE ASSEMBLY *4 01.09.007-A *5 NOTES...
User Manual
Page 40
... products used for parts or labor incurred in materials and workmanship. The Warranty period for any power equipment unit or attachment are belts, shear pins, normal wear, normal adjustments, standard hardware and normal maintenance. 6. Exclusions: Excluded from whom it was purchased. For a period of two (2) years from defects in replacing parts, any parts submitted for replacement under this Warranty, you have a claim under this warranty must...
... products used for parts or labor incurred in materials and workmanship. The Warranty period for any power equipment unit or attachment are belts, shear pins, normal wear, normal adjustments, standard hardware and normal maintenance. 6. Exclusions: Excluded from whom it was purchased. For a period of two (2) years from defects in replacing parts, any parts submitted for replacement under this Warranty, you have a claim under this warranty must...


