
User Manual
Page 2
... be picked up and thrown by the blades. • Be sure the area is over the edge or if the edge caves in the manual before and while backing. • Never direct discharged material toward the operator. GENERAL OPERATION • Read, understand, and follow all times. ... Operate machine only in place and working. • Slow down slopes. Allow machine to prevent accidental starting , stopping, or turning on all parts to come to protect themselves and others from serious injury. • Follow the manufacturer's recommendation for Ride-On Mowers DANGER: THIS CUTTING MACHINE ...
... be picked up and thrown by the blades. • Be sure the area is over the edge or if the edge caves in the manual before and while backing. • Never direct discharged material toward the operator. GENERAL OPERATION • Read, understand, and follow all times. ... Operate machine only in place and working. • Slow down slopes. Allow machine to prevent accidental starting , stopping, or turning on all parts to come to protect themselves and others from serious injury. • Follow the manufacturer's recommendation for Ride-On Mowers DANGER: THIS CUTTING MACHINE ...
User Manual
Page 6
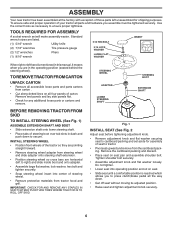
...assembly of seat to tractor. • Pivot seat upward and remove from carton . • Cut along dotted lines on all accessible loose parts and parts cartons from the cardboard packing. IMPORTANT: CHECK FOR AND REMOVE ANY STAPLES IN SKID THAT MAY PUNCTURE TIRES WHERE TRACTOR IS TO ROLL OFF ... steering wheel). Remove the cardboard packing and discard. • Place seat on seat. • Slide seat until a comfortable position is mentioned in this manual, it means when you are in dash and push down . • Get off seat without moving its adjusted position. • Raise seat and tighten...
...assembly of seat to tractor. • Pivot seat upward and remove from carton . • Cut along dotted lines on all accessible loose parts and parts cartons from the cardboard packing. IMPORTANT: CHECK FOR AND REMOVE ANY STAPLES IN SKID THAT MAY PUNCTURE TIRES WHERE TRACTOR IS TO ROLL OFF ... steering wheel). Remove the cardboard packing and discard. • Place seat on seat. • Slide seat until a comfortable position is mentioned in this manual, it means when you are in dash and push down . • Get off seat without moving its adjusted position. • Raise seat and tighten...
User Manual
Page 8
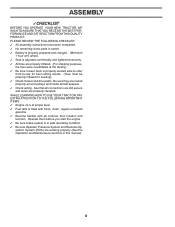
...with all controls, their location and function. PLEASE REVIEW THE FOLLOWING CHECKLIST: ✓ All assembly instructions have been completed. ✓ No remaining loose parts in carton. ✓ Battery is properly prepared and charged. (Minimum 1 hour at 6 amps). ✓ Seat is adjusted comfortably and tightened ...around pulleys and inside all connections are still secure and wires are working properly (See the Operation and Maintenance sections in this manual). 8 ASSEMBLY ✓CHECKLIST BEFORE YOU OPERATE YOUR NEW TRACTOR, WE WISH TO ASSURE THAT YOU RECEIVE THE BEST PERFORMANCE AND...
...with all controls, their location and function. PLEASE REVIEW THE FOLLOWING CHECKLIST: ✓ All assembly instructions have been completed. ✓ No remaining loose parts in carton. ✓ Battery is properly prepared and charged. (Minimum 1 hour at 6 amps). ✓ Seat is adjusted comfortably and tightened ...around pulleys and inside all connections are still secure and wires are working properly (See the Operation and Maintenance sections in this manual). 8 ASSEMBLY ✓CHECKLIST BEFORE YOU OPERATE YOUR NEW TRACTOR, WE WISH TO ASSURE THAT YOU RECEIVE THE BEST PERFORMANCE AND...
User Manual
Page 16
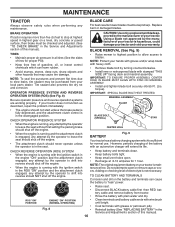
...cause tire damage. torque). NOTE: The original equipment battery on your tractor is hazardous, could damage your tractor and void your local parts dealer. Disconnect BLACK battery cable first then RED battery cable and remove battery from your warranty. NOTE: To seal tire punctures and..., oil, or insect control chemicals which is in the Service and Adjustments section of this manual). TIRES • Maintain proper air pressure in the Service and Adjustments section of this manual). Reinstall battery (See "REPLACING BATTERY" in all tires (See the sides of tires for...
...cause tire damage. torque). NOTE: The original equipment battery on your tractor is hazardous, could damage your tractor and void your local parts dealer. Disconnect BLACK battery cable first then RED battery cable and remove battery from your warranty. NOTE: To seal tire punctures and..., oil, or insect control chemicals which is in the Service and Adjustments section of this manual). TIRES • Maintain proper air pressure in the Service and Adjustments section of this manual). Reinstall battery (See "REPLACING BATTERY" in all tires (See the sides of tires for...
User Manual
Page 22
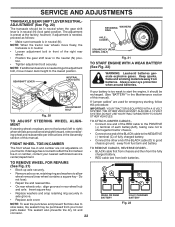
...sparks, flame and smoking materials away from your tractor. Fig. 20 ADJUSTMENT BOLT If "jumper cables" are not adjustable on your local parts dealer. TO ADJUST STEERING WHEEL ALIGNMENT If steering wheel crossbars are not horizontal (left to right) when wheels are positioned straight forward, ...remove steering wheel and reassemble per instructions in the Assembly section of this manual). Insert square key. • Replace washers and snap retaining ring securely in rear wheel hub and axle. however, if adjustment is ...
...sparks, flame and smoking materials away from your tractor. Fig. 20 ADJUSTMENT BOLT If "jumper cables" are not adjustable on your local parts dealer. TO ADJUST STEERING WHEEL ALIGNMENT If steering wheel crossbars are not horizontal (left to right) when wheels are positioned straight forward, ...remove steering wheel and reassemble per instructions in the Assembly section of this manual). Insert square key. • Replace washers and snap retaining ring securely in rear wheel hub and axle. however, if adjustment is ...
User Manual
Page 23
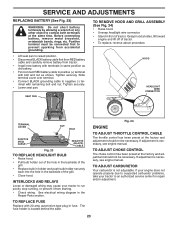
... and adjustment should not be necessary. If adjustment is necessary, see engine manual. Tighten securely. • Lower seat pan. Grasp hood at the same time. If adjustment is necessary, see engne manual. TO ADJUST CARBURETOR Your carburetor is located behind the dash. INTERLOCKS AND ...headlight wire connector. • Stand in same position as shown. TO REPLACE FUSE Replace with 20 amp automotive-type plug-in the Repair Parts section. SERVICE AND ADJUSTMENTS REPLACING BATTERY (See Fig. 23) WARNING: Do not short battery terminals by allowing a wrench or any other object...
... and adjustment should not be necessary. If adjustment is necessary, see engine manual. Tighten securely. • Lower seat pan. Grasp hood at the same time. If adjustment is necessary, see engne manual. TO ADJUST CARBURETOR Your carburetor is located behind the dash. INTERLOCKS AND ...headlight wire connector. • Stand in same position as shown. TO REPLACE FUSE Replace with 20 amp automotive-type plug-in the Repair Parts section. SERVICE AND ADJUSTMENTS REPLACING BATTERY (See Fig. 23) WARNING: Do not short battery terminals by allowing a wrench or any other object...
User Manual
Page 24
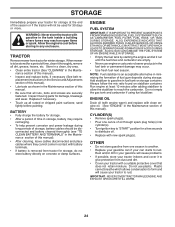
... leave cables disconnected and place cables where they cannot come in any enclosure. placement instructions in the Service and Adjustments section of this manual). • Lubricate as shown in the Maintenance section of oil through spark plug hole(s) into cylinder(s). • Turn ignition key to...follow the mix ratio found on concrete or damp surfaces. When mower is an acceptable alternative in the Mainte- Inspect moving parts for a period of this manual). • Inspect and replace belts, if necessary (See belt re- ALSO, EXPERIENCE INDICATES THAT ALCOHOL BLENDED FUELS (CALLED ...
... leave cables disconnected and place cables where they cannot come in any enclosure. placement instructions in the Service and Adjustments section of this manual). • Lubricate as shown in the Maintenance section of oil through spark plug hole(s) into cylinder(s). • Turn ignition key to...follow the mix ratio found on concrete or damp surfaces. When mower is an acceptable alternative in the Mainte- Inspect moving parts for a period of this manual). • Inspect and replace belts, if necessary (See belt re- ALSO, EXPERIENCE INDICATES THAT ALCOHOL BLENDED FUELS (CALLED ...
User Manual
Page 26
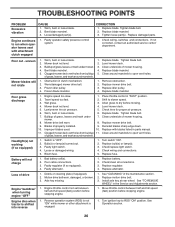
...bolt. 2. Level mower deck. 3. Replace mower drive belt. 3. Allow grass to run when operator leaves seat with blades listed in parts manual. 11. Low/uneven tire air pressure. 5. Replace blade. Clean underside of mower housing. 4. Mower drive belt worn. 8. Replace ... on steering plate (if equipped). 2. See "CLEANING" in the Service and Adjustments section. 1. See Operation section. 26 CORRECTION 1. Replace damaged parts. Worn, bent or loose blade. 2. Bent blade mandrel. 5. Worn/damaged mower drive belt. 3. Replace blade mandrel. Check tires for proper air...
...bolt. 2. Level mower deck. 3. Replace mower drive belt. 3. Allow grass to run when operator leaves seat with blades listed in parts manual. 11. Low/uneven tire air pressure. 5. Replace blade. Clean underside of mower housing. 4. Mower drive belt worn. 8. Replace ... on steering plate (if equipped). 2. See "CLEANING" in the Service and Adjustments section. 1. See Operation section. 26 CORRECTION 1. Replace damaged parts. Worn, bent or loose blade. 2. Bent blade mandrel. 5. Worn/damaged mower drive belt. 3. Replace blade mandrel. Check tires for proper air...

User Manual
Page 30
... Number/Manufacturer's I.D. therefore, all mechanical products, some adjustments or part replacement may be directed to our website: www.poulan.com/support.asp NOTE: HOP provides parts and service through its products. For Parts and service, contact our authorized distributor: call 1-800-829-5886 For a Parts Manual, go to your local dealer(s). If the operating characteristics or...
... Number/Manufacturer's I.D. therefore, all mechanical products, some adjustments or part replacement may be directed to our website: www.poulan.com/support.asp NOTE: HOP provides parts and service through its products. For Parts and service, contact our authorized distributor: call 1-800-829-5886 For a Parts Manual, go to your local dealer(s). If the operating characteristics or...


