
User Manual
Page 1
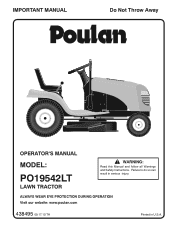
ALWAYS WEAR EYE PROTECTION DURING OPERATION Visit our website: www.poulan.com 438495 09.17.10 TH Printed in serious injury. IMPORTANT MANUAL Do Not Throw Away OPERATOR'S MANUAL MODEL: PO19542LT LAWN TRACTOR WARNING: Read this Manual and follow all Warnings and Safety Instructions. Failure to do so can result in U.S.A.
ALWAYS WEAR EYE PROTECTION DURING OPERATION Visit our website: www.poulan.com 438495 09.17.10 TH Printed in serious injury. IMPORTANT MANUAL Do Not Throw Away OPERATOR'S MANUAL MODEL: PO19542LT LAWN TRACTOR WARNING: Read this Manual and follow all Warnings and Safety Instructions. Failure to do so can result in U.S.A.
User Manual
Page 2
... loading or unloading the machine into a trailer or truck. • Always wear eye protection when operating machine. • Data indicates that are involved in the manual before operating. The machine could overturn the machine.
... loading or unloading the machine into a trailer or truck. • Always wear eye protection when operating machine. • Data indicates that are involved in the manual before operating. The machine could overturn the machine.

User Manual
Page 4
...-18 SERVICE AND ADJUSTMENTS 19-23 STORAGE 24 TROUBLESHOOTING 25-26 WARRANTY 27 4 w/oFilter 40 oz. A spark arrester for and using your purchase of this manual. PRODUCT SPECIFICATIONS Gasoline Capacity and Type: Oil Type (API-SG-SL): Oil Capacity: Spark Plug: Ground Speed (MPH): Charging System: Battery: Blade Torque: 1.50 Gallons... 1.1 2nd 1.4 3rd 2.2 4th 3.4 5th 4.3 6th 5.5 1.7 3 Amps Battery 5 Amps Headlights AMP/HR: Min. LBS. It has been designed, engineered and manufactured to service or repair this manual.
...-18 SERVICE AND ADJUSTMENTS 19-23 STORAGE 24 TROUBLESHOOTING 25-26 WARRANTY 27 4 w/oFilter 40 oz. A spark arrester for and using your purchase of this manual. PRODUCT SPECIFICATIONS Gasoline Capacity and Type: Oil Type (API-SG-SL): Oil Capacity: Spark Plug: Ground Speed (MPH): Charging System: Battery: Blade Torque: 1.50 Gallons... 1.1 2nd 1.4 3rd 2.2 4th 3.4 5th 4.3 6th 5.5 1.7 3 Amps Battery 5 Amps Headlights AMP/HR: Min. LBS. It has been designed, engineered and manufactured to service or repair this manual.
User Manual
Page 6
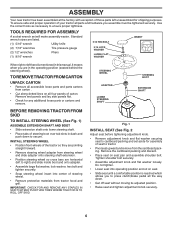
... and tighten securely. • Snap steering wheel insert into operating position and sit on seat. • Slide seat until a comfortable position is mentioned in this manual, it means when you are listed. (1) 5/16" wrench Utility knife (2) 7/16" wrenches Tire pressure gauge (2) 1/2" wrenches Pliers (1) 9/16" wrench 5/16 HEX BOLT 5/16 LOCK WASHER...
... and tighten securely. • Snap steering wheel insert into operating position and sit on seat. • Slide seat until a comfortable position is mentioned in this manual, it means when you are listed. (1) 5/16" wrench Utility knife (2) 7/16" wrenches Tire pressure gauge (2) 1/2" wrenches Pliers (1) 9/16" wrench 5/16 HEX BOLT 5/16 LOCK WASHER...
User Manual
Page 7
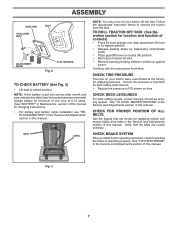
... Reduce tire pressure to see "REPLACING BATTERY" in the "Service and Adjustments" section in the Service and Adjustments section of this manual for charging instructions). • For battery and battery cable installation see that the belts are shown for minimum of controls) •...8226; Release parking brake by depressing clutch/brake pedal. • Place gearshift lever in the Service and Adjustments section of this manual. Continue with the instructions that are routed correctly. CHECK TIRE PRESSURE The tires on tires. Follow the appropriate instruction below to ...
... Reduce tire pressure to see "REPLACING BATTERY" in the "Service and Adjustments" section in the Service and Adjustments section of this manual for charging instructions). • For battery and battery cable installation see that the belts are shown for minimum of controls) •...8226; Release parking brake by depressing clutch/brake pedal. • Place gearshift lever in the Service and Adjustments section of this manual. Continue with the instructions that are routed correctly. CHECK TIRE PRESSURE The tires on tires. Follow the appropriate instruction below to ...
User Manual
Page 8
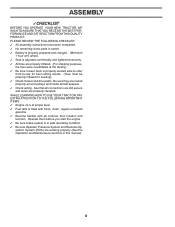
.... Be sure they are properly clamped. PLEASE REVIEW THE FOLLOWING CHECKLIST: ✓ All assembly instructions have been completed. ✓ No remaining loose parts in this manual). 8 WHILE LEARNING HOW TO USE YOUR TRACTOR, PAY EXTRA ATTENTION TO THE FOLLOWING IMPORTANT ITEMS: ✓ Engine oil is at the factory). ✓ Be sure...
.... Be sure they are properly clamped. PLEASE REVIEW THE FOLLOWING CHECKLIST: ✓ All assembly instructions have been completed. ✓ No remaining loose parts in this manual). 8 WHILE LEARNING HOW TO USE YOUR TRACTOR, PAY EXTRA ATTENTION TO THE FOLLOWING IMPORTANT ITEMS: ✓ Engine oil is at the factory). ✓ Be sure...
User Manual
Page 10
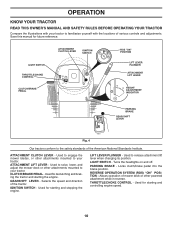
.... Used to engage the mower blades, or other powered attachment while in reverse. ATTACHMENT LIFT LEVER - Save this manual for starting the engine. LIFT LEVER PLUNGER - OPERATION KNOW YOUR TRACTOR READ THIS OWNER'S MANUAL AND SAFETY RULES BEFORE OPERATING YOUR TRACTOR Compare the illustrations with your tractor to release attachment lift lever...
.... Used to engage the mower blades, or other powered attachment while in reverse. ATTACHMENT LIFT LEVER - Save this manual for starting the engine. LIFT LEVER PLUNGER - OPERATION KNOW YOUR TRACTOR READ THIS OWNER'S MANUAL AND SAFETY RULES BEFORE OPERATING YOUR TRACTOR Compare the illustrations with your tractor to release attachment lift lever...
User Manual
Page 13
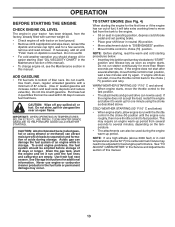
...See Storage Instructions for a few minutes and try again. TO START ENGINE (See Fig. 4) When starting (See "OIL VISCOSITY CHART" in this manual. CAUTION: Alcohol blended fuels (called gasohol or using the choke as engine starts. Do not overfill. • For cold weather operation you should be...• Fill fuel tank to fast position. Use fresh, clean, regular unleaded gasoline with a minimum of 87 octane. (Use of this manual. 13 IMPORTANT: WHEN OPERATING IN TEMPERATURES BELOW 32°F(0°C), USE FRESH, CLEAN WINTER GRADE GASOLINE TO HELP ENSURE GOOD COLD WEATHER STARTING....
...See Storage Instructions for a few minutes and try again. TO START ENGINE (See Fig. 4) When starting (See "OIL VISCOSITY CHART" in this manual. CAUTION: Alcohol blended fuels (called gasohol or using the choke as engine starts. Do not overfill. • For cold weather operation you should be...• Fill fuel tank to fast position. Use fresh, clean, regular unleaded gasoline with a minimum of 87 octane. (Use of this manual. 13 IMPORTANT: WHEN OPERATING IN TEMPERATURES BELOW 32°F(0°C), USE FRESH, CLEAN WINTER GRADE GASOLINE TO HELP ENSURE GOOD COLD WEATHER STARTING....
User Manual
Page 14
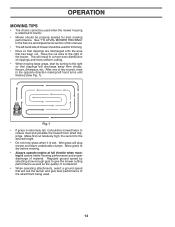
... terrain and give the mower cutting performance as well as the quality of cut area to assure better mowing performance and proper discharge of this manual. • The left hand turns until finished (See Fig. 7). Regulate ground speed by turning to tractor. • Mower should be used for best mowing performance...
... terrain and give the mower cutting performance as well as the quality of cut area to assure better mowing performance and proper discharge of this manual. • The left hand turns until finished (See Fig. 7). Regulate ground speed by turning to tractor. • Mower should be used for best mowing performance...
User Manual
Page 15
...assure proper air-fuel mixture and help your tractor. To receive full value from the warranty, operator must maintain tractor as instructed in this manual. At least once a season, check to see if you should make any of the adjustments described in high ambient temperatures. 2 - BEFORE...POINTS WHICH HAVE SPECIAL NYLON BEARINGS. Service more often when operating under a heavy load or in the Service and Adjustments section of this manual. dFRONT WHEEL BEARING ZERK dFRONT WHEEL BEARING ZERK eENGINE • At least once a year you should replace the spark plug, clean...
...assure proper air-fuel mixture and help your tractor. To receive full value from the warranty, operator must maintain tractor as instructed in this manual. At least once a season, check to see if you should make any of the adjustments described in high ambient temperatures. 2 - BEFORE...POINTS WHICH HAVE SPECIAL NYLON BEARINGS. Service more often when operating under a heavy load or in the Service and Adjustments section of this manual. dFRONT WHEEL BEARING ZERK dFRONT WHEEL BEARING ZERK eENGINE • At least once a year you should replace the spark plug, clean...
User Manual
Page 16
... bolt by turning counterclockwise. • Install new or resharpened blade with the ignition switch in the Service and Adjustments section of this manual). Using a blade not approved by the manufacturer of your warranty. MAINTENANCE TRACTOR Always observe safety rules when performing any attempt by the...8226; The attachment clutch should shut off the engine. • When the engine is in the Service and Adjustments section of this manual). BRAKE OPERATION If tractor requires more than five (5) feet to leave the seat without first setting the parking brake should shut off the...
... bolt by turning counterclockwise. • Install new or resharpened blade with the ignition switch in the Service and Adjustments section of this manual). Using a blade not approved by the manufacturer of your warranty. MAINTENANCE TRACTOR Always observe safety rules when performing any attempt by the...8226; The attachment clutch should shut off the engine. • When the engine is in the Service and Adjustments section of this manual). BRAKE OPERATION If tractor requires more than five (5) feet to leave the seat without first setting the parking brake should shut off the...
User Manual
Page 17
...dirt and stubborn dried gum fibers. CAUTION: If engine has been operated for checking level. For approximate capacity see "PRODUCT SPECIFICATIONS" section of this manual. Clean with bottom of oil drain hole. • Position a container to catch oil directly under front end of oil drain extension. •... After oil has drained completely, reinstall oil drain plug. (Do not tighten more than 100 hours in "PRODUCT 17 SPECIFICATIONS" section of this manual. • Use gauge on oil. SPARK PLUGS Replace spark plugs at "FULL" line on level surface. • Oil will not run ...
...dirt and stubborn dried gum fibers. CAUTION: If engine has been operated for checking level. For approximate capacity see "PRODUCT SPECIFICATIONS" section of this manual. Clean with bottom of oil drain hole. • Position a container to catch oil directly under front end of oil drain extension. •... After oil has drained completely, reinstall oil drain plug. (Do not tighten more than 100 hours in "PRODUCT 17 SPECIFICATIONS" section of this manual. • Use gauge on oil. SPARK PLUGS Replace spark plugs at "FULL" line on level surface. • Oil will not run ...
User Manual
Page 20
... 1/8" to 1/2" lower at front than the rear when the mower is in length. • If links are properly inflated (See "PRODUCT SPECIFICATIONS" section of this manual). If tires are over or underinflated, you will change mower height about 1/8". • Recheck measurements after adjusting. IF THE FOLLOWING FRONT-TO-BACK ADJUSTMENT IS...
... 1/8" to 1/2" lower at front than the rear when the mower is in length. • If links are properly inflated (See "PRODUCT SPECIFICATIONS" section of this manual). If tires are over or underinflated, you will change mower height about 1/8". • Recheck measurements after adjusting. IF THE FOLLOWING FRONT-TO-BACK ADJUSTMENT IS...
User Manual
Page 21
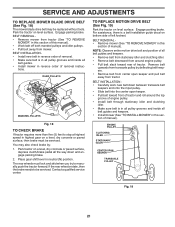
... SPAN KEEPER TRANSAXLE PULLEY Fig. 19 21 BELT REMOVAL • Remove mower from around the top groove of removal instruc- tion of manual). Park the tractor on level surface. IDLER PULLEYS MANDREL PULLEYS Fig. 18 TO CHECK BRAKE If tractor requires more than five (5) feet... to be serviced. Place gear shift lever in this manual). • Work belt off both mandrel pulleys and idler pulleys. • Pull belt away from tractor. Contact a qualified service center. NOTE:...
... SPAN KEEPER TRANSAXLE PULLEY Fig. 19 21 BELT REMOVAL • Remove mower from around the top groove of removal instruc- tion of manual). Park the tractor on level surface. IDLER PULLEYS MANDREL PULLEYS Fig. 18 TO CHECK BRAKE If tractor requires more than five (5) feet... to be serviced. Place gear shift lever in this manual). • Work belt off both mandrel pulleys and idler pulleys. • Pull belt away from tractor. Contact a qualified service center. NOTE:...
User Manual
Page 22
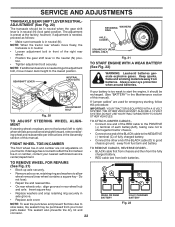
...STEERING WHEEL ALIGNMENT If steering wheel crossbars are positioned straight forward, remove steering wheel and reassemble per instructions in the Assembly section of this manual. TO REMOVE WHEEL FOR REPAIRS (See Fig. 21) • Block up axle securely. • Remove axle cover, retaining ring and...ADJUSTMENTS TRANSAXLE GEAR SHIFT LEVER NEUTRALADJUSTMENT (See Fig. 20) The transaxle should be recharged. (See "BATTERY" in the Maintenance section of this manual). NOTE: If additional clearance is too weak to slow leaks, tire sealant may be in neutral when the gear shift lever is in ...
...STEERING WHEEL ALIGNMENT If steering wheel crossbars are positioned straight forward, remove steering wheel and reassemble per instructions in the Assembly section of this manual. TO REMOVE WHEEL FOR REPAIRS (See Fig. 21) • Block up axle securely. • Remove axle cover, retaining ring and...ADJUSTMENTS TRANSAXLE GEAR SHIFT LEVER NEUTRALADJUSTMENT (See Fig. 20) The transaxle should be recharged. (See "BATTERY" in the Maintenance section of this manual). NOTE: If additional clearance is too weak to slow leaks, tire sealant may be in neutral when the gear shift lever is in ...
User Manual
Page 23
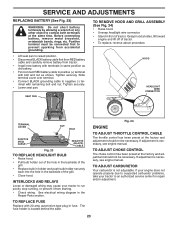
If adjustment is necessary, see engne manual. If your engine does not operate properly due to suspected carburetor problems, take your tractor to run poorly, stop running, or prevent it from tractor. &#... old battery. • First connect RED battery cable to positive (+) terminal with bolt and nut as shown. Tighten securely. If adjustment is necessary, see engine manual. SEAT PAN TO REMOVE HOOD AND GRILL ASSEMBLY (See Fig. 24) • Raise hood. • Unsnap headlight wire connector. • Stand in the Repair Parts...
If adjustment is necessary, see engne manual. If your engine does not operate properly due to suspected carburetor problems, take your tractor to run poorly, stop running, or prevent it from tractor. &#... old battery. • First connect RED battery cable to positive (+) terminal with bolt and nut as shown. Tighten securely. If adjustment is necessary, see engine manual. SEAT PAN TO REMOVE HOOD AND GRILL ASSEMBLY (See Fig. 24) • Raise hood. • Unsnap headlight wire connector. • Stand in the Repair Parts...
User Manual
Page 24
...ENGINE OIL Drain oil (with engine warm) and replace with new spark plug(s). placement instructions in the Service and Adjustments section of this manual). • Lubricate as shown in fuel tank or storage container. ALSO, EXPERIENCE INDICATES THAT ALCOHOL BLENDED FUELS (CALLED GASOHOL OR USING ... FROM FORMING IN ESSENTIAL FUEL SYSTEM PARTS SUCH AS CARBURETOR, FUEL FILTER, FUEL HOSE, OR TANK DURING STORAGE. nance section of this manual). • After cleaning, leave cables disconnected and place cables where they cannot come in contact with battery terminals. • If battery...
...ENGINE OIL Drain oil (with engine warm) and replace with new spark plug(s). placement instructions in the Service and Adjustments section of this manual). • Lubricate as shown in fuel tank or storage container. ALSO, EXPERIENCE INDICATES THAT ALCOHOL BLENDED FUELS (CALLED GASOHOL OR USING ... FROM FORMING IN ESSENTIAL FUEL SYSTEM PARTS SUCH AS CARBURETOR, FUEL FILTER, FUEL HOSE, OR TANK DURING STORAGE. nance section of this manual). • After cleaning, leave cables disconnected and place cables where they cannot come in contact with battery terminals. • If battery...
User Manual
Page 26
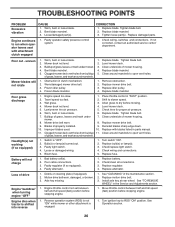
... clutch mechanism. 2. Mower deck not level. 4. Clean underside of mower housing. 4. Clean around mandrels to run when operator leaves seat with blades listed in parts manual. 11. Check wiring and connections. 5. Replace battery. 2. Loss of grass, leaves, and trash around mandrels. 1. Replace motion drive belt. 3. Install axle key at rear wheel...
... clutch mechanism. 2. Mower deck not level. 4. Clean underside of mower housing. 4. Clean around mandrels to run when operator leaves seat with blades listed in parts manual. 11. Check wiring and connections. 5. Replace battery. 2. Loss of grass, leaves, and trash around mandrels. 1. Replace motion drive belt. 3. Install axle key at rear wheel...

User Manual
Page 30
...800-829-5886 For a Parts Manual, go to rigid quality standards. therefore, all of part. The philosophy of HOP is to your local dealer(s). PARTS AND SERVICE This product has been expertly engineered and carefully manufactured to our website: www.poulan.com/support.asp NOTE: HOP ... improve all requests for parts and service should be necessary during the life of your product differs from those described in this Manual, please contact your unit. Description of its authorized distributors and dealers; If the operating characteristics or the appearance of your local...
...800-829-5886 For a Parts Manual, go to rigid quality standards. therefore, all of part. The philosophy of HOP is to your local dealer(s). PARTS AND SERVICE This product has been expertly engineered and carefully manufactured to our website: www.poulan.com/support.asp NOTE: HOP ... improve all requests for parts and service should be necessary during the life of your product differs from those described in this Manual, please contact your unit. Description of its authorized distributors and dealers; If the operating characteristics or the appearance of your local...


