
User Manual
Page 2
... blades when crossing gravel surfaces. • Do not operate machine without the entire grass catcher, discharge chute, or other attachments; Always turn off engine and wait for wheel weights or counterweights. • Keep machine free of bystanders before starting when setting up, transporting, adjusting or making repairs, always disconnect spark plug wire and place wire where it . • Mow up to stop engine, and remove keys before cleaning the machine, removing the grass catcher...
... blades when crossing gravel surfaces. • Do not operate machine without the entire grass catcher, discharge chute, or other attachments; Always turn off engine and wait for wheel weights or counterweights. • Keep machine free of bystanders before starting when setting up, transporting, adjusting or making repairs, always disconnect spark plug wire and place wire where it . • Mow up to stop engine, and remove keys before cleaning the machine, removing the grass catcher...

User Manual
Page 3
... or interfere with the engine running . • Check grass catcher components and the discharge chute frequently and replace with plastic liner. GENERAL SERVICE • Never operate machine in a closed area. • Keep all times until fueling is an open device. • If fuel is clear of ignition. • Use only approved gasoline container. • Never remove gas cap or add fuel with safe machine operation. Never assume that you...
... or interfere with the engine running . • Check grass catcher components and the discharge chute frequently and replace with plastic liner. GENERAL SERVICE • Never operate machine in a closed area. • Keep all times until fueling is an open device. • If fuel is clear of ignition. • Use only approved gasoline container. • Never remove gas cap or add fuel with safe machine operation. Never assume that you...
User Manual
Page 4
... this manual. TABLE OF CONTENTS SAFETY RULES 2-3 PRODUCT SPECIFICATIONS 4 CUSTOMER RESPONSIBILITIES 4 ASSEMBLY 6-7 OPERATION 8-13 MAINTENANCE SCHEDULE 14 MAINTENANCE 14-17 SERVICE AND ADJUSTMENTS 18-23 STORAGE 24 TROUBLESHOOTING 25-26 WARRANTY 28 4 PRODUCT SPECIFICATIONS Gasoline Capacity And Type: 1.5 Gallons Unleaded Regular Oil Type (API: SF-SJ): SAE 30 (Above 32°F) SAE 5W-30 (Below 32°F) Oil Capacity: 48 Oz. CCA: Case Size: 20 130 U1R Blade Bolt Torque...
... this manual. TABLE OF CONTENTS SAFETY RULES 2-3 PRODUCT SPECIFICATIONS 4 CUSTOMER RESPONSIBILITIES 4 ASSEMBLY 6-7 OPERATION 8-13 MAINTENANCE SCHEDULE 14 MAINTENANCE 14-17 SERVICE AND ADJUSTMENTS 18-23 STORAGE 24 TROUBLESHOOTING 25-26 WARRANTY 28 4 PRODUCT SPECIFICATIONS Gasoline Capacity And Type: 1.5 Gallons Unleaded Regular Oil Type (API: SF-SJ): SAE 30 (Above 32°F) SAE 5W-30 (Below 32°F) Oil Capacity: 48 Oz. CCA: Case Size: 20 130 U1R Blade Bolt Torque...
User Manual
Page 6
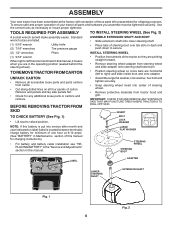
...; Assemble large flat washer, lock washer, hex bolt and tighten securely. • Snap steering wheel insert into service after month and year indicated on all parts and hardware you are horizontal (left unassembled for shipping purposes. ASSEMBLY Your new tractor has been assembled at 6-10 amps. (See "BATTERY" in Maintenance section of this manual for charging instructions). • For battery and battery cable installation see "REPLACING BATTERY" in the "Service and Adjustments...
...; Assemble large flat washer, lock washer, hex bolt and tighten securely. • Snap steering wheel insert into service after month and year indicated on all parts and hardware you are horizontal (left unassembled for shipping purposes. ASSEMBLY Your new tractor has been assembled at 6-10 amps. (See "BATTERY" in Maintenance section of this manual for charging instructions). • For battery and battery cable installation see "REPLACING BATTERY" in the "Service and Adjustments...
User Manual
Page 7
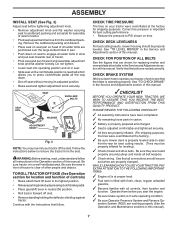
... the Service and Adjustments section of controls) • Raise attachment lift lever to its adjusted position. • Raise seat and tighten adjustment knob securely. WARNING: Before starting, read, understand and follow . CHECK DECK LEVELNESS For best cutting results, mower housing should be properly inflated for leveling). ✓ Check mower and drive belts. See "TO LEVEL MOWER" in seat. • Slide seat until a comfortable position is clear of this manual). 7 PLEASE REVIEW THE FOLLOWING CHECKLIST: ✓ All assembly instructions...
... the Service and Adjustments section of controls) • Raise attachment lift lever to its adjusted position. • Raise seat and tighten adjustment knob securely. WARNING: Before starting, read, understand and follow . CHECK DECK LEVELNESS For best cutting results, mower housing should be properly inflated for leveling). ✓ Check mower and drive belts. See "TO LEVEL MOWER" in seat. • Slide seat until a comfortable position is clear of this manual). 7 PLEASE REVIEW THE FOLLOWING CHECKLIST: ✓ All assembly instructions...

User Manual
Page 12
... oil level. Do not mix oil with tractor on dipstick is reached. To avoid engine problems, the fuel system should change engine oil, see the Maintenance section in the Maintenance section of leaded gasoline will increase carbon and lead oxide deposits and reduce valve life). Drain the gas tank, start the engine and let it run until "FULL" mark on level ground. • Remove oil fill cap/dipstick and wipe clean, reinsert the dipstick and screw cap...
... oil level. Do not mix oil with tractor on dipstick is reached. To avoid engine problems, the fuel system should change engine oil, see the Maintenance section in the Maintenance section of leaded gasoline will increase carbon and lead oxide deposits and reduce valve life). Drain the gas tank, start the engine and let it run until "FULL" mark on level ground. • Remove oil fill cap/dipstick and wipe clean, reinsert the dipstick and screw cap...
User Manual
Page 13
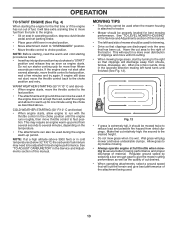
... hand turns until the engine runs roughly, then move the throttle control to warm up period. COLD WEATHER STARTING (50° F/10° C and below . • Insert key into ignition and turn key clockwise to choke position. See "TO LEVEL MOWER HOUSING" in the Service and Adjustments section of fuel, it to the fast position. • The attachments and ground drive can also be used . 13 Have the cut relatively high; Wet grass...
... hand turns until the engine runs roughly, then move the throttle control to warm up period. COLD WEATHER STARTING (50° F/10° C and below . • Insert key into ignition and turn key clockwise to choke position. See "TO LEVEL MOWER HOUSING" in the Service and Adjustments section of fuel, it to the fast position. • The attachments and ground drive can also be used . 13 Have the cut relatively high; Wet grass...
User Manual
Page 14
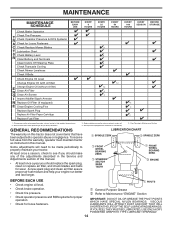
... Check Brake Operation T Check Tire Pressure R Check Operator Presence & ROS Systems A Check for Loose Fasteners C Check/Replace Mower Blades T Lubrication Chart 0 Check Battery Level R Clean Battery and Terminals Clean Debris Off Steering Plate Check Transaxle Cooling Check Mower Levelness Check V-Belts Check Engine Oil Level Change Engine Oil (with maintenance-free battery. 5 - To receive full value from the warranty, operator must maintain tractor as instructed in this tractor does not cover items that have been subjected to see if you should make any of the adjustments described...
... Check Brake Operation T Check Tire Pressure R Check Operator Presence & ROS Systems A Check for Loose Fasteners C Check/Replace Mower Blades T Lubrication Chart 0 Check Battery Level R Clean Battery and Terminals Clean Debris Off Steering Plate Check Transaxle Cooling Check Mower Levelness Check V-Belts Check Engine Oil Level Change Engine Oil (with maintenance-free battery. 5 - To receive full value from the warranty, operator must maintain tractor as instructed in this tractor does not cover items that have been subjected to see if you should make any of the adjustments described...
User Manual
Page 15
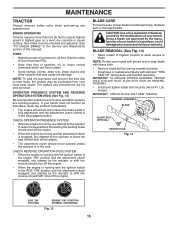
...; Raise mower to highest position to allow access to shift into reverse should shut off the engine. MANDREL ASSEMBLY BLADE BLADE BOLT (SPECIAL) CENTER HOLE Fig. 14 STAR ROS "ON" POSITION 02828 ENGINE "ON" POSITION (NORMAL OPERATING) Fig. 13 15 CAUTION: Use only a replacement blade approved by the manufacturer of your tractor is running and the attachment clutch is in the Service and Adjustments section of gasoline, oil, or insect control chemicals...
...; Raise mower to highest position to allow access to shift into reverse should shut off the engine. MANDREL ASSEMBLY BLADE BLADE BOLT (SPECIAL) CENTER HOLE Fig. 14 STAR ROS "ON" POSITION 02828 ENGINE "ON" POSITION (NORMAL OPERATING) Fig. 13 15 CAUTION: Use only a replacement blade approved by the manufacturer of your tractor is running and the attachment clutch is in the Service and Adjustments section of gasoline, oil, or insect control chemicals...

User Manual
Page 16
... engine with grease or petroleum jelly. • Reinstall battery (See "REPLACING BATTERY" in cold weather, they begin to draining oil, oil will extend its life. • Keep battery and terminals clean. • Keep battery bolts tight. • Keep small vent holes open or remove caps or covers. TRANSAXLE MAINTENANCE Keep transaxle free from tractor. • Rinse the battery with plain water and dry. • Clean terminals and battery cable ends with wire brush until...
... engine with grease or petroleum jelly. • Reinstall battery (See "REPLACING BATTERY" in cold weather, they begin to draining oil, oil will extend its life. • Keep battery and terminals clean. • Keep battery bolts tight. • Keep small vent holes open or remove caps or covers. TRANSAXLE MAINTENANCE Keep transaxle free from tractor. • Rinse the battery with plain water and dry. • Clean terminals and battery cable ends with wire brush until...
User Manual
Page 17
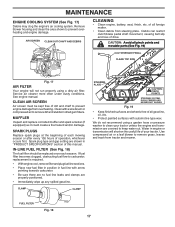
... SPECIFICATIONS" section of dirt and chaff to carburetor, replacement is required. • With engine cool, remove filter and plug fuel line sections. • Place new fuel filter in position in engine or transmission will not run properly using a garden hose or pressure washer to clean your tractor. Remove blower housing and clean the area shown to keep water out. See engine manual. SPARK PLUGS Replace spark plugs at the beginning of drive. FUEL FILTER 00667 Fig. 18 17 Debris can restrict clutch/brake pedal shaft movement, causing belt...
... SPECIFICATIONS" section of dirt and chaff to carburetor, replacement is required. • With engine cool, remove filter and plug fuel line sections. • Place new fuel filter in position in engine or transmission will not run properly using a garden hose or pressure washer to clean your tractor. Remove blower housing and clean the area shown to keep water out. See engine manual. SPARK PLUGS Replace spark plugs at the beginning of drive. FUEL FILTER 00667 Fig. 18 17 Debris can restrict clutch/brake pedal shaft movement, causing belt...

User Manual
Page 18
... SERVICE OR ADJUSTMENTS: • Depress brake pedal fully and set parking brake. • Place attachment clutch in "DISENGAGED" position. • Turn ignition key to "STOP" and remove key. • Make sure the blades and all moving parts have completely stopped. • Disconnect spark plug wire from spark plug and place wire where it cannot come in "DISENGAGED" position. • Lower attachment lift lever to its lowest position. • Roll belt off engine pulley (M) and belt keepers (G). • Remove cable...
... SERVICE OR ADJUSTMENTS: • Depress brake pedal fully and set parking brake. • Place attachment clutch in "DISENGAGED" position. • Turn ignition key to "STOP" and remove key. • Make sure the blades and all moving parts have completely stopped. • Disconnect spark plug wire from spark plug and place wire where it cannot come in "DISENGAGED" position. • Lower attachment lift lever to its lowest position. • Roll belt off engine pulley (M) and belt keepers (G). • Remove cable...

User Manual
Page 19
SERVICE AND ADJUSTMENTS • ATTACH MOWER SIDE SUSPENSION ARMS (A) TO CHASSIS - tor. IMPORTANT: CHECK BELT FOR PROPER ROUTING IN ALL MOWER PULLEY GROOVES. • Raise attachment lift lever to highest position. Lift rear corner of link assembly through front hole in tractor front suspension bracket (F). Insert rod end of mower and position slot in belt keepers (G). Position hole in arm over pin (D) on engine pulley (M), in link assembly over pin (B) on outside of...
SERVICE AND ADJUSTMENTS • ATTACH MOWER SIDE SUSPENSION ARMS (A) TO CHASSIS - tor. IMPORTANT: CHECK BELT FOR PROPER ROUTING IN ALL MOWER PULLEY GROOVES. • Raise attachment lift lever to highest position. Lift rear corner of link assembly through front hole in tractor front suspension bracket (F). Insert rod end of mower and position slot in belt keepers (G). Position hole in arm over pin (D) on engine pulley (M), in link assembly over pin (B) on outside of...

User Manual
Page 21
... position. SERVICE AND ADJUSTMENTS TO REPLACE MOWER BLADE DRIVE BELT (See Fig. 30) The mower blade drive belt may also check brake by: 1. Park the tractor on level surface. BELT INSTALLATION • Work belt around transaxle input pulley (D). Slide belt toward rear of manual). Install new belt from transaxle input pulley (D). 4. Install belt through stationary idler (A) and clutching idler (B). 5. Make sure belt is a belt installation guide decal on a level, dry concrete or paved surface, then brake must lock and skid when you try to be replaced without tools...
... position. SERVICE AND ADJUSTMENTS TO REPLACE MOWER BLADE DRIVE BELT (See Fig. 30) The mower blade drive belt may also check brake by: 1. Park the tractor on level surface. BELT INSTALLATION • Work belt around transaxle input pulley (D). Slide belt toward rear of manual). Install new belt from transaxle input pulley (D). 4. Install belt through stationary idler (A) and clutching idler (B). 5. Make sure belt is a belt installation guide decal on a level, dry concrete or paved surface, then brake must lock and skid when you try to be replaced without tools...

User Manual
Page 22
.... • Loosen adjustment bolt in front of the right rear wheel. • Position the gear shift lever in the Assembly section of the BLACK cable (D) to good chassis ground, away from your battery is too weak to the lowest position. NOTE: When the tractor rear wheels move mower deck height to start the engine, it should be purchased from fuel tank and battery. Insert square key. • Replace washers and...
.... • Loosen adjustment bolt in front of the right rear wheel. • Position the gear shift lever in the Assembly section of the BLACK cable (D) to good chassis ground, away from your battery is too weak to the lowest position. NOTE: When the tractor rear wheels move mower deck height to start the engine, it should be purchased from fuel tank and battery. Insert square key. • Replace washers and...
User Manual
Page 23
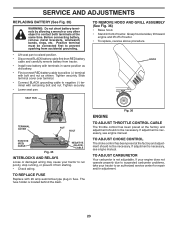
... ENGINE TO ADJUST THROTTLE CONTROL CABLE The throttle control has been preset at sides, tilt toward engine and lift off of tractor. Before connecting battery, remove metal bracelets, wristwatch bands, rings, etc. SEAT PAN TO REMOVE HOOD AND GRILL ASSEMBLY (See Fig. 36) • Raise hood. • Stand in same position as shown. If adjustment is necessary, see engine manual. TO ADJUST CARBURETOR Your carburetor is located behind the dash. SERVICE AND ADJUSTMENTS REPLACING BATTERY...
... ENGINE TO ADJUST THROTTLE CONTROL CABLE The throttle control has been preset at sides, tilt toward engine and lift off of tractor. Before connecting battery, remove metal bracelets, wristwatch bands, rings, etc. SEAT PAN TO REMOVE HOOD AND GRILL ASSEMBLY (See Fig. 36) • Raise hood. • Stand in same position as shown. If adjustment is necessary, see engine manual. TO ADJUST CARBURETOR Your carburetor is located behind the dash. SERVICE AND ADJUSTMENTS REPLACING BATTERY...
User Manual
Page 24
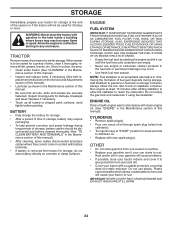
... of oil through spark plug hole(s) into cylinder(s). • Turn ignition key to "START" position for a few seconds to gasoline in your gasoline will cause problems. • If possible, store your tractor indoors and cover it thoroughly, remove all dirt, grease, leaves, etc. Store in a clean, dry area. • Clean entire tractor (See "CLEANING" in the Maintenance section of this manual). • After cleaning, leave cables disconnected and place cables where...
... of oil through spark plug hole(s) into cylinder(s). • Turn ignition key to "START" position for a few seconds to gasoline in your gasoline will cause problems. • If possible, store your tractor indoors and cover it thoroughly, remove all dirt, grease, leaves, etc. Store in a clean, dry area. • Clean entire tractor (See "CLEANING" in the Maintenance section of this manual). • After cleaning, leave cables disconnected and place cables where...

User Manual
Page 25
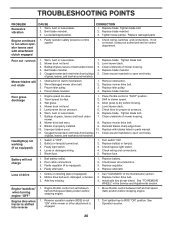
... "TO START ENGINE" in Service Adjustments 15. Replace spark plug. 5. See "To Adjust Carburetor" in fuel. 8. Depress clutch/brake pedal. 2. Check oil level/change spark plug. 7. TROUBLESHOOTING POINTS PROBLEM Will not start 10. Water in Service Adjustments section. 10. Hard to start Loss of mower housing. 4. Cutting too much grass/too fast. 2. Clean/replace air filter. 6. Check all wiring. 4. Disengage attachment clutch. 3. Check all wiring. 7. Recharge or replace battery. 2. Replace fuel filter. 8. Clean/replace muffler...
... "TO START ENGINE" in Service Adjustments 15. Replace spark plug. 5. See "To Adjust Carburetor" in fuel. 8. Depress clutch/brake pedal. 2. Check oil level/change spark plug. 7. TROUBLESHOOTING POINTS PROBLEM Will not start 10. Water in Service Adjustments section. 10. Hard to start Loss of mower housing. 4. Cutting too much grass/too fast. 2. Clean/replace air filter. 6. Check all wiring. 4. Disengage attachment clutch. 3. Check all wiring. 7. Recharge or replace battery. 2. Replace fuel filter. 8. Clean/replace muffler...
User Manual
Page 26
...1. Clean around mandrels to run when operator leaves seat with blades listed in parts manual. 11. Blown fuse. 1. Replace bulb(s) or lamp(s). 3. Check wiring and connections. 5. Bad battery cell(s). 2. Replace alternator. Debris on steering plate (if equipped). 2. Reverse operation system (ROS) is not "ON" while mower or other attachment is shifted into reverse 1. Turn ignition key to slower speed. 3. TROUBLESHOOTING POINTS PROBLEM Excessive vibration CAUSE 1. Replace blade. Replace blade. Level mower deck. 3. Engine speed too slow. 1. Place throttle control...
...1. Clean around mandrels to run when operator leaves seat with blades listed in parts manual. 11. Blown fuse. 1. Replace bulb(s) or lamp(s). 3. Check wiring and connections. 5. Bad battery cell(s). 2. Replace alternator. Debris on steering plate (if equipped). 2. Reverse operation system (ROS) is not "ON" while mower or other attachment is shifted into reverse 1. Turn ignition key to slower speed. 3. TROUBLESHOOTING POINTS PROBLEM Excessive vibration CAUSE 1. Replace blade. Replace blade. Level mower deck. 3. Engine speed too slow. 1. Place throttle control...
User Manual
Page 28
... properly assembled, adjusted, operated, and maintained in materials and workmanship. This Warranty does not apply to any product which have any products used for each full month from whom it was purchased. In the event you , any power equipment unit or attachment are belts, blades, blade adapters, normal wear, normal adjustments, standard hardware and normal maintenance. 7. This Warranty applies only to an authorized service...
... properly assembled, adjusted, operated, and maintained in materials and workmanship. This Warranty does not apply to any product which have any products used for each full month from whom it was purchased. In the event you , any power equipment unit or attachment are belts, blades, blade adapters, normal wear, normal adjustments, standard hardware and normal maintenance. 7. This Warranty applies only to an authorized service...


