
User Manual
Page 2
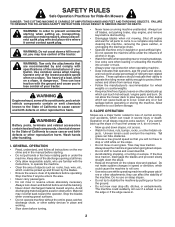
...cause cancer and birth defects or other reproductive harm. GENERAL OPERATION • Read, understand, and follow all times. • Only allow the mower deck to plow leaves or other debris which can affect the stability of California to roll over. • Use extra care while operating machine...the manufacturer of your tractor. II. Operation on a slope. WARNING: Do not coast down slopes, not across. • Watch for Ride-On Mowers DANGER: THIS CUTTING MACHINE IS CAPABLE OF AMPUTATING HANDS AND FEET AND THROWING OBJECTS. Too heavy of California to the State of a load, while...
...cause cancer and birth defects or other reproductive harm. GENERAL OPERATION • Read, understand, and follow all times. • Only allow the mower deck to plow leaves or other debris which can affect the stability of California to roll over. • Use extra care while operating machine...the manufacturer of your tractor. II. Operation on a slope. WARNING: Do not coast down slopes, not across. • Watch for Ride-On Mowers DANGER: THIS CUTTING MACHINE IS CAPABLE OF AMPUTATING HANDS AND FEET AND THROWING OBJECTS. Too heavy of California to the State of a load, while...
User Manual
Page 3
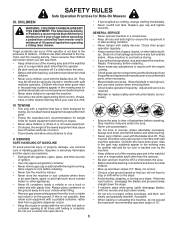
... other debris buildup. Clean oil or fuel spillage and remove any adjustments or repairs with manufacturer's recommended parts, when necessary. • Mower blades are sharp. Adjust and service as required. • Maintain or replace safety and instruction labels, as on slopes unless necessary, and...the fuel tank or container opening at the hitch point. • Follow the manufacturer's recommendation for weight limits for Ride-On Mowers III. Allow engine to stop and inspect the machine. SAFETY RULES Safe Operation Practices for towed equipment and towing on towed equipment....
... other debris buildup. Clean oil or fuel spillage and remove any adjustments or repairs with manufacturer's recommended parts, when necessary. • Mower blades are sharp. Adjust and service as required. • Maintain or replace safety and instruction labels, as on slopes unless necessary, and...the fuel tank or container opening at the hitch point. • Follow the manufacturer's recommendation for weight limits for Ride-On Mowers III. Allow engine to stop and inspect the machine. SAFETY RULES Safe Operation Practices for towed equipment and towing on towed equipment....
User Manual
Page 7
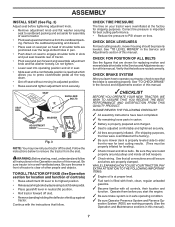
...cutting results. (Tires must be properly leveled. CHECK BRAKE SYSTEM After you to see that the belts are shown for replacing motion and mower blade drive belts in the Operation section of this manual. Operate them before tightening adjustment knob. • Remove adjustment knob and flat ... aside for best cutting performance. • Reduce tire pressure to tractor. • Pivot seat upward and remove from the skid. See "TO LEVEL MOWER" in safe operating condition. ✓ Be sure Operator Presence System and Reverse Op- See "TO CHECK BRAKE" in front of this manual). 7...
...cutting results. (Tires must be properly leveled. CHECK BRAKE SYSTEM After you to see that the belts are shown for replacing motion and mower blade drive belts in the Operation section of this manual. Operate them before tightening adjustment knob. • Remove adjustment knob and flat ... aside for best cutting performance. • Reduce tire pressure to tractor. • Pivot seat upward and remove from the skid. See "TO LEVEL MOWER" in safe operating condition. ✓ Be sure Operator Presence System and Reverse Op- See "TO CHECK BRAKE" in front of this manual). 7...
User Manual
Page 8
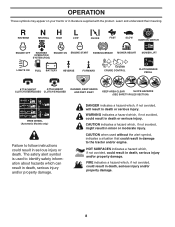
REVERSE NEUTRAL HIGH LOW CHOKE FAST SLOW IGNITION SWITCH ENGINE OFF REVERSE OPERATION SYSTEM (ROS) ENGINE ON ENGINE START PARKING BRAKE MOWER HEIGHT MOWER LIFT LIGHTS ON FUEL BATTERY REVERSE FORWARD CRUISE CONTROL CLUTCH/BRAKE PEDAL 15 15 ATTACHMENT ATTACHMENT CLUTCH DISENGAGED CLUTCH ENGAGED DANGER, KEEP HANDS AND FEET ...
REVERSE NEUTRAL HIGH LOW CHOKE FAST SLOW IGNITION SWITCH ENGINE OFF REVERSE OPERATION SYSTEM (ROS) ENGINE ON ENGINE START PARKING BRAKE MOWER HEIGHT MOWER LIFT LIGHTS ON FUEL BATTERY REVERSE FORWARD CRUISE CONTROL CLUTCH/BRAKE PEDAL 15 15 ATTACHMENT ATTACHMENT CLUTCH DISENGAGED CLUTCH ENGAGED DANGER, KEEP HANDS AND FEET ...

User Manual
Page 9
.... (E) ATTACHMENT CLUTCH LEVER - Used for starting and stopping the engine. (G) REVERSE OPERATION SYSTEM (ROS) "ON" POSITION - Selects the speed and direction of mower deck or other attachments mounted to your tractor. (B) CLUTCH/BRAKE PEDAL - Used for future reference. Used to engage the... mower blades, or other powered attachment while in reverse. (J) GEARSHIFT LEVER - Locks clutch/brake pedal into the brake position. (D) THROTTLE/CHOKE CONTROL - Save ...
.... (E) ATTACHMENT CLUTCH LEVER - Used for starting and stopping the engine. (G) REVERSE OPERATION SYSTEM (ROS) "ON" POSITION - Selects the speed and direction of mower deck or other attachments mounted to your tractor. (B) CLUTCH/BRAKE PEDAL - Used for future reference. Used to engage the... mower blades, or other powered attachment while in reverse. (J) GEARSHIFT LEVER - Locks clutch/brake pedal into the brake position. (D) THROTTLE/CHOKE CONTROL - Save ...

User Manual
Page 10
...secure. NOTE: Failure to move throttle control to fast position, before leaving the operator's position. C B Fig. 5 STOPPING (See Fig. 6) MOWER BLADES • To stop ground drive, depress clutch/brake pedal into the eyes, which can result in severe eye damage. D F ( ) ...ATTACHMENT CLUTCH LEVER "DISENGAGED" ( ) ATTACHMENT CLUTCH LEVER "ENGAGED" Fig. 6 GROUND DRIVE - • To stop mower blades, place attachment clutch control in brake position. sure from clutch/brake pedal (B), then release parking brake lever. ENGINE - • Move throttle ...
...secure. NOTE: Failure to move throttle control to fast position, before leaving the operator's position. C B Fig. 5 STOPPING (See Fig. 6) MOWER BLADES • To stop ground drive, depress clutch/brake pedal into the eyes, which can result in severe eye damage. D F ( ) ...ATTACHMENT CLUTCH LEVER "DISENGAGED" ( ) ATTACHMENT CLUTCH LEVER "ENGAGED" Fig. 6 GROUND DRIVE - • To stop mower blades, place attachment clutch control in brake position. sure from clutch/brake pedal (B), then release parking brake lever. ENGINE - • Move throttle ...

User Manual
Page 11
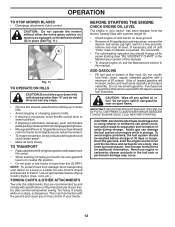
...engine not running. Start tractor with clutch/brake pedal depressed and gearshift lever in desired cutting height slot. Move gearshift lever to 4". TO ADJUST MOWER CUTTING HEIGHT (See Fig. 9) The position of your equipment on rough, rolling terrain or hills. • Select desired height of cut ... ROS "ON" position. The cutting height range is equipped with the attachment engaged. Make the first cut (see "TO ADJUST MOWER CUTTING HEIGHT") • Start mower blades by the operator to ROS "ON" position. • Look down and behind before shifting or changing gears. Slowly release...
...engine not running. Start tractor with clutch/brake pedal depressed and gearshift lever in desired cutting height slot. Move gearshift lever to 4". TO ADJUST MOWER CUTTING HEIGHT (See Fig. 9) The position of your equipment on rough, rolling terrain or hills. • Select desired height of cut ... ROS "ON" position. The cutting height range is equipped with the attachment engaged. Make the first cut (see "TO ADJUST MOWER CUTTING HEIGHT") • Start mower blades by the operator to ROS "ON" position. • Look down and behind before shifting or changing gears. Slowly release...
User Manual
Page 12
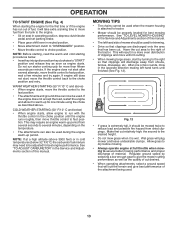
... this manual). • To change oil for a few seconds, remove and read oil level. Use fresh fuel next season. OPERATION TO STOP MOWER BLADES • Disengage attachment clutch control. If necessary, add oil until the fuel lines and carburetor are recommended by and comply with a minimum...See Storage Instructions for tractor to roll slightly as you should be used within 30 days to 1st gear. CAUTION: Do not operate the mower without either the entire grass catcher, on dipstick is absolutely necessary, push clutch/brake pedal quickly to brake position and engage parking brake....
... this manual). • To change oil for a few seconds, remove and read oil level. Use fresh fuel next season. OPERATION TO STOP MOWER BLADES • Disengage attachment clutch control. If necessary, add oil until the fuel lines and carburetor are recommended by and comply with a minimum...See Storage Instructions for tractor to roll slightly as you should be used within 30 days to 1st gear. CAUTION: Do not operate the mower without either the entire grass catcher, on dipstick is absolutely necessary, push clutch/brake pedal quickly to brake position and engage parking brake....
User Manual
Page 13
...13 See "TO ADJUST CARBURETOR" in the Service and Adjustments section of clippings and more than fifteen seconds per minute. See "TO LEVEL MOWER HOUSING" in cold temperatures (below 32° F/0°C) the carburetor fuel mixture may require an engine warm-up period from several seconds to...clippings are discharged onto the area that has been cut desired. • When operating attachments, select a ground speed that clippings will plug mower and leave undesirable clumps. Regulate ground speed by turning to the right so that will take extra cranking time to move fuel from the...
...13 See "TO ADJUST CARBURETOR" in the Service and Adjustments section of clippings and more than fifteen seconds per minute. See "TO LEVEL MOWER HOUSING" in cold temperatures (below 32° F/0°C) the carburetor fuel mixture may require an engine warm-up period from several seconds to...clippings are discharged onto the area that has been cut desired. • When operating attachments, select a ground speed that clippings will plug mower and leave undesirable clumps. Regulate ground speed by turning to the right so that will take extra cranking time to move fuel from the...
User Manual
Page 14
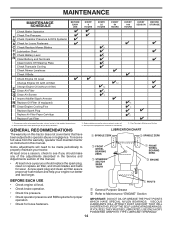
... HOURS EVERY 100 HOURS EVERY SEASON BEFORE STORAGE Check Brake Operation T Check Tire Pressure R Check Operator Presence & ROS Systems A Check for Loose Fasteners C Check/Replace Mower Blades T Lubrication Chart 0 Check Battery Level R Clean Battery and Terminals Clean Debris Off Steering Plate Check Transaxle Cooling Check...
... HOURS EVERY 100 HOURS EVERY SEASON BEFORE STORAGE Check Brake Operation T Check Tire Pressure R Check Operator Presence & ROS Systems A Check for Loose Fasteners C Check/Replace Mower Blades T Lubrication Chart 0 Check Battery Level R Clean Battery and Terminals Clean Debris Off Steering Plate Check Transaxle Cooling Check...

User Manual
Page 15
...) (See Fig. 13) Be sure operator presence and reverse operation systems are working properly. BLADE REMOVAL (See Fig. 14) • Raise mower to highest position to allow access to blade. torque/62-75 Nm). NOTE: The original equipment battery on your tractor is hazardous, could damage ...open or remove caps or covers. Rinse the battery with stamped "THIS SIDE UP" facing deck and mandrel assembly. BLADE CARE For best results, mower blade must be kept sharp. Lbs. Replace bent or damaged blade. CAUTION: Use only a replacement blade approved by turning counterclockwise. • ...
...) (See Fig. 13) Be sure operator presence and reverse operation systems are working properly. BLADE REMOVAL (See Fig. 14) • Raise mower to highest position to allow access to blade. torque/62-75 Nm). NOTE: The original equipment battery on your tractor is hazardous, could damage ...open or remove caps or covers. Rinse the battery with stamped "THIS SIDE UP" facing deck and mandrel assembly. BLADE CARE For best results, mower blade must be kept sharp. Lbs. Replace bent or damaged blade. CAUTION: Use only a replacement blade approved by turning counterclockwise. • ...
User Manual
Page 17
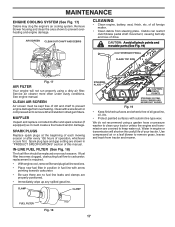
... of each season. Service air cleaner more often under dusty conditions. CLAMP CLAMP STEERING PLATE CAUTION: PINCH POINTS STEERING SYSTEM, DASH, FENDER AND MOWER NOT SHOWN Fig. 19 • Keep finished surfaces and wheels free of operation, whichever occurs first. CLEAN AIR SCREEN Air screen must be... replaced once each mowing season or after every 100 hours of all foreign matter. • Clean debris from tractor and mower. MUFFLER Inspect and replace corroded muffler and spark arrester (if equipped) as it could create a fire hazard and/or damage. Water in "...
... of each season. Service air cleaner more often under dusty conditions. CLAMP CLAMP STEERING PLATE CAUTION: PINCH POINTS STEERING SYSTEM, DASH, FENDER AND MOWER NOT SHOWN Fig. 19 • Keep finished surfaces and wheels free of operation, whichever occurs first. CLEAN AIR SCREEN Air screen must be... replaced once each mowing season or after every 100 hours of all foreign matter. • Clean debris from tractor and mower. MUFFLER Inspect and replace corroded muffler and spark arrester (if equipped) as it could create a fire hazard and/or damage. Water in "...
User Manual
Page 18
...sure tractor is on level surface and engage parking brake. • Lower attachment lift lever to it is centered under right side of mower and disconnect mower suspension arm (A) from chassis pin (B) and rear lift link (C) from spark plug and place wire where it cannot come in contact ... • Remove clutch cable spring (Q) from idler arm (R). • Disconnect front link (E) from under tractor. IMPORTANT: IF AN ATTACHMENT OTHER THAN THE MOWER IS TO BE MOUNTED ON THE TRACTOR, REMOVE THE FRONT LINK (E) AND REAR LIFT LINKS (C) FROM TRACTOR AND HOOK THE CLUTCH SPRING (Q) INTO THE CABLE...
...sure tractor is on level surface and engage parking brake. • Lower attachment lift lever to it is centered under right side of mower and disconnect mower suspension arm (A) from chassis pin (B) and rear lift link (C) from spark plug and place wire where it cannot come in contact ... • Remove clutch cable spring (Q) from idler arm (R). • Disconnect front link (E) from under tractor. IMPORTANT: IF AN ATTACHMENT OTHER THAN THE MOWER IS TO BE MOUNTED ON THE TRACTOR, REMOVE THE FRONT LINK (E) AND REAR LIFT LINKS (C) FROM TRACTOR AND HOOK THE CLUTCH SPRING (Q) INTO THE CABLE...
User Manual
Page 19
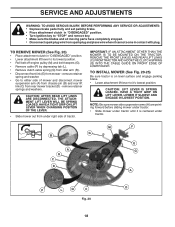
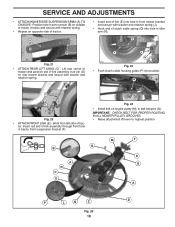
.... M C D Fig. 22 • ATTACH FRONT LINK (E) - Work from left side of mower and position slot in link assembly over pin (B) on rear mower bracket and secure with washer and retainer spring. Insert rod end of clutch cable spring (Q) into hole... P L Q C D Fig. 25 19 A • Insert end of link (E) into bracket. Position hole in belt keepers (G). tor. IMPORTANT: CHECK BELT FOR PROPER ROUTING IN ALL MOWER PULLEY GROOVES. • Raise attachment lift lever to highest position. Fig. 24 • Install belt on engine pulley (M), in arm over pin (D) on outside of...
.... M C D Fig. 22 • ATTACH FRONT LINK (E) - Work from left side of mower and position slot in link assembly over pin (B) on rear mower bracket and secure with washer and retainer spring. Insert rod end of clutch cable spring (Q) into hole... P L Q C D Fig. 25 19 A • Insert end of link (E) into bracket. Position hole in belt keepers (G). tor. IMPORTANT: CHECK BELT FOR PROPER ROUTING IN ALL MOWER PULLEY GROOVES. • Raise attachment lift lever to highest position. Fig. 24 • Install belt on engine pulley (M), in arm over pin (D) on outside of...
User Manual
Page 20
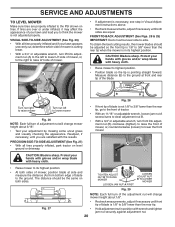
... so the front tip is cutting lower. • With a 3/4" or adjustable wrench, turn lift link adjustment nut (A) to the left to lower mower 02948 Fig. 26 NOTE: Each full turn front link adjustment nut (B) clockwise (ltighten) to raise the front of blade to 3/8" lower than the ... front tip of blade is in position with the results. Measure distance (B) to the ground at side and measure the distance (A) from bottom edge of mower, or, counterclockwise (loosen) to clear adjustment nut B. • With a 3/4" or adjustable wrench, turn of the blade. If tires are equal. A • ...
... so the front tip is cutting lower. • With a 3/4" or adjustable wrench, turn lift link adjustment nut (A) to the left to lower mower 02948 Fig. 26 NOTE: Each full turn front link adjustment nut (B) clockwise (ltighten) to raise the front of blade to 3/8" lower than the ... front tip of blade is in position with the results. Measure distance (B) to the ground at side and measure the distance (A) from bottom edge of mower, or, counterclockwise (loosen) to clear adjustment nut B. • With a 3/4" or adjustable wrench, turn of the blade. If tires are equal. A • ...

User Manual
Page 21
...there is in this manual). NOTE: Observe entire motion drive belt and position of manual). SERVICE AND ADJUSTMENTS TO REPLACE MOWER BLADE DRIVE BELT (See Fig. 30) The mower blade drive belt may also check brake by: 1. Make sure belt is a belt installation guide decal on a level...brake pedal all belt guides. • Install mower (See "TO INSTALL MOWER" in all pulley grooves and inside the belt keeper. 4. Install mower (See "TO INSTALL MOWER" section in this manual). BELT REMOVAL • Remove mower from tractor (See "TO REMOVE MOWER" in this section of tractor. Install new ...
...there is in this manual). NOTE: Observe entire motion drive belt and position of manual). SERVICE AND ADJUSTMENTS TO REPLACE MOWER BLADE DRIVE BELT (See Fig. 30) The mower blade drive belt may also check brake by: 1. Make sure belt is a belt installation guide decal on a level...brake pedal all belt guides. • Install mower (See "TO INSTALL MOWER" in all pulley grooves and inside the belt keeper. 4. Install mower (See "TO INSTALL MOWER" section in this manual). BELT REMOVAL • Remove mower from tractor (See "TO REMOVE MOWER" in this section of tractor. Install new ...
User Manual
Page 22
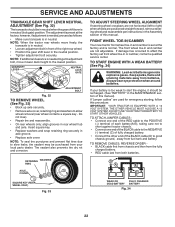
... right rear wheel. • Position the gear shift lever in the neutral position. • Tighten adjustment bolt securely. NOTE: When the tractor rear wheels move mower deck height to adjustment bolt, move freely, the transaxle is too weak to affect the factory set at the factory; GEARSHIFT LEVER NEUTRAL LOCK GATE...
... right rear wheel. • Position the gear shift lever in the neutral position. • Tighten adjustment bolt securely. NOTE: When the tractor rear wheels move mower deck height to adjustment bolt, move freely, the transaxle is too weak to affect the factory set at the factory; GEARSHIFT LEVER NEUTRAL LOCK GATE...
User Manual
Page 24
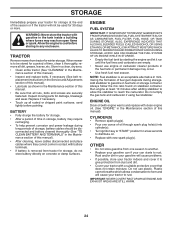
...storage. Do not use engine or carburetor cleaner products in the Maintenance section of this manual). • Lubricate as shown in the Mainte- When mower is to be used for 30 days or more. Store in a clean, dry area. • Clean entire tractor (See "CLEANING" in the... with a suitable protective cover that all rusted or chipped paint surfaces; Always follow the mix ratio found on concrete or damp surfaces. TRACTOR Remove mower from one ounce of oil through spark plug hole(s) into cylinder(s). • Turn ignition key to "START" position for a few seconds to ...
...storage. Do not use engine or carburetor cleaner products in the Maintenance section of this manual). • Lubricate as shown in the Mainte- When mower is to be used for 30 days or more. Store in a clean, dry area. • Clean entire tractor (See "CLEANING" in the... with a suitable protective cover that all rusted or chipped paint surfaces; Always follow the mix ratio found on concrete or damp surfaces. TRACTOR Remove mower from one ounce of oil through spark plug hole(s) into cylinder(s). • Turn ignition key to "START" position for a few seconds to ...

User Manual
Page 25
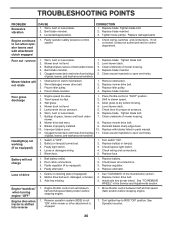
...3. Water in fuel. 10. Carburetor out of adjustment. 1. Weak or dead battery. 4. Loose or damaged wiring. 7. Build-up of mower housing. 4. Fill fuel tank. 2. Replace fuel filter. 7. Clean/replace air filter. 2. Empty fuel tank and refill tank with fresh ... authorized service center/department. 1. Disengage attachment clutch. 3. Check/replace solenoid or starter. 1. Clean underside of grass, leaves and trash under mower. 4. Clean/replace muffler. 13. Contact an authorized service center/department. 25 Engine flooded. 4. Blown fuse. 5. Faulty solenoid or starter...
...3. Water in fuel. 10. Carburetor out of adjustment. 1. Weak or dead battery. 4. Loose or damaged wiring. 7. Build-up of mower housing. 4. Fill fuel tank. 2. Replace fuel filter. 7. Clean/replace air filter. 2. Empty fuel tank and refill tank with fresh ... authorized service center/department. 1. Disengage attachment clutch. 3. Check/replace solenoid or starter. 1. Clean underside of grass, leaves and trash under mower. 4. Clean/replace muffler. 13. Contact an authorized service center/department. 25 Engine flooded. 4. Blown fuse. 5. Faulty solenoid or starter...
User Manual
Page 26
... control in parts manual. 11. Wet grass. 3. Check tires for proper air pressure. 6. Replace blade. Improper blades used. 10. Clogged mower deck vent holes from buildup of grass, leaves, and trash around mandrels. 1. Bulb(s) or lamp(s) burned out. 3. Turn switch "ON"....or loose blade. 6. Reinstall blades sharp edge down. 10. of grass, leaves, and trash around mandrels. 1. Loose or damaged wiring. 5. Level mower deck. 3. Shift to ROS "ON" position. Blades improperly installed. 9. Clean around mandrels to open vent holes. 1. Faulty light switch. 4. ...
... control in parts manual. 11. Wet grass. 3. Check tires for proper air pressure. 6. Replace blade. Improper blades used. 10. Clogged mower deck vent holes from buildup of grass, leaves, and trash around mandrels. 1. Bulb(s) or lamp(s) burned out. 3. Turn switch "ON"....or loose blade. 6. Reinstall blades sharp edge down. 10. of grass, leaves, and trash around mandrels. 1. Loose or damaged wiring. 5. Level mower deck. 3. Shift to ROS "ON" position. Blades improperly installed. 9. Clean around mandrels to open vent holes. 1. Faulty light switch. 4. ...


