

User Manual
Page 2
...holes, ruts, or bumps. Use only an approved container. - Do not smoke. - Tall grass can change the stability of riding mower-related injuries. If tires lose traction, disengage the blades and proceed slowly straight down before restarting. • Never make sudden changes ...the machine and the mowing activity. Uneven terrain could be seriously injured or interfere with grass catchers or other attachments. • Mower blades are involved in good condition. • Never tamper with manufacturer's recom- mended parts, when necessary. • Use extra...
...holes, ruts, or bumps. Use only an approved container. - Do not smoke. - Tall grass can change the stability of riding mower-related injuries. If tires lose traction, disengage the blades and proceed slowly straight down before restarting. • Never make sudden changes ...the machine and the mowing activity. Uneven terrain could be seriously injured or interfere with grass catchers or other attachments. • Mower blades are involved in good condition. • Never tamper with manufacturer's recom- mended parts, when necessary. • Use extra...

User Manual
Page 3
... children.They may lose control of California to cause cancer and birth defects or other reproductive harm. SAFETY RULES SAFE OPERATION PRACTICES FOR RIDE-ON MOWERS • Be sure the area is dangerous. Stop machine if anyone enters the area. • Never carry passengers or children even with specifications...
... children.They may lose control of California to cause cancer and birth defects or other reproductive harm. SAFETY RULES SAFE OPERATION PRACTICES FOR RIDE-ON MOWERS • Be sure the area is dangerous. Stop machine if anyone enters the area. • Never carry passengers or children even with specifications...
User Manual
Page 8
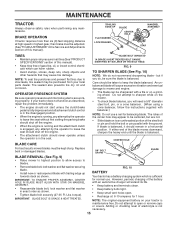
...are routed correctly. Operate them before you learn how to operate your tractor were overinflated at the factory). ✓ Be sure mower deck is properly leveled side-to-side/ front-to-rear for best cutting results. (Tires must be properly leveled. CHECK DECK LEVELNESS ...For best cutting results, mower housing should be properly inflated for leveling). ✓ Check mower and drive belts. Verify that the brake is filled with fresh, clean, regular unleaded gasoline. ✓...
...are routed correctly. Operate them before you learn how to operate your tractor were overinflated at the factory). ✓ Be sure mower deck is properly leveled side-to-side/ front-to-rear for best cutting results. (Tires must be properly leveled. CHECK DECK LEVELNESS ...For best cutting results, mower housing should be properly inflated for leveling). ✓ Check mower and drive belts. Verify that the brake is filled with fresh, clean, regular unleaded gasoline. ✓...

User Manual
Page 9
... ENGINE OFF LIGHTS ON P ENGINE ON ENGINE START PARKING BRAKE PARKING BRAKE PARKING BRAKE LOCKED UNLOCKED OVER TEMP LIGHT FUEL OIL PRESSURE BATTERY REVERSE FORWARD MOWER HEIGHT MOWER LIFT 15 15 15 ATTACHMENT ATTACHMENT CLUTCH ENGAGED CLUTCH DISENGAGED DANGER, KEEP HANDS AND FEET AWAY KEEP AREA CLEAR SLOPE HAZARDS (SEE SAFETY RULES...
... ENGINE OFF LIGHTS ON P ENGINE ON ENGINE START PARKING BRAKE PARKING BRAKE PARKING BRAKE LOCKED UNLOCKED OVER TEMP LIGHT FUEL OIL PRESSURE BATTERY REVERSE FORWARD MOWER HEIGHT MOWER LIFT 15 15 15 ATTACHMENT ATTACHMENT CLUTCH ENGAGED CLUTCH DISENGAGED DANGER, KEEP HANDS AND FEET AWAY KEEP AREA CLEAR SLOPE HAZARDS (SEE SAFETY RULES...

User Manual
Page 10
... THROTTLE/CHOKE CONTROL: Used for starting and controlling engine speed. ATTACHMENT LIFT LEVER: Used to raise, lower, and adjust the mower deck or other attachments mounted to your tractor. LIFT LEVER PLUNGER: Used to the safety standards of the American National Standards Institute....POSITION: Turns the headlights on and off. CLUTCH/BRAKE PEDAL: Used for future reference. ATTACHMENT CLUTCH LEVER: Used to engage the mower blades, or other attachments mounted to familiarize yourself with the locations of the tractor. GEARSHIFT LEVER - Save this manual for declutching and...
... THROTTLE/CHOKE CONTROL: Used for starting and controlling engine speed. ATTACHMENT LIFT LEVER: Used to raise, lower, and adjust the mower deck or other attachments mounted to your tractor. LIFT LEVER PLUNGER: Used to the safety standards of the American National Standards Institute....POSITION: Turns the headlights on and off. CLUTCH/BRAKE PEDAL: Used for future reference. ATTACHMENT CLUTCH LEVER: Used to engage the mower blades, or other attachments mounted to familiarize yourself with the locations of the tractor. GEARSHIFT LEVER - Save this manual for declutching and...

User Manual
Page 11
... of grass and types of grass being mowed. • The average lawn should be mowed twice. To eliminate this possibility, always stop mower blades,move attachment clutch lever to stop engine. Make sure parking brake will shut off the engine. • Depress clutch/brake pedal into... throttle. • Operating engine at less than full throttle reduces the battery charging rate. • Full throttle offers the best bagging and mower perfor- GROUND DRIVE • To stop tractor completely,as described above,before stopping may cause "browning" of grass. the second to empty grass...
... of grass and types of grass being mowed. • The average lawn should be mowed twice. To eliminate this possibility, always stop mower blades,move attachment clutch lever to stop engine. Make sure parking brake will shut off the engine. • Depress clutch/brake pedal into... throttle. • Operating engine at less than full throttle reduces the battery charging rate. • Full throttle offers the best bagging and mower perfor- GROUND DRIVE • To stop tractor completely,as described above,before stopping may cause "browning" of grass. the second to empty grass...

User Manual
Page 12
... ADJUST GAUGE WHEELS (See Fig. 6) Gauge wheels are properly adjusted when they are slightly off the ground. CAUTION: Do not operate the mower without either the entire grass catcher, on dipstick is absolutely necessary, push clutch/brake pedal quickly to brake position and engage parking brake. ...THE ENGINE CHECK ENGINE OIL LEVEL • The engine in operating position. Any attempt by engaging attachment clutch control. • TO STOP MOWER BLADES - Install gauge wheel in appropriate hole with the engine running and the attachment clutch engaged will shut off the engine. • Select...
... ADJUST GAUGE WHEELS (See Fig. 6) Gauge wheels are properly adjusted when they are slightly off the ground. CAUTION: Do not operate the mower without either the entire grass catcher, on dipstick is absolutely necessary, push clutch/brake pedal quickly to brake position and engage parking brake. ...THE ENGINE CHECK ENGINE OIL LEVEL • The engine in operating position. Any attempt by engaging attachment clutch control. • TO STOP MOWER BLADES - Install gauge wheel in appropriate hole with the engine running and the attachment clutch engaged will shut off the engine. • Select...

User Manual
Page 13
...• Drive so that clippings are empty. NOTE: If at full throttle when mowing to separation and formation of material. MOWING TIPS • Mower should be emptied before mowing. Have the cut desired. TO START ENGINE (See Fig. 5) When starting procedures below ) • When engine ...properly leveled for best engine performance. Regulate ground speed by turning to the right so that will suit the terrain and give the mower cutting performance as well as engine starts. When operating attachments, select a ground speed that clippings will discharge away from several seconds ...
...• Drive so that clippings are empty. NOTE: If at full throttle when mowing to separation and formation of material. MOWING TIPS • Mower should be emptied before mowing. Have the cut desired. TO START ENGINE (See Fig. 5) When starting procedures below ) • When engine ...properly leveled for best engine performance. Regulate ground speed by turning to the right so that will suit the terrain and give the mower cutting performance as well as engine starts. When operating attachments, select a ground speed that clippings will discharge away from several seconds ...

User Manual
Page 14
.... • Check brake operation. • Check tire pressure. • Check operator presence and interlock systems for proper operation. • Check for Loose Fasteners A Sharpen/Replace Mower Blades C T Lubrication Chart 0 Check Battery Level R Clean Battery and Terminals Check Transaxle Cooling Check V-Belts BEFOREEEVAECRHYU8ESVHEEORUYRS2E5VHEROYUR5E0SVEHROYUR1E0SV0EHROYUBSREESFAOSROENSSTEORRAVGEICE DATES 5 3 4 Check Engine Oil Level Change Engine Oil (with...
.... • Check brake operation. • Check tire pressure. • Check operator presence and interlock systems for proper operation. • Check for Loose Fasteners A Sharpen/Replace Mower Blades C T Lubrication Chart 0 Check Battery Level R Clean Battery and Terminals Check Transaxle Cooling Check V-Belts BEFOREEEVAECRHYU8ESVHEEORUYRS2E5VHEROYUR5E0SVEHROYUR1E0SV0EHROYUBSREESFAOSROENSSTEORRAVGEICE DATES 5 3 4 Check Engine Oil Level Change Engine Oil (with...
User Manual
Page 15
... the seat. ing wheel. Replace bent or damaged blades. 5/8" BOLT OR PIN BLADE BLADE REMOVAL (See Fig. 9) • Raise mower to highest position to allow access to mower and engine. • The blade can harm rubber. • Avoid stumps, stones, deep ruts, sharp objects and other hazards that...the battery with trailing edge up towards deck as shown. • Tighten blade bolt securely (27-35 Ft. CENTER HOLE BLADE CARE For best results mower blades must be adjusted. (See "TO ADJUST BRAKE" in a horizontal position. Lbs. NOTE: To seal tire punctures and prevent flat 6-...
... the seat. ing wheel. Replace bent or damaged blades. 5/8" BOLT OR PIN BLADE BLADE REMOVAL (See Fig. 9) • Raise mower to highest position to allow access to mower and engine. • The blade can harm rubber. • Avoid stumps, stones, deep ruts, sharp objects and other hazards that...the battery with trailing edge up towards deck as shown. • Tighten blade bolt securely (27-35 Ft. CENTER HOLE BLADE CARE For best results mower blades must be adjusted. (See "TO ADJUST BRAKE" in a horizontal position. Lbs. NOTE: To seal tire punctures and prevent flat 6-...
User Manual
Page 17
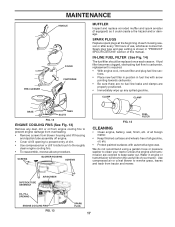
...; Immediately wipe up any dust, dirt or oil from engine cooling fins to prevent engine damage from overheating. • Remove screws from tractor and mower. PRE-CLEANER MAINTENANCE HANDLE COVER CARTRIDGE MUFFLER Inspect and replace corroded muffler and spark arrester (if equipped) as it could create a fire...
...; Immediately wipe up any dust, dirt or oil from engine cooling fins to prevent engine damage from overheating. • Remove screws from tractor and mower. PRE-CLEANER MAINTENANCE HANDLE COVER CARTRIDGE MUFFLER Inspect and replace corroded muffler and spark arrester (if equipped) as it could create a fire...
User Manual
Page 18
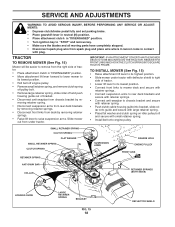
... remove from the right side of tractor. • Place attachment clutch in "DISENGAGED" position. • Move attachment lift lever forward to lower mower to its lowest position. • Roll belt off engine pulley. • Remove small retainer spring, and remove clutch spring off pulley bolt. ... retainer spring, slide collar off and push housing guide out of tractor. • Lower lift lever to its highest position. • Slide mower under tractor with deflector shield to right side of bracket. • Disconnect anti-swaybar from chassis bracket by removing retainer spring. &#...
... remove from the right side of tractor. • Place attachment clutch in "DISENGAGED" position. • Move attachment lift lever forward to lower mower to its lowest position. • Roll belt off engine pulley. • Remove small retainer spring, and remove clutch spring off pulley bolt. ... retainer spring, slide collar off and push housing guide out of tractor. • Lower lift lever to its highest position. • Slide mower under tractor with deflector shield to right side of bracket. • Disconnect anti-swaybar from chassis bracket by removing retainer spring. &#...
User Manual
Page 19
...is 1/8" to same length as shown. • Before making any necessary adjustments, check that side. To obtain the best cutting results, the mower housing should be replaced without tools. Park the tractor on both front links an equal number of turns. Tighten nut "E" on level surface. Check... Install new belt in reverse order of removal. • Make sure belt is in all pulley grooves and inside all belt guides. • Install mower in length. • When distance "D" is 1/8" to 1/2" lower at front than rear, tighten nut "F" against trunnion on both mandrel pulleys and ...
...is 1/8" to same length as shown. • Before making any necessary adjustments, check that side. To obtain the best cutting results, the mower housing should be replaced without tools. Park the tractor on both front links an equal number of turns. Tighten nut "E" on level surface. Check... Install new belt in reverse order of removal. • Make sure belt is in all pulley grooves and inside all belt guides. • Install mower in length. • When distance "D" is 1/8" to 1/2" lower at front than rear, tighten nut "F" against trunnion on both mandrel pulleys and ...

User Manual
Page 20
... The rear wheels must be replaced. TO ADJUST BRAKE • Depress clutch/brake pedal all belt guides and keepers. • Install mower (See "TO INSTALL MOWER" in highest gear on level surface. If tractor requires more than five (5) feet in this sec- If stopping distance is ...still greater than five (5) feet to manually push the tractor forward. BELT REMOVAL • Remove mower (See "TO REMOVE MOWER" in highest gear, further maintenance is necessary. OPERATING ARM FIG. 21 TO REPLACE MOTION DRIVE BELT (See Fig. 22) Park the ...
... The rear wheels must be replaced. TO ADJUST BRAKE • Depress clutch/brake pedal all belt guides and keepers. • Install mower (See "TO INSTALL MOWER" in highest gear on level surface. If tractor requires more than five (5) feet in this sec- If stopping distance is ...still greater than five (5) feet to manually push the tractor forward. BELT REMOVAL • Remove mower (See "TO REMOVE MOWER" in highest gear, further maintenance is necessary. OPERATING ARM FIG. 21 TO REPLACE MOTION DRIVE BELT (See Fig. 22) Park the ...

User Manual
Page 21
... lever is in front of this manual. The adjustment is in neutral. • Loosen adjustment bolt in neutral (N). NOTE: When the tractor rear wheels move mower deck height to allow wheel removal (rear wheel contains a square key - Do not lose). • Repair tire and reassemble. • On rear wheels only: align...
... lever is in front of this manual. The adjustment is in neutral. • Loosen adjustment bolt in neutral (N). NOTE: When the tractor rear wheels move mower deck height to allow wheel removal (rear wheel contains a square key - Do not lose). • Repair tire and reassemble. • On rear wheels only: align...
User Manual
Page 24
When mower is removed from one ounce of this manual. • Be sure that does not retain moisture. Replace if necessary. • Touch up all dirt, grease, ... cables disconnected and place cables where they cannot come in any enclosure. Always follow the mix ratio found on concrete or damp surfaces. TRACTOR Remove mower from dust and dirt. • Cover your tractor with clean engine oil. (See "ENGINE" in fuel tank or storage container. nance section of time in...
When mower is removed from one ounce of this manual. • Be sure that does not retain moisture. Replace if necessary. • Touch up all dirt, grease, ... cables disconnected and place cables where they cannot come in any enclosure. Always follow the mix ratio found on concrete or damp surfaces. TRACTOR Remove mower from dust and dirt. • Cover your tractor with clean engine oil. (See "ENGINE" in fuel tank or storage container. nance section of time in...
User Manual
Page 25
Out of grass, leaves and trash under mower. 4. Replace fuel filter. 7. Bad spark plug. 3. Weak or dead battery. 4. Dirty fuel filter. 5. Stale or dirty fuel. 6. Attachment clutch is engaged. 3. Weak or .... 2. Set in fuel. 10. TROUBLESHOOTING POINTS PROBLEM Will not start . 4. Check all wiring. 9. Hard to start CAUSE 1. Loose or damaged wiring. 7. Engine valves out of mower housing. 4. Clean/replace air filter. 2. Engine will not start 1. Loose or damaged wiring. 7. Check/replace solenoid or starter. 9. Engine clicks but will not turn...
Out of grass, leaves and trash under mower. 4. Replace fuel filter. 7. Bad spark plug. 3. Weak or dead battery. 4. Dirty fuel filter. 5. Stale or dirty fuel. 6. Attachment clutch is engaged. 3. Weak or .... 2. Set in fuel. 10. TROUBLESHOOTING POINTS PROBLEM Will not start . 4. Check all wiring. 9. Hard to start CAUSE 1. Loose or damaged wiring. 7. Engine valves out of mower housing. 4. Clean/replace air filter. 2. Engine will not start 1. Loose or damaged wiring. 7. Check/replace solenoid or starter. 9. Engine clicks but will not turn...

User Manual
Page 26
... bolt. 2. Replace blade mandrel. 5. Obstruction in "FAST" position. 2. Remove obstruction. 2. Replace idler pulley. 4. Poor grass discharge 1. Wet grass. 4. Worn, bent or loose blade. 7. Mower drive belt worn. 9. Clogged mower deck vent holes from buildup of grass, leaves, and trash around mandrels. 1. Shift to run when operator leaves seat with blades listed in...
... bolt. 2. Replace blade mandrel. 5. Obstruction in "FAST" position. 2. Remove obstruction. 2. Replace idler pulley. 4. Poor grass discharge 1. Wet grass. 4. Worn, bent or loose blade. 7. Mower drive belt worn. 9. Clogged mower deck vent holes from buildup of grass, leaves, and trash around mandrels. 1. Shift to run when operator leaves seat with blades listed in...

User Manual
Page 31
inches 1 inch = 25.4 mm 31 Pivot Mower Rear Nut Lock Hex W/Ins 1/4-20 Washer 9/32 x 7/8 x 16 Ga. MODEL NUMBER PC1742STA, PRODUCT NUMBER 954 57 07-72 CHASSIS AND ENCLOSURES KEY PART NO. Bracjet Grukke Lh Screw Hex Wshd 8-18 x 7/8 Bracket Grille Rh Bolt Hex 1/4-20 x 3/4 ...
inches 1 inch = 25.4 mm 31 Pivot Mower Rear Nut Lock Hex W/Ins 1/4-20 Washer 9/32 x 7/8 x 16 Ga. MODEL NUMBER PC1742STA, PRODUCT NUMBER 954 57 07-72 CHASSIS AND ENCLOSURES KEY PART NO. Bracjet Grukke Lh Screw Hex Wshd 8-18 x 7/8 Bracket Grille Rh Bolt Hex 1/4-20 x 3/4 ...

User Manual
Page 33
inches 1 inch = 25.4 mm 33 MODEL NUMBER PC1742STA, PRODUCT NUMBER 954 57 07-72 DRIVE KEY PART NO. NO. 1 ------ 2 146682 3 123666X 4 12000028 5 121520X 6 17060512 8 165619 10 76020416 11 105701X 13 74550412 14 10040400 ... 169613 198 169593 202 72110614 212 145212 Washer Lock Hvy Hlcl Spr 7/16 Keeper Belt Engine Foolproof Screw Hex wsh Hi-Lo 1/4 x 1/2 Unc Guide Belt Mower Drive RH Spacer Axle Washer 25/32 x 1 1/4 x 16 Ga E-ring #5133-75 Key Square 2 0 x 1845/ 1865 Washer 25/32 x 1-5/8 x 16 Ga Key Woodruff #9 3/16 x 3/4 Arm...
inches 1 inch = 25.4 mm 33 MODEL NUMBER PC1742STA, PRODUCT NUMBER 954 57 07-72 DRIVE KEY PART NO. NO. 1 ------ 2 146682 3 123666X 4 12000028 5 121520X 6 17060512 8 165619 10 76020416 11 105701X 13 74550412 14 10040400 ... 169613 198 169593 202 72110614 212 145212 Washer Lock Hvy Hlcl Spr 7/16 Keeper Belt Engine Foolproof Screw Hex wsh Hi-Lo 1/4 x 1/2 Unc Guide Belt Mower Drive RH Spacer Axle Washer 25/32 x 1 1/4 x 16 Ga E-ring #5133-75 Key Square 2 0 x 1845/ 1865 Washer 25/32 x 1-5/8 x 16 Ga Key Woodruff #9 3/16 x 3/4 Arm...


