

User Manual
Page 2
... inside a closed area. • Keep nuts and bolts, especially blade attachment bolts, II. SLOPE OPERATION Slopes are familiar with the instructions, to stop or shift while on slopes unless necessary, and then, turn off blades, set parking brake, stop engine, and remove keys before mowing. Tall grass can change the stability of -control and tipover accidents, which can touch hot exhaust / engine parts and burn. tight and keep...
... inside a closed area. • Keep nuts and bolts, especially blade attachment bolts, II. SLOPE OPERATION Slopes are familiar with the instructions, to stop or shift while on slopes unless necessary, and then, turn off blades, set parking brake, stop engine, and remove keys before mowing. Tall grass can change the stability of -control and tipover accidents, which can touch hot exhaust / engine parts and burn. tight and keep...
User Manual
Page 4
...". A spark arrester for and using your purchase of this manual). CCA: 230 CASE SIZE: U1R 27-35 FT. TABLE OF CONTENTS SAFETY RULES 2-3 PRODUCT SPECIFICATIONS 4 CUSTOMER RESPONSIBILITIES 4 ASSEMBLY 6-8 OPERATION 9-13 MAINTENANCE SCHEDULE 14 MAINTENANCE 14-17 SERVICE AND ADJUSTMENTS 18-23 STORAGE 24 TROUBLESHOOTING 25-26 REPAIR PARTS 28-43 WARRANTY 45 4 PRODUCT SPECIFICATIONS GASOLINE CAPACITY AND TYPE: OIL TYPE (API-SF-SJ): OIL CAPACITY: SPARK PLUG: (GAP: .030") GROUND SPEED (MPH): TIRE PRESSURE: CHARGING SYSTEM: BATTERY: BLADE BOLT TORQUE...
...". A spark arrester for and using your purchase of this manual). CCA: 230 CASE SIZE: U1R 27-35 FT. TABLE OF CONTENTS SAFETY RULES 2-3 PRODUCT SPECIFICATIONS 4 CUSTOMER RESPONSIBILITIES 4 ASSEMBLY 6-8 OPERATION 9-13 MAINTENANCE SCHEDULE 14 MAINTENANCE 14-17 SERVICE AND ADJUSTMENTS 18-23 STORAGE 24 TROUBLESHOOTING 25-26 REPAIR PARTS 28-43 WARRANTY 45 4 PRODUCT SPECIFICATIONS GASOLINE CAPACITY AND TYPE: OIL TYPE (API-SF-SJ): OIL CAPACITY: SPARK PLUG: (GAP: .030") GROUND SPEED (MPH): TIRE PRESSURE: CHARGING SYSTEM: BATTERY: BLADE BOLT TORQUE...
User Manual
Page 7
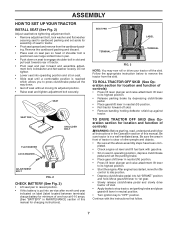
... clutch/brake pedal and set the parking brake. • Place gear shift lever in neutral (N) position. • Press lift lever plunger and raise attachment lift lever to its highest position. • Start the engine.After engine has started, move throttle control to idle position. • Depress clutch/brake pedal into operating position and sit on seat to engage shoulder bolt in slot and pull seat towards rear of tractor. • Pivot seat and pan forward and assemble adjustment bolt...
... clutch/brake pedal and set the parking brake. • Place gear shift lever in neutral (N) position. • Press lift lever plunger and raise attachment lift lever to its highest position. • Start the engine.After engine has started, move throttle control to idle position. • Depress clutch/brake pedal into operating position and sit on seat to engage shoulder bolt in slot and pull seat towards rear of tractor. • Pivot seat and pan forward and assemble adjustment bolt...
User Manual
Page 8
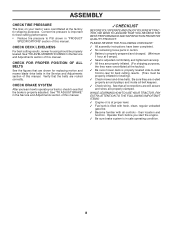
... ADJUST BRAKE" in the Service and Adjustments section of this manual. Operate them before you learn how to operate your tractor were overinflated at the factory for leveling). ✓ Check mower and drive belts. See that the brake is in the Service and Adjustments section of this manual. their location and function. Correct tire pressure is important for replacing motion and mower blade drive belts in safe operating condition. 8 CHECK BRAKE SYSTEM After you start the engine...
... ADJUST BRAKE" in the Service and Adjustments section of this manual. Operate them before you learn how to operate your tractor were overinflated at the factory for leveling). ✓ Check mower and drive belts. See that the brake is in the Service and Adjustments section of this manual. their location and function. Correct tire pressure is important for replacing motion and mower blade drive belts in safe operating condition. 8 CHECK BRAKE SYSTEM After you start the engine...

User Manual
Page 12
...;ector shield in the Maintenance section of your tractor. disengage attachment clutch control. Be sure you have allowed room for easier starting up or down hills with specifications of the manufacturer of cut position, gauge wheels should change oil for tractor to desired cutting height (See "TO ADJUST MOWER CUTTING HEIGHT" in desired height of your tractor. BEFORE STARTING THE ENGINE CHECK ENGINE OIL LEVEL • The engine in operating position. FIG. 7 12 TO TRANSPORT...
...;ector shield in the Maintenance section of your tractor. disengage attachment clutch control. Be sure you have allowed room for easier starting up or down hills with specifications of the manufacturer of cut position, gauge wheels should change oil for tractor to desired cutting height (See "TO ADJUST MOWER CUTTING HEIGHT" in desired height of your tractor. BEFORE STARTING THE ENGINE CHECK ENGINE OIL LEVEL • The engine in operating position. FIG. 7 12 TO TRANSPORT...

User Manual
Page 13
... Service and Adjustments section of 30 days or longer. See "TO LEVEL MOWER HOUSING" in storage. If the engine does not start by selecting a low enough gear to dry before storage of this manual. • The left hand turns until the engine runs roughly, then move the throttle control back to the desired height. Make first cut area to the • fast position. • The attachments...
... Service and Adjustments section of 30 days or longer. See "TO LEVEL MOWER HOUSING" in storage. If the engine does not start by selecting a low enough gear to dry before storage of this manual. • The left hand turns until the engine runs roughly, then move the throttle control back to the desired height. Make first cut area to the • fast position. • The attachments...

User Manual
Page 14
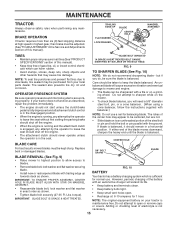
... pivot bolt to operator abuse or negligence. eENGINE BEFORE EACH USE • Check engine oil level. • Check brake operation. • Check tire pressure. • Check operator presence and interlock systems for proper operation. • Check for Loose Fasteners A Sharpen/Replace Mower Blades C T Lubrication Chart 0 Check Battery Level R Clean Battery and Terminals Check Transaxle Cooling Check V-Belts BEFOREEEVAECRHYU8ESVHEEORUYRS2E5VHEROYUR5E0SVEHROYUR1E0SV0EHROYUBSREESFAOSROENSSTEORRAVGEICE DATES 5 3 4 Check Engine Oil Level Change Engine Oil (with maintenance-free...
... pivot bolt to operator abuse or negligence. eENGINE BEFORE EACH USE • Check engine oil level. • Check brake operation. • Check tire pressure. • Check operator presence and interlock systems for proper operation. • Check for Loose Fasteners A Sharpen/Replace Mower Blades C T Lubrication Chart 0 Check Battery Level R Clean Battery and Terminals Check Transaxle Cooling Check V-Belts BEFOREEEVAECRHYU8ESVHEEORUYRS2E5VHEROYUR5E0SVEHROYUR1E0SV0EHROYUBSREESFAOSROENSSTEORRAVGEICE DATES 5 3 4 Check Engine Oil Level Change Engine Oil (with maintenance-free...
User Manual
Page 15
... and attachement clutch control is in the disengaged position. • When the engine is running, any attempt by the operator to blades. • Remove blade bolt, lock washer and flat washer in a horizontal position. BLADE BOLT (GRADE 8)* *A GRADE 8 HEAT TREATED BOLT CAN BE IDENTIFIED BY SIX LINES ON THE BOLT HEAD. CENTER HOLE BLADE CARE For best results mower blades must be adjusted. (See "TO ADJUST BRAKE" in the Service and Adjustments section of electrolyte is maintenance free...
... and attachement clutch control is in the disengaged position. • When the engine is running, any attempt by the operator to blades. • Remove blade bolt, lock washer and flat washer in a horizontal position. BLADE BOLT (GRADE 8)* *A GRADE 8 HEAT TREATED BOLT CAN BE IDENTIFIED BY SIX LINES ON THE BOLT HEAD. CENTER HOLE BLADE CARE For best results mower blades must be adjusted. (See "TO ADJUST BRAKE" in the Service and Adjustments section of electrolyte is maintenance free...

User Manual
Page 16
... manual. • Use gauge on oil fill cap/dipstick for 50 hours in blower housing and replace cover. • Hook handle on cover and push down on handle to clean the cartridge. Replace pre-cleaner after each time you check the oil level. Replace belts if they begin to clean cartridge. 16 For approximate capacity see "PRODUCT SPECIFICATIONS" section of drain valve and install the drain tube onto the fitting. CLOSED AND LOCKED POSITION OIL DRAIN VALVE YELLOW CAP DRAIN TUBE V-BELTS CheckV-belts...
... manual. • Use gauge on oil fill cap/dipstick for 50 hours in blower housing and replace cover. • Hook handle on cover and push down on handle to clean the cartridge. Replace pre-cleaner after each time you check the oil level. Replace belts if they begin to clean cartridge. 16 For approximate capacity see "PRODUCT SPECIFICATIONS" section of drain valve and install the drain tube onto the fitting. CLOSED AND LOCKED POSITION OIL DRAIN VALVE YELLOW CAP DRAIN TUBE V-BELTS CheckV-belts...
User Manual
Page 18
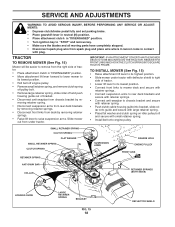
... ANY SERVICE OR ADJUSTMENTS: • Depress clutch/brake pedal fully and set parking brake. • Place gearshift lever in neutral (N) position. • Place attachment clutch in "DISENGAGED" position. • Turn ignition key to "STOP" and remove key. • Make sure the blades and all moving parts have completely stopped. • Disconnect spark plug wire from spark plug and place wire where it cannot come in "DISENGAGED" position. • Move attachment lift lever forward to lower mower...
... ANY SERVICE OR ADJUSTMENTS: • Depress clutch/brake pedal fully and set parking brake. • Place gearshift lever in neutral (N) position. • Place attachment clutch in "DISENGAGED" position. • Turn ignition key to "STOP" and remove key. • Make sure the blades and all moving parts have completely stopped. • Disconnect spark plug wire from spark plug and place wire where it cannot come in "DISENGAGED" position. • Move attachment lift lever forward to lower mower...
User Manual
Page 19
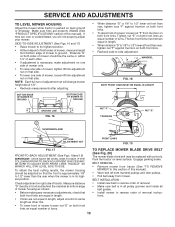
...; Before making any necessary adjustments, check that both front links. BELT REMOVAL • Remove mower from tractor (See "TO REMOVE MOWER" in flated (See "PRODUCT SPECIFICATIONS" section of mower should be replaced without tools. TO REPLACE MOWER BLADE DRIVE BELT (See Fig. 20) The mower blade drive belt may be adjusted so that side. Distance "A" on that side. • To lower one link to -side adjustment. Engage parking brake. IF THE FOLLOWING FRONT-TO...
...; Before making any necessary adjustments, check that both front links. BELT REMOVAL • Remove mower from tractor (See "TO REMOVE MOWER" in flated (See "PRODUCT SPECIFICATIONS" section of mower should be replaced without tools. TO REPLACE MOWER BLADE DRIVE BELT (See Fig. 20) The mower blade drive belt may be adjusted so that side. Distance "A" on that side. • To lower one link to -side adjustment. Engage parking brake. IF THE FOLLOWING FRONT-TO...

User Manual
Page 20
... BELT INSTALLATION • Carefully work new belt down and en- OPERATING ARM FIG. 21 TO REPLACE MOTION DRIVE BELT (See Fig. 22) Park the tractor on a level, dry concrete or paved surface, depress clutch/brake pedal all the way down and engage parking brake. • Place gear shift lever in this sec- If the rear wheels rotate, the brake needs to be checked and adjusted. SERVICE AND ADJUSTMENTS IDLER PULLEYS WITH PARKING BRAKE "ENGAGED" 1-1/2" NUT...
... BELT INSTALLATION • Carefully work new belt down and en- OPERATING ARM FIG. 21 TO REPLACE MOTION DRIVE BELT (See Fig. 22) Park the tractor on a level, dry concrete or paved surface, depress clutch/brake pedal all the way down and engage parking brake. • Place gear shift lever in this sec- If the rear wheels rotate, the brake needs to be checked and adjusted. SERVICE AND ADJUSTMENTS IDLER PULLEYS WITH PARKING BRAKE "ENGAGED" 1-1/2" NUT...

User Manual
Page 23
... of tractor. • To replace, reverse above procedure. High speed stop running , move throttle control lever from starting. • Check wiring. IMPORTANT: NEVERTAMPERWITHTHEENGINEGOVERNOR, WHICH IS FACTORY SET FOR PROPER ENGINE SPEED. Tighten clamp screw securely. SERVICE AND ADJUSTMENTS TO REPLACE HEADLIGHT BULB • Raise hood. • Pull bulb holder out of the hole in the backside of the grill. • Replace bulb in holder and push bulb holder securely back into the hole in fuel...
... of tractor. • To replace, reverse above procedure. High speed stop running , move throttle control lever from starting. • Check wiring. IMPORTANT: NEVERTAMPERWITHTHEENGINEGOVERNOR, WHICH IS FACTORY SET FOR PROPER ENGINE SPEED. Tighten clamp screw securely. SERVICE AND ADJUSTMENTS TO REPLACE HEADLIGHT BULB • Raise hood. • Pull bulb holder out of the hole in the backside of the grill. • Replace bulb in holder and push bulb holder securely back into the hole in fuel...
User Manual
Page 24
... tractor with a suitable protective cover that all nuts, bolts and screws are empty. • Never use plastic. TRACTOR Remove mower from dust and dirt. • Cover your tractor for a period of this manual). ENGINE FUEL SYSTEM IMPORTANT: IT IS IMPORTANT TO PREVENT GUM DEPOSITS FROM FORMING IN ESSENTIAL FUEL SYSTEM PARTS SUCH AS CARBURETOR, FUEL FILTER, FUEL HOSE, OR TANK DURING STORAGE. Allow the engine to distribute oil. • Replace with new spark plug(s). nance section of time, clean...
... tractor with a suitable protective cover that all nuts, bolts and screws are empty. • Never use plastic. TRACTOR Remove mower from dust and dirt. • Cover your tractor for a period of this manual). ENGINE FUEL SYSTEM IMPORTANT: IT IS IMPORTANT TO PREVENT GUM DEPOSITS FROM FORMING IN ESSENTIAL FUEL SYSTEM PARTS SUCH AS CARBURETOR, FUEL FILTER, FUEL HOSE, OR TANK DURING STORAGE. Allow the engine to distribute oil. • Replace with new spark plug(s). nance section of time, clean...
User Manual
Page 25
... dirty fuel. 6. Engine will not start 1. Corroded battery terminals. 6. Check/replace ignition switch. 8. Check/replace solenoid or starter. 9. Corroded battery terminals. 3. Faulty solenoid or starter. 1. Recharge or replace battery. 2. Low oil level/dirty oil. 6. Spark plug wire loose. 11. Loose or damaged wiring. 14. Engine valves out of adjustment. 10. Set in Service Adjustments section. 15. Check oil level/change spark plug. 7. See "To Adjust Carburetor" in "Higher Cut" position/reduce speed. 2. Excessive vibration 1. Replace blade. Engine not "CHOKED" properly...
... dirty fuel. 6. Engine will not start 1. Corroded battery terminals. 6. Check/replace ignition switch. 8. Check/replace solenoid or starter. 9. Corroded battery terminals. 3. Faulty solenoid or starter. 1. Recharge or replace battery. 2. Low oil level/dirty oil. 6. Spark plug wire loose. 11. Loose or damaged wiring. 14. Engine valves out of adjustment. 10. Set in Service Adjustments section. 15. Check oil level/change spark plug. 7. See "To Adjust Carburetor" in "Higher Cut" position/reduce speed. 2. Excessive vibration 1. Replace blade. Engine not "CHOKED" properly...

User Manual
Page 26
... engine. 1. Clean around mandrels. 1. Frozen idler pulley. 4. Bulb(s) or lamp(s) burned out. 3. Replace alternator. Improper blades used. 11. Reinstall blades sharp edge down. 10. TROUBLESHOOTING POINTS PROBLEM CAUSE Engine continues to run when operator leaves seat with blades listed in this manual. 11. Mower deck not level. 3. Clogged mower deck vent holes from buildup of grass, leaves and trash under mower. 4. Headlight(s) not working (if so equipped) 1. Turn switch "ON". 2. Bad battery cell(s). 2. Engine throttle control not set at "SLOW" position...
... engine. 1. Clean around mandrels. 1. Frozen idler pulley. 4. Bulb(s) or lamp(s) burned out. 3. Replace alternator. Improper blades used. 11. Reinstall blades sharp edge down. 10. TROUBLESHOOTING POINTS PROBLEM CAUSE Engine continues to run when operator leaves seat with blades listed in this manual. 11. Mower deck not level. 3. Clogged mower deck vent holes from buildup of grass, leaves and trash under mower. 4. Headlight(s) not working (if so equipped) 1. Turn switch "ON". 2. Bad battery cell(s). 2. Engine throttle control not set at "SLOW" position...

User Manual
Page 27
... THE BATTERY, BUT HAVE THEIR OWN ELECTRICAL SOURCE. MODEL NUMBER PC1742STA, PRODUCT NUMBER 954 57 07-72 SCHEMATIC RED BATTERY BLACK A AMMETER (OPTIONAL) RED WHITE RED S BM G A1 L A2 IGNITION SWITCH FUSE CLUTCH / BRAKE (PEDAL UP) RED M STARTER BLACK SOLENOID WHITE WHITE SEAT SWITCH (NOT OCCUPIED) BLACK BLACK BLACK BLACK BLACK HOUR METER ATT'MENT CLUTCH BLACK (CLUTCH OFF) (OPTIONAL) FUEL BLACK IGNITION UNIT BLUE LINE GROUNDING CONNECTOR SPARK PLUG GAP (2 PLUGS ON...
... THE BATTERY, BUT HAVE THEIR OWN ELECTRICAL SOURCE. MODEL NUMBER PC1742STA, PRODUCT NUMBER 954 57 07-72 SCHEMATIC RED BATTERY BLACK A AMMETER (OPTIONAL) RED WHITE RED S BM G A1 L A2 IGNITION SWITCH FUSE CLUTCH / BRAKE (PEDAL UP) RED M STARTER BLACK SOLENOID WHITE WHITE SEAT SWITCH (NOT OCCUPIED) BLACK BLACK BLACK BLACK BLACK HOUR METER ATT'MENT CLUTCH BLACK (CLUTCH OFF) (OPTIONAL) FUEL BLACK IGNITION UNIT BLUE LINE GROUNDING CONNECTOR SPARK PLUG GAP (2 PLUGS ON...

User Manual
Page 37
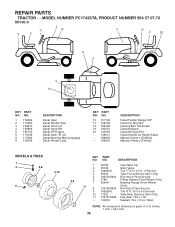
... Thd Cut 1/4-20 x 1/2 Engine Briggs Model 31G777 (Order Parts From Engine Manufacturer) Muffler Exhaust B&S Lt Gasket 1 313 Id Tin Plated Tube Drain Oil Easy Washer Lock Ext Tooth 3/8 Shield Browning/Debris Guard Arrestor Spark Tank Fuel 1 25 Fr Cap Asm Fuel W/sym Vented Clamp Hose Blk Line Fuel 20" Plug Drain Oil Easy Bushing Snap Nyl Blk Fuel Line Screw Hexwsh Thdrol 1/4-20 x 3/4 Screw Hex Wsh Thdrol 3/8-16 Washer 9/32 x 7/8 x 16 ga Screw Socket Head...
... Thd Cut 1/4-20 x 1/2 Engine Briggs Model 31G777 (Order Parts From Engine Manufacturer) Muffler Exhaust B&S Lt Gasket 1 313 Id Tin Plated Tube Drain Oil Easy Washer Lock Ext Tooth 3/8 Shield Browning/Debris Guard Arrestor Spark Tank Fuel 1 25 Fr Cap Asm Fuel W/sym Vented Clamp Hose Blk Line Fuel 20" Plug Drain Oil Easy Bushing Snap Nyl Blk Fuel Line Screw Hexwsh Thdrol 1/4-20 x 3/4 Screw Hex Wsh Thdrol 3/8-16 Washer 9/32 x 7/8 x 16 ga Screw Socket Head...
User Manual
Page 39
... E/F Decal Ins Strg Whl Decal V-Belt Schematic Decal Replace Decal Bat Dan/Psn Decal Handle Lft Height Adjust Manual Owner's (English) Manual Owner's (French) WHEELS & TIRES 1 2 5,8 4,10 7 6 KEY PART NO. REPAIR PARTS TRACTOR - - DESCRIPTION 1 59192 Cap Valve Tire 2 65139 Stem Valve 3 106222X Tire F Ts 15 x 6 0 - 6 Service 4 59904 Tube Front (Service Item Only) 5 106732X624 Rim Asm 6"front Service 3,9 6 278H 7 9040H Fitting Grease (Front Wheel Only) Bearing Flange (Front Wheel 11 8 Only) 106108X624 Rim Asm...
... E/F Decal Ins Strg Whl Decal V-Belt Schematic Decal Replace Decal Bat Dan/Psn Decal Handle Lft Height Adjust Manual Owner's (English) Manual Owner's (French) WHEELS & TIRES 1 2 5,8 4,10 7 6 KEY PART NO. REPAIR PARTS TRACTOR - - DESCRIPTION 1 59192 Cap Valve Tire 2 65139 Stem Valve 3 106222X Tire F Ts 15 x 6 0 - 6 Service 4 59904 Tube Front (Service Item Only) 5 106732X624 Rim Asm 6"front Service 3,9 6 278H 7 9040H Fitting Grease (Front Wheel Only) Bearing Flange (Front Wheel 11 8 Only) 106108X624 Rim Asm...

User Manual
Page 43
... Guard TUV Idler Knob V-Belt, 42" Mower Bracket Wheel Gauge LH Bracket Wheel Gauge RH Screw 3/8-16 x .625 Nut keps 5/16-18 Unc Bolt Shld "A" 2.41 "B" 1.66 Wheel Gauge Std Nut Centerlock 3/8-16 Unc Washer 3/8 x 7/8 x 14 Arm Spring Brake Mower Bracket Arm Idler 42" Keeper Belt 42" Clutch Cable Pulley Idler Flat Bolt Carriage Idler Spring Extension Spring Return Idler Retainer Spring Yellow Washer 9/32 x 3/4 x 16 Ga. DESCRIPTION 1 165892 Mower Deck Assembly, 42" 2 72140506 Bolt 3 138017 Bracket Asm Fr. MODEL NUMBER PC1742STA, PRODUCT NUMBER...
... Guard TUV Idler Knob V-Belt, 42" Mower Bracket Wheel Gauge LH Bracket Wheel Gauge RH Screw 3/8-16 x .625 Nut keps 5/16-18 Unc Bolt Shld "A" 2.41 "B" 1.66 Wheel Gauge Std Nut Centerlock 3/8-16 Unc Washer 3/8 x 7/8 x 14 Arm Spring Brake Mower Bracket Arm Idler 42" Keeper Belt 42" Clutch Cable Pulley Idler Flat Bolt Carriage Idler Spring Extension Spring Return Idler Retainer Spring Yellow Washer 9/32 x 3/4 x 16 Ga. DESCRIPTION 1 165892 Mower Deck Assembly, 42" 2 72140506 Bolt 3 138017 Bracket Asm Fr. MODEL NUMBER PC1742STA, PRODUCT NUMBER...


