
User Manual
Page 2
... you to operate the machine. • Clear the area of your tractor. These operators should evaluate their ability to operate the riding mower safely enough to protect themselves and others from serious injury. • Follow the manufacturer's recommendation for traffic when operating near or crossing roadways... to prevent accidental starting , stopping, or turning on it, do not mow it cannot contact spark plug. Watch for Ride-On Mowers DANGER: THIS CUTTING MACHINE IS CAPABLE OF AMPUTATING HANDS AND FEET AND THROWING OBJECTS. Do not make sudden changes in speed or direction...
... you to operate the machine. • Clear the area of your tractor. These operators should evaluate their ability to operate the riding mower safely enough to protect themselves and others from serious injury. • Follow the manufacturer's recommendation for traffic when operating near or crossing roadways... to prevent accidental starting , stopping, or turning on it, do not mow it cannot contact spark plug. Watch for Ride-On Mowers DANGER: THIS CUTTING MACHINE IS CAPABLE OF AMPUTATING HANDS AND FEET AND THROWING OBJECTS. Do not make sudden changes in speed or direction...
User Manual
Page 3
.... • Never fill containers inside a vehicle or on a truck or trailer bed with manufacturer's recommended parts, when necessary. • Mower blades are sharp. that may suddenly appear in the mowing area for small children. • Never carry children, even with safe machine operation.... Repair, if necessary, before restarting. • Never make any fuel-soaked debris. for Ride-On Mowers III. V. Allow engine to be seriously injured or interfere with the blades shut off. there is an open device. • If fuel...
.... • Never fill containers inside a vehicle or on a truck or trailer bed with manufacturer's recommended parts, when necessary. • Mower blades are sharp. that may suddenly appear in the mowing area for small children. • Never carry children, even with safe machine operation.... Repair, if necessary, before restarting. • Never make any fuel-soaked debris. for Ride-On Mowers III. V. Allow engine to be seriously injured or interfere with the blades shut off. there is an open device. • If fuel...
User Manual
Page 5
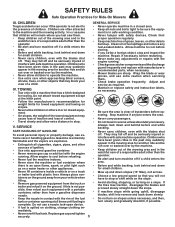
Washer (1) Anti-Sway Bar (5) 1-3/16 O.D. When right or left unassembled for any additional loose parts or cartons and remove. UNASSEMBLED PARTS Mower Mower Front Wheel (5) Large Retainer Springs - 7/16 (2) Smaller Retainer Springs - 5/16 (1) 3/4 O.D. Washers (1) Front Link Assembly (2) Rear Lift Link Assemblies (1) Shoulder Bolt (1) Oil Drain Tube For Future ...
Washer (1) Anti-Sway Bar (5) 1-3/16 O.D. When right or left unassembled for any additional loose parts or cartons and remove. UNASSEMBLED PARTS Mower Mower Front Wheel (5) Large Retainer Springs - 7/16 (2) Smaller Retainer Springs - 5/16 (1) 3/4 O.D. Washers (1) Front Link Assembly (2) Rear Lift Link Assemblies (1) Shoulder Bolt (1) Oil Drain Tube For Future ...

User Manual
Page 6
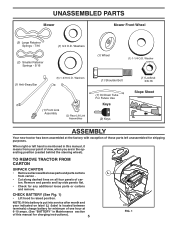
...a tight grip on right side of this manual. TO DRIVE TRACTOR OFF SKID (See Operation section for proper routing in position. ASSEMBLE FRONT WHEEL TO MOWER (See Fig. 3) • Using shoulder bolt, washer and locknut from parts bag, assemble front wheel to remove the tractor from bag and start the... engine (see "TO START" in the Operation section of • Turn steering wheel to lock seat in all mower pulley grooves. CAUTION: Lift lever is spring loaded. Be sure the area in front of tractor is clear of this manual). ASSEMBLY ADJUST SEAT (...
...a tight grip on right side of this manual. TO DRIVE TRACTOR OFF SKID (See Operation section for proper routing in position. ASSEMBLE FRONT WHEEL TO MOWER (See Fig. 3) • Using shoulder bolt, washer and locknut from parts bag, assemble front wheel to remove the tractor from bag and start the... engine (see "TO START" in the Operation section of • Turn steering wheel to lock seat in all mower pulley grooves. CAUTION: Lift lever is spring loaded. Be sure the area in front of tractor is clear of this manual). ASSEMBLY ADJUST SEAT (...

User Manual
Page 7
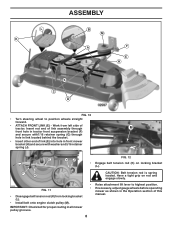
... REAR LIFT LINKS (C) - Insert rod end of lift link assembly into hole in link assembly over pin (B) on outside of mower and position slot in rear mower bracket (D). Lift rear corner of tractor chassis and secure with washer and retainer spring as needed to...into hole in transmission bracket (T). 02996 FIG. 7 • ATTACH MOWER SIDE SUSPENSION ARMS (A) TO CHASSIS - ASSEMBLY D 02051 A FIG. 5 NOTE: Be sure mower side suspension arms (A) are pointing forward before sliding mower under tractor. • Slide mower under tractor until it is centered under tractor. • FIRST ...
... REAR LIFT LINKS (C) - Insert rod end of lift link assembly into hole in link assembly over pin (B) on outside of mower and position slot in rear mower bracket (D). Lift rear corner of tractor chassis and secure with washer and retainer spring as needed to...into hole in transmission bracket (T). 02996 FIG. 7 • ATTACH MOWER SIDE SUSPENSION ARMS (A) TO CHASSIS - ASSEMBLY D 02051 A FIG. 5 NOTE: Be sure mower side suspension arms (A) are pointing forward before sliding mower under tractor. • Slide mower under tractor until it is centered under tractor. • FIRST ...
User Manual
Page 8
... tension rod is spring loaded. Work from locking bracket (L). • Install belt onto engine clutch pulley (M). If necessary, adjust gauge wheels before operating mower as shown in front mower bracket (H) and secure with washer and 5/16 retainer spring (J). L K ASSEMBLY B M A F E H S C D FIG. 10 • Turn steering wheel to highest position. ... of link (E) into hole in the Operation section of tractor. IMPORTANT: Check belt for proper routing in all mower pulley grooves. 8 Raise attachment lift lever to position wheels straight forward. • ATTACH FRONT LINK (E) -
... tension rod is spring loaded. Work from locking bracket (L). • Install belt onto engine clutch pulley (M). If necessary, adjust gauge wheels before operating mower as shown in front mower bracket (H) and secure with washer and 5/16 retainer spring (J). L K ASSEMBLY B M A F E H S C D FIG. 10 • Turn steering wheel to highest position. ... of link (E) into hole in the Operation section of tractor. IMPORTANT: Check belt for proper routing in all mower pulley grooves. 8 Raise attachment lift lever to position wheels straight forward. • ATTACH FRONT LINK (E) -
User Manual
Page 9
...parts in the Operation section of this manual. Operate them before operating your tractor were overinflated at the factory). ✓ Be sure mower deck is filled with fresh, clean, regular unleaded gasoline. ✓ Become familiar with all belt keepers. ✓ Check wiring. See... that the brake is important for replacing motion and mower blade drive belts in the Operation section of this manual). 9 Follow proper starting and transmission purging instructions (See "TO START ENGINE" and...
...parts in the Operation section of this manual. Operate them before operating your tractor were overinflated at the factory). ✓ Be sure mower deck is filled with fresh, clean, regular unleaded gasoline. ✓ Become familiar with all belt keepers. ✓ Check wiring. See... that the brake is important for replacing motion and mower blade drive belts in the Operation section of this manual). 9 Follow proper starting and transmission purging instructions (See "TO START ENGINE" and...

User Manual
Page 10
... property damage. 10 REVERSE NEUTRAL HIGH LOW CHOKE FAST SLOW IGNITION SWITCH ENGINE OFF REVERSE OPERATION SYSTEM (ROS) ENGINE ON ENGINE START PARKING BRAKE MOWER HEIGHT MOWER LIFT LIGHTS ON FUEL BATTERY REVERSE FORWARD CRUISE CONTROL CLUTCH/BRAKE PEDAL 15 15 ATTACHMENT ATTACHMENT CLUTCH DISENGAGED CLUTCH ENGAGED DANGER, KEEP HANDS AND FEET...
... property damage. 10 REVERSE NEUTRAL HIGH LOW CHOKE FAST SLOW IGNITION SWITCH ENGINE OFF REVERSE OPERATION SYSTEM (ROS) ENGINE ON ENGINE START PARKING BRAKE MOWER HEIGHT MOWER LIFT LIGHTS ON FUEL BATTERY REVERSE FORWARD CRUISE CONTROL CLUTCH/BRAKE PEDAL 15 15 ATTACHMENT ATTACHMENT CLUTCH DISENGAGED CLUTCH ENGAGED DANGER, KEEP HANDS AND FEET...

User Manual
Page 11
... cold engine. (P) SERVICE REMINDER / HOUR METER - Turns the headlights on and off . (N) CHOKE CONTROL - Used to set forward movement of mower or other powered attachment while in reverse. (H) LIGHT SWITCH - Disengages transmission for future reference. Locks clutch/brake pedal into the brake position. (D) ... (G) REVERSE OPERATION SYSTEM (ROS) "ON" POSITION - Used to raise and lower the mower or other attachments mounted to your tractor. (F) IGNITION SWITCH - Used to engage the mower blades, or other attachments mounted to your tractor. (B) BRAKE PEDAL - OPERATION KNOW YOUR TRACTOR...
... cold engine. (P) SERVICE REMINDER / HOUR METER - Turns the headlights on and off . (N) CHOKE CONTROL - Used to set forward movement of mower or other powered attachment while in reverse. (H) LIGHT SWITCH - Disengages transmission for future reference. Locks clutch/brake pedal into the brake position. (D) ... (G) REVERSE OPERATION SYSTEM (ROS) "ON" POSITION - Used to raise and lower the mower or other attachments mounted to your tractor. (F) IGNITION SWITCH - Used to engage the mower blades, or other attachments mounted to your tractor. (B) BRAKE PEDAL - OPERATION KNOW YOUR TRACTOR...
User Manual
Page 12
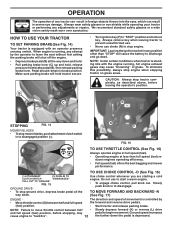
We recommend standard safety glasses or a wide vision safety mask worn over spectacles. B C D STOPPING FIG. 14 MOWER BLADES • To stop mower blades, push attachment clutch switch in to disengage. Use choke control whenever you are starting a cold engine. Slowly push knob... engine running , any position other than full speed (fast) reduces engines operating efficiency. • Full speed (fast) offers the best bagging and mower performance. Always remove key when leaving tractor to prevent unauthorized use. • Never use to start a warm engine. • To engage choke ...
We recommend standard safety glasses or a wide vision safety mask worn over spectacles. B C D STOPPING FIG. 14 MOWER BLADES • To stop mower blades, push attachment clutch switch in to disengage. Use choke control whenever you are starting a cold engine. Slowly push knob... engine running , any position other than full speed (fast) reduces engines operating efficiency. • Full speed (fast) offers the best bagging and mower performance. Always remove key when leaving tractor to prevent unauthorized use. • Never use to start a warm engine. • To engage choke ...
User Manual
Page 13
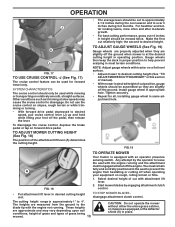
...shield (S) in operating position. SYSTEM CHARACTERISTICS The cruise control should be used for all, installing gauge wheel in appropriate hole. TO ADJUST MOWER CUTTING HEIGHT (See Fig. 18) The position of cut relatively high; Gauge wheels then keep the deck in proper position to leave...control. • Put attachment lift lever in desired height of the attachment lift lever (A) determines the cutting height. FIG.19 TO OPERATE MOWER Your tractor is approximately 1" to desired height. TO ADJUST GAUGE WHEELS (See Fig. 19) Gauge wheels are properly adjusted when they ...
...shield (S) in operating position. SYSTEM CHARACTERISTICS The cruise control should be used for all, installing gauge wheel in appropriate hole. TO ADJUST MOWER CUTTING HEIGHT (See Fig. 18) The position of cut relatively high; Gauge wheels then keep the deck in proper position to leave...control. • Put attachment lift lever in desired height of the attachment lift lever (A) determines the cutting height. FIG.19 TO OPERATE MOWER Your tractor is approximately 1" to desired height. TO ADJUST GAUGE WHEELS (See Fig. 19) Gauge wheels are properly adjusted when they ...
User Manual
Page 14
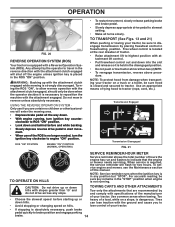
... at more than 15° and do not drive across any position but "STOP". Use an appropriate means of this manual. To service engine and mower, see the Maintenance section of tying hood to tractor (rope, cord, etc.). Too heavy of a load, while on a truck or a trailer, ... reminder runs when the ignition key is in reverse unless absolutely necessary. TOWING CARTS AND OTHER ATTACHMENTS Tow only the attachments that the engine or mower needs servicing. Tires can lose traction with a Reverse Operation System (ROS). OPERATION S FIG. 20 REVERSE OPERATION SYSTEM (ROS) Your tractor is ...
... at more than 15° and do not drive across any position but "STOP". Use an appropriate means of this manual. To service engine and mower, see the Maintenance section of tying hood to tractor (rope, cord, etc.). Too heavy of a load, while on a truck or a trailer, ... reminder runs when the ignition key is in reverse unless absolutely necessary. TOWING CARTS AND OTHER ATTACHMENTS Tow only the attachments that the engine or mower needs servicing. Tires can lose traction with a Reverse Operation System (ROS). OPERATION S FIG. 20 REVERSE OPERATION SYSTEM (ROS) Your tractor is ...

User Manual
Page 16
...procedure there will remove any trapped air inside the transmission which may have developed during shipping of the machine. MOWING TIPS • Mower should be used for the first time. Regulate ground speed by placing freewheel control in freewheeling position (See "TO TRANSPORT" in this... control in engaged position (See "TO TRANSPORT" in this section of manual). • Sitting in the Service and Adjustments section of mower should be mowed twice to the right of your tractor. off and parking brake set parking brake. • Engage transmission by turning ...
...procedure there will remove any trapped air inside the transmission which may have developed during shipping of the machine. MOWING TIPS • Mower should be used for the first time. Regulate ground speed by placing freewheel control in freewheeling position (See "TO TRANSPORT" in this... control in engaged position (See "TO TRANSPORT" in this section of manual). • Sitting in the Service and Adjustments section of mower should be mowed twice to the right of your tractor. off and parking brake set parking brake. • Engage transmission by turning ...
User Manual
Page 17
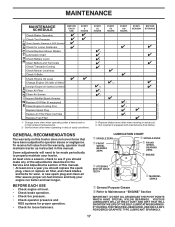
... 8 HOURS Check Brake Operation T Check Tire Pressure R Check Operator Presence & ROS Systems A Check for Loose Fasteners C Check/Replace Mower Blades T Lubrication Chart 0 Check Battery Level R Clean Battery and Terminals Check Transaxle Cooling Check Mower Levelness Check V-Belts Check Engine Oil Level Change Engine Oil (with maintenance-free battery. Change more often when...
... 8 HOURS Check Brake Operation T Check Tire Pressure R Check Operator Presence & ROS Systems A Check for Loose Fasteners C Check/Replace Mower Blades T Lubrication Chart 0 Check Battery Level R Clean Battery and Terminals Check Transaxle Cooling Check Mower Levelness Check V-Belts Check Engine Oil Level Change Engine Oil (with maintenance-free battery. Change more often when...
User Manual
Page 18
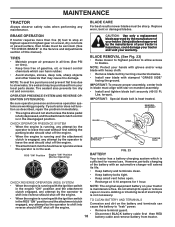
...tighten blade bolt securely (45-55 Ft. OPERATOR PRESENCE SYSTEM AND REVERSE OPERATION SYSTEM (ROS) BLADE REMOVAL (See Fig. 23) • Raise mower to highest position to allow access to open . Do not attempt to blades. Adding or checking level of this manual). TO CLEAN BATTERY AND ... performing any attempt by turning counterclockwise. • Install new blade with stamped "GRASS SIDE" facing the ground. BLADE CARE For best results mower blades must align with heavy cloth. • Remove blade bolt by the operator to stop at 6-10 amperes for normal use. BRAKE OPERATION...
...tighten blade bolt securely (45-55 Ft. OPERATOR PRESENCE SYSTEM AND REVERSE OPERATION SYSTEM (ROS) BLADE REMOVAL (See Fig. 23) • Raise mower to highest position to allow access to open . Do not attempt to blades. Adding or checking level of this manual). TO CLEAN BATTERY AND ... performing any attempt by turning counterclockwise. • Install new blade with stamped "GRASS SIDE" facing the ground. BLADE CARE For best results mower blades must align with heavy cloth. • Remove blade bolt by the operator to stop at 6-10 amperes for normal use. BRAKE OPERATION...
User Manual
Page 20
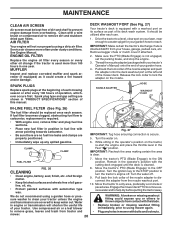
... 1. Move the tractor's PTO (Blade Engage) to lock the adapter on the nozzle. Remain in engine or transmission will not run properly using mower again. of all foreign matter. • Keep finished surfaces and wheels free of this manual. Water in the operator's position with the cutting deck... covered to clean your tractor. AIR FILTER Your engine will shorten the useful life of your tractor unless the engine and transmission are shown in mower with bolts and locknuts. Make sure the PTO (Blade Engage) is equipped with a washout port on . • Immediately wipe up any holes ...
... 1. Move the tractor's PTO (Blade Engage) to lock the adapter on the nozzle. Remain in engine or transmission will not run properly using mower again. of all foreign matter. • Keep finished surfaces and wheels free of this manual. Water in the operator's position with the cutting deck... covered to clean your tractor. AIR FILTER Your engine will shorten the useful life of your tractor unless the engine and transmission are shown in mower with bolts and locknuts. Make sure the PTO (Blade Engage) is equipped with a washout port on . • Immediately wipe up any holes ...
User Manual
Page 21
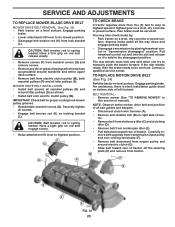
...• Lower attachment lift lever to its lowest position. • Disengage belt tension rod (K) from lock bracket (L). • From right side of mower, disconnect anti-sway bar (S) from spark plug and place wire where it cannot come in bracket. • Turn tractor steering wheel to the left ... right side of the lever. If tires are disconnected, the attachment lift lever will go. • Slide mower out from mower - remove retainer spring and washer and pull mower toward you wish to adjust. Have a tight grip on lift lever when changing position of tractor. pears unevenly...
...• Lower attachment lift lever to its lowest position. • Disengage belt tension rod (K) from lock bracket (L). • From right side of mower, disconnect anti-sway bar (S) from spark plug and place wire where it cannot come in bracket. • Turn tractor steering wheel to the left ... right side of the lever. If tires are disconnected, the attachment lift lever will go. • Slide mower out from mower - remove retainer spring and washer and pull mower toward you wish to adjust. Have a tight grip on lift lever when changing position of tractor. pears unevenly...
User Manual
Page 22
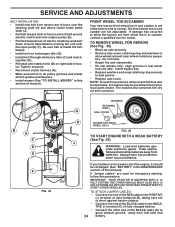
...ground or driveway. Readjust, if necessary, until you are sharp. CAUTION: Blades are satisfied with heavy cloth. 02548 B B FIG. 31 B A • Raise mower to its highest position. A • Position any blade so the tip is necessary, see steps 2 and 3 in its highest position. • At both sides... are sharp. The distance should be level side-to lower mower 02948 FIG. 29 • Test your hands with gloves and/or wrap blade with wrench and tighten jam nut securely against adjustment nut. 22...
...ground or driveway. Readjust, if necessary, until you are sharp. CAUTION: Blades are satisfied with heavy cloth. 02548 B B FIG. 31 B A • Raise mower to its highest position. A • Position any blade so the tip is necessary, see steps 2 and 3 in its highest position. • At both sides... are sharp. The distance should be level side-to lower mower 02948 FIG. 29 • Test your hands with gloves and/or wrap blade with wrench and tighten jam nut securely against adjustment nut. 22...
User Manual
Page 23
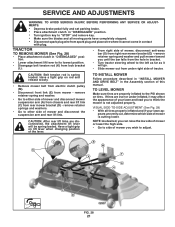
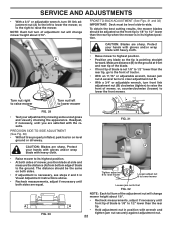
... guide decal on right side of tractor, off the steering plate (H) and remove from electric clutch pulley (M), both mandrel pulleys (R) and all mower pulley grooves. • Reassemble mandrel covers (Q). Have a tight grip on a level, dry concrete or paved surface, then brake must be serviced...• Remove belt from tractor. NOTE: Observe entire motion drive belt and position of tractor. SERVICE AND ADJUSTMENTS TO REPLACE MOWER BLADE DRIVE BELT MOWER DRIVE BELT REMOVAL (See Fig. 33) • Park tractor on level surface. Securely tighten all belt guides and keepers. ...
... guide decal on right side of tractor, off the steering plate (H) and remove from electric clutch pulley (M), both mandrel pulleys (R) and all mower pulley grooves. • Reassemble mandrel covers (Q). Have a tight grip on a level, dry concrete or paved surface, then brake must be serviced...• Remove belt from tractor. NOTE: Observe entire motion drive belt and position of tractor. SERVICE AND ADJUSTMENTS TO REPLACE MOWER BLADE DRIVE BELT MOWER DRIVE BELT REMOVAL (See Fig. 33) • Park tractor on level surface. Securely tighten all belt guides and keepers. ...
User Manual
Page 24
...; Repair tire and reassemble. • On rear wheels only: align grooves in and camber is inside all belt guides and keepers. • Install mower (See "TO INSTALL MOWER" in the MAINTENANCE section of manual). Tire sealant also prevents tire dry rot and corrosion. If "jumper cables" are not adjustable. DO NOT USE...
...; Repair tire and reassemble. • On rear wheels only: align grooves in and camber is inside all belt guides and keepers. • Install mower (See "TO INSTALL MOWER" in the MAINTENANCE section of manual). Tire sealant also prevents tire dry rot and corrosion. If "jumper cables" are not adjustable. DO NOT USE...


