
User Manual
Page 2
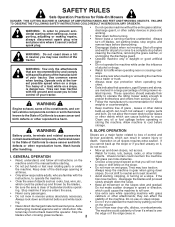
... to stop engine, and remove keys before operat- WARNING II. Tall grass can touch hot exhaust / engine parts and burn. WARNING: Tow only the attachments that you to roll over the edge or if the edge caves in the manual before operating or storing the machine. after handling. • Mow up , transporting, adjusting or making repairs, always disconnect spark plug wire and place wire where...
... to stop engine, and remove keys before operat- WARNING II. Tall grass can touch hot exhaust / engine parts and burn. WARNING: Tow only the attachments that you to roll over the edge or if the edge caves in the manual before operating or storing the machine. after handling. • Mow up , transporting, adjusting or making repairs, always disconnect spark plug wire and place wire where...
User Manual
Page 3
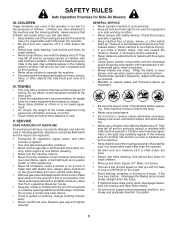
... and turn on a truck or trailer bed with the blades shut off and be run - If this is in the watchful care of a responsible adult other objects that children will not have to the machine and the mowing activity. Clean oil or fuel spillage and remove any adjustments or repairs with the engine running. • Check grass catcher components and the discharge guard frequently and replace...
... and turn on a truck or trailer bed with the blades shut off and be run - If this is in the watchful care of a responsible adult other objects that children will not have to the machine and the mowing activity. Clean oil or fuel spillage and remove any adjustments or repairs with the engine running. • Check grass catcher components and the discharge guard frequently and replace...
User Manual
Page 4
... and retain this owner's manual. In the state of California the above 32°F) SAE 5W-30 (below 32°F) Oil Capacity: W/Filter: 3.5 Pints W/O Filter:3.0 Pints Spark Plug: (Gap: .030") Champion RC12YC Ground Speed (MPH): Forward: 5.2 Reverse: 2.7 Charging System: 3 Amps Battery 5 Amps Headlights Battery: AMP/HR: Min. Federal laws apply on or near any unimproved forest-covered, brush-covered or grass-covered land unless the engine's exhaust system is...
... and retain this owner's manual. In the state of California the above 32°F) SAE 5W-30 (below 32°F) Oil Capacity: W/Filter: 3.5 Pints W/O Filter:3.0 Pints Spark Plug: (Gap: .030") Champion RC12YC Ground Speed (MPH): Forward: 5.2 Reverse: 2.7 Charging System: 3 Amps Battery 5 Amps Headlights Battery: AMP/HR: Min. Federal laws apply on or near any unimproved forest-covered, brush-covered or grass-covered land unless the engine's exhaust system is...
User Manual
Page 6
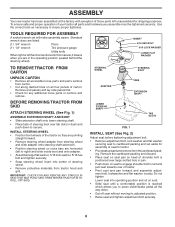
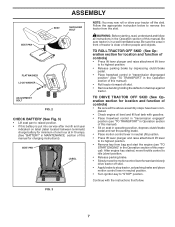
... wheel and slide adapter onto steering shaft extension. • Position steering wheel so cross bars are in slot and pull seat towards rear of tractor. • Pivot seat and pan forward and assemble adjustment bolt, lockwasher and flat washer loosely. Do not tighten Lower seat into center of steering wheel. • Remove protective materials from tractor hood and grill. IMPORTANT: CHECK FOR AND REMOVE...
... wheel and slide adapter onto steering shaft extension. • Position steering wheel so cross bars are in slot and pull seat towards rear of tractor. • Pivot seat and pan forward and assemble adjustment bolt, lockwasher and flat washer loosely. Do not tighten Lower seat into center of steering wheel. • Remove protective materials from tractor hood and grill. IMPORTANT: CHECK FOR AND REMOVE...
User Manual
Page 7
... the above assembly steps have been completed. • Check engine oil level and fill fuel tank with gasoline. • Place freewheel control in "transmission engaged" position (see "TO START ENGINE" in the Operation section of this manual). Follow the appropriate instruction below to remove the tractor from bag and start the engine (see "TO TRANSPORT" in Operation section of this manual). • Sit on label (label located between terminals) charge battery for...
... the above assembly steps have been completed. • Check engine oil level and fill fuel tank with gasoline. • Place freewheel control in "transmission engaged" position (see "TO START ENGINE" in the Operation section of this manual). Follow the appropriate instruction below to remove the tractor from bag and start the engine (see "TO TRANSPORT" in Operation section of this manual). • Sit on label (label located between terminals) charge battery for...
User Manual
Page 8
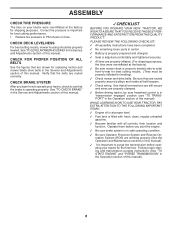
... mower blade drive belts in "transmission engaged" position (see that all controls, their location and function. Correct tire pressure is operating properly. CHECK BRAKE SYSTEM After you start the engine. ✓ Be sure brake system is in the Service and Adjustments section of this manual. Follow proper starting and transmission purging instructions (See "TO START ENGINE" and "PURGE TRANSMISSION" in flated for the first time. ASSEMBLY CHECK TIRE PRESSURE The tires on tires. CHECK DECK LEVELNESS For best cutting results, mower housing...
... mower blade drive belts in "transmission engaged" position (see that all controls, their location and function. Correct tire pressure is operating properly. CHECK BRAKE SYSTEM After you start the engine. ✓ Be sure brake system is in the Service and Adjustments section of this manual. Follow proper starting and transmission purging instructions (See "TO START ENGINE" and "PURGE TRANSMISSION" in flated for the first time. ASSEMBLY CHECK TIRE PRESSURE The tires on tires. CHECK DECK LEVELNESS For best cutting results, mower housing...
User Manual
Page 13
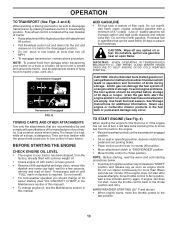
.... Drain the gas tank, start , move the throttle control to the choke position and retry. See Storage Instructions for more than fifteen seconds per minute. Do not run until "FULL" mark on a slope, is located at more than two (2) MPH. • To reengage transmission, reverse above ) • When engine starts, move the throttle control back to the fast position. 13 Free wheel control is dangerous. BEFORE STARTING THE ENGINE CHECK ENGINE OIL LEVEL • The engine...
.... Drain the gas tank, start , move the throttle control to the choke position and retry. See Storage Instructions for more than fifteen seconds per minute. Do not run until "FULL" mark on a slope, is located at more than two (2) MPH. • To reengage transmission, reverse above ) • When engine starts, move the throttle control back to the fast position. 13 Free wheel control is dangerous. BEFORE STARTING THE ENGINE CHECK ENGINE OIL LEVEL • The engine...

User Manual
Page 14
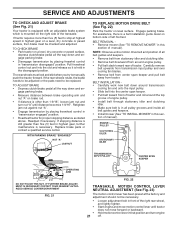
... a level surface - See "TO LEVEL MOWER HOUSING" in the Service and Adjustments section of manual). • Sitting in the Service and Adjustments section of this section of this procedure three (3) times. 14 FIG. 9 If grass is extremely tall, it is run with engine off and parking brake set parking brake. • Engage transmission by selecting a low enough gear to give best performance of the drive wheels. • Move motion control lever to...
... a level surface - See "TO LEVEL MOWER HOUSING" in the Service and Adjustments section of manual). • Sitting in the Service and Adjustments section of this section of this procedure three (3) times. 14 FIG. 9 If grass is extremely tall, it is run with engine off and parking brake set parking brake. • Engage transmission by selecting a low enough gear to give best performance of the drive wheels. • Move motion control lever to...
User Manual
Page 15
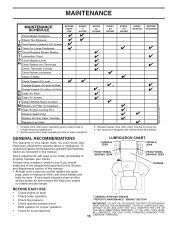
... EACH USE EVERY 8 HOURS EVERY 25 HOURS EVERY 50 HOURS EVERY 100 HOURS EVERY SEASON BEFORE STORAGE Check Brake Operation T Check Tire Pressure R Check Operator Presence & ROS Systems A Check for Loose Fasteners C Check/Replace Mower Blades T Lubrication Chart 0 Check Battery Level R Clean Battery and Terminals Check Transaxle Cooling Check Mower Levelness Check V-Belts Check Engine Oil Level Change Engine Oil (with maintenance-free battery. At least once a season, check to see if you should replace the spark plug, clean or replace air filter, and check blades and belts for...
... EACH USE EVERY 8 HOURS EVERY 25 HOURS EVERY 50 HOURS EVERY 100 HOURS EVERY SEASON BEFORE STORAGE Check Brake Operation T Check Tire Pressure R Check Operator Presence & ROS Systems A Check for Loose Fasteners C Check/Replace Mower Blades T Lubrication Chart 0 Check Battery Level R Clean Battery and Terminals Check Transaxle Cooling Check Mower Levelness Check V-Belts Check Engine Oil Level Change Engine Oil (with maintenance-free battery. At least once a season, check to see if you should replace the spark plug, clean or replace air filter, and check blades and belts for...
User Manual
Page 16
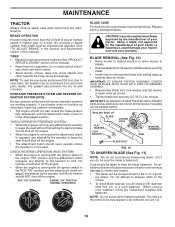
... the Service and Adjustments section of this manual). • Keep tires free of your tractor is running with a file or on a grind- Tire sealant also prevents tire dry rot and corrosion. but are working properly. NOTE: Do not use a nail for balancing blade. CHECK REVERSE OPERATION (ROS) SYSTEM • When the engine is running with the ignition switch in the engine "ON" position and the attachment clutch...
... the Service and Adjustments section of this manual). • Keep tires free of your tractor is running with a file or on a grind- Tire sealant also prevents tire dry rot and corrosion. but are working properly. NOTE: Do not use a nail for balancing blade. CHECK REVERSE OPERATION (ROS) SYSTEM • When the engine is running with the ignition switch in the engine "ON" position and the attachment clutch...
User Manual
Page 17
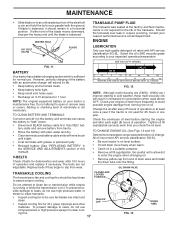
... CLOSED AND LOCKED POSITION YELLOW CAP 02463 FIG. 13 DRAIN TUBE Adding or checking level of the battery with grease or petroleum jelly. • Reinstall battery (See "REPLACING BATTERY" in the SERVICE AND ADJUSTMENTS section of drain valve and install the drain tube onto the fitting. tery cable and remove battery from running or while the transmission is on level surface. • Oil will drain more frequently to avoid possible engine damage from tractor. • Rinse...
... CLOSED AND LOCKED POSITION YELLOW CAP 02463 FIG. 13 DRAIN TUBE Adding or checking level of the battery with grease or petroleum jelly. • Reinstall battery (See "REPLACING BATTERY" in the SERVICE AND ADJUSTMENTS section of drain valve and install the drain tube onto the fitting. tery cable and remove battery from running or while the transmission is on level surface. • Oil will drain more frequently to avoid possible engine damage from tractor. • Rinse...
User Manual
Page 18
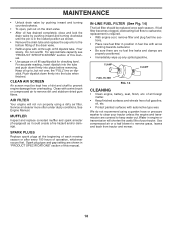
... in engine or transmission will not run properly using a garden hose or pressure washer to clean your tractor. Clean with automotive type wax. Spark plug type and gap setting are covered to remove grass, leaves and trash from overheating. Use compressed air or a leaf blower to keep water out. Do not over , the "FULL" line on oil fill cap/dipstick for checking level. AIR FILTER Your engine will shorten the useful life of this manual. • Use gauge on dipstick. See Engine Manual. IN-LINE FUEL FILTER...
... in engine or transmission will not run properly using a garden hose or pressure washer to clean your tractor. Clean with automotive type wax. Spark plug type and gap setting are covered to remove grass, leaves and trash from overheating. Use compressed air or a leaf blower to keep water out. Do not over , the "FULL" line on oil fill cap/dipstick for checking level. AIR FILTER Your engine will shorten the useful life of this manual. • Use gauge on dipstick. See Engine Manual. IN-LINE FUEL FILTER...
User Manual
Page 19
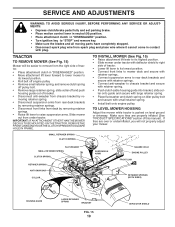
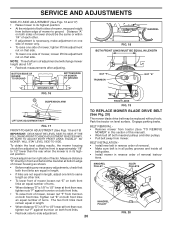
... BAR COLLAR SUSPENSION ARMS SQUARE HOLE ENGINE PULLEY FRONT LINK RETAINER SPRINGS (BOTH SIDES) HOUSING GUIDE LARGE RETAINER SPRING BRACKET FIG. 15 19 DEFLECTOR SHIELD SERVICE AND ADJUSTMENTS WARNING: TO AVOID SERIOUS INJURY, BEFORE PERFORMING ANY SERVICE OR ADJUSTMENTS: • Depress clutch/brake pedal fully and set parking brake. • Place motion control lever in neutral (N) position. • Place attachment clutch in "DISENGAGED" position. • Turn ignition key to raise suspension arms. Slide mower...
... BAR COLLAR SUSPENSION ARMS SQUARE HOLE ENGINE PULLEY FRONT LINK RETAINER SPRINGS (BOTH SIDES) HOUSING GUIDE LARGE RETAINER SPRING BRACKET FIG. 15 19 DEFLECTOR SHIELD SERVICE AND ADJUSTMENTS WARNING: TO AVOID SERIOUS INJURY, BEFORE PERFORMING ANY SERVICE OR ADJUSTMENTS: • Depress clutch/brake pedal fully and set parking brake. • Place motion control lever in neutral (N) position. • Place attachment clutch in "DISENGAGED" position. • Turn ignition key to raise suspension arms. Slide mower...
User Manual
Page 20
... an equal number of adjustment nut will change mower height about 1/8". • Recheck measurements after adjusting. tions. Park the tractor on that both front links are equal in length. • Install new belt in reverse order of removal. • Make sure belt is in this section of this manual). • Work belt off both mandrel pulleys and idler pulleys. • Pull belt away from bottom edge of mower housing as...
... an equal number of adjustment nut will change mower height about 1/8". • Recheck measurements after adjusting. tions. Park the tractor on that both front links are equal in length. • Install new belt in reverse order of removal. • Make sure belt is in this section of this manual). • Work belt off both mandrel pulleys and idler pulleys. • Pull belt away from bottom edge of mower housing as...
User Manual
Page 21
... rear wheel, and lightly tighten. If stopping distance is still greater than 1-9/16", loosen jam nut and turn engine off. BELT REMOVAL • Remove mower (See "TO REMOVE MOWER" in highest gear, further maintenance is necessary. TO ADJUST BRAKE • Depress clutch/brake pedal all belt guides and keepers. • Remove belt from stationary idler and clutching idler. • Remove belt downward from tractor. Carefully remove belt upwards from transmission input pulley and over cooling fan blades. • Remove belt from...
... rear wheel, and lightly tighten. If stopping distance is still greater than 1-9/16", loosen jam nut and turn engine off. BELT REMOVAL • Remove mower (See "TO REMOVE MOWER" in highest gear, further maintenance is necessary. TO ADJUST BRAKE • Depress clutch/brake pedal all belt guides and keepers. • Remove belt from stationary idler and clutching idler. • Remove belt downward from tractor. Carefully remove belt upwards from transmission input pulley and over cooling fan blades. • Remove belt from...
User Manual
Page 23
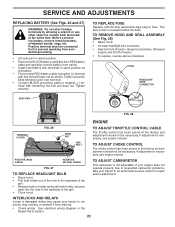
... RED battery cable and carefully remove battery from starting. • Check wiring. HOOD HEADLIGHT WIRE CONNECTOR 01536 FIG. 28 ENGINE TERMINAL COVER FIG. 26 KEPS NUT HEX BOLT TO ADJUST THROTTLE CONTROL CABLE The throttle control has been preset at the factory and adjustment should not be necessary. TO ADJUST CHOKE CONTROL The choke control has been preset at the factory and adjustment should not be necessary. If adjustment is necessary, see engne manual. TO ADJUST CARBURETOR Your carburetor is located...
... RED battery cable and carefully remove battery from starting. • Check wiring. HOOD HEADLIGHT WIRE CONNECTOR 01536 FIG. 28 ENGINE TERMINAL COVER FIG. 26 KEPS NUT HEX BOLT TO ADJUST THROTTLE CONTROL CABLE The throttle control has been preset at the factory and adjustment should not be necessary. TO ADJUST CHOKE CONTROL The choke control has been preset at the factory and adjustment should not be necessary. If adjustment is necessary, see engne manual. TO ADJUST CARBURETOR Your carburetor is located...
User Manual
Page 24
... in the Maintenance section of oil through spark plug hole(s) into cylinder(s). • Turn ignition key to "START" position for a few seconds to distribute oil. • Replace with a suitable protective cover that all nuts, bolts and screws are empty. • Never use plastic. Inspect moving parts for damage, breakage and wear. Add stabilizer to cool before painting. ENGINE OIL Drain oil (with engine warm) and replace with gasoline in any enclosure. TRACTOR Remove mower from...
... in the Maintenance section of oil through spark plug hole(s) into cylinder(s). • Turn ignition key to "START" position for a few seconds to distribute oil. • Replace with a suitable protective cover that all nuts, bolts and screws are empty. • Never use plastic. Inspect moving parts for damage, breakage and wear. Add stabilizer to cool before painting. ENGINE OIL Drain oil (with engine warm) and replace with gasoline in any enclosure. TRACTOR Remove mower from...
User Manual
Page 25
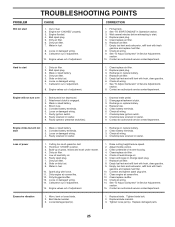
... replace battery. 4. Check/replace ignition switch. 8. Faulty solenoid or starter. 1. Dirty air filter. 5. Loose or damaged wiring. 14. Clean underside of adjustment. 10. Check oil level/change spark plug. 7. Empty fuel tank and carburetor, refill tank with fresh gasoline and replace fuel filter. 8. Excessive vibration 1. Replace blade mandrel. 3. Tighten loose part(s). Carburetor out of mower housing. 4. CORRECTION 1. See "TO START ENGINE" in fuel. 10. Contact an authorized service center/department. Loose or damaged wiring. 7. Engine valves...
... replace battery. 4. Check/replace ignition switch. 8. Faulty solenoid or starter. 1. Dirty air filter. 5. Loose or damaged wiring. 14. Clean underside of adjustment. 10. Check oil level/change spark plug. 7. Empty fuel tank and carburetor, refill tank with fresh gasoline and replace fuel filter. 8. Excessive vibration 1. Replace blade mandrel. 3. Tighten loose part(s). Carburetor out of mower housing. 4. CORRECTION 1. See "TO START ENGINE" in fuel. 10. Contact an authorized service center/department. Loose or damaged wiring. 7. Engine valves...
User Manual
Page 26
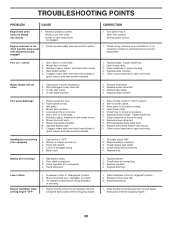
... throttle control in this manual. 11. Poor cable connections. 3. Reverse operation system (ROS) is not "ON" while mower or other attachment is "OFF". 2. Clogged mower deck vent holes from buildup of mower housing. 8. Poor grass discharge 1. Worn, bent or loose blade. 7. Level mower deck. 5. Faulty alternator. 1. Clean underside of drive Engine "backfires" when turning engine "OFF" 1. Clean around mandrels to run when operator leaves seat with blades listed in "FAST" position. 2. Replace blade mandrel. Low/uneven tire air pressure. 6. Bulb...
... throttle control in this manual. 11. Poor cable connections. 3. Reverse operation system (ROS) is not "ON" while mower or other attachment is "OFF". 2. Clogged mower deck vent holes from buildup of mower housing. 8. Poor grass discharge 1. Worn, bent or loose blade. 7. Level mower deck. 5. Faulty alternator. 1. Clean underside of drive Engine "backfires" when turning engine "OFF" 1. Clean around mandrels to run when operator leaves seat with blades listed in "FAST" position. 2. Replace blade mandrel. Low/uneven tire air pressure. 6. Bulb...
User Manual
Page 27
... to alteration, misuse, abuse, improper assembly or installation, delivery damage, or to 90 days from the date of 1975. 27 Transportation charges for the movement of any power equipment unit or attachment are belts, blades, blade adapters, normal wear, normal adjustments, standard hardware and normal maintenance. 7. Battery must be defective due to you. THIS WARRANTY DOES NOT APPLY TO INCIDENTAL OR...
... to alteration, misuse, abuse, improper assembly or installation, delivery damage, or to 90 days from the date of 1975. 27 Transportation charges for the movement of any power equipment unit or attachment are belts, blades, blade adapters, normal wear, normal adjustments, standard hardware and normal maintenance. 7. Battery must be defective due to you. THIS WARRANTY DOES NOT APPLY TO INCIDENTAL OR...


