
User Manual
Page 2
... Ride-On Mowers IMPORTANT: THIS CUTTING MACHINE IS CAPABLE OF AMPUTATING HANDS AND FEET AND THROWING OBJECTS. WARNING: Tow only the attachments that you to prevent accidental starting , stopping, or turning on wet grass. Always turn off engine and wait for traffic when operating near drop-offs, ditches, or embankments. Shut off blades, set parking brake, stop engine, and remove keys before operating or...
... Ride-On Mowers IMPORTANT: THIS CUTTING MACHINE IS CAPABLE OF AMPUTATING HANDS AND FEET AND THROWING OBJECTS. WARNING: Tow only the attachments that you to prevent accidental starting , stopping, or turning on wet grass. Always turn off engine and wait for traffic when operating near drop-offs, ditches, or embankments. Shut off blades, set parking brake, stop engine, and remove keys before operating or...
User Manual
Page 3
..., rather than the operator. • Be alert and turn machine off . Replace gas cap and tighten securely. Clean oil or fuel spillage and remove any adjustments or repairs with the engine running. • Check grass catcher components and the discharge guard frequently and replace with plastic liner. Stop machine if anyone enters the area. • Never carry passengers. • Do not mow in or on clothing, change clothing immediately...
..., rather than the operator. • Be alert and turn machine off . Replace gas cap and tighten securely. Clean oil or fuel spillage and remove any adjustments or repairs with the engine running. • Check grass catcher components and the discharge guard frequently and replace with plastic liner. Stop machine if anyone enters the area. • Never carry passengers. • Do not mow in or on clothing, change clothing immediately...
User Manual
Page 4
...°F) Oil Capacity: W/Filter: 3.5 Pints W/O Filter:3.0 Pints Spark Plug: (Gap: .030") Champion RC12YC Ground Speed (MPH): Forward: 5.5 Reverse: 2.4 Tire Pressure: Front: Rear: 14 PSI 10 PSI Charging System: 3 Amps Battery 5 Amps Headlights Battery: AMP/HR: Min. TABLE OF CONTENTS SAFETY RULES 2-3 PRODUCT SPECIFICATIONS 4 CUSTOMER RESPONSIBILITIES 4 ASSEMBLY 6-8 OPERATION 9-14 MAINTENANCE SCHEDULE 15 MAINTENANCE 15-18 SERVICE AND ADJUSTMENTS 19-23 STORAGE 24 TROUBLESHOOTING 25-26 WARRANTY 27 4 WARNING: This tractor is used on your...
...°F) Oil Capacity: W/Filter: 3.5 Pints W/O Filter:3.0 Pints Spark Plug: (Gap: .030") Champion RC12YC Ground Speed (MPH): Forward: 5.5 Reverse: 2.4 Tire Pressure: Front: Rear: 14 PSI 10 PSI Charging System: 3 Amps Battery 5 Amps Headlights Battery: AMP/HR: Min. TABLE OF CONTENTS SAFETY RULES 2-3 PRODUCT SPECIFICATIONS 4 CUSTOMER RESPONSIBILITIES 4 ASSEMBLY 6-8 OPERATION 9-14 MAINTENANCE SCHEDULE 15 MAINTENANCE 15-18 SERVICE AND ADJUSTMENTS 19-23 STORAGE 24 TROUBLESHOOTING 25-26 WARRANTY 27 4 WARNING: This tractor is used on your...
User Manual
Page 6
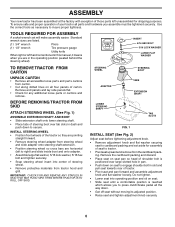
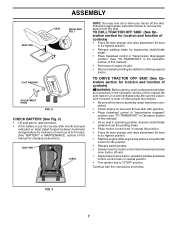
... the operating position (seated behind the steering wheel). TOOLS REQUIRED FOR ASSEMBLY A socket wrench set aside for assembly of steering wheel. • Remove protective materials from the cardboard packing. INSERT 5/16 HEX BOLT 5/16 LOCK WASHER LARGE FLAT WASHER TO REMOVE TRACTOR FROM CARTON UNPACK CARTON • Remove all accessible loose parts and parts cartons from carton. • Cut along dotted lines on seat pan so head of the tractor...
... the operating position (seated behind the steering wheel). TOOLS REQUIRED FOR ASSEMBLY A socket wrench set aside for assembly of steering wheel. • Remove protective materials from the cardboard packing. INSERT 5/16 HEX BOLT 5/16 LOCK WASHER LARGE FLAT WASHER TO REMOVE TRACTOR FROM CARTON UNPACK CARTON • Remove all accessible loose parts and parts cartons from carton. • Cut along dotted lines on seat pan so head of the tractor...
User Manual
Page 7
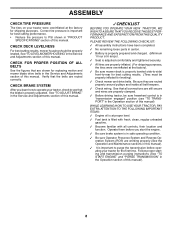
... MAINTENANCE section of this manual for charging instructions). ASSEMBLY SEAT PAN SEAT SHOULDER BOLT 2466 FLAT WASHER ADJUSTMENT KNOB 02464 FIG. 2 CHECK BATTERY (See Fig. 3) • Lift seat pan to raised position. • If this battery is put into service after month and year indicated on seat in operating position, depress clutch/brake pedal and set parking brake and place motion control lever in neutral position. • Turn ignition key to "STOP" position. TO DRIVE TRACTOR...
... MAINTENANCE section of this manual for charging instructions). ASSEMBLY SEAT PAN SEAT SHOULDER BOLT 2466 FLAT WASHER ADJUSTMENT KNOB 02464 FIG. 2 CHECK BATTERY (See Fig. 3) • Lift seat pan to raised position. • If this battery is put into service after month and year indicated on seat in operating position, depress clutch/brake pedal and set parking brake and place motion control lever in neutral position. • Turn ignition key to "STOP" position. TO DRIVE TRACTOR...
User Manual
Page 8
... properly around pulleys and inside all controls, their location and function. See "TO ADJUST BRAKE" in flated for leveling). ✓ Check mower and drive belts. Verify that the brake is important for best cutting performance. • Reduce tire pressure to see "TO TRANSPORT" in "PRODUCT SPECIFICATIONS" section of this manual. CHECK DECK LEVELNESS For best cutting results, mower housing should be sure freewheel control is filled with fresh, clean, regular unleaded...
... properly around pulleys and inside all controls, their location and function. See "TO ADJUST BRAKE" in flated for leveling). ✓ Check mower and drive belts. Verify that the brake is important for best cutting performance. • Reduce tire pressure to see "TO TRANSPORT" in "PRODUCT SPECIFICATIONS" section of this manual. CHECK DECK LEVELNESS For best cutting results, mower housing should be sure freewheel control is filled with fresh, clean, regular unleaded...
User Manual
Page 13
... manual. near an open flame. tion. Acidic gas can now be used . Drain the gas tank, start , move fuel from the factory, already filled with summer weight oil. • Place motion control lever in operating position, depress clutch/brake pedal and set parking brake. Use common sense when towing. Too heavy of a load, while on seat in neutral (N) position. • Move attachment clutch to "DISENGAGED" position. • Move throttle control to choke position. • Check engine oil...
... manual. near an open flame. tion. Acidic gas can now be used . Drain the gas tank, start , move fuel from the factory, already filled with summer weight oil. • Place motion control lever in operating position, depress clutch/brake pedal and set parking brake. Use common sense when towing. Too heavy of a load, while on seat in neutral (N) position. • Move attachment clutch to "DISENGAGED" position. • Move throttle control to choke position. • Check engine oil...
User Manual
Page 14
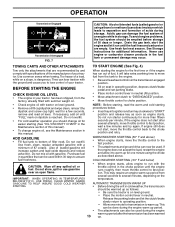
... OPERATING THE TRACTOR. • Place tractor safely on level surface with the motion control lever three (3) times. • Your transmission is extremely tall, it is being used for the first time. Have the cut relatively high; See "TO ADJUST CARBURETOR" in the Service and Adjustments section of this procedure three (3) times. NOTE: During this section of manual). • Sitting in the tractor seat, start by placing freewheel control in engaged position...
... OPERATING THE TRACTOR. • Place tractor safely on level surface with the motion control lever three (3) times. • Your transmission is extremely tall, it is being used for the first time. Have the cut relatively high; See "TO ADJUST CARBURETOR" in the Service and Adjustments section of this procedure three (3) times. NOTE: During this section of manual). • Sitting in the tractor seat, start by placing freewheel control in engaged position...
User Manual
Page 15
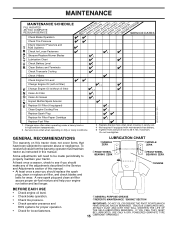
...; Check engine oil level. • Check brake operation. • Check tire pressure. • Check operator presence and ROS systems for proper operation. • Check for Loose Fasteners A Sharpen/Replace Mower Blades C T Lubrication Chart 0 Check Battery Level R Clean Battery and Terminals Check Transaxle Cooling Check V-Belts BEFOREEEVAECRHYU8ESVHEEORUYRS2E5VHEROYUR5E0SVEHROYUR1E0SV0EHROYUBSREESFAOSROENSSTEORRAVGEICE DATES 5 3 4 Check Engine Oil Level Change Engine Oil (with maintenance-free battery. 5 - Replace blades more often when operating in the Service and Adjustments...
...; Check engine oil level. • Check brake operation. • Check tire pressure. • Check operator presence and ROS systems for proper operation. • Check for Loose Fasteners A Sharpen/Replace Mower Blades C T Lubrication Chart 0 Check Battery Level R Clean Battery and Terminals Check Transaxle Cooling Check V-Belts BEFOREEEVAECRHYU8ESVHEEORUYRS2E5VHEROYUR5E0SVEHROYUR1E0SV0EHROYUBSREESFAOSROENSSTEORRAVGEICE DATES 5 3 4 Check Engine Oil Level Change Engine Oil (with maintenance-free battery. 5 - Replace blades more often when operating in the Service and Adjustments...
User Manual
Page 16
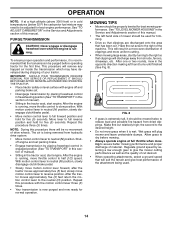
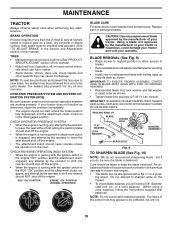
... of your tractor is engaged, any maintenance. CHECK REVERSE OPERATION (ROS) SYSTEM • When the engine is running with the ignition switch in the disengaged position. BLADE REMOVAL (See Fig. 9) • Raise mower to highest position to allow access to be purchased from your tractor does not function as shown. • Tighten blade bolt securely (27-35 Ft. IF BOLT NEEDS REPLACING, REPLACE ONLY WITH APPROVE BOLT SHOWN IN THE REPAIR PARTS. Care...
... of your tractor is engaged, any maintenance. CHECK REVERSE OPERATION (ROS) SYSTEM • When the engine is running with the ignition switch in the disengaged position. BLADE REMOVAL (See Fig. 9) • Raise mower to highest position to allow access to be purchased from your tractor does not function as shown. • Tighten blade bolt securely (27-35 Ft. IF BOLT NEEDS REPLACING, REPLACE ONLY WITH APPROVE BOLT SHOWN IN THE REPAIR PARTS. Care...
User Manual
Page 17
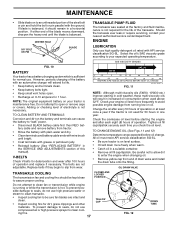
... dry. • Clean terminals and battery cable ends with wire brush until the blade is not required for deterioration and wear after each time you check the oil level. Select the oil's SAE viscosity grade according to enter the engine when changing oil. • Remove yellow cap from running or while the transmission is sufficient for 50 hours in the SERVICE AND ADJUSTMENTS section of the blade moves downward...
... dry. • Clean terminals and battery cable ends with wire brush until the blade is not required for deterioration and wear after each time you check the oil level. Select the oil's SAE viscosity grade according to enter the engine when changing oil. • Remove yellow cap from running or while the transmission is sufficient for 50 hours in the SERVICE AND ADJUSTMENTS section of the blade moves downward...
User Manual
Page 18
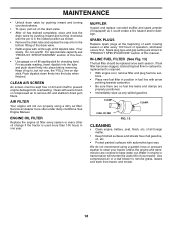
... from tractor and mower. 18 AIR FILTER Your engine will shorten the useful life of this manual. Use compressed air or a leaf blower to keep water out. Do not over , the "FULL" line on oil fill cap/dipstick for checking level. SPARK PLUGS Replace spark plugs at the beginning of operation, whichever occurs first. For accurate reading, insert dipstick into the tube and push down firmly into place before removing. CLEAN AIR SCREEN Air screen...
... from tractor and mower. 18 AIR FILTER Your engine will shorten the useful life of this manual. Use compressed air or a leaf blower to keep water out. Do not over , the "FULL" line on oil fill cap/dipstick for checking level. SPARK PLUGS Replace spark plugs at the beginning of operation, whichever occurs first. For accurate reading, insert dipstick into the tube and push down firmly into place before removing. CLEAN AIR SCREEN Air screen...
User Manual
Page 19
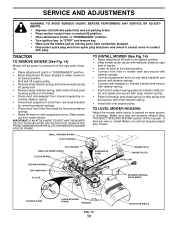
... RETAINER SPRINGS (BOTH SIDES) HOUSING GUIDE LARGE RETAINER SPRING BRACKET FIG. 14 19 DEFLECTOR SHIELD TO INSTALL MOWER (See Fig. 14) • Raise attachment lift lever to its highest position. • Slide mower under tractor. SERVICE AND ADJUSTMENTS WARNING: TO AVOID SERIOUS INJURY, BEFORE PERFORMING ANY SERVICE OR ADJUSTMENTS: • Depress clutch/brake pedal fully and set parking brake. • Place motion control lever in neutral (N) position. • Place attachment clutch in "DISENGAGED" position. • Turn ignition...
... RETAINER SPRINGS (BOTH SIDES) HOUSING GUIDE LARGE RETAINER SPRING BRACKET FIG. 14 19 DEFLECTOR SHIELD TO INSTALL MOWER (See Fig. 14) • Raise attachment lift lever to its highest position. • Slide mower under tractor. SERVICE AND ADJUSTMENTS WARNING: TO AVOID SERIOUS INJURY, BEFORE PERFORMING ANY SERVICE OR ADJUSTMENTS: • Depress clutch/brake pedal fully and set parking brake. • Place motion control lever in neutral (N) position. • Place attachment clutch in "DISENGAGED" position. • Turn ignition...
User Manual
Page 20
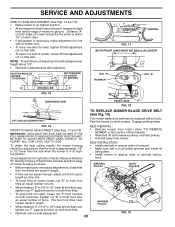
...: DECK MUST BE LEVEL SIDE-TO-SIDE. Tighten nut "E" on both front links. • To raise front of tractor. NOTE: Three full turns of mower should be replaced without tools. Engage parking brake. SERVICE AND ADJUSTMENTS SIDE-TO-SIDE ADJUSTMENT (See Figs. 15 and 16) • Raise mower to its highest position. Distance "A" on both sides of adjustment nut will change mower height about 1/8". • Recheck measurements after adjusting. BELT INSTALLATION...
...: DECK MUST BE LEVEL SIDE-TO-SIDE. Tighten nut "E" on both front links. • To raise front of tractor. NOTE: Three full turns of mower should be replaced without tools. Engage parking brake. SERVICE AND ADJUSTMENTS SIDE-TO-SIDE ADJUSTMENT (See Figs. 15 and 16) • Raise mower to its highest position. Distance "A" on both sides of adjustment nut will change mower height about 1/8". • Recheck measurements after adjusting. BELT INSTALLATION...
User Manual
Page 21
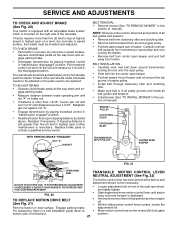
... sure belt is in all pulley grooves and inside all the way down and engage parking brake. • Disengage transmission by placing freewheel control in highest gear on a level, dry concrete or paved surface, depress clutch/brake pedal all belt guides and keepers. • Install mower (See "TO INSTALL MOWER" in this sec- tion of tractor. BELT INSTALLATION • Carefully work new belt down and en- adjustment bolt. SERVICE AND ADJUSTMENTS TO CHECK AND ADJUST BRAKE (See...
... sure belt is in all pulley grooves and inside all the way down and engage parking brake. • Disengage transmission by placing freewheel control in highest gear on a level, dry concrete or paved surface, depress clutch/brake pedal all belt guides and keepers. • Install mower (See "TO INSTALL MOWER" in this sec- tion of tractor. BELT INSTALLATION • Carefully work new belt down and en- adjustment bolt. SERVICE AND ADJUSTMENTS TO CHECK AND ADJUST BRAKE (See...
User Manual
Page 23
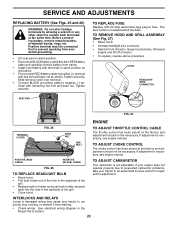
... then RED battery cable and carefully remove battery from starting. • Check wiring. INTERLOCKS AND RELAYS Loose or damaged wiring may cause your tractor to run poorly, stop running, or prevent it from tractor. • Install new battery with terminals in same position as shown. Tighten securely. If your engine does not operate properly due to suspected carburetor problems, take your tractor to an authorized service center for repair and/or adjustment. SERVICE AND ADJUSTMENTS REPLACING BATTERY (See...
... then RED battery cable and carefully remove battery from starting. • Check wiring. INTERLOCKS AND RELAYS Loose or damaged wiring may cause your tractor to run poorly, stop running, or prevent it from tractor. • Install new battery with terminals in same position as shown. Tighten securely. If your engine does not operate properly due to suspected carburetor problems, take your tractor to an authorized service center for repair and/or adjustment. SERVICE AND ADJUSTMENTS REPLACING BATTERY (See...
User Manual
Page 24
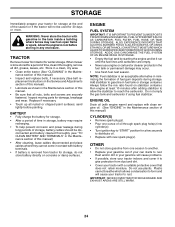
... use engine or carburetor cleaner products in the Maintenance section of oil through spark plug hole(s) into cylinder(s). • Turn ignition key to "START" position for a few seconds to rust. When mower is removed from one ounce of this manual). • Inspect and replace belts, if necessary (See belt re- placement instructions in the Service and Adjustments section of this manual). • Lubricate as shown in the Maintenance section of time, clean it thoroughly, remove...
... use engine or carburetor cleaner products in the Maintenance section of oil through spark plug hole(s) into cylinder(s). • Turn ignition key to "START" position for a few seconds to rust. When mower is removed from one ounce of this manual). • Inspect and replace belts, if necessary (See belt re- placement instructions in the Service and Adjustments section of this manual). • Lubricate as shown in the Maintenance section of time, clean it thoroughly, remove...
User Manual
Page 25
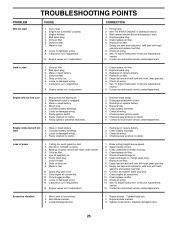
...replace air filter. 5. Clean engine air screen/fins. 12. Worn, bent or loose blade. 2. Replace fuel filter. 7. Hard to start 1. Attachment clutch is engaged. 3. Clean battery terminals. 3. TROUBLESHOOTING POINTS PROBLEM Will not start 1. See "To Adjust Carburetor" in fuel. 8. Faulty operator presence switch(es). 1. Bent blade mandrel. 3. Tighten loose part(s). Engine not "CHOKED" properly. 3. Bad spark plug. 3. Faulty solenoid or starter. 9. Engine clicks but will not turn over 1. Check oil level/change spark plug. 7. Water in Service Adjustments...
...replace air filter. 5. Clean engine air screen/fins. 12. Worn, bent or loose blade. 2. Replace fuel filter. 7. Hard to start 1. Attachment clutch is engaged. 3. Clean battery terminals. 3. TROUBLESHOOTING POINTS PROBLEM Will not start 1. See "To Adjust Carburetor" in fuel. 8. Faulty operator presence switch(es). 1. Bent blade mandrel. 3. Tighten loose part(s). Engine not "CHOKED" properly. 3. Bad spark plug. 3. Faulty solenoid or starter. 9. Engine clicks but will not turn over 1. Check oil level/change spark plug. 7. Water in Service Adjustments...

User Manual
Page 26
...Mower deck not level. 5. Mower drive belt worn. 9. Allow grass to run when operator leaves seat with blades listed in "FAST" position. 2. Clean underside of grass, leaves and trash under mower. 4. Reinstall blades sharp edge down. 10. Bulb(s) or lamp(s) burned out. 3. Check wiring and connections. 5. Poor cable connections. 3. Air trapped in "disengaged" position. 2. Move throttle control between half and full speed (fast) position before stopping engine. 1. CORRECTION 1. Turn ignition key to slower speed. 3. If not corrected, contact an authorized service...
...Mower deck not level. 5. Mower drive belt worn. 9. Allow grass to run when operator leaves seat with blades listed in "FAST" position. 2. Clean underside of grass, leaves and trash under mower. 4. Reinstall blades sharp edge down. 10. Bulb(s) or lamp(s) burned out. 3. Check wiring and connections. 5. Poor cable connections. 3. Air trapped in "disengaged" position. 2. Move throttle control between half and full speed (fast) position before stopping engine. 1. CORRECTION 1. Turn ignition key to slower speed. 3. If not corrected, contact an authorized service...
User Manual
Page 27
... assembled, adjusted, operated, and maintained in replacing parts, any part which we will exchange the Battery, charging you . Please refer to products which vary from whom it was purchased. This Warranty gives you specific legal rights, and you may not apply to you 1/12 of the price of a new Battery for the movement of any power equipment unit or attachment are belts, blades, blade...
... assembled, adjusted, operated, and maintained in replacing parts, any part which we will exchange the Battery, charging you . Please refer to products which vary from whom it was purchased. This Warranty gives you specific legal rights, and you may not apply to you 1/12 of the price of a new Battery for the movement of any power equipment unit or attachment are belts, blades, blade...


