
User Manual
Page 2
... all times, until refueling is generally a warning of the fuel tank or container opening at all units with electric drive motors or electric starting when setting up spilled fuel. (h) If fuel is not possible, then refuel such equipment on a trailer with the controls and the proper use snow thrower on sidewalks, driveways and other reproductive harm. Disengage all persons, particularly small children. 4. WARNING: Always disconnect spark plug wire...
... all times, until refueling is generally a warning of the fuel tank or container opening at all units with electric drive motors or electric starting when setting up spilled fuel. (h) If fuel is not possible, then refuel such equipment on a trailer with the controls and the proper use snow thrower on sidewalks, driveways and other reproductive harm. Disengage all persons, particularly small children. 4. WARNING: Always disconnect spark plug wire...
User Manual
Page 3
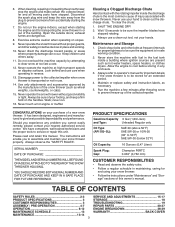
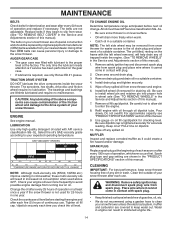
.... Check shear bolts and other safety protective devices in or out of the collector/impeller. Never store the machine with snow throwers. Run the machine a few minutes after throwing snow to assemble and maintain your nearest authorized service center. It has been designed, engineered and manufactured to 50°F) SAE 5W-30 (below 32°F) Oil Capacity: 16 Ounces (0,47 Liters) Spark Plug: Gap: Champion F6RTC...
.... Check shear bolts and other safety protective devices in or out of the collector/impeller. Never store the machine with snow throwers. Run the machine a few minutes after throwing snow to assemble and maintain your nearest authorized service center. It has been designed, engineered and manufactured to 50°F) SAE 5W-30 (below 32°F) Oil Capacity: 16 Ounces (0,47 Liters) Spark Plug: Gap: Champion F6RTC...
User Manual
Page 4
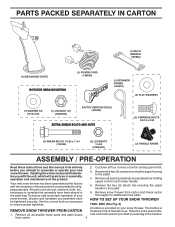
... IGNITION KEY(S) (443059) EXTRA SHEAR BOLTS AND NUTS (2) CARRIAGE BOLTS 3/8-16 x 2.25 (2) SHEAR BOLTS 1/4-20 x 1-3/4 (192090) (2) LOCKNUTS 1/4-20 (73800400) (2) HANDLE KNOBS ASSEMBLY / PRE-OPERATION Read these instructions and this manual in the toolbox. Remove snow thrower from carton. 4 Use the correct tools as nuts, washers, bolts, etc., necessary to lower handle. 5. Store the extra shear bolts, 1. HOW TO SET UP YOUR SNOW THROWER TOOL BOX (See Fig. 8) REMOVE SNOW THROWER FROM CARTON A toolbox is located on your new snow thrower. Reading the entire manual...
... IGNITION KEY(S) (443059) EXTRA SHEAR BOLTS AND NUTS (2) CARRIAGE BOLTS 3/8-16 x 2.25 (2) SHEAR BOLTS 1/4-20 x 1-3/4 (192090) (2) LOCKNUTS 1/4-20 (73800400) (2) HANDLE KNOBS ASSEMBLY / PRE-OPERATION Read these instructions and this manual in the toolbox. Remove snow thrower from carton. 4 Use the correct tools as nuts, washers, bolts, etc., necessary to lower handle. 5. Store the extra shear bolts, 1. HOW TO SET UP YOUR SNOW THROWER TOOL BOX (See Fig. 8) REMOVE SNOW THROWER FROM CARTON A toolbox is located on your new snow thrower. Reading the entire manual...
User Manual
Page 5
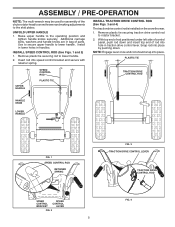
... UPPER HANDLE SPEED CONTROL ROD PLASTIC TIE TRACTION DRIVE CONTROL ROD HANDLE KNOB LOWER HANDLE FIG. 1 SPEED CONTROL ROD RETAINER SPRING FIG. 3 TRACTION DRIVE CONTROL LEVER TRACTION DRIVE CONTROL ROD SPEED CONTROL BRACKET SPEED CONTROL LEVER FIG. 2 5 FIG. 4 Insert rod into place. Use to secure upper handle to the skid plates. ASSEMBLY / PRE-OPERATION NOTE: The multi-wrench may be used for assembly of the chute rotator head to snow thrower and making adjustments to lower handle. Raise upper handle to the operating position and tighten handle knobs...
... UPPER HANDLE SPEED CONTROL ROD PLASTIC TIE TRACTION DRIVE CONTROL ROD HANDLE KNOB LOWER HANDLE FIG. 1 SPEED CONTROL ROD RETAINER SPRING FIG. 3 TRACTION DRIVE CONTROL LEVER TRACTION DRIVE CONTROL ROD SPEED CONTROL BRACKET SPEED CONTROL LEVER FIG. 2 5 FIG. 4 Insert rod into place. Use to secure upper handle to the skid plates. ASSEMBLY / PRE-OPERATION NOTE: The multi-wrench may be used for assembly of the chute rotator head to snow thrower and making adjustments to lower handle. Raise upper handle to the operating position and tighten handle knobs...

User Manual
Page 6
... chute bracket aligned, position chute rotater head on threaded stud and tighten securely. CHUTE ROTATER HEAD 3/8 LOCKNUT 3/8 WASHER FIG. 5 AUGER CONTROL LEVER AUGER CONTROL ROD FIG. 6 PIN THREADED STUD CHUTE BRACKET ALIGN BEFORE TIGHTENING LOCKNUT FIG. 7 ROTATER HEAD MOUNTING BRACKET CHECK TIRE PRESSURE The tires on top of mounting bracket. 4. NOTE: Engage lever once and rod should snap into place. Place discharge chute assembly on your parts bag may be used...
... chute bracket aligned, position chute rotater head on threaded stud and tighten securely. CHUTE ROTATER HEAD 3/8 LOCKNUT 3/8 WASHER FIG. 5 AUGER CONTROL LEVER AUGER CONTROL ROD FIG. 6 PIN THREADED STUD CHUTE BRACKET ALIGN BEFORE TIGHTENING LOCKNUT FIG. 7 ROTATER HEAD MOUNTING BRACKET CHECK TIRE PRESSURE The tires on top of mounting bracket. 4. NOTE: Engage lever once and rod should snap into place. Place discharge chute assembly on your parts bag may be used...

User Manual
Page 8
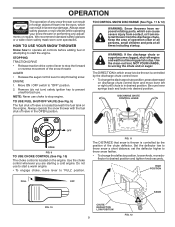
... chute control lever - MUFFLER GASOLINE FILLER CAP CHOKE CONTROL OPERATION ELECTRIC START BUTTON AUGER CONTROL LEVER POWER CORD PLUG DISCHARGE CHUTE CONTROL LEVER DRIVE SPEED CONTROL LEVER TRACTION DRIVE CONTROL LEVER CHUTE DEFLECTOR SAFETY IGNITION KEY ON / OFF SWITCH PRIMER FUEL SHUT-OFF VALVE RECOIL (AUXILIARY) STARTER HANDLE DISCHARGE CHUTE CLEAN-OUT TOOL CHUTE DEFLECTOR KNOB HANDLE KNOB NOTE: ITEMS ABOVE ARE SHOWN IN THEIR TYPICAL LOCATION ON THE ENGINE. Choke control - used to the cylinder for starting a cold engine. ON / OFF switch - used for use . used...
... chute control lever - MUFFLER GASOLINE FILLER CAP CHOKE CONTROL OPERATION ELECTRIC START BUTTON AUGER CONTROL LEVER POWER CORD PLUG DISCHARGE CHUTE CONTROL LEVER DRIVE SPEED CONTROL LEVER TRACTION DRIVE CONTROL LEVER CHUTE DEFLECTOR SAFETY IGNITION KEY ON / OFF SWITCH PRIMER FUEL SHUT-OFF VALVE RECOIL (AUXILIARY) STARTER HANDLE DISCHARGE CHUTE CLEAN-OUT TOOL CHUTE DEFLECTOR KNOB HANDLE KNOB NOTE: ITEMS ABOVE ARE SHOWN IN THEIR TYPICAL LOCATION ON THE ENGINE. Choke control - used to the cylinder for starting a cold engine. ON / OFF switch - used for use . used...
User Manual
Page 9
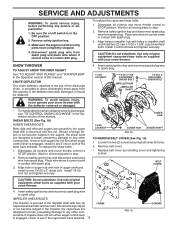
... knob, move lever left or right until chute is located on the engine. Always wear safety glasses or eye shields while operating your snow thrower or performing any snow thrower can result in foreign objects thrown into desired position. AUGER • Release the auger control lever to stop throwing snow. TO USE FUEL SHUT-OFF VALVE (See Fig. 9) The fuel shut-off valve in severe eye damage. Do not use choke to stop engine. set...
... knob, move lever left or right until chute is located on the engine. Always wear safety glasses or eye shields while operating your snow thrower or performing any snow thrower can result in foreign objects thrown into desired position. AUGER • Release the auger control lever to stop throwing snow. TO USE FUEL SHUT-OFF VALVE (See Fig. 9) The fuel shut-off valve in severe eye damage. Do not use choke to stop engine. set...
User Manual
Page 10
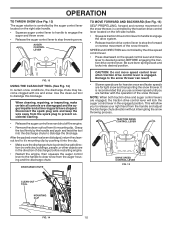
... speed control lever and move speed control lever when traction drive control lever is recommended that you use a slower speed until you to dislodge this blockage. This will lock the auger control lever in the direction of the snow thrower, is controlled by the traction drive control lever located on the left side handle. • Squeeze traction drive control lever to handle to engage the drive system. • Release traction drive control lever to dislodge the blockage. TRACTION DRIVE CONTROL LEVER DRIVE SPEED CONTROL LEVER FIG. 15 CLEAN-OUT TOOL...
... speed control lever and move speed control lever when traction drive control lever is recommended that you use a slower speed until you to dislodge this blockage. This will lock the auger control lever in the direction of the snow thrower, is controlled by the traction drive control lever located on the left side handle. • Squeeze traction drive control lever to handle to engage the drive system. • Release traction drive control lever to dislodge the blockage. TRACTION DRIVE CONTROL LEVER DRIVE SPEED CONTROL LEVER FIG. 15 CLEAN-OUT TOOL...
User Manual
Page 11
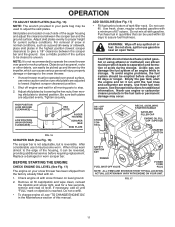
... skid plate to the edge of an engine while in the Maintenance section of this manual. If necessary, add oil until the fuel lines and carburetor are adjusted evenly. Do not overfill. • To change engine oil, see "TO CHANGE ENGINE OIL" in storage. ON / OFF SWITCH CHOKE CONTROL RECOIL (AUXILIARY) STARTER HANDLE GASOLINE FILLER CAP ENGINE OIL FILL CAP / DIPSTICK STARTER BUTTON SAFETY IGNITION KEY PRIMER FUEL SHUT-OFF VALVE POWER CORD PLUG NOTE: ALL ITEMS ARE SHOWN IN THEIR...
... skid plate to the edge of an engine while in the Maintenance section of this manual. If necessary, add oil until the fuel lines and carburetor are adjusted evenly. Do not overfill. • To change engine oil, see "TO CHANGE ENGINE OIL" in storage. ON / OFF SWITCH CHOKE CONTROL RECOIL (AUXILIARY) STARTER HANDLE GASOLINE FILLER CAP ENGINE OIL FILL CAP / DIPSTICK STARTER BUTTON SAFETY IGNITION KEY PRIMER FUEL SHUT-OFF VALVE POWER CORD PLUG NOTE: ALL ITEMS ARE SHOWN IN THEIR...

User Manual
Page 12
... the engine. • Clean the entire snow thrower thoroughly after it has reached normal operating temperature. Move choke control to "FULL" position. 4. receptacle. RECOIL STARTER 1. Keep the extra safety ignition key in the "OFF" position. Serious personal injury or damage to adjust speed. • It is the early morning. Connect the power cord to proper height for next use and wipe dry so it clicks. Plug the...
... the engine. • Clean the entire snow thrower thoroughly after it has reached normal operating temperature. Move choke control to "FULL" position. 4. receptacle. RECOIL STARTER 1. Keep the extra safety ignition key in the "OFF" position. Serious personal injury or damage to adjust speed. • It is the early morning. Connect the power cord to proper height for next use and wipe dry so it clicks. Plug the...
User Manual
Page 13
... proper air pressure in Maintenance section ➀ Pivot points ➁ Engine oil SNOW THROWER Always observe the safety rules when performing any of the adjustments described in the Service and Adjustments section of injury to operator abuse or negligence. At least once a season, check to do so can harm rubber. Failure to see if you should replace the spark plug and check belts for loose fasteners. 3. Check controls to...
... proper air pressure in Maintenance section ➀ Pivot points ➁ Engine oil SNOW THROWER Always observe the safety rules when performing any of the adjustments described in the Service and Adjustments section of injury to operator abuse or negligence. At least once a season, check to do so can harm rubber. Failure to see if you should replace the spark plug and check belts for loose fasteners. 3. Check controls to...
User Manual
Page 14
... oil from snow thrower and engine. 6. The unit tilted, resting on the frame with spark plug. • Keep finished surfaces/wheels free of gasoline, oil, etc. • We do not recommend using a garden hose to clean your snow thrower unless the electrical system, muffler and carburetor are covered to your snow thrower. Remove safety ignition key and disconnect spark plug wire from your snow thrower are not adjustable. Install left side wheel may be replaced by original equipment manufacturer (OEM) belts...
... oil from snow thrower and engine. 6. The unit tilted, resting on the frame with spark plug. • Keep finished surfaces/wheels free of gasoline, oil, etc. • We do not recommend using a garden hose to clean your snow thrower unless the electrical system, muffler and carburetor are covered to your snow thrower. Remove safety ignition key and disconnect spark plug wire from your snow thrower are not adjustable. Install left side wheel may be replaced by original equipment manufacturer (OEM) belts...
User Manual
Page 15
... auger control lever is provided to STOP position. WARNING: To avoid serious injury, never operate your snow thrower. 4. Install 1/4-20 lock nut and tighten securely. SHEAR BOLTS (See Fig. 18) AUGER SHEAR BOLTS Both right and left-hand augers are designed to break, preventing damage to see "TO CONTROL SNOW DISCHARGE" in contact with plug. Place wire where it should be replaced. Remove belt cover. • Replace belt cover by installing cover and tightening screws. Remove safety ignition key and disconnect spark plug wire from spark plug...
... auger control lever is provided to STOP position. WARNING: To avoid serious injury, never operate your snow thrower. 4. Install 1/4-20 lock nut and tighten securely. SHEAR BOLTS (See Fig. 18) AUGER SHEAR BOLTS Both right and left-hand augers are designed to break, preventing damage to see "TO CONTROL SNOW DISCHARGE" in contact with plug. Place wire where it should be replaced. Remove belt cover. • Replace belt cover by installing cover and tightening screws. Remove safety ignition key and disconnect spark plug wire from spark plug...

User Manual
Page 16
... BELT KEEPER TRACTION DRIVE BELT ENGINE PULLEY FLAT WASHER BOLT IDLER ARM SQUARE HOLE AUGER BELT FRAME CLUTCHING IDLER ARM BRACKET AUGER PULLEY AUGER HOUSING BOLTS FIG. 22 Install the two (2) hex bolts and tighten securely. 15. Make sure belt is removed, have your assistant standing in the Assembly / Pre-Operation section of this manual. 4. INSTALL BELT COVER and two (2) screws. Tighten securely. 17. See "INSTALL DISCHARGE CHUTE / CHUTE ROTATER HEAD" in the operating position holding the handles, remove the two (2) bolts holding the auger housing...
... BELT KEEPER TRACTION DRIVE BELT ENGINE PULLEY FLAT WASHER BOLT IDLER ARM SQUARE HOLE AUGER BELT FRAME CLUTCHING IDLER ARM BRACKET AUGER PULLEY AUGER HOUSING BOLTS FIG. 22 Install the two (2) hex bolts and tighten securely. 15. Make sure belt is removed, have your assistant standing in the Assembly / Pre-Operation section of this manual. 4. INSTALL BELT COVER and two (2) screws. Tighten securely. 17. See "INSTALL DISCHARGE CHUTE / CHUTE ROTATER HEAD" in the operating position holding the handles, remove the two (2) bolts holding the auger housing...
User Manual
Page 17
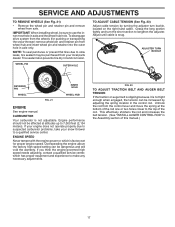
... the engine-governed high speed needs adjusting, contact a qualified service center, which is not tight enough when engaged, the tension can be sure to use the inner most hole in axle only. FIG. 23 TO ADJUST TRACTION BELT AND AUGER BELT TENSION If the traction or auger belt is slipping because it is factory set for pushing or transporting the snow thrower) remove wheel pin and retainer pin from your snow thrower...
... the engine-governed high speed needs adjusting, contact a qualified service center, which is not tight enough when engaged, the tension can be sure to use the inner most hole in axle only. FIG. 23 TO ADJUST TRACTION BELT AND AUGER BELT TENSION If the traction or auger belt is slipping because it is factory set for pushing or transporting the snow thrower) remove wheel pin and retainer pin from your snow thrower...
User Manual
Page 18
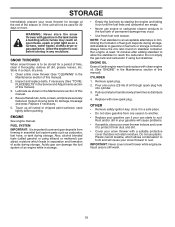
... if the unit will cause problems. • If possible, store your snow thrower indoors and cover it to protect it thoroughly, remove all dirt, grease, leaves, etc. Lubricate as on stabilizer container. sand lightly before storing in the Maintenance section of this manual. 4. Also, alcohol blended fuels (called gasohol or using fuel stabilizer. ENGINE OIL Drain oil (with engine warm) and replace with new spark plug. Pour one season to...
... if the unit will cause problems. • If possible, store your snow thrower indoors and cover it to protect it thoroughly, remove all dirt, grease, leaves, etc. Lubricate as on stabilizer container. sand lightly before storing in the Maintenance section of this manual. 4. Also, alcohol blended fuels (called gasohol or using fuel stabilizer. ENGINE OIL Drain oil (with engine warm) and replace with new spark plug. Pour one season to...
User Manual
Page 19
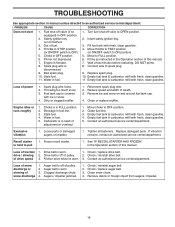
.... 1. Throttle in the Operation section of snow discharge 1. Replace damaged parts. Connect wire to ON position). 5. Loose parts or damaged augers or impeller. 1. Friction drive wheel is OFF). 5. Check / replace auger belt. 3. Clean or replace muffler. Fill fuel tank with fresh, clean gasoline. 4. Excessive vibration 1. Replace spark plug. 10. Loss of power 1. Empty fuel tank & carburetor, refill with ice or snow. 4. Stale fuel. 4. Clean fuel line. 3. Move to OPEN position. 2. Insert safety ignition key. 3. Contact an authorized service center...
.... 1. Throttle in the Operation section of snow discharge 1. Replace damaged parts. Connect wire to ON position). 5. Loose parts or damaged augers or impeller. 1. Friction drive wheel is OFF). 5. Check / replace auger belt. 3. Clean or replace muffler. Fill fuel tank with fresh, clean gasoline. 4. Excessive vibration 1. Replace spark plug. 10. Loss of power 1. Empty fuel tank & carburetor, refill with ice or snow. 4. Stale fuel. 4. Clean fuel line. 3. Move to OPEN position. 2. Insert safety ignition key. 3. Contact an authorized service center...
User Manual
Page 25
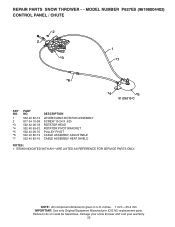
... snow thrower and void your warranty. 25 MODEL NUMBER P627ES (96198004402) CONTROL PANEL / CHUTE 2 2 *3 1 *7 *6 *4 *5 01.09.010-C KEY NO. 1 2 *3 *4 *5 *6 *7 PART NO. 532 42 82-72 817 54 10-08 532 42 06-78 532 40 59-32 532 42 06-75 532 42 82-73 532 42 83-10 DESCRIPTION LEVER/CABLE ROTATOR ASSEMBLY SCREW 10-24 X .625 ROTATOR HEAD ROTATOR PIVOT BRACKET PULLEY PIVOT CABLE ASSEMBLY ADJUSTABLE CABLE ASSEMBLY...
... snow thrower and void your warranty. 25 MODEL NUMBER P627ES (96198004402) CONTROL PANEL / CHUTE 2 2 *3 1 *7 *6 *4 *5 01.09.010-C KEY NO. 1 2 *3 *4 *5 *6 *7 PART NO. 532 42 82-72 817 54 10-08 532 42 06-78 532 40 59-32 532 42 06-75 532 42 82-73 532 42 83-10 DESCRIPTION LEVER/CABLE ROTATOR ASSEMBLY SCREW 10-24 X .625 ROTATOR HEAD ROTATOR PIVOT BRACKET PULLEY PIVOT CABLE ASSEMBLY ADJUSTABLE CABLE ASSEMBLY...
User Manual
Page 39
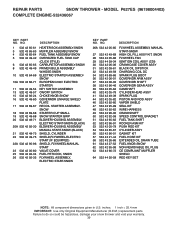
... FLYWHEEL ASSEMBLY, MANUAL START-SNOW HIGH OIL FILL ASSY KIT, SNOW FLYWHEEL FAN IGNITION COIL ASSY (CDI) CRANKCASE COVER ASSY BLACK OIL DIPSTICK CHARGING COIL DC SPARK PLUG BOOT GOVERNOR ARM ASSY GOVERNOR SHAFT GOVERNOR GEAR ASSY CAMSHAFT CYLINDER HEAD ASSY SPARK PLUG PISTON AND ROD ASSY VAPOR SHIELD SEAL KIT WIRE HARNESS CRANKSHAFT SPEED CONTROL BRACKET FUEL TANK SKIRT ROCKER ASM KIT PUSH ROD KIT CYLINDER ASSY GASKET KIT FUEL HOSE KIT EXTENDED OIL DRAIN TUBE FUEL KNOB-SNOW NON-REMOVABLE OIL PLUG CE COMPLIANT MUFFLER SHIELD...
... FLYWHEEL ASSEMBLY, MANUAL START-SNOW HIGH OIL FILL ASSY KIT, SNOW FLYWHEEL FAN IGNITION COIL ASSY (CDI) CRANKCASE COVER ASSY BLACK OIL DIPSTICK CHARGING COIL DC SPARK PLUG BOOT GOVERNOR ARM ASSY GOVERNOR SHAFT GOVERNOR GEAR ASSY CAMSHAFT CYLINDER HEAD ASSY SPARK PLUG PISTON AND ROD ASSY VAPOR SHIELD SEAL KIT WIRE HARNESS CRANKSHAFT SPEED CONTROL BRACKET FUEL TANK SKIRT ROCKER ASM KIT PUSH ROD KIT CYLINDER ASSY GASKET KIT FUEL HOSE KIT EXTENDED OIL DRAIN TUBE FUEL KNOB-SNOW NON-REMOVABLE OIL PLUG CE COMPLIANT MUFFLER SHIELD...
User Manual
Page 40
... the product. 6. This Warranty gives you specific legal rights, and you 1/12 of the price of a new Battery for each full month from this Warranty, please contact: Poulan Outdoor Products Customer Service Dept. 9335 Harris Corners Parkway Charlotte, NC 28269 USA In Canada contact: Poulan 5855 Terry Fox Way Mississauga, Ontario L5V 3E4 giving the model number, serial number and date of...
... the product. 6. This Warranty gives you specific legal rights, and you 1/12 of the price of a new Battery for each full month from this Warranty, please contact: Poulan Outdoor Products Customer Service Dept. 9335 Harris Corners Parkway Charlotte, NC 28269 USA In Canada contact: Poulan 5855 Terry Fox Way Mississauga, Ontario L5V 3E4 giving the model number, serial number and date of...


