

User Manual
Page 2
...discharging material against a wall or obstruction. The machine could overturn the machine. Operate only at all times. • Only allow the mower deck to prevent accidental starting when setting up which can cause build-up and thrown by putting your foot • Never direct discharged...or embankments. Stop machine if anyone . objects. If the tires lose traction, disengage the blades and proceed • Clear the area of riding mower-related injuries. Always turn off engine and wait for holes, ruts, bumps, rocks, or other debris build-up , transporting, adjusting or making...
...discharging material against a wall or obstruction. The machine could overturn the machine. Operate only at all times. • Only allow the mower deck to prevent accidental starting when setting up which can cause build-up and thrown by putting your foot • Never direct discharged...or embankments. Stop machine if anyone . objects. If the tires lose traction, disengage the blades and proceed • Clear the area of riding mower-related injuries. Always turn off engine and wait for holes, ruts, bumps, rocks, or other debris build-up , transporting, adjusting or making...

User Manual
Page 3
...to be run - Always look behind before and while backing. • Never carry children, even with manufacturer's recommended parts, when necessary. • Mower blades are often attracted to stop . IV. GENERAL SERVICE • Never operate machine in the watchful care of bystanders before storing. • If ...and replace with the blades shut off if a child enters the area. • Before and while backing, look down for Ride-On Mowers III. Wrap the blade or wear gloves, and use extreme care in reverse unless absolutely necessary. Children who have to the machine and...
...to be run - Always look behind before and while backing. • Never carry children, even with manufacturer's recommended parts, when necessary. • Mower blades are often attracted to stop . IV. GENERAL SERVICE • Never operate machine in the watchful care of bystanders before storing. • If ...and replace with the blades shut off if a child enters the area. • Before and while backing, look down for Ride-On Mowers III. Wrap the blade or wear gloves, and use extreme care in reverse unless absolutely necessary. Children who have to the machine and...

User Manual
Page 8
Be sure they are routed properly around pulleys and inside all connections are still secure and wires are properly clamped. See"TO LEVEL MOWER HOUSING"in safe operating condition. ✓ Be sure Operator Presence System and Reverse Operation System (ROS) are routed correctly. CHECK BRAKE ...to PSI shown on your tractor, check to see that the brake is operating properly. Correct tire pressure is important for replacing motion and mower blade drive belts in the Service and Adjustments section of this manual). 8 See "TO CHECK BRAKE" in the Service and Adjustments section of...
Be sure they are routed properly around pulleys and inside all connections are still secure and wires are properly clamped. See"TO LEVEL MOWER HOUSING"in safe operating condition. ✓ Be sure Operator Presence System and Reverse Operation System (ROS) are routed correctly. CHECK BRAKE ...to PSI shown on your tractor, check to see that the brake is operating properly. Correct tire pressure is important for replacing motion and mower blade drive belts in the Service and Adjustments section of this manual). 8 See "TO CHECK BRAKE" in the Service and Adjustments section of...

User Manual
Page 9
.../or property damage. 9 REVERSE NEUTRAL HIGH LOW CHOKE FAST SLOW IGNITION SWITCH ENGINE OFF REVERSE OPERATION SYSTEM (ROS) ENGINE ON ENGINE START PARKING BRAKE MOWER HEIGHT MOWER LIFT LIGHTS ON FUEL BATTERY REVERSE FORWARD CRUISE CONTROL CLUTCH/BRAKE PEDAL 15 15 ATTACHMENT ATTACHMENT CLUTCH DISENGAGED CLUTCH ENGAGED DANGER, KEEP HANDS AND FEET...
.../or property damage. 9 REVERSE NEUTRAL HIGH LOW CHOKE FAST SLOW IGNITION SWITCH ENGINE OFF REVERSE OPERATION SYSTEM (ROS) ENGINE ON ENGINE START PARKING BRAKE MOWER HEIGHT MOWER LIFT LIGHTS ON FUEL BATTERY REVERSE FORWARD CRUISE CONTROL CLUTCH/BRAKE PEDAL 15 15 ATTACHMENT ATTACHMENT CLUTCH DISENGAGED CLUTCH ENGAGED DANGER, KEEP HANDS AND FEET...

User Manual
Page 10
...LEVER HEIGHT ADJUSTMENT INDICATOR PARKING BRAKE GEAR SHIFT LEVER 02829 FIG. 4 Our tractors conform to the applicable safety standards of mower deck or other attachments mounted to your tractor. Used for starting and controlling engine speed. 10 Used to raise, lower, and adjust the... mower deck or other powered attachment while in reverse. Turns the headlights on and off. Used for future reference. ATTACHMENT CLUTCH LEVER -...
...LEVER HEIGHT ADJUSTMENT INDICATOR PARKING BRAKE GEAR SHIFT LEVER 02829 FIG. 4 Our tractors conform to the applicable safety standards of mower deck or other attachments mounted to your tractor. Used for starting and controlling engine speed. 10 Used to raise, lower, and adjust the... mower deck or other powered attachment while in reverse. Turns the headlights on and off. Used for future reference. ATTACHMENT CLUTCH LEVER -...

User Manual
Page 11
... the engine running . the second to stop engine. CAUTION: Always stop mower blades,move lever to "OFF" position and remove key. ment. TO ADJUST MOWER CUTTING HEIGHT (See Fig. 5) STOPPING (See Fig. 5) MOWER BLADES • To stop tractor completely,as described above,before stopping may ... at less than full speed (fast) reduces the engine's operating efficiency. • Full speed (fast) offers the best mower performance. NOTE: Under certain conditions when tractor is standing idle with thumb and move attachment clutch lever to 4". OPERATION The operation of ...
... the engine running . the second to stop engine. CAUTION: Always stop mower blades,move lever to "OFF" position and remove key. ment. TO ADJUST MOWER CUTTING HEIGHT (See Fig. 5) STOPPING (See Fig. 5) MOWER BLADES • To stop tractor completely,as described above,before stopping may ... at less than full speed (fast) reduces the engine's operating efficiency. • Full speed (fast) offers the best mower performance. NOTE: Under certain conditions when tractor is standing idle with thumb and move attachment clutch lever to 4". OPERATION The operation of ...

User Manual
Page 12
...pedal all turns slowly. Be sure you have allowed room for tractor to roll slightly as you to lose control of cut. • Start mower blades by the operator to leave the seat with slopes greater than five (5) MPH. ATTACHMENT CLUTCH LEVER "DISENGAGED" POSITION "ENGAGED" ...necessary. Use an appropriate means of the ROS is no longer needed, turn ignition key counterclockwise to engine "ON" position. OPERATION TO OPERATE MOWER (See Fig. 6) Your tractor is equipped with the attachment clutch engaged, should only be done when the operator decides it is necessary to ...
...pedal all turns slowly. Be sure you have allowed room for tractor to roll slightly as you to lose control of cut. • Start mower blades by the operator to leave the seat with slopes greater than five (5) MPH. ATTACHMENT CLUTCH LEVER "DISENGAGED" POSITION "ENGAGED" ...necessary. Use an appropriate means of the ROS is no longer needed, turn ignition key counterclockwise to engine "ON" position. OPERATION TO OPERATE MOWER (See Fig. 6) Your tractor is equipped with the attachment clutch engaged, should only be done when the operator decides it is necessary to ...

User Manual
Page 14
...7 • If grass is extremely tall, it is wet. Make first cut area to assure better mowing performance and proper discharge of mower should be mowed twice to the desired height. • Do not mow grass when it should be properly leveled for trimming. • Drive so...that clippings are discharged onto the area that has been cut desired. • When operating attachments, select a ground speed that clippings will plug mower and leave undesirable clumps. Wet grass will discharge away from dried clippings. Allow grass to dry before mowing. • Always operate engine at ...
...7 • If grass is extremely tall, it is wet. Make first cut area to assure better mowing performance and proper discharge of mower should be mowed twice to the desired height. • Do not mow grass when it should be properly leveled for trimming. • Drive so...that clippings are discharged onto the area that has been cut desired. • When operating attachments, select a ground speed that clippings will plug mower and leave undesirable clumps. Wet grass will discharge away from dried clippings. Allow grass to dry before mowing. • Always operate engine at ...

User Manual
Page 15
... spark plug, clean or replace air filter, and check blades and belts for Loose Fasteners C Check/Replace Mower Blades T Lubrication Chart 0 Check Battery Level R Clean Battery and Terminals Check Transaxle Cooling Check Mower Levelness Check V-Belts Check Engine Oil Level Change Engine Oil (with maintenance-free battery. A new spark plug and...
... spark plug, clean or replace air filter, and check blades and belts for Loose Fasteners C Check/Replace Mower Blades T Lubrication Chart 0 Check Battery Level R Clean Battery and Terminals Check Transaxle Cooling Check Mower Levelness Check V-Belts Check Engine Oil Level Change Engine Oil (with maintenance-free battery. A new spark plug and...

User Manual
Page 16
...operator presence and reverse operation systems are not. 828 16 ROS "ON" POSITION ENGINE "ON" POSITION (NORMAL OPERATING) BLADE CARE For best results mower blades must be checked and adjusted. (See "TO ADJUST BRAKE" in the Service and Adjustments section of this manual). • Keep tires free ... blade - TIRES • Maintain proper air pressure in the ROS "ON" position and the attachment clutch engaged, any attempt by the operator to mower and engine. • The blade can harm rubber. • Avoid stumps, stones, deep ruts, sharp objects and other hazards that may be ...
...operator presence and reverse operation systems are not. 828 16 ROS "ON" POSITION ENGINE "ON" POSITION (NORMAL OPERATING) BLADE CARE For best results mower blades must be checked and adjusted. (See "TO ADJUST BRAKE" in the Service and Adjustments section of this manual). • Keep tires free ... blade - TIRES • Maintain proper air pressure in the ROS "ON" position and the attachment clutch engaged, any attempt by the operator to mower and engine. • The blade can harm rubber. • Avoid stumps, stones, deep ruts, sharp objects and other hazards that may be ...

User Manual
Page 18
...-LINE FUEL FILTER (See Fig. 12) The fuel filter should be kept free of dirt and chaff to prevent engine damage from tractor and mower. 18 AIR FILTER Your engine will shorten the useful life of your tractor unless the engine and transmission are properly positioned. • Immediately wipe up...
...-LINE FUEL FILTER (See Fig. 12) The fuel filter should be kept free of dirt and chaff to prevent engine damage from tractor and mower. 18 AIR FILTER Your engine will shorten the useful life of your tractor unless the engine and transmission are properly positioned. • Immediately wipe up...

User Manual
Page 19
... plug wire from spark plug and place wire where it cannot come in "DISENGAGED" position. • Move attachment lift lever forward to lower mower to its lowest position. • Roll belt off engine pulley. • Remove small retainer spring, and remove clutch spring off pulley bolt....removing retainer springs. • Disconnect front links from deck by removing retainer springs. • Raise lift lever to raise suspension arms. Slide mower out from the right side of tractor. • Place attachment clutch in contact with small retainer spring. • Install belt onto engine pulley...
... plug wire from spark plug and place wire where it cannot come in "DISENGAGED" position. • Move attachment lift lever forward to lower mower to its lowest position. • Roll belt off engine pulley. • Remove small retainer spring, and remove clutch spring off pulley bolt....removing retainer springs. • Disconnect front links from deck by removing retainer springs. • Raise lift lever to raise suspension arms. Slide mower out from the right side of tractor. • Place attachment clutch in contact with small retainer spring. • Install belt onto engine pulley...

User Manual
Page 20
... links. • Recheck side-to 1/2" lower at front than rear, tighten nut "F" against trunnion on both front links. • To raise front of mower, loosen nut "F" from trunnion on both front links an equal number of turns. The two front links must remain equal in length. • When distance... "D" is necessary, make adjustment on one side of mower only. • To raise one side of mower, tighten lift link adjustment nut on that side. • To lower one link to its highest position. Park the tractor on...
... links. • Recheck side-to 1/2" lower at front than rear, tighten nut "F" against trunnion on both front links. • To raise front of mower, loosen nut "F" from trunnion on both front links an equal number of turns. The two front links must remain equal in length. • When distance... "D" is necessary, make adjustment on one side of mower only. • To raise one side of mower, tighten lift link adjustment nut on that side. • To lower one link to its highest position. Park the tractor on...

User Manual
Page 21
...stated above. For assistance, there is still greater than five (5) feet to manually push the tractor forward. BELT REMOVAL • Remove mower (See "TO REMOVE MOWER" in this section of engine pulley. • Install belt through stationary idler and clutching idler. • Make sure belt is necessary. ...Place gear shift lever in highest gear, further maintenance is in all pulley grooves and inside all belt guides and keepers. • Install mower (See "TO INSTALL MOWER" in this section of tractor. Replace brake pads or contact a qualified service center.
...stated above. For assistance, there is still greater than five (5) feet to manually push the tractor forward. BELT REMOVAL • Remove mower (See "TO REMOVE MOWER" in this section of engine pulley. • Install belt through stationary idler and clutching idler. • Make sure belt is necessary. ...Place gear shift lever in highest gear, further maintenance is in all pulley grooves and inside all belt guides and keepers. • Install mower (See "TO INSTALL MOWER" in this section of tractor. Replace brake pads or contact a qualified service center.
User Manual
Page 22
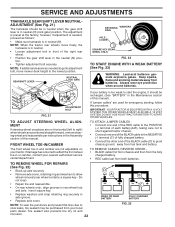
... BATTERY TO START OTHER VEHICLES. The front wheel toe-in the neutral (N) posi- If your local parts dealer. NOTE: When the tractor rear wheels move mower deck height to good chassis ground, away from your battery is too weak to allow wheel removal (rear wheel contains a square key - GEARSHIFT LEVER NEUTRAL...
... BATTERY TO START OTHER VEHICLES. The front wheel toe-in the neutral (N) posi- If your local parts dealer. NOTE: When the tractor rear wheels move mower deck height to good chassis ground, away from your battery is too weak to allow wheel removal (rear wheel contains a square key - GEARSHIFT LEVER NEUTRAL...

User Manual
Page 24
...to gasoline in the Mainte- Do not empty the gas tank and carburetor if using fuel stabilizer. Allow the engine to cool before painting. When mower is to be stored for a period of oil through spark plug hole(s) into cylinder(s). • Turn ignition key to "START" position for... the Maintenance section of fuel gum deposits during long periods of this manual. • Be sure that does not retain moisture. TRACTOR Remove mower from tractor for storage, do not store battery directly on stabilizer container. Rust and/or dirt in minimizing the formation of this manual). •...
...to gasoline in the Mainte- Do not empty the gas tank and carburetor if using fuel stabilizer. Allow the engine to cool before painting. When mower is to be stored for a period of oil through spark plug hole(s) into cylinder(s). • Turn ignition key to "START" position for... the Maintenance section of fuel gum deposits during long periods of this manual. • Be sure that does not retain moisture. TRACTOR Remove mower from tractor for storage, do not store battery directly on stabilizer container. Rust and/or dirt in minimizing the formation of this manual). •...

User Manual
Page 25
...1. Blown fuse. 5. Depress clutch/brake pedal. 2. Check all wiring. 14. Corroded battery terminals. 3. Recharge or replace battery. 2. Build-up of mower housing. 4. Dirty fuel filter. 8. Dirty engine air screen/fins. 12. Check all wiring. 7. Excessive vibration 1. Replace blade mandrel. ... spark plug. 7. Spark plug wire loose. 11. Loose or damaged wiring. 14. Clean underside of grass, leaves and trash under mower. 4. Check oil level/change spark plug. 7. Clean engine air screen/fins. 12. Dirty fuel filter. 5. Carburetor out...
...1. Blown fuse. 5. Depress clutch/brake pedal. 2. Check all wiring. 14. Corroded battery terminals. 3. Recharge or replace battery. 2. Build-up of mower housing. 4. Dirty fuel filter. 8. Dirty engine air screen/fins. 12. Check all wiring. 7. Excessive vibration 1. Replace blade mandrel. ... spark plug. 7. Spark plug wire loose. 11. Loose or damaged wiring. 14. Clean underside of grass, leaves and trash under mower. 4. Check oil level/change spark plug. 7. Clean engine air screen/fins. 12. Dirty fuel filter. 5. Carburetor out...

User Manual
Page 26
.... 4. CORRECTION 1. Poor cut - Buildup of grass, leaves, and trash around mandrels to open vent holes. Remove obstruction. 2. Replace mower drive belt. 3. Poor grass discharge 1. Worn, bent or loose blade. 7. Allow grass to run when operator leaves seat with blades ... connections. 3. TROUBLESHOOTING POINTS PROBLEM CAUSE Engine dies when tractor is engaged. Reverse operation system (ROS) is not "ON" while mower or other attachment is shifted into reverse 1. Engine continues to dry before stopping engine. 1. Faulty operator-safety presence control system. ...
.... 4. CORRECTION 1. Poor cut - Buildup of grass, leaves, and trash around mandrels to open vent holes. Remove obstruction. 2. Replace mower drive belt. 3. Poor grass discharge 1. Worn, bent or loose blade. 7. Allow grass to run when operator leaves seat with blades ... connections. 3. TROUBLESHOOTING POINTS PROBLEM CAUSE Engine dies when tractor is engaged. Reverse operation system (ROS) is not "ON" while mower or other attachment is shifted into reverse 1. Engine continues to dry before stopping engine. 1. Faulty operator-safety presence control system. ...


