

User Manual
Page 2
.... WARNING • Do not operate machine without the entire grass catcher, discharge guard, or other hidden I. Shut off blades, set parking brake, stop engine, and remove keys before cleaning the machine, removing the grass catcher, or unclogging the discharge guard. • Operate machine only in a large percentage of the discharge opening at the lowest possible speed when on the ground. SLOPE OPERATION Battery posts, terminals and related accessories...
.... WARNING • Do not operate machine without the entire grass catcher, discharge guard, or other hidden I. Shut off blades, set parking brake, stop engine, and remove keys before cleaning the machine, removing the grass catcher, or unclogging the discharge guard. • Operate machine only in a large percentage of the discharge opening at the lowest possible speed when on the ground. SLOPE OPERATION Battery posts, terminals and related accessories...

User Manual
Page 3
... the hitch point. • Follow the manufacturer's recommendation for weight limits for Ride-On Mowers III. Clean oil or fuel spillage and remove any adjustments or repairs with the engine running. • Check grass catcher components and the discharge guard frequently and replace with the blades shut off and be run over or backed over by the machine. • Keep children out of the mowing area...
... the hitch point. • Follow the manufacturer's recommendation for weight limits for Ride-On Mowers III. Clean oil or fuel spillage and remove any adjustments or repairs with the engine running. • Check grass catcher components and the discharge guard frequently and replace with the blades shut off and be run over or backed over by the machine. • Keep children out of the mowing area...

User Manual
Page 4
... rules. • Follow a regular schedule in effective working order by the operator. PRODUCT SPECIFICATIONS Gasoline Capacity and Type: Oil Type (API-SG-SL): Oil Capacity: Spark Plug: (Gap: .030") Ground Speed (MPH): Charging System: Battery: Blade Torque: 1.25 Gallons Unleaded Regular SAE 30 (above 32°F) SAE 5W-30 (below 32°F) W/Filter: 3.5 Pints W/O Filter: 3.0 Pints Champion RC12YC Forward: 1st 1.1 2nd 1.4 3rd 2.2 4th 3.4 5th 4.3 6th 5.5 Reverse: 1.7 3 Amps...
... rules. • Follow a regular schedule in effective working order by the operator. PRODUCT SPECIFICATIONS Gasoline Capacity and Type: Oil Type (API-SG-SL): Oil Capacity: Spark Plug: (Gap: .030") Ground Speed (MPH): Charging System: Battery: Blade Torque: 1.25 Gallons Unleaded Regular SAE 30 (above 32°F) SAE 5W-30 (below 32°F) W/Filter: 3.5 Pints W/O Filter: 3.0 Pints Champion RC12YC Forward: 1st 1.1 2nd 1.4 3rd 2.2 4th 3.4 5th 4.3 6th 5.5 Reverse: 1.7 3 Amps...

User Manual
Page 6
... shaft extension. • Position steering wheel so cross bars are horizontal (left unassembled for shipping purposes. Remove the cardboard packing and discard. • Place seat on seat pan so head of shoulder bolt is positioned over tab slots in the operating position (seated behind the steering wheel). Use the correct tools as necessary to insure proper tightness. ASSEMBLY Your new tractor has been assembled at . • Check for assembly...
... shaft extension. • Position steering wheel so cross bars are horizontal (left unassembled for shipping purposes. Remove the cardboard packing and discard. • Place seat on seat pan so head of shoulder bolt is positioned over tab slots in the operating position (seated behind the steering wheel). Use the correct tools as necessary to insure proper tightness. ASSEMBLY Your new tractor has been assembled at . • Check for assembly...

User Manual
Page 7
... starting, read, understand and follow all the above assembly steps have been completed. • Check engine oil level and fill fuel tank with the instructions that follow. TO DRIVE TRACTOR OFF SKID (See Operation section for charging instructions). Move gearshift lever to 1st gear. • Slowly release clutch/brake pedal and slowly drive tractor off the skid. Continue with gasoline. • Sit on label (label located between terminals) charge battery...
... starting, read, understand and follow all the above assembly steps have been completed. • Check engine oil level and fill fuel tank with the instructions that follow. TO DRIVE TRACTOR OFF SKID (See Operation section for charging instructions). Move gearshift lever to 1st gear. • Slowly release clutch/brake pedal and slowly drive tractor off the skid. Continue with gasoline. • Sit on label (label located between terminals) charge battery...

User Manual
Page 8
... Maintenance sections in the Service and Adjustments section of this manual. WHILE LEARNING HOW TO USE YOUR TRACTOR, PAY EXTRA ATTENTION TO THE FOLLOWING IMPORTANT ITEMS: ✓ Engine oil is at proper level. ✓ Fuel tank is properly leveled side-to-side/ front-to-rear for replacing motion and mower blade drive belts in this manual. CHECK BRAKE SYSTEM After you start the engine. ✓ Be sure brake system is operating properly. CHECK FOR PROPER POSITION...
... Maintenance sections in the Service and Adjustments section of this manual. WHILE LEARNING HOW TO USE YOUR TRACTOR, PAY EXTRA ATTENTION TO THE FOLLOWING IMPORTANT ITEMS: ✓ Engine oil is at proper level. ✓ Fuel tank is properly leveled side-to-side/ front-to-rear for replacing motion and mower blade drive belts in this manual. CHECK BRAKE SYSTEM After you start the engine. ✓ Be sure brake system is operating properly. CHECK FOR PROPER POSITION...

User Manual
Page 11
... tractor secure. ATTACHMENT CLUTCH LEVER "ENGAGED" POSITION THROTTLE/ CHOKE CONTROL LEVER IGNITION KEY "DISENGAGED" POSITION "BRAKE" POSITION PARKING BRAKE "ENGAGED" POSITION TO USE THROTTLE CONTROL (See Fig. 5) Always operate engine at full speed (fast). • Operating engine at less than full speed (fast) reduces the engine's operating efficiency. • Full speed (fast) offers the best mower performance. CLUTCH/BRAKE PEDAL "DRIVE" POSITION PARKING BRAKE "DISENGAGED" POSITION GEAR SHIFT LEVER FIG. 5 IMPORTANT: BRING TRACTOR TO A COMPLETE STOP BEFORE SHIFTING OR CHANGING...
... tractor secure. ATTACHMENT CLUTCH LEVER "ENGAGED" POSITION THROTTLE/ CHOKE CONTROL LEVER IGNITION KEY "DISENGAGED" POSITION "BRAKE" POSITION PARKING BRAKE "ENGAGED" POSITION TO USE THROTTLE CONTROL (See Fig. 5) Always operate engine at full speed (fast). • Operating engine at less than full speed (fast) reduces the engine's operating efficiency. • Full speed (fast) offers the best mower performance. CLUTCH/BRAKE PEDAL "DRIVE" POSITION PARKING BRAKE "DISENGAGED" POSITION GEAR SHIFT LEVER FIG. 5 IMPORTANT: BRING TRACTOR TO A COMPLETE STOP BEFORE SHIFTING OR CHANGING...

User Manual
Page 13
... 32 F) the carburetor fuel mixture may occur. Do not mix oil with the throttle control in the choke ( ) position until the engine runs roughly, then move throttle control to fast position, wait a few seconds, remove and read the warm and cold starting procedures below ) • When engine starts, allow it will increase carbon and lead oxide deposits and reduce valve life). OPERATION BEFORE STARTING THE ENGINE CHECK ENGINE OIL LEVEL The engine in your tractor has been shipped...
... 32 F) the carburetor fuel mixture may occur. Do not mix oil with the throttle control in the choke ( ) position until the engine runs roughly, then move throttle control to fast position, wait a few seconds, remove and read the warm and cold starting procedures below ) • When engine starts, allow it will increase carbon and lead oxide deposits and reduce valve life). OPERATION BEFORE STARTING THE ENGINE CHECK ENGINE OIL LEVEL The engine in your tractor has been shipped...

User Manual
Page 15
...filter) E N Clean Air Filter G Clean Air Screen I Inspect Muffler/Spark Arrester N Replace Oil Filter (If equipped) E Clean Engine Cooling Fins Replace Spark Plug Replace Air Filter Paper Cartridge Replace Fuel Filter 1 - MAINTENANCE MAINTENANCE SCHEDULE BEFORE EACH USE EVERY 8 HOURS Check Brake Operation T Check Tire Pressure R Check Operator Presence & ROS Systems A Check for Loose Fasteners C Check/Replace Mower Blades T Lubrication Chart 0 Check Battery Level R Clean Battery and Terminals Check Transaxle Cooling Check Mower Levelness Check V-Belts Check Engine Oil Level Change Engine...
...filter) E N Clean Air Filter G Clean Air Screen I Inspect Muffler/Spark Arrester N Replace Oil Filter (If equipped) E Clean Engine Cooling Fins Replace Spark Plug Replace Air Filter Paper Cartridge Replace Fuel Filter 1 - MAINTENANCE MAINTENANCE SCHEDULE BEFORE EACH USE EVERY 8 HOURS Check Brake Operation T Check Tire Pressure R Check Operator Presence & ROS Systems A Check for Loose Fasteners C Check/Replace Mower Blades T Lubrication Chart 0 Check Battery Level R Clean Battery and Terminals Check Transaxle Cooling Check Mower Levelness Check V-Belts Check Engine Oil Level Change Engine...

User Manual
Page 16
... speed in highest gear on a grinding wheel. CHECK REVERSE OPERATION (ROS) SYSTEM • When the engine is running with the ignition switch in the engine "ON" position and the attachment clutch engaged, any attempt by the manufacturer of your local parts dealer. CAUTION: Use only a replacement blade approved by the operator to leave the seat without first setting the parking brake should shut off the engine. • The attachment clutch should never operate...
... speed in highest gear on a grinding wheel. CHECK REVERSE OPERATION (ROS) SYSTEM • When the engine is running with the ignition switch in the engine "ON" position and the attachment clutch engaged, any attempt by the manufacturer of your local parts dealer. CAUTION: Use only a replacement blade approved by the operator to leave the seat without first setting the parking brake should shut off the engine. • The attachment clutch should never operate...

User Manual
Page 17
... of this manual). If blade is not necessary. Check your tractor is maintenance free. Be sure dipstick cap is not used above 32°F. After oil has drained completely, close and lock the drain valve by pushing inward and turning counterclockwise. If either end of operation or at "FULL" line on the battery and terminals can restrict cooling. • ENGINE • LUBRICATION • Only use . OIL DRAIN VALVE CLOSED AND LOCKED POSITION V-BELTS Check V-belts for accurate...
... of this manual). If blade is not necessary. Check your tractor is maintenance free. Be sure dipstick cap is not used above 32°F. After oil has drained completely, close and lock the drain valve by pushing inward and turning counterclockwise. If either end of operation or at "FULL" line on the battery and terminals can restrict cooling. • ENGINE • LUBRICATION • Only use . OIL DRAIN VALVE CLOSED AND LOCKED POSITION V-BELTS Check V-belts for accurate...

User Manual
Page 18
Clean with a wire brush or compressed air to clean your tractor. Spark plug type and gap setting is required. • With engine cool, remove filter and plug fuel line sections. • Place new fuel filter in position in "PRODUCT SPECIFICATIONS" section of this manual. of all foreign matter. • Keep finished surfaces and wheels free of all gasoline, oil, etc. • Protect painted surfaces with arrow pointing towards carburetor. • Be sure there...
Clean with a wire brush or compressed air to clean your tractor. Spark plug type and gap setting is required. • With engine cool, remove filter and plug fuel line sections. • Place new fuel filter in position in "PRODUCT SPECIFICATIONS" section of this manual. of all foreign matter. • Keep finished surfaces and wheels free of all gasoline, oil, etc. • Protect painted surfaces with arrow pointing towards carburetor. • Be sure there...

User Manual
Page 19
... ANY SERVICE OR ADJUSTMENTS: • Depress clutch/brake pedal fully and set parking brake. • Place gearshift lever in neutral (N) position. • Place attachment clutch in "DISENGAGED" position. • Turn ignition key to "STOP" and remove key. • Make sure the blades and all moving parts have completely stopped. • Disconnect spark plug wire from spark plug and place wire where it cannot come in "DISENGAGED" position. • Move attachment lift lever forward to lower mower...
... ANY SERVICE OR ADJUSTMENTS: • Depress clutch/brake pedal fully and set parking brake. • Place gearshift lever in neutral (N) position. • Place attachment clutch in "DISENGAGED" position. • Turn ignition key to "STOP" and remove key. • Make sure the blades and all moving parts have completely stopped. • Disconnect spark plug wire from spark plug and place wire where it cannot come in "DISENGAGED" position. • Move attachment lift lever forward to lower mower...

User Manual
Page 20
... parking brake. BELT INSTALLATION • Install new belt in reverse order of removal. • Make sure belt is necessary, make adjustment on that side. To obtain the best cutting results, the mower housing should be replaced without tools. Tighten nut "E" on both mandrel pulleys and idler pulleys. • Pull belt away from tractor (See "TO REMOVE MOWER" in reverse order of turns. Check adjustment on both front links an equal number of removal instruc- Park the tractor on level...
... parking brake. BELT INSTALLATION • Install new belt in reverse order of removal. • Make sure belt is necessary, make adjustment on that side. To obtain the best cutting results, the mower housing should be replaced without tools. Tighten nut "E" on both mandrel pulleys and idler pulleys. • Pull belt away from tractor (See "TO REMOVE MOWER" in reverse order of turns. Check adjustment on both front links an equal number of removal instruc- Park the tractor on level...

User Manual
Page 21
...; Pull belt toward rear of tractor. If tractor requires more than five (5) feet in this section of manual). WITH PARKING BRAKE "ENGAGED" 1-1/2" NUT "A" JAM NUT TO REPLACE MOTION DRIVE BELT (See Fig. 20) Park the tractor on a level, dry concrete or paved surface, then brake must lock and skid when you try to stop at highest speed in highest gear on level surface. SERVICE AND ADJUSTMENTS IDLER PULLEYS MANDREL PULLEYS FIG...
...; Pull belt toward rear of tractor. If tractor requires more than five (5) feet in this section of manual). WITH PARKING BRAKE "ENGAGED" 1-1/2" NUT "A" JAM NUT TO REPLACE MOTION DRIVE BELT (See Fig. 20) Park the tractor on a level, dry concrete or paved surface, then brake must lock and skid when you try to stop at highest speed in highest gear on level surface. SERVICE AND ADJUSTMENTS IDLER PULLEYS MANDREL PULLEYS FIG...
User Manual
Page 23
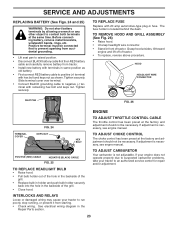
... dash. TERMINAL COVER KEPS NUT HEX BOLT TO ADJUST CHOKE CONTROL The choke control has been preset at the same time. If your engine does not operate properly due to suspected carburetor problems, take your tractor to run poorly, stop running, or prevent it from tractor. • Install new battery with terminals in same position as old battery. • First connect RED battery cable to positive (+) terminal with hex bolt and keps nut as shown. SERVICE AND ADJUSTMENTS REPLACING BATTERY (See...
... dash. TERMINAL COVER KEPS NUT HEX BOLT TO ADJUST CHOKE CONTROL The choke control has been preset at the same time. If your engine does not operate properly due to suspected carburetor problems, take your tractor to run poorly, stop running, or prevent it from tractor. • Install new battery with terminals in same position as old battery. • First connect RED battery cable to positive (+) terminal with hex bolt and keps nut as shown. SERVICE AND ADJUSTMENTS REPLACING BATTERY (See...

User Manual
Page 24
... engine and let it thoroughly, remove all dirt, grease, leaves, etc. Always follow the mix ratio found on concrete or damp surfaces. Do not empty the gas tank and carburetor if using fuel stabilizer. Store in a clean, dry area. • Clean entire tractor (See "CLEANING" in fuel tank or storage container. BATTERY • Fully charge the battery for storage. • After a period of time in the Maintenance section of this manual...
... engine and let it thoroughly, remove all dirt, grease, leaves, etc. Always follow the mix ratio found on concrete or damp surfaces. Do not empty the gas tank and carburetor if using fuel stabilizer. Store in a clean, dry area. • Clean entire tractor (See "CLEANING" in fuel tank or storage container. BATTERY • Fully charge the battery for storage. • After a period of time in the Maintenance section of this manual...

User Manual
Page 25
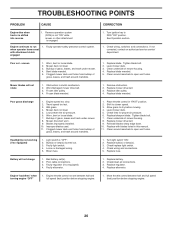
... 6. Engine valves out of adjustment. 8. Replace spark plug. 5. Check all wiring. 7. Hard to start 1. Carburetor out of adjustment. 1. Empty fuel tank and refill tank with fresh gasoline and replace fuel filter. 8. Contact an authorized service center/department. Faulty ignition switch. 8. Check all wiring. 9. Check/replace solenoid or starter. 9. Corroded battery terminals. 3. Loss of grass, leaves and trash under mower. 4. Build-up of power 1. Low oil level/dirty oil. 6. Clean/replace air filter. 5. Check oil level/change spark plug. 7. Clean and...
... 6. Engine valves out of adjustment. 8. Replace spark plug. 5. Check all wiring. 7. Hard to start 1. Carburetor out of adjustment. 1. Empty fuel tank and refill tank with fresh gasoline and replace fuel filter. 8. Contact an authorized service center/department. Faulty ignition switch. 8. Check all wiring. 9. Check/replace solenoid or starter. 9. Corroded battery terminals. 3. Loss of grass, leaves and trash under mower. 4. Build-up of power 1. Low oil level/dirty oil. 6. Clean/replace air filter. 5. Check oil level/change spark plug. 7. Clean and...
User Manual
Page 26
... Check/replace light switch. 4. Faulty regulator (if so equipped). 4. Replace battery. 2. Engine throttle control not set between half and full speed (fast) position before stopping engine. 26 CORRECTION 1. Poor cut - Mower deck not level. 3. Replace blade mandrel. 5. Frozen blade mandrel. 1. Improper blades used. 11. Shift to ROS "ON" position. Clean underside of mower housing. 4. Bulb(s) or lamp(s) burned out. 3. Blown fuse. 1. Bad battery cell(s). 2. Faulty operator-safety presence control system. Tighten blade bolt. 2. Worn/damaged mower drive belt. 3. Remove...
... Check/replace light switch. 4. Faulty regulator (if so equipped). 4. Replace battery. 2. Engine throttle control not set between half and full speed (fast) position before stopping engine. 26 CORRECTION 1. Poor cut - Mower deck not level. 3. Replace blade mandrel. 5. Frozen blade mandrel. 1. Improper blades used. 11. Shift to ROS "ON" position. Clean underside of mower housing. 4. Bulb(s) or lamp(s) burned out. 3. Blown fuse. 1. Bad battery cell(s). 2. Faulty operator-safety presence control system. Tighten blade bolt. 2. Worn/damaged mower drive belt. 3. Remove...
User Manual
Page 27
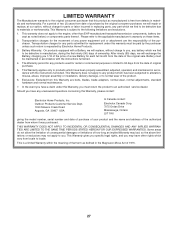
... model number, serial number and date of purchase of your product and the name and address of the authorized dealer from the date of any products used for parts or labor incurred in accordance with the instructions furnished. 4. The Warranty period for each full month from date of a new Battery for any power equipment unit or attachment are belts, blades, blade adapters, normal wear, normal adjustments...
... model number, serial number and date of purchase of your product and the name and address of the authorized dealer from the date of any products used for parts or labor incurred in accordance with the instructions furnished. 4. The Warranty period for each full month from date of a new Battery for any power equipment unit or attachment are belts, blades, blade adapters, normal wear, normal adjustments...


