

User Manual
Page 4
... ORDERING/SERVICE 15 20-25 26 27-28 30-45 BACK COVER LIMITED WARRANTY The Manufacturer warrants to any power equipment unit or attachment are belts, blades, blade adapters, normal wear, normal adjustments, standard hardware and normal maintenance. 7. Battery Warranty: On products equipped with a Battery, we will exchange the Battery, charging you have...
... ORDERING/SERVICE 15 20-25 26 27-28 30-45 BACK COVER LIMITED WARRANTY The Manufacturer warrants to any power equipment unit or attachment are belts, blades, blade adapters, normal wear, normal adjustments, standard hardware and normal maintenance. 7. Battery Warranty: On products equipped with a Battery, we will exchange the Battery, charging you have...

User Manual
Page 7
.... SEAT SEAT PAN ASSEMBLE GAUGE WHEELS TO MOWER DECK (See Fig. 4) The gauge wheels are shown for replacing motion and mower blade drive belts in the Service and Adjustments section of this manual for shipping purposes. See "TO LEVEL MOWER HOUSING" in the Service and Adjustments ...position when operating mower. SHOULDER BOLT ADJUSTMENT BOLT 0 FLAT WASHER LOCK WASHER FIG. 3 CHECK FOR PROPER POSITION OF ALL BELTS See the figures that the belts are properly adjusted to keep the mower deck in same adjustment hole. Be sure they are slightly off seat without moving...
.... SEAT SEAT PAN ASSEMBLE GAUGE WHEELS TO MOWER DECK (See Fig. 4) The gauge wheels are shown for replacing motion and mower blade drive belts in the Service and Adjustments section of this manual for shipping purposes. See "TO LEVEL MOWER HOUSING" in the Service and Adjustments ...position when operating mower. SHOULDER BOLT ADJUSTMENT BOLT 0 FLAT WASHER LOCK WASHER FIG. 3 CHECK FOR PROPER POSITION OF ALL BELTS See the figures that the belts are properly adjusted to keep the mower deck in same adjustment hole. Be sure they are slightly off seat without moving...

User Manual
Page 15
...• Check for Loose Fasteners V V V A Sharpen/Replace Mower Blades 1/4 CT Lubrication Chart 0 Check Battery Level V V ve6 R Clean Battery and Terminals V V Check Transaxle Cooling V Adjust Blade Belt(s) Tension Vs Adjust Motion Drive Belt(s) Tension Vs Check Engine Oil Level V V Change Engine Oil E ...least once each season. • Once a year you should replace the spark plug, clean or replace air filter, and check blades and belts for wear. CUSTOMER RESPONSIBILITIES MAINTENANCE SCHEDULE FILL IN DATES AS YOU COMPLETE REGULAR SERVICE .0' c,' c14/ .e x.x 4' e ,OC14...
...• Check for Loose Fasteners V V V A Sharpen/Replace Mower Blades 1/4 CT Lubrication Chart 0 Check Battery Level V V ve6 R Clean Battery and Terminals V V Check Transaxle Cooling V Adjust Blade Belt(s) Tension Vs Adjust Motion Drive Belt(s) Tension Vs Check Engine Oil Level V V Change Engine Oil E ...least once each season. • Once a year you should replace the spark plug, clean or replace air filter, and check blades and belts for wear. CUSTOMER RESPONSIBILITIES MAINTENANCE SCHEDULE FILL IN DATES AS YOU COMPLETE REGULAR SERVICE .0' c,' c14/ .e x.x 4' e ,OC14...

User Manual
Page 17
...or require servicing, contact your expected operating temperature. All oil must meet API service classification SF, SG or SH. Do not overfill. The belts are intact and clean. • Inspect cooling fins for normal use. Be sure tractor is tightened securely for checking level. page 3 ...of transmission should be sure fan blades are not adjustable. OIL FILL CARDIPSTSICK FIG. 13 OIL DRAIN PLUG 17 Do not attempt to clean cooling fins. Pour slowly. tery cable...
...or require servicing, contact your expected operating temperature. All oil must meet API service classification SF, SG or SH. Do not overfill. The belts are intact and clean. • Inspect cooling fins for normal use. Be sure tractor is tightened securely for checking level. page 3 ...of transmission should be sure fan blades are not adjustable. OIL FILL CARDIPSTSICK FIG. 13 OIL DRAIN PLUG 17 Do not attempt to clean cooling fins. Pour slowly. tery cable...

User Manual
Page 20
...(N) position. • Place attachment clutch in "DISENGAGED" position. • Turn ignition key "OFF" and remove key. • Make sure the blades and all moving parts have completely stopped. • Disconnect spark plug wire from under tractor with discharge guard to right side of tractor. • ...Lower lift lever to its lowest position. • Roll belt off engine pulley. • Disconnect clutch rod from clutch lever by removing retainer spring. • Disconnect anti-sway bar from chassis bracket ...
...(N) position. • Place attachment clutch in "DISENGAGED" position. • Turn ignition key "OFF" and remove key. • Make sure the blades and all moving parts have completely stopped. • Disconnect spark plug wire from under tractor with discharge guard to right side of tractor. • ...Lower lift lever to its lowest position. • Roll belt off engine pulley. • Disconnect clutch rod from clutch lever by removing retainer spring. • Disconnect anti-sway bar from chassis bracket ...

User Manual
Page 22
... highest gear, then brake must be replaced without tools. Carefully remove belt upwards from transmission input pulley and over cooling fan blades. • Pull belt toward rear of tractor. SERVICE AND ADJUSTMENTS TO REPLACE MOWER BLADE DRIVE BELT (See Fig. 22) The mower blade drive belt may be adjusted. • Depress clutch/brake pedal and engage parking...
... highest gear, then brake must be replaced without tools. Carefully remove belt upwards from transmission input pulley and over cooling fan blades. • Pull belt toward rear of tractor. SERVICE AND ADJUSTMENTS TO REPLACE MOWER BLADE DRIVE BELT (See Fig. 22) The mower blade drive belt may be adjusted. • Depress clutch/brake pedal and engage parking...
User Manual
Page 28
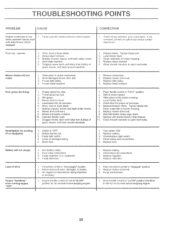
.... 3. Clogged mower deck vent holes from buildup of grass, leaves, and trash around mandrels. 1. Worn/damaged mower drive belt. 3. Engine speed too slow. 2. Worn, bent or loose blade. 7. Buildup of grass, leaves, and trash around mandrels. 1. Level mower deck. 5. Switch is "OFF". 2. Bad...3. Freewheel control in clutch mechanism. 2. Poor cut - Clean around mandrels to open vent holes. Replace mower drive belt. 3. Blades improperly installed. 10. Clogged mower deck vent holes from buildup of grass, leaves and trash under mower. 4. Replace/sharpen...
.... 3. Clogged mower deck vent holes from buildup of grass, leaves, and trash around mandrels. 1. Worn/damaged mower drive belt. 3. Engine speed too slow. 2. Worn, bent or loose blade. 7. Buildup of grass, leaves, and trash around mandrels. 1. Level mower deck. 5. Switch is "OFF". 2. Bad...3. Freewheel control in clutch mechanism. 2. Poor cut - Clean around mandrels to open vent holes. Replace mower drive belt. 3. Blades improperly installed. 10. Clogged mower deck vent holes from buildup of grass, leaves and trash under mower. 4. Replace/sharpen...

User Manual
Page 39
...10 165352 11 160396 16 158169 17 145005 10 19 11 • I • Iy • J DESCRIPTION Deca Saddle Inst. LBD48 42" Snow Blade - - inches 1 inch = 25.4 mm 39 MODEL NUMBER HD145H42J IECALS 5 2 3 4 8 5 18 7 9 'EY PART 1O. LAO18 Tire Chains - - DESCRIPTION 18 158176 Decal Seat Acc 19 164912 Decal...LH Deca Fender Sd Lawn Deca Fender Logo Deca Caution Fender Eng/Sp Deca Clutch/brake Eng/Sp Deca HP Engine Deca V-Belt Sch Deca Mulch Bag Poulan Deca Btry Dngr/Psn P/L Sym 16 KEY PART NO. LSB42 42" Snow Blower -- Tube) NOTE: All component dimensions ...
...10 165352 11 160396 16 158169 17 145005 10 19 11 • I • Iy • J DESCRIPTION Deca Saddle Inst. LBD48 42" Snow Blade - - inches 1 inch = 25.4 mm 39 MODEL NUMBER HD145H42J IECALS 5 2 3 4 8 5 18 7 9 'EY PART 1O. LAO18 Tire Chains - - DESCRIPTION 18 158176 Decal Seat Acc 19 164912 Decal...LH Deca Fender Sd Lawn Deca Fender Logo Deca Caution Fender Eng/Sp Deca Clutch/brake Eng/Sp Deca HP Engine Deca V-Belt Sch Deca Mulch Bag Poulan Deca Btry Dngr/Psn P/L Sym 16 KEY PART NO. LSB42 42" Snow Blower -- Tube) NOTE: All component dimensions ...

User Manual
Page 43
REPAIR PARTS TRACTOR - - MODEL NUMBER HD145H42J MOWER DECK
REPAIR PARTS TRACTOR - - MODEL NUMBER HD145H42J MOWER DECK

