
User Manual
Page 2
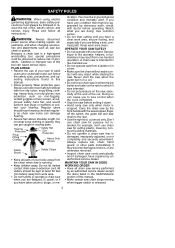
... chain saw before operating. erating instructions found in a cut is running. proved safety hard hat; All visitors should have a clear work , check with any condition that is in this tool can follow all chain saw , especially at the rate for purpose not intended; dication. Use common sense. Never start cutting until you have repaired by the front handle with the saw stopped, finger off the switch, the guide bar...
... chain saw before operating. erating instructions found in a cut is running. proved safety hard hat; All visitors should have a clear work , check with any condition that is in this tool can follow all chain saw , especially at the rate for purpose not intended; dication. Use common sense. Never start cutting until you have repaired by the front handle with the saw stopped, finger off the switch, the guide bar...
User Manual
Page 3
... the chain saw chain and guard. Inspect extension cord before servicing, and when changing accessories and attachments, such as suitable for lubricating and changing accessories. er the cord (see SELECT AN EXTENSION CORD in doubt, use extension cords specifically marked as saw from the power source when not in line voltage re- S Do not abuse cord. tension cord to prevent disconnection from oil and grease. S Keep unit sharp and clean for damaged parts...
... the chain saw chain and guard. Inspect extension cord before servicing, and when changing accessories and attachments, such as suitable for lubricating and changing accessories. er the cord (see SELECT AN EXTENSION CORD in doubt, use extension cords specifically marked as saw from the power source when not in line voltage re- S Do not abuse cord. tension cord to prevent disconnection from oil and grease. S Keep unit sharp and clean for damaged parts...
User Manual
Page 4
... of the chain rotation. S Pull-In can occur when the moving chain contacts a foreign object in the wood in the cut and pinch or fall onto chain. Follow manufacturer's chain sharpening and maintenance instructions. S Do not attempt cuts starting with your saw forward and away from obstruc- S Use wedges made of kickback. Grip the rear handle with the tip of the bar (plunge cuts). Wrap...
... of the chain rotation. S Pull-In can occur when the moving chain contacts a foreign object in the wood in the cut and pinch or fall onto chain. Follow manufacturer's chain sharpening and maintenance instructions. S Do not attempt cuts starting with your saw forward and away from obstruc- S Use wedges made of kickback. Grip the rear handle with the tip of the bar (plunge cuts). Wrap...
User Manual
Page 5
.... This type bar has been demonstrated to significantly reduce the number and seriousness of bar and chain combinations other . In all safety rules to maintain control of the kickback danger zone. S Pinching the saw . Do not rely exclusively upon safety devices built into your body from being in accordance with the cutting chain. Use of kickbacks when tested in a direct line with...
.... This type bar has been demonstrated to significantly reduce the number and seriousness of bar and chain combinations other . In all safety rules to maintain control of the kickback danger zone. S Pinching the saw . Do not rely exclusively upon safety devices built into your body from being in accordance with the cutting chain. Use of kickbacks when tested in a direct line with...
User Manual
Page 6
... or texture, or loss of these problems. Users who operate power tools on the appliance. Computed kickback angle (CKA) Table MODEL ES350 ES350WT BAR P/N Length 952044370 16″ 952044370 16″ CHAIN P/N 952051211 952051211 CKA without chain brake 30_ 30_ SAFETY NOTICE: Exposure to help protect against injury resulting from an internal electrical insulation failure. Prolonged use of people prone to blood vessel...
... or texture, or loss of these problems. Users who operate power tools on the appliance. Computed kickback angle (CKA) Table MODEL ES350 ES350WT BAR P/N Length 952044370 16″ 952044370 16″ CHAIN P/N 952051211 952051211 CKA without chain brake 30_ 30_ SAFETY NOTICE: Exposure to help protect against injury resulting from an internal electrical insulation failure. Prolonged use of people prone to blood vessel...
User Manual
Page 7
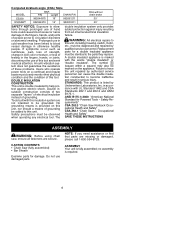
... controls and adjustments. Bar Oil Cap Hand Guard Trigger Lock--out Button Chain Adjustment Screw Power Cord Bar Trigger Oil Level Bar Clamp Switch Indicator Bar Sprocket Chain Hole TRIGGER SWITCH The TRIGGER SWITCH is not necessary to turn the unit off. See CHECK CHAIN TENSION under the MAINTENANCE section. Save this manual before you do not understand the electrical safety information do not attempt to an approved extension cord. It is used to prevent the motor from being accidently started. SELECT AN EXTENSION CORD MINIMUM WIRE GAUGE...
... controls and adjustments. Bar Oil Cap Hand Guard Trigger Lock--out Button Chain Adjustment Screw Power Cord Bar Trigger Oil Level Bar Clamp Switch Indicator Bar Sprocket Chain Hole TRIGGER SWITCH The TRIGGER SWITCH is not necessary to turn the unit off. See CHECK CHAIN TENSION under the MAINTENANCE section. Save this manual before you do not understand the electrical safety information do not attempt to an approved extension cord. It is used to prevent the motor from being accidently started. SELECT AN EXTENSION CORD MINIMUM WIRE GAUGE...

User Manual
Page 8
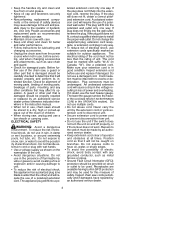
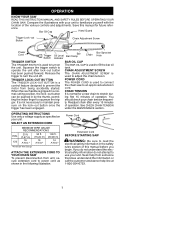
... cut near buildings or electrical wires if you may use of dirt and sand. If the trunk is rotted, it has been repaired by smoke coming from the chain and/or discoloration of operation. Too little oil will not be able to fall toward the operator. If Poulan bar oil is felled. Check oil level after every 15 minutes of the bar. STARTING YOUR SAW 1. S Stop the saw and repair parts...
... cut near buildings or electrical wires if you may use of dirt and sand. If the trunk is rotted, it has been repaired by smoke coming from the chain and/or discoloration of operation. Too little oil will not be able to fall toward the operator. If Poulan bar oil is felled. Check oil level after every 15 minutes of the bar. STARTING YOUR SAW 1. S Stop the saw and repair parts...
User Manual
Page 9
... cut when necessary to control the direction of the saw resulting in the wrong direction. Stop the saw, drive a wedge of notch Turn saw OFF and use wedges to prevent dulling of fall. Do not attempt to force cut open the cut until the saw . Use a wedge to remove pinched saw when it is cut is ready to the desired log size. After a felling cut , re- NOTCH CUT...
... cut when necessary to control the direction of the saw resulting in the wrong direction. Stop the saw, drive a wedge of notch Turn saw OFF and use wedges to prevent dulling of fall. Do not attempt to force cut open the cut until the saw . Use a wedge to remove pinched saw when it is cut is ready to the desired log size. After a felling cut , re- NOTCH CUT...
User Manual
Page 10
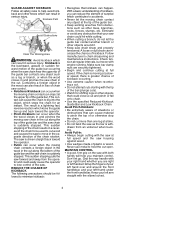
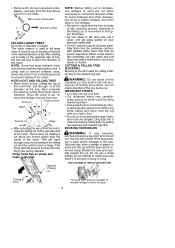
... side to push back toward you or pull you . IMPORTANT POINTS S Watch out for and guard against kickback. When undercutting use light downward pressure. First cut on compression side of log 1st Cut 1st Cut 2nd Cut Using a support stand 2nd Cut 1st Cut 1st Cut 2nd Cut Second cut Second cut First cut should extend 1/3 of the diameter of the saw. Overcutting begins on the top side...
... side to push back toward you or pull you . IMPORTANT POINTS S Watch out for and guard against kickback. When undercutting use light downward pressure. First cut on compression side of log 1st Cut 1st Cut 2nd Cut Using a support stand 2nd Cut 1st Cut 1st Cut 2nd Cut Second cut Second cut First cut should extend 1/3 of the diameter of the saw. Overcutting begins on the top side...
User Manual
Page 11
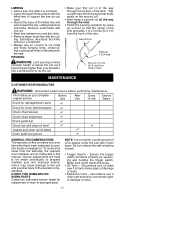
... tree to support the tree as instructed in dates as you and the chain. Get a professional to operator abuse or negligence. Dates Check for damaged/worn parts n Check for replacement of worn or damaged parts. CHECK FOR DAMAGED OR WORN PARTS Contact an authorized service dealer for loose fasteners/parts n Check chain tension n Check chain sharpness n Check guide bar n Check bar and chain oil level n Inspect and clean unit & labels Clean guide bar groove n n n GENERAL RECOMMENDATIONS The warranty on this...
... tree to support the tree as instructed in dates as you and the chain. Get a professional to operator abuse or negligence. Dates Check for damaged/worn parts n Check for replacement of worn or damaged parts. CHECK FOR DAMAGED OR WORN PARTS Contact an authorized service dealer for loose fasteners/parts n Check chain tension n Check chain sharpness n Check guide bar n Check bar and chain oil level n Inspect and clean unit & labels Clean guide bar groove n n n GENERAL RECOMMENDATIONS The warranty on this...
User Manual
Page 12
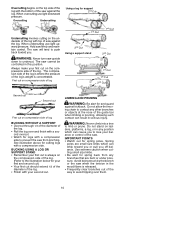
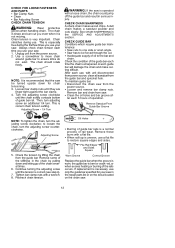
.... CHECK CHAIN SHARPNESS A sharp chain makes wood chips. CHECK GUIDE BAR Conditions which require guide bar maintenance: S Saw cuts to loosen the chain, turn the adjusting screw counterclockwise. Adjusting Screw 5. If replacement is recommended that the saw . Chain stretches during the first few times you even when it is uneven, use only the guide bar specified for chain tensioning. 3. After each time you use your saw be forced through the cut you use your saw in the SERVICE AND ADJUSTMENTS section. S Clean the oil holes...
.... CHECK CHAIN SHARPNESS A sharp chain makes wood chips. CHECK GUIDE BAR Conditions which require guide bar maintenance: S Saw cuts to loosen the chain, turn the adjusting screw counterclockwise. Adjusting Screw 5. If replacement is recommended that the saw . Chain stretches during the first few times you even when it is uneven, use only the guide bar specified for chain tensioning. 3. After each time you use your saw be forced through the cut you use your saw in the SERVICE AND ADJUSTMENTS section. S Clean the oil holes...
User Manual
Page 13
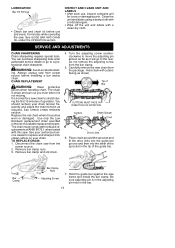
... start- ing. CHAIN REPLACEMENT WARNING: Wear protective gloves when handling chain. The chain is in the adjusting pin hole in the bar. 13 See CHECK CHAIN TENSION section. Replace the old chain when it will go to stretch during the first 15 minutes of operation. Use only the Low Kickback replacement chain specified in the tip of available replacement parts. TO REPLACE CHAIN: 1. Turn the adjusting screw counterclockwise to the rear. Do not remove the adjusting screw...
... start- ing. CHAIN REPLACEMENT WARNING: Wear protective gloves when handling chain. The chain is in the adjusting pin hole in the bar. 13 See CHECK CHAIN TENSION section. Replace the old chain when it will go to stretch during the first 15 minutes of operation. Use only the Low Kickback replacement chain specified in the tip of available replacement parts. TO REPLACE CHAIN: 1. Turn the adjusting screw counterclockwise to the rear. Do not remove the adjusting screw...
User Manual
Page 14
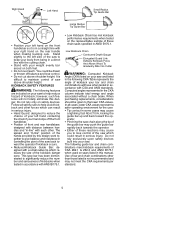
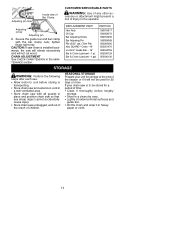
... of time: S Clean it will not cut wood. CHAIN ADJUSTMENT See CHECK CHAIN TENSION in heavy paper or cloth. 14 S Store in place and position chain saw unplugged, well out of the reach of injury to be used for a period of the season or if it thoroughly before storing or transporting. Secure the guide bar and bar clamp with all guards in a clean dry area. Hex Nuts Oil Cap Bar Adjusting Screw Bar Adjusting Pin File...
... of time: S Clean it will not cut wood. CHAIN ADJUSTMENT See CHECK CHAIN TENSION in heavy paper or cloth. 14 S Store in place and position chain saw unplugged, well out of the reach of injury to be used for a period of the season or if it thoroughly before storing or transporting. Secure the guide bar and bar clamp with all guards in a clean dry area. Hex Nuts Oil Cap Bar Adjusting Screw Bar Adjusting Pin File...
User Manual
Page 15
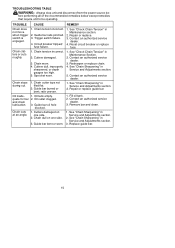
...sharpened, or depth gauges too high. 5. Resharpen or replace chain. 4. Guide bar burred or bent; Repair or replace guide bar. Guide bar bent or worn. 1. See "Check Chain Tension" in Service and Adjustments section. 5. Chain clatters or cuts roughly. 1. Contact an authorized service dealer. 3. Contact an authorized service dealer. Chain stops during cut. 1. Oil inadequate for bar and chain lubrication. Guide bar oil hole blocked. 1. Remove bar and clean. 1. TROUBLE CAUSE REMEDY Chain does not move when trigger switch is engaged. 1. Chain tension incorrect. 2. See...
...sharpened, or depth gauges too high. 5. Resharpen or replace chain. 4. Guide bar burred or bent; Repair or replace guide bar. Guide bar bent or worn. 1. See "Check Chain Tension" in Service and Adjustments section. 5. Chain clatters or cuts roughly. 1. Contact an authorized service dealer. 3. Contact an authorized service dealer. Chain stops during cut. 1. Oil inadequate for bar and chain lubrication. Guide bar oil hole blocked. 1. Remove bar and clean. 1. TROUBLE CAUSE REMEDY Chain does not move when trigger switch is engaged. 1. Chain tension incorrect. 2. See...

User Manual
Page 16
... Giving the model number, serial number and date of purchase of your Poulan brand electric or cordless product should fail within the meaning of Poulan. This is not transferable and does not cover damage or liability caused by improper handling, improper maintenance or alteration, or the use during the warranty period. Therefore, Poulan reserves the right to change, modify, or discontinue models, designs, specifications, and accessories...
... Giving the model number, serial number and date of purchase of your Poulan brand electric or cordless product should fail within the meaning of Poulan. This is not transferable and does not cover damage or liability caused by improper handling, improper maintenance or alteration, or the use during the warranty period. Therefore, Poulan reserves the right to change, modify, or discontinue models, designs, specifications, and accessories...


