
User Manual
Page 2
...engine and wait for all instructions on all times. • Only allow the mower deck to protect themselves and others from serious injury. • Follow the manufacturer's recommendation for Ride-On Mowers IMPORTANT: THIS CUTTING MACHINE IS CAPABLE OF AMPUTATING HANDS AND FEET AND THROWING ...OBJECTS. they can touch hot exhaust / engine parts and burn. These operators should evaluate their ability to operate the riding mower safely enough to plow leaves or other reproductive harm. Wash hands tip-over . • Never carry passengers. • Use extra ...
...engine and wait for all instructions on all times. • Only allow the mower deck to protect themselves and others from serious injury. • Follow the manufacturer's recommendation for Ride-On Mowers IMPORTANT: THIS CUTTING MACHINE IS CAPABLE OF AMPUTATING HANDS AND FEET AND THROWING ...OBJECTS. they can touch hot exhaust / engine parts and burn. These operators should evaluate their ability to operate the riding mower safely enough to plow leaves or other reproductive harm. Wash hands tip-over . • Never carry passengers. • Use extra ...

User Manual
Page 3
...the engine running. • Check grass catcher components and the discharge guard frequently and replace with manufacturer's recommended parts, when necessary. • Mower blades are explosive. • Extinguish all nuts and bolts tight to cool before refueling. • Never fuel the machine indoors. •... On slopes, the weight of control. • Travel slowly and allow children or others in the mowing area for Ride-On Mowers III. SAFETY RULES Safe Operation Practices for another ride and be seriously injured or interfere with plastic liner. SERVICE SAFE HANDLING OF ...
...the engine running. • Check grass catcher components and the discharge guard frequently and replace with manufacturer's recommended parts, when necessary. • Mower blades are explosive. • Extinguish all nuts and bolts tight to cool before refueling. • Never fuel the machine indoors. •... On slopes, the weight of control. • Travel slowly and allow children or others in the mowing area for Ride-On Mowers III. SAFETY RULES Safe Operation Practices for another ride and be seriously injured or interfere with plastic liner. SERVICE SAFE HANDLING OF ...
User Manual
Page 8
... Operation System (ROS) are working properly (See the Operation and Maintenance sections in this manual). ✓ It is important to ensure optimum mower performance. • Slide gauge wheel bar down into bracket channel, Be sure that the brake is important for the first time....YOU RECEIVE THE BEST PERFORMANCE AND SATISFACTION FROM THIS QUALITY PRODUCT. Operate them before you learn how to -rear for leveling). ✓ Check mower and drive belts. Be sure they are routed correctly. Follow proper starting and transmission purging instructions (See "TO START ENGINE" and "PURGE...
... Operation System (ROS) are working properly (See the Operation and Maintenance sections in this manual). ✓ It is important to ensure optimum mower performance. • Slide gauge wheel bar down into bracket channel, Be sure that the brake is important for the first time....YOU RECEIVE THE BEST PERFORMANCE AND SATISFACTION FROM THIS QUALITY PRODUCT. Operate them before you learn how to -rear for leveling). ✓ Check mower and drive belts. Be sure they are routed correctly. Follow proper starting and transmission purging instructions (See "TO START ENGINE" and "PURGE...

User Manual
Page 9
... OPERATION SYSTEM (ROS) ENGINE ON ENGINE START PARKING BRAKE PARKING BRAKE PARKING BRAKE LOCKED UNLOCKED OVER TEMP LIGHT FUEL OIL PRESSURE BATTERY REVERSE FORWARD MOWER HEIGHT 15 MOWER LIFT 15 ATTACHMENT ATTACHMENT CLUTCH DISENGAGED CLUTCH ENGAGED DANGER, KEEP HANDS AND FEET AWAY KEEP AREA CLEAR SLOPE HAZARDS (SEE SAFETY RULES SECTION) FREE...
... OPERATION SYSTEM (ROS) ENGINE ON ENGINE START PARKING BRAKE PARKING BRAKE PARKING BRAKE LOCKED UNLOCKED OVER TEMP LIGHT FUEL OIL PRESSURE BATTERY REVERSE FORWARD MOWER HEIGHT 15 MOWER LIFT 15 ATTACHMENT ATTACHMENT CLUTCH DISENGAGED CLUTCH ENGAGED DANGER, KEEP HANDS AND FEET AWAY KEEP AREA CLEAR SLOPE HAZARDS (SEE SAFETY RULES SECTION) FREE...
User Manual
Page 10
...BRAKE LIGHT SWITCH HEIGHT ADJUSTMENT KNOB 02874 FIG. 5 MOTION CONTROL LEVER Our tractors conform to adjust the mower cutting height. Used to engage the mower blades or other attachments mounted to your tractor. Used when starting and stopping the engine. Used for...SWITCH - PARKING BRAKE - Save this manual for declutching and braking the tractor and starting the engine. Selects the speed and direction of mower deck or other powered attachment while in reverse. 10 ATTACHMENT CLUTCH SWITCH - Disengages transmission for starting a cold engine. HEIGHT ADJUSTMENT KNOB...
...BRAKE LIGHT SWITCH HEIGHT ADJUSTMENT KNOB 02874 FIG. 5 MOTION CONTROL LEVER Our tractors conform to adjust the mower cutting height. Used to engage the mower blades or other attachments mounted to your tractor. Used when starting and stopping the engine. Used for...SWITCH - PARKING BRAKE - Save this manual for declutching and braking the tractor and starting the engine. Selects the speed and direction of mower deck or other powered attachment while in reverse. 10 ATTACHMENT CLUTCH SWITCH - Disengages transmission for starting a cold engine. HEIGHT ADJUSTMENT KNOB...

User Manual
Page 11
... is approximately 1-1/2" to disengage. IMPORTANT: THE MOTION CONTROL LEVER DOES NOT RETURN TO NEUTRAL (N) POSITION WHEN THE CLUTCH/ TO ADJUST MOWER CUTTING HEIGHT (See Fig. 6) The cutting height is equipped with motion control lever in to 4". heights are measured from clutch/brake...DISENGAGED" POSITION TO MOVE FORWARD AND BACKWARD (See Fig. 6) The direction and speed of grass. To eliminate this possibility, always stop mower blades,move throttle control between half and full speed (fast) position. FIG. 6 • Start tractor with an operator presence sensing switch...
... is approximately 1-1/2" to disengage. IMPORTANT: THE MOTION CONTROL LEVER DOES NOT RETURN TO NEUTRAL (N) POSITION WHEN THE CLUTCH/ TO ADJUST MOWER CUTTING HEIGHT (See Fig. 6) The cutting height is equipped with motion control lever in to 4". heights are measured from clutch/brake...DISENGAGED" POSITION TO MOVE FORWARD AND BACKWARD (See Fig. 6) The direction and speed of grass. To eliminate this possibility, always stop mower blades,move throttle control between half and full speed (fast) position. FIG. 6 • Start tractor with an operator presence sensing switch...
User Manual
Page 12
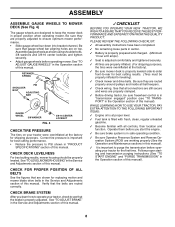
... Remove retainer spring and clevis pin which secure each gauge wheel bar. • Lower gauge wheels to engine "ON" position. JUST MOWER CUTTING HEIGHT" in most terrain conditions. Any attempt by the operator to leave the seat with tractor on rough, rolling terrain or hills.... with the attachment clutch engaged while mowing is necessary to align holes in operating position. RETAINER SPRING CLEVIS PIN FIG. 7 TO OPERATE MOWER (See Fig. 8) Your tractor is equipped with an operator presence sensing switch. disengage attachment clutch control. OPERATION TO ADJUST GAUGE WHEELS ...
... Remove retainer spring and clevis pin which secure each gauge wheel bar. • Lower gauge wheels to engine "ON" position. JUST MOWER CUTTING HEIGHT" in most terrain conditions. Any attempt by the operator to leave the seat with tractor on rough, rolling terrain or hills.... with the attachment clutch engaged while mowing is necessary to align holes in operating position. RETAINER SPRING CLEVIS PIN FIG. 7 TO OPERATE MOWER (See Fig. 8) Your tractor is equipped with an operator presence sensing switch. disengage attachment clutch control. OPERATION TO ADJUST GAUGE WHEELS ...
User Manual
Page 14
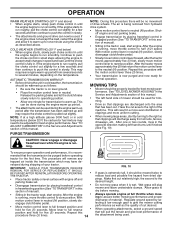
...and ground drive can now be used . Have the cut relatively high; ning. This procedure will suit the terrain and give the mower cutting performance as well as the quality of material. IMPORTANT: SHOULD YOUR TRANSMISSION REQUIRE REMOVAL FOR SERVICE OR REPLACEMENT, IT SHOULD BE ...cold temperatures (below ) • When engine starts, slowly push choke control in until the engine begins to run smoothly. MOWING TIPS • Mower should be pulled out slightly. Always operate engine at a high altitude (above 3000 feet) or in neutral (N) position, slowly disengage clutch/brake pedal...
...and ground drive can now be used . Have the cut relatively high; ning. This procedure will suit the terrain and give the mower cutting performance as well as the quality of material. IMPORTANT: SHOULD YOUR TRANSMISSION REQUIRE REMOVAL FOR SERVICE OR REPLACEMENT, IT SHOULD BE ...cold temperatures (below ) • When engine starts, slowly push choke control in until the engine begins to run smoothly. MOWING TIPS • Mower should be pulled out slightly. Always operate engine at a high altitude (above 3000 feet) or in neutral (N) position, slowly disengage clutch/brake pedal...

User Manual
Page 15
... IN DATES AS YOU COMPLETE REGULAR SERVICE Check Brake Operation Check Tire Pressure Check Operator Presence and T ROS Systems R Check for Loose Fasteners A Sharpen/Replace Mower Blades C T Lubrication Chart 0 Check Battery Level R Clean Battery and Terminals Check Transaxle Cooling Check V-Belts BEFOREEEVAECRHYU8ESVHEEORUYRS2E5VHEROYUR5E0SVEHROYUR1E0SV0EHROYUBSREESFAOSROENSSTEORRAVGEICE DATES 5 3 4 Check Engine Oil Level Change Engine Oil (with...
... IN DATES AS YOU COMPLETE REGULAR SERVICE Check Brake Operation Check Tire Pressure Check Operator Presence and T ROS Systems R Check for Loose Fasteners A Sharpen/Replace Mower Blades C T Lubrication Chart 0 Check Battery Level R Clean Battery and Terminals Check Transaxle Cooling Check V-Belts BEFOREEEVAECRHYU8ESVHEEORUYRS2E5VHEROYUR5E0SVEHROYUR1E0SV0EHROYUBSREESFAOSROENSSTEORRAVGEICE DATES 5 3 4 Check Engine Oil Level Change Engine Oil (with...
User Manual
Page 16
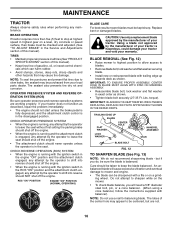
... (When using a cone balancer, follow the instructions supplied with trailing edge up towards deck as shown. Do not attempt to sharpen while on the mower. • To check blade balance, you do not recommend sharpening blade - BRAKE OPERATION If tractor requires more than five (5) feet to stop... to shift into reverse should NOT shut off the engine. ROS "ON" POSITION ENGINE "ON" POSITION (NORMAL OPERATING) BLADE CARE For best results mower blades must be taken to keep the blade balanced. Replace bent or damaged blades. NOTE: Do not use a nail for balancing blade. BLADE REMOVAL...
... (When using a cone balancer, follow the instructions supplied with trailing edge up towards deck as shown. Do not attempt to sharpen while on the mower. • To check blade balance, you do not recommend sharpening blade - BRAKE OPERATION If tractor requires more than five (5) feet to stop... to shift into reverse should NOT shut off the engine. ROS "ON" POSITION ENGINE "ON" POSITION (NORMAL OPERATING) BLADE CARE For best results mower blades must be taken to keep the blade balanced. Replace bent or damaged blades. NOTE: Do not use a nail for balancing blade. BLADE REMOVAL...
User Manual
Page 18
...;er and spark arrester (if equipped) as shown. • Remove the drain tube and replace the cap onto to prevent engine damage from tractor and mower. 18 Use compressed air or a leaf blower to carburetor, replacement is used more often under dusty conditions. Service air cleaner more than 100 hours in...
...;er and spark arrester (if equipped) as shown. • Remove the drain tube and replace the cap onto to prevent engine damage from tractor and mower. 18 Use compressed air or a leaf blower to carburetor, replacement is used more often under dusty conditions. Service air cleaner more than 100 hours in...

User Manual
Page 19
... the right side of tractor. • Place attachment clutch switch in "DISENGAGED" position. • Move attachment lift lever forward to lower mower to its lowest position. • Roll belt off electric clutch pulley. • Disconnect anti-sway bar from chassis bracket by removing retainer spring... are over or underinflated, you will be mounted on level ground or driveway. TRACTOR TO REMOVE MOWER (See Fig. 17) Mower will not properly adjust your mower. SERVICE AND ADJUSTMENTS WARNING: TO AVOID SERIOUS INJURY, BEFORE PERFORMING ANY SERVICE OR ADJUSTMENTS: • Depress clutch...
... the right side of tractor. • Place attachment clutch switch in "DISENGAGED" position. • Move attachment lift lever forward to lower mower to its lowest position. • Roll belt off electric clutch pulley. • Disconnect anti-sway bar from chassis bracket by removing retainer spring... are over or underinflated, you will be mounted on level ground or driveway. TRACTOR TO REMOVE MOWER (See Fig. 17) Mower will not properly adjust your mower. SERVICE AND ADJUSTMENTS WARNING: TO AVOID SERIOUS INJURY, BEFORE PERFORMING ANY SERVICE OR ADJUSTMENTS: • Depress clutch...
User Manual
Page 20
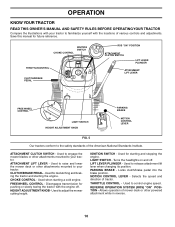
...PULLEY IDLER PULLEYS • Before making any necessary adjustments, check that the front is approximately 1/8" to ground. Tighten nut "E" on right side of mower, tighten lift link adjustment nut on that side. Distance "A" on both front links are equal in length. • If links are not equal ...If adjustment is 1/8" to 1/2" lower at front than rear, tighten nut "F" against trunnion on both front links. • To raise front of mower, measure height from mower. FIG. 19 FRONT-TO-BACK ADJUSTMENT (See Figs. 20 and 21) IMPORTANT: DECK MUST BE LEVEL SIDE-TO-SIDE. NOTE: Three full ...
...PULLEY IDLER PULLEYS • Before making any necessary adjustments, check that the front is approximately 1/8" to ground. Tighten nut "E" on right side of mower, tighten lift link adjustment nut on that side. Distance "A" on both front links are equal in length. • If links are not equal ...If adjustment is 1/8" to 1/2" lower at front than rear, tighten nut "F" against trunnion on both front links. • To raise front of mower, measure height from mower. FIG. 19 FRONT-TO-BACK ADJUSTMENT (See Figs. 20 and 21) IMPORTANT: DECK MUST BE LEVEL SIDE-TO-SIDE. NOTE: Three full ...

User Manual
Page 21
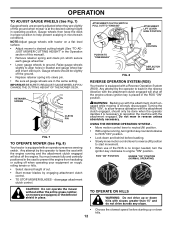
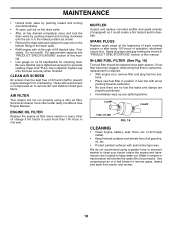
.... tion of the transaxle. The rear wheels must be replaced. Engage parking brake. Readjust if necessary. BELT REMOVAL • Remove mower (See "TO REMOVE MOWER" in this section of left footrest. BELT INSTALLATION • Carefully work new belt down and en- SERVICE AND ADJUSTMENTS TO CHECK ... to be checked and adjusted. NOTE: Observe entire motion drive belt and position of all belt guides and keepers. • Install mower (See "TO INSTALL MOWER" in this sec- ELECTRIC CLUTCH CLUTCH LOCATOR CLUTCHING IDLER STATIONARY IDLER OPERATING ARM 01513 DO NOT TOUCH THIS NUT.
.... tion of the transaxle. The rear wheels must be replaced. Engage parking brake. Readjust if necessary. BELT REMOVAL • Remove mower (See "TO REMOVE MOWER" in this section of left footrest. BELT INSTALLATION • Carefully work new belt down and en- SERVICE AND ADJUSTMENTS TO CHECK ... to be checked and adjusted. NOTE: Observe entire motion drive belt and position of all belt guides and keepers. • Install mower (See "TO INSTALL MOWER" in this sec- ELECTRIC CLUTCH CLUTCH LOCATOR CLUTCHING IDLER STATIONARY IDLER OPERATING ARM 01513 DO NOT TOUCH THIS NUT.

User Manual
Page 22
... to creep. • Tighten adjustment bolt securely. • Start engine and test. • If tractor still creeps, repeat above steps until tractor does not move mower deck height to the neutral (N) (lock gate) position. • Tighten adjustment bolt securely. Tire sealant also prevents tire dry rot and corrosion. If "jumper cables...
... to creep. • Tighten adjustment bolt securely. • Start engine and test. • If tractor still creeps, repeat above steps until tractor does not move mower deck height to the neutral (N) (lock gate) position. • Tighten adjustment bolt securely. Tire sealant also prevents tire dry rot and corrosion. If "jumper cables...

User Manual
Page 24
...; Use fresh fuel next season. Add stabilizer to cool before painting. Do not empty the gas tank and carburetor if using fuel stabilizer. When mower is to be stored for damage, breakage and wear. Inspect moving parts for a period of time, clean it thoroughly, remove all dirt, grease.... 24 placement instructions in the Service and Adjustments section of this manual). • Inspect and replace belts, if necessary (See belt re- TRACTOR Remove mower from dust and dirt. • Cover your tractor to rust. Store in a clean, dry area. • Clean entire tractor (See "CLEANING"...
...; Use fresh fuel next season. Add stabilizer to cool before painting. Do not empty the gas tank and carburetor if using fuel stabilizer. When mower is to be stored for damage, breakage and wear. Inspect moving parts for a period of time, clean it thoroughly, remove all dirt, grease.... 24 placement instructions in the Service and Adjustments section of this manual). • Inspect and replace belts, if necessary (See belt re- TRACTOR Remove mower from dust and dirt. • Cover your tractor to rust. Store in a clean, dry area. • Clean entire tractor (See "CLEANING"...

User Manual
Page 25
... battery. 4. Recharge or replace battery. 2. Adjust throttle control. 3. Bad spark plug. 3. Dirty fuel filter. 5. Carburetor out of mower housing. 4. Blown fuse. 5. Build-up of fuel. 2. Clean/replace air filter. 6. Faulty operator presence switch(es). 1. Replace spark... plug. 5. Check all wiring. 4. Out of grass, leaves and trash under mower. 4. Faulty solenoid or starter. 9. Spark plug wire loose. 11. Raise cutting height/reduce speed. 2. TROUBLESHOOTING POINTS PROBLEM Will not ...
... battery. 4. Recharge or replace battery. 2. Adjust throttle control. 3. Bad spark plug. 3. Dirty fuel filter. 5. Carburetor out of mower housing. 4. Blown fuse. 5. Build-up of fuel. 2. Clean/replace air filter. 6. Faulty operator presence switch(es). 1. Replace spark... plug. 5. Check all wiring. 4. Out of grass, leaves and trash under mower. 4. Faulty solenoid or starter. 9. Spark plug wire loose. 11. Raise cutting height/reduce speed. 2. TROUBLESHOOTING POINTS PROBLEM Will not ...

User Manual
Page 26
... is engaged. Bent blade mandrel. 5. Clean underside of grass, leaves, and trash around mandrels. 1. Replace blade mandrel. 5. Mower blades will not charge 1. Worn, bent or loose blade. 7. Shift to ROS "ON" position. Replace/sharpen blade. Faulty... 1. Replace motion drive belt. 3. CORRECTION 1. Frozen idler pulley. 4. Remove obstruction. 2. Buildup of mower housing. 8. Mower drive belt worn. 9. Clogged mower deck vent holes from buildup of mower housing. 4. Bulb(s) or lamp(s) burned out. 3. Turn light switch "ON". 2. Replace fuse. ...
... is engaged. Bent blade mandrel. 5. Clean underside of grass, leaves, and trash around mandrels. 1. Replace blade mandrel. 5. Mower blades will not charge 1. Worn, bent or loose blade. 7. Shift to ROS "ON" position. Replace/sharpen blade. Faulty... 1. Replace motion drive belt. 3. CORRECTION 1. Frozen idler pulley. 4. Remove obstruction. 2. Buildup of mower housing. 8. Mower drive belt worn. 9. Clogged mower deck vent holes from buildup of mower housing. 4. Bulb(s) or lamp(s) burned out. 3. Turn light switch "ON". 2. Replace fuse. ...


