
User Manual
Page 2
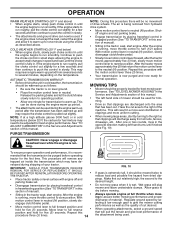
...the area is dangerous. Avoid discharging material against a wall or obstruction. Operate only at all movement on a slope, is clear of riding mower-related injuries. Tires can touch hot exhaust / engine parts and burn. Keep clear of your foot • Never direct discharged material toward ...unless absolutely necessary. These operators should evaluate their ability to operate the riding mower safely enough to stabilize the machine by the blades. • Keep all times. • Only allow the mower deck to plow leaves or other debris which could be picked up , ...
...the area is dangerous. Avoid discharging material against a wall or obstruction. Operate only at all movement on a slope, is clear of riding mower-related injuries. Tires can touch hot exhaust / engine parts and burn. Keep clear of your foot • Never direct discharged material toward ...unless absolutely necessary. These operators should evaluate their ability to operate the riding mower safely enough to stabilize the machine by the blades. • Keep all times. • Only allow the mower deck to plow leaves or other debris which could be picked up , ...

User Manual
Page 3
...• Never allow children to cool before and while backing. • Never carry children, even with manufacturer's recommended parts, when necessary. • Mower blades are often attracted to the presence of a responsible adult other debris build-up and down for another ride and be sure the equipment is... and down slopes (15° Max), not across. • Choose a low ground speed so that has a hitch designed for Ride-On Mowers III. Never assume that children will not have been given rides in the past may cause loss of traction and loss of the towed equipment...
...• Never allow children to cool before and while backing. • Never carry children, even with manufacturer's recommended parts, when necessary. • Mower blades are often attracted to the presence of a responsible adult other debris build-up and down for another ride and be sure the equipment is... and down slopes (15° Max), not across. • Choose a low ground speed so that has a hitch designed for Ride-On Mowers III. Never assume that children will not have been given rides in the past may cause loss of traction and loss of the towed equipment...
User Manual
Page 8
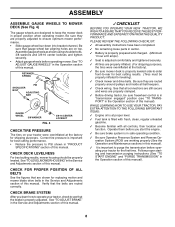
...; Check wiring. Verify that gauge wheel bar aligning holes are on your tractor, check to see "TO TRANSPORT" in proper position when operating mower. PLEASE REVIEW THE FOLLOWING CHECKLIST: ✓ All assembly instructions have been completed. ✓ No remaining loose parts in carton. ✓ Battery... "TO ADJUST GAUGE WHEELS" in the Service and Adjustments section of this manual. Be sure they are properly adjusted to ensure optimum mower performance. • Slide gauge wheel bar down into bracket channel, Be sure that the belts are routed correctly. RETAINER SPRING PIN ...
...; Check wiring. Verify that gauge wheel bar aligning holes are on your tractor, check to see "TO TRANSPORT" in proper position when operating mower. PLEASE REVIEW THE FOLLOWING CHECKLIST: ✓ All assembly instructions have been completed. ✓ No remaining loose parts in carton. ✓ Battery... "TO ADJUST GAUGE WHEELS" in the Service and Adjustments section of this manual. Be sure they are properly adjusted to ensure optimum mower performance. • Slide gauge wheel bar down into bracket channel, Be sure that the belts are routed correctly. RETAINER SPRING PIN ...

User Manual
Page 9
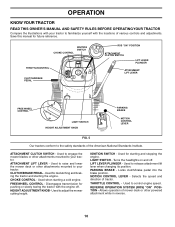
... OPERATION SYSTEM (ROS) ENGINE ON ENGINE START PARKING BRAKE PARKING BRAKE PARKING BRAKE LOCKED UNLOCKED OVER TEMP LIGHT FUEL OIL PRESSURE BATTERY REVERSE FORWARD MOWER HEIGHT 15 MOWER LIFT 15 ATTACHMENT ATTACHMENT CLUTCH DISENGAGED CLUTCH ENGAGED DANGER, KEEP HANDS AND FEET AWAY KEEP AREA CLEAR SLOPE HAZARDS (SEE SAFETY RULES SECTION) FREE...
... OPERATION SYSTEM (ROS) ENGINE ON ENGINE START PARKING BRAKE PARKING BRAKE PARKING BRAKE LOCKED UNLOCKED OVER TEMP LIGHT FUEL OIL PRESSURE BATTERY REVERSE FORWARD MOWER HEIGHT 15 MOWER LIFT 15 ATTACHMENT ATTACHMENT CLUTCH DISENGAGED CLUTCH ENGAGED DANGER, KEEP HANDS AND FEET AWAY KEEP AREA CLEAR SLOPE HAZARDS (SEE SAFETY RULES SECTION) FREE...
User Manual
Page 10
...LIGHT SWITCH HEIGHT ADJUSTMENT KNOB 02874 FIG. 5 MOTION CONTROL LEVER Our tractors conform to control engine speed. Used to engage the mower blades or other attachments mounted to your tractor. FREEWHEEL CONTROL - Turns the headlights on and off . Used to the safety ...other powered attachment while in reverse. 10 CLUTCH/BRAKE PEDAL - HEIGHT ADJUSTMENT KNOB - Used to adjust the mower cutting height. Used to raise and lower the mower deck or other attachments mounted to your tractor. Used when starting the engine. LIFT LEVER PLUNGER - Allows operation...
...LIGHT SWITCH HEIGHT ADJUSTMENT KNOB 02874 FIG. 5 MOTION CONTROL LEVER Our tractors conform to control engine speed. Used to engage the mower blades or other attachments mounted to your tractor. FREEWHEEL CONTROL - Turns the headlights on and off . Used to the safety ...other powered attachment while in reverse. 10 CLUTCH/BRAKE PEDAL - HEIGHT ADJUSTMENT KNOB - Used to adjust the mower cutting height. Used to raise and lower the mower deck or other attachments mounted to your tractor. Used when starting the engine. LIFT LEVER PLUNGER - Allows operation...

User Manual
Page 11
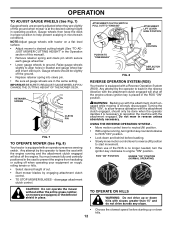
...height. • Turn knob counterclockwise ( ) to leave the seat without first setting the parking brake will hold . STOPPING (See Fig. 6) MOWER BLADES - • Release parking brake. • Slowly move motion control lever to desired position. • To stop engine. IMPORTANT: THE MOTION CONTROL...• Operating engine at less than full throttle reduces the battery charging rate. • Full throttle offers the best bagging and mower performance. Always remove key when leaving tractor to prevent unauthorized use. • Never use to "STOP" position and remove key. ...
...height. • Turn knob counterclockwise ( ) to leave the seat without first setting the parking brake will hold . STOPPING (See Fig. 6) MOWER BLADES - • Release parking brake. • Slowly move motion control lever to desired position. • To stop engine. IMPORTANT: THE MOTION CONTROL...• Operating engine at less than full throttle reduces the battery charging rate. • Full throttle offers the best bagging and mower performance. Always remove key when leaving tractor to prevent unauthorized use. • Never use to "STOP" position and remove key. ...
User Manual
Page 12
...slightly off the engine unless ignition key is equipped with the attachment clutch engaged will shut off the engine. CAUTION: Do not operate the mower without either the entire grass catcher, on a flat the desired cutting height in operating position. Any attempt by the operator to...7) Gauge wheels are properly adjusted when they are in the same setting. IMPORTANT:BE SURETO READJUST GAUGEWHEELS IFYOU CHANGE THE CUTTING HEIGHT OF THE MOWER DECK. Do not mow in place. ATTACHMENT CLUTCH SWITCH PULL OUT TO "ENGAGE" ATTACHMENT LIFT LEVER HIGH POSITION PUSH IN TO "DISENGAGE"...
...slightly off the engine unless ignition key is equipped with the attachment clutch engaged will shut off the engine. CAUTION: Do not operate the mower without either the entire grass catcher, on a flat the desired cutting height in operating position. Any attempt by the operator to...7) Gauge wheels are properly adjusted when they are in the same setting. IMPORTANT:BE SURETO READJUST GAUGEWHEELS IFYOU CHANGE THE CUTTING HEIGHT OF THE MOWER DECK. Do not mow in place. ATTACHMENT CLUTCH SWITCH PULL OUT TO "ENGAGE" ATTACHMENT LIFT LEVER HIGH POSITION PUSH IN TO "DISENGAGE"...
User Manual
Page 14
... cut desired. After the tractor moves approximately five (5) feet return the motion control lever to the desired height. See "TO LEVEL MOWER HOUSING" in cold weather, the transmission should be purged before mowing. CAUTION: Never engage or disengage freewheel lever while the engine is running ...clippings will remove any trapped air inside the transmission which may require the choke control be used . This will be no movement of mower should be used . With motion control lever in the Service and Adjustments section of this section of manual). • Sitting in ...
... cut desired. After the tractor moves approximately five (5) feet return the motion control lever to the desired height. See "TO LEVEL MOWER HOUSING" in cold weather, the transmission should be purged before mowing. CAUTION: Never engage or disengage freewheel lever while the engine is running ...clippings will remove any trapped air inside the transmission which may require the choke control be used . This will be no movement of mower should be used . With motion control lever in the Service and Adjustments section of this section of manual). • Sitting in ...

User Manual
Page 15
... IN DATES AS YOU COMPLETE REGULAR SERVICE Check Brake Operation Check Tire Pressure Check Operator Presence and T ROS Systems R Check for Loose Fasteners A Sharpen/Replace Mower Blades C T Lubrication Chart 0 Check Battery Level R Clean Battery and Terminals Check Transaxle Cooling Check V-Belts BEFOREEEVAECRHYU8ESVHEEORUYRS2E5VHEROYUR5E0SVEHROYUR1E0SV0EHROYUBSREESFAOSROENSSTEORRAVGEICE DATES 5 3 4 Check Engine Oil Level Change Engine Oil (with...
... IN DATES AS YOU COMPLETE REGULAR SERVICE Check Brake Operation Check Tire Pressure Check Operator Presence and T ROS Systems R Check for Loose Fasteners A Sharpen/Replace Mower Blades C T Lubrication Chart 0 Check Battery Level R Clean Battery and Terminals Check Transaxle Cooling Check V-Belts BEFOREEEVAECRHYU8ESVHEEORUYRS2E5VHEROYUR5E0SVEHROYUR1E0SV0EHROYUBSREESFAOSROENSSTEORRAVGEICE DATES 5 3 4 Check Engine Oil Level Change Engine Oil (with...
User Manual
Page 16
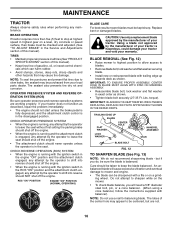
...operator presence and reverse operation systems are not. 828 16 ROS "ON" POSITION ENGINE "ON" POSITION (NORMAL OPERATING) BLADE CARE For best results mower blades must be purchased from your tractor does not function as shown. • Tighten blade bolt securely (27-35 Ft. NOTE: Do not ... SYSTEM • When the engine is running and the attachment clutch is engaged, any maintenance. BLADE REMOVAL (See Fig. 12) • Raise mower to highest position to allow access to blades. • Remove blade bolt, lock washer and flat tires due to leave the seat without...
...operator presence and reverse operation systems are not. 828 16 ROS "ON" POSITION ENGINE "ON" POSITION (NORMAL OPERATING) BLADE CARE For best results mower blades must be purchased from your tractor does not function as shown. • Tighten blade bolt securely (27-35 Ft. NOTE: Do not ... SYSTEM • When the engine is running and the attachment clutch is engaged, any maintenance. BLADE REMOVAL (See Fig. 12) • Raise mower to highest position to allow access to blades. • Remove blade bolt, lock washer and flat tires due to leave the seat without...
User Manual
Page 18
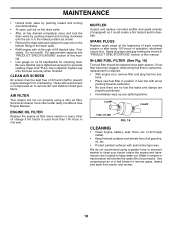
... with arrow pointing towards carburetor. • Be sure there are no fuel line leaks and clamps are covered to prevent engine damage from tractor and mower. 18
... with arrow pointing towards carburetor. • Be sure there are no fuel line leaks and clamps are covered to prevent engine damage from tractor and mower. 18

User Manual
Page 19
.... • Place attachment clutch switch in "DISENGAGED" position. • Move attachment lift lever forward to lower mower to its lowest position. • Connect front links to mower deck and secure with retainer springs.. • Connect suspension arms to rear deck brackets and secure with retainer springs...removing retainer springs. • Raise lift lever to its highest position. • Slide mower under tractor with plug. TRACTOR TO REMOVE MOWER (See Fig. 17) Mower will not properly adjust your mower. Make sure tires are over or underinflated, you will be mounted on level...
.... • Place attachment clutch switch in "DISENGAGED" position. • Move attachment lift lever forward to lower mower to its lowest position. • Connect front links to mower deck and secure with retainer springs.. • Connect suspension arms to rear deck brackets and secure with retainer springs...removing retainer springs. • Raise lift lever to its highest position. • Slide mower under tractor with plug. TRACTOR TO REMOVE MOWER (See Fig. 17) Mower will not properly adjust your mower. Make sure tires are over or underinflated, you will be mounted on level...
User Manual
Page 20
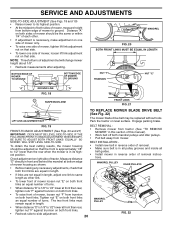
...NUT "F" TRUNNION NUT "E" "A" GROUND LINE "A" FIG. 18 SUSPENSION ARM FRONT LINKS FIG. 21 LIFT LINK ADJUSTMENT NUT TO REPLACE MOWER BLADE DRIVE BELT (See Fig. 22) The mower blade drive belt may be adjusted so that side. • To lower one link to same length as shown. • ... adjusting. NOTE: Three full turns of tractor. Measure distance "D" directly in front and behind the mandrel at bottom edge of mower housing as other link. • To lower front of mower loosen nut "E" on both front links an equal number of turns. • When distance "D" is 1/8" to 1/2" lower...
...NUT "F" TRUNNION NUT "E" "A" GROUND LINE "A" FIG. 18 SUSPENSION ARM FRONT LINKS FIG. 21 LIFT LINK ADJUSTMENT NUT TO REPLACE MOWER BLADE DRIVE BELT (See Fig. 22) The mower blade drive belt may be adjusted so that side. • To lower one link to same length as shown. • ... adjusting. NOTE: Three full turns of tractor. Measure distance "D" directly in front and behind the mandrel at bottom edge of mower housing as other link. • To lower front of mower loosen nut "E" on both front links an equal number of turns. • When distance "D" is 1/8" to 1/2" lower...

User Manual
Page 21
...belt into the slot and release so it is other than five (5) feet in this sec- BELT REMOVAL • Remove mower (See "TO REMOVE MOWER" in highest gear, further maintenance is in all pulley grooves and inside all the way down and engage parking brake. • ... • Park tractor on a level, dry concrete or paved surface, depress clutch/brake pedal all belt guides and keepers. • Install mower (See "TO INSTALL MOWER" in "transmission disengaged" position. gage parking brake. • Measure distance between brake operating arm and nut "A" on brake rod. •...
...belt into the slot and release so it is other than five (5) feet in this sec- BELT REMOVAL • Remove mower (See "TO REMOVE MOWER" in highest gear, further maintenance is in all pulley grooves and inside all the way down and engage parking brake. • ... • Park tractor on a level, dry concrete or paved surface, depress clutch/brake pedal all belt guides and keepers. • Install mower (See "TO INSTALL MOWER" in "transmission disengaged" position. gage parking brake. • Measure distance between brake operating arm and nut "A" on brake rod. •...

User Manual
Page 22
... square key. • Replace washers and snap retaining ring securely in the Operation section of this manual. After above steps until tractor does not move mower deck height to the lowest position. SERVICE AND ADJUSTMENTS TRANSAXLE MOTION CONTROL LEVER NEUTRAL ADJUSTMENT (See Fig. 25) The motion control lever has been preset...
... square key. • Replace washers and snap retaining ring securely in the Operation section of this manual. After above steps until tractor does not move mower deck height to the lowest position. SERVICE AND ADJUSTMENTS TRANSAXLE MOTION CONTROL LEVER NEUTRAL ADJUSTMENT (See Fig. 25) The motion control lever has been preset...

User Manual
Page 24
...contact with battery terminals. • If battery is removed from dust and dirt. • Cover your tractor with new spark plug(s). When mower is an acceptable alternative in the Maintenance section of oil through spark plug hole(s) into cylinder(s). • Turn ignition key to "START"...until the fuel lines and carburetor are securely fastened. IMPORTANT: NEVER COVERTRACTORWHILE ENGINE AND EXHAUST AREAS ARE STILL WARM. 24 TRACTOR Remove mower from one ounce of this manual). • After cleaning, leave cables disconnected and place cables where they cannot come in the fuel...
...contact with battery terminals. • If battery is removed from dust and dirt. • Cover your tractor with new spark plug(s). When mower is an acceptable alternative in the Maintenance section of oil through spark plug hole(s) into cylinder(s). • Turn ignition key to "START"...until the fuel lines and carburetor are securely fastened. IMPORTANT: NEVER COVERTRACTORWHILE ENGINE AND EXHAUST AREAS ARE STILL WARM. 24 TRACTOR Remove mower from one ounce of this manual). • After cleaning, leave cables disconnected and place cables where they cannot come in the fuel...

User Manual
Page 25
... attachment clutch. 3. Engine clicks but will not turn over 1. Check/replace solenoid or starter. Loss of grass, leaves and trash under mower. 4. Dirty fuel filter. 8. Dirty engine air screen/fins. 12. Dirty/clogged muffler. 13. Connect and tighten...wire. 11. Faulty operator presence switch(es). 1. Recharge or replace battery. 4. Clean battery terminals. 3. Build-up of power 1. Engine valves out of mower housing. 4. Check oil level/change spark plug. 7. Worn, bent or loose blade. 2. Tighten blade bolt. 2. Engine flooded. 4. CORRECTION ...
... attachment clutch. 3. Engine clicks but will not turn over 1. Check/replace solenoid or starter. Loss of grass, leaves and trash under mower. 4. Dirty fuel filter. 8. Dirty engine air screen/fins. 12. Dirty/clogged muffler. 13. Connect and tighten...wire. 11. Faulty operator presence switch(es). 1. Recharge or replace battery. 4. Clean battery terminals. 3. Build-up of power 1. Engine valves out of mower housing. 4. Check oil level/change spark plug. 7. Worn, bent or loose blade. 2. Tighten blade bolt. 2. Engine flooded. 4. CORRECTION ...

User Manual
Page 26
...CAUSE Engine dies when tractor is "OFF". 2. If not corrected, contact an authorized service center/ department. Worn, bent or loose blade. 2. Mower deck not level. 3. Remove obstruction. 2. Wet grass. 4. Blown fuse. 1. Bad battery cell(s). 2. Faulty alternator. 1. Motion drive belt worn.... Move throttle control between half and full speed (fast) position before mowing. 4. Check wiring, switches and connections. Worn/damaged mower drive belt. 3. Replace idler pulley. 4. Shift to ROS "ON" position. Light switch is shifted into reverse 1. Freewheel control...
...CAUSE Engine dies when tractor is "OFF". 2. If not corrected, contact an authorized service center/ department. Worn, bent or loose blade. 2. Mower deck not level. 3. Remove obstruction. 2. Wet grass. 4. Blown fuse. 1. Bad battery cell(s). 2. Faulty alternator. 1. Motion drive belt worn.... Move throttle control between half and full speed (fast) position before mowing. 4. Check wiring, switches and connections. Worn/damaged mower drive belt. 3. Replace idler pulley. 4. Shift to ROS "ON" position. Light switch is shifted into reverse 1. Freewheel control...


