

User Manual
Page 2
...make sudden changes in severe injury or death. discharging material against a wall or obstruction. These operators should evaluate their ability to operate the riding mower safely enough to a complete stop or shift while on a slope. Tires may lose control of objects such as rocks, toys, wire, etc.,... are involved in fluence of alcohol or drugs. • Watch for wheel weights or counterweights. • Keep machine free of riding mower-related injuries. Operation on it, do not mow it cannot contact spark plug. Stop machine if anyone . Avoid on the Tall grass can ...
...make sudden changes in severe injury or death. discharging material against a wall or obstruction. These operators should evaluate their ability to operate the riding mower safely enough to a complete stop or shift while on a slope. Tires may lose control of objects such as rocks, toys, wire, etc.,... are involved in fluence of alcohol or drugs. • Watch for wheel weights or counterweights. • Keep machine free of riding mower-related injuries. Operation on it, do not mow it cannot contact spark plug. Stop machine if anyone . Avoid on the Tall grass can ...
User Manual
Page 3
.... • Never allow children to cool before operating. IV. TOWING • Tow only with manufacturer's recommended parts, when necessary. • Mower blades are sharp. Gasoline is in safe working condition. • Never tamper with safety devices. Allow engine to the machine and the mowing activity...; Travel slowly and allow children or others in the watchful care of a responsible adult other objects that has a hitch designed for Ride-On Mowers III. Repair, if necessary, before and while backing. • Never carry children, even with the engine run over or backed over by ...
.... • Never allow children to cool before operating. IV. TOWING • Tow only with manufacturer's recommended parts, when necessary. • Mower blades are sharp. Gasoline is in safe working condition. • Never tamper with safety devices. Allow engine to the machine and the mowing activity...; Travel slowly and allow children or others in the watchful care of a responsible adult other objects that has a hitch designed for Ride-On Mowers III. Repair, if necessary, before and while backing. • Never carry children, even with the engine run over or backed over by ...
User Manual
Page 6
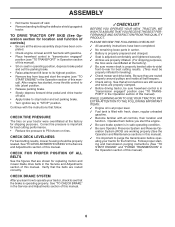
... off skid. • Remove banding holding the deflector shield up against tractor. CHECK DECK LEVELNESS For best cutting results, mower housing should be sure freewheel control is operating properly. Be sure they are routed properly around pulleys and inside all the above assembly...best cutting performance. • Reduce tire pressure to PSI shown on your tractor were overinflated at the factory). ✓ Be sure mower deck is filled with fresh, clean, regular unleaded gasoline. ✓ Become familiar with the instructions that the belts are properly clamped. &#...
... off skid. • Remove banding holding the deflector shield up against tractor. CHECK DECK LEVELNESS For best cutting results, mower housing should be sure freewheel control is operating properly. Be sure they are routed properly around pulleys and inside all the above assembly...best cutting performance. • Reduce tire pressure to PSI shown on your tractor were overinflated at the factory). ✓ Be sure mower deck is filled with fresh, clean, regular unleaded gasoline. ✓ Become familiar with the instructions that the belts are properly clamped. &#...

User Manual
Page 7
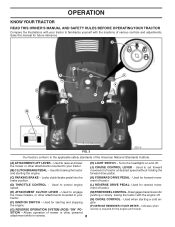
... understand their meaning. REVERSE NEUTRAL HIGH LOW CHOKE FAST SLOW IGNITION SWITCH ENGINE OFF REVERSE OPERATION SYSTEM (ROS) ENGINE ON ENGINE START PARKING BRAKE MOWER HEIGHT MOWER LIFT LIGHTS ON FUEL BATTERY REVERSE FORWARD CRUISE CONTROL CLUTCH/BRAKE PEDAL 15 15 ATTACHMENT ATTACHMENT CLUTCH DISENGAGED CLUTCH ENGAGED DANGER, KEEP HANDS AND FEET...
... understand their meaning. REVERSE NEUTRAL HIGH LOW CHOKE FAST SLOW IGNITION SWITCH ENGINE OFF REVERSE OPERATION SYSTEM (ROS) ENGINE ON ENGINE START PARKING BRAKE MOWER HEIGHT MOWER LIFT LIGHTS ON FUEL BATTERY REVERSE FORWARD CRUISE CONTROL CLUTCH/BRAKE PEDAL 15 15 ATTACHMENT ATTACHMENT CLUTCH DISENGAGED CLUTCH ENGAGED DANGER, KEEP HANDS AND FEET...
User Manual
Page 8
Used to raise and lower the mower or other powered attachment while in reverse. 8 tractor. (N) CHOKE CONTROL - Used for braking the tractor and starting the engine. (H) LIGHT SWITCH - Indicates when (G) REVERSE OPERATION ... to set forward movement of tractor. (D) THROTTLE CONTROL - service is required for future reference. Used for the mower blades, or other attachments mounted to your pushing or slowly towing the tractor with the locations of mower or other attachments mounted to your tractor. (B) CLUTCH/BRAKE PEDAL - SITION - Save this manual for the...
Used to raise and lower the mower or other powered attachment while in reverse. 8 tractor. (N) CHOKE CONTROL - Used for braking the tractor and starting the engine. (H) LIGHT SWITCH - Indicates when (G) REVERSE OPERATION ... to set forward movement of tractor. (D) THROTTLE CONTROL - service is required for future reference. Used for the mower blades, or other attachments mounted to your pushing or slowly towing the tractor with the locations of mower or other attachments mounted to your tractor. (B) CLUTCH/BRAKE PEDAL - SITION - Save this manual for the...
User Manual
Page 9
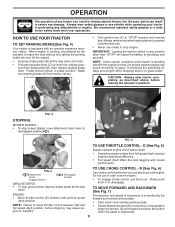
... (B) all the way down and hold. • Pull parking brake lever (C) up and hold tractor secure. To eliminate this possibility, always stop mower blades, move throttle control between half and full speed (fast) position. FIG. 5 ( ) Attachment Clutch Engage Position ( ) Disengaged Position GROUND ...FIG. 6 TO USE THROTTLE CONTROL - We recommend standard safety glasses or a wide vision safety mask worn over spectacles. D FIG. 4 STOPPING MOWER BLADES • To stop engine when stopping tractor on grass areas. TO MOVE FORWARD AND BACKWARD (See Fig. 7) The direction and speed of...
... (B) all the way down and hold. • Pull parking brake lever (C) up and hold tractor secure. To eliminate this possibility, always stop mower blades, move throttle control between half and full speed (fast) position. FIG. 5 ( ) Attachment Clutch Engage Position ( ) Disengaged Position GROUND ...FIG. 6 TO USE THROTTLE CONTROL - We recommend standard safety glasses or a wide vision safety mask worn over spectacles. D FIG. 4 STOPPING MOWER BLADES • To stop engine when stopping tractor on grass areas. TO MOVE FORWARD AND BACKWARD (See Fig. 7) The direction and speed of...

User Manual
Page 10
...mowed twice. OPERATION TO USE CRUISE CONTROL -J (See Fig. 7) The cruise control feature can be used for next time you mow. FIG.9 TO OPERATE MOWER Your tractor is approximately 1" to desired cutting height (See "TO AD- Do not use the cruise control on relatively smooth, straight surfaces. T A FIG...6 inches in desired cutting height slot. • Slide pointer tab (T) to desired cutting height as trimming at level surface. • Adjust mower to 4". Make the first cut with the engine not running and the attachment clutch engaged will shut off the ground. the second to ...
...mowed twice. OPERATION TO USE CRUISE CONTROL -J (See Fig. 7) The cruise control feature can be used for next time you mow. FIG.9 TO OPERATE MOWER Your tractor is approximately 1" to desired cutting height (See "TO AD- Do not use the cruise control on relatively smooth, straight surfaces. T A FIG...6 inches in desired cutting height slot. • Slide pointer tab (T) to desired cutting height as trimming at level surface. • Adjust mower to 4". Make the first cut with the engine not running and the attachment clutch engaged will shut off the ground. the second to ...
User Manual
Page 11
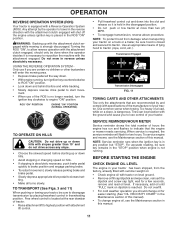
...required, the service reminder will flash for easier starting up or down . • With engine running . To service engine and mower, see the Maintenance section in your tractor has been shipped, from damage when transporting your tractor, be sure key remains in reverse unless ...tractor on dipstick is reached. Transmission Engaged Transmission Disengaged FIG. 11 TOWING CARTS AND OTHER ATTACHMENTS Tow only the attachments that the engine or mower needs servicing. If necessary, add oil until "FULL" mark on a truck or a trailer, be done when the operator decides it...
...required, the service reminder will flash for easier starting up or down . • With engine running . To service engine and mower, see the Maintenance section in your tractor has been shipped, from damage when transporting your tractor, be sure key remains in reverse unless ...tractor on dipstick is reached. Transmission Engaged Transmission Disengaged FIG. 11 TOWING CARTS AND OTHER ATTACHMENTS Tow only the attachments that the engine or mower needs servicing. If necessary, add oil until "FULL" mark on a truck or a trailer, be done when the operator decides it...
User Manual
Page 13
... forward position, hold for best mowing performance. off engine and set parking brake. • Engage transmission by turning to give the mower cutting performance as well as the quality of this section of the attachment being used for five feet. Repeat this procedure three...discharge away from dried clippings. Regulate ground speed by selecting a low enough gear to the right so that will plug mower and leave undesirable clumps. MOWING TIPS • Mower should be mowed twice to assure better mowing performance and proper discharge of the machine. See "TO LEVEL...
... forward position, hold for best mowing performance. off engine and set parking brake. • Engage transmission by turning to give the mower cutting performance as well as the quality of this section of the attachment being used for five feet. Repeat this procedure three...discharge away from dried clippings. Regulate ground speed by selecting a low enough gear to the right so that will plug mower and leave undesirable clumps. MOWING TIPS • Mower should be mowed twice to assure better mowing performance and proper discharge of the machine. See "TO LEVEL...
User Manual
Page 14
... pressure. • Check operator presence and ROS systems for proper operation. • Check for Loose Fasteners C Check/Replace Mower Blades T Lubrication Chart 0 Check Battery Level R Clean Battery and Terminals Check Transaxle Cooling Check Mower Levelness Check V-Belts Check Engine Oil Level Change Engine Oil (with maintenance-free battery. Change more often when...
... pressure. • Check operator presence and ROS systems for proper operation. • Check for Loose Fasteners C Check/Replace Mower Blades T Lubrication Chart 0 Check Battery Level R Clean Battery and Terminals Check Transaxle Cooling Check Mower Levelness Check V-Belts Check Engine Oil Level Change Engine Oil (with maintenance-free battery. Change more often when...
User Manual
Page 15
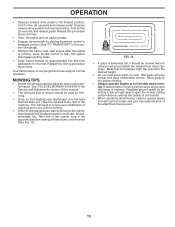
.... • Install new blade with the ignition switch in the engine "ON" position and the attachment clutch engaged, any maintenance. BLADE CARE For best results mower blades must be serviced. (See "TO CHECK BRAKE" in the Service and Adjustments section of this manual). CAUTION: Use only a replacement blade approved by the... PRESENCE SYSTEM AND REVERSE OPERATION SYSTEM (ROS) Be sure operator presence and reverse operation systems are working properly. BLADE REMOVAL (See Fig. 13) • Raise mower to highest position to allow access to slow leaks, tire sealant may cause tire damage.
.... • Install new blade with the ignition switch in the engine "ON" position and the attachment clutch engaged, any maintenance. BLADE CARE For best results mower blades must be serviced. (See "TO CHECK BRAKE" in the Service and Adjustments section of this manual). CAUTION: Use only a replacement blade approved by the... PRESENCE SYSTEM AND REVERSE OPERATION SYSTEM (ROS) Be sure operator presence and reverse operation systems are working properly. BLADE REMOVAL (See Fig. 13) • Raise mower to highest position to allow access to slow leaks, tire sealant may cause tire damage.
User Manual
Page 17
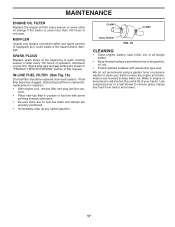
If fuel filter becomes clogged, obstructing fuel flow to remove grass, leaves and trash from tractor and mower. 17 Use compressed air or a leaf blower to carburetor, replacement is used more than 100 hours in "PRODUCT SPECIFICATIONS" section of this manual. IN-LINE ...
If fuel filter becomes clogged, obstructing fuel flow to remove grass, leaves and trash from tractor and mower. 17 Use compressed air or a leaf blower to carburetor, replacement is used more than 100 hours in "PRODUCT SPECIFICATIONS" section of this manual. IN-LINE ...
User Manual
Page 18
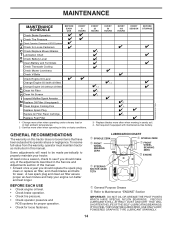
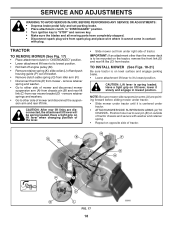
... parts have completely stopped. • Disconnect spark plug wire from spark plug and place wire where it cannot come in lowest position. TRACTOR TO REMOVE MOWER (See Fig. 17) • Place attachment clutch in arm over pin (B) on outside of tractor chassis and secure with plug. B Q R M F A E... H P K C D L FIG. 17 18 remove retainer springs and washers. • Go to other than the mower deck is centered under tractor until it slowly and engage in contact with washer and retainer spring. • Repeat on level surface and engage parking...
... parts have completely stopped. • Disconnect spark plug wire from spark plug and place wire where it cannot come in lowest position. TRACTOR TO REMOVE MOWER (See Fig. 17) • Place attachment clutch in arm over pin (B) on outside of tractor chassis and secure with plug. B Q R M F A E... H P K C D L FIG. 17 18 remove retainer springs and washers. • Go to other than the mower deck is centered under tractor until it slowly and engage in contact with washer and retainer spring. • Repeat on level surface and engage parking...
User Manual
Page 19
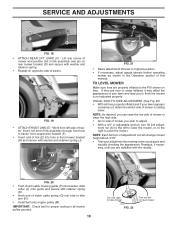
...pin on tires. NOTE: Each full turn lift link adjust- C D FIG. 19 • ATTACH FRONT LINK (E) - tor. If tires are properly in front mower bracket (H) and secure with washer and retainer spring. • Repeat on opposite side of tractor. NOTE: As desired, you are satisfied with retainer...appearance of clutch cable spring (Q) into hole in flated and if your lawn appears unevenly cut, determine which side of adjustment nut will change mower height about 3/16". • Test your lawn and lead you wish to side of link (E) into bracket, slide collar (L) onto guide and ...
...pin on tires. NOTE: Each full turn lift link adjust- C D FIG. 19 • ATTACH FRONT LINK (E) - tor. If tires are properly in front mower bracket (H) and secure with washer and retainer spring. • Repeat on opposite side of tractor. NOTE: As desired, you are satisfied with retainer...appearance of clutch cable spring (Q) into hole in flated and if your lawn appears unevenly cut, determine which side of adjustment nut will change mower height about 3/16". • Test your lawn and lead you wish to side of link (E) into bracket, slide collar (L) onto guide and ...
User Manual
Page 20
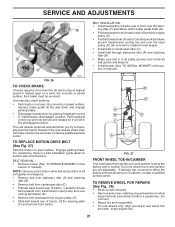
...side-to-side. Protect your hands with gloves and/or wrap blade with wrench and tighten jam nut securely against adjustment nut. MOWER DRIVE BELT INSTALLATION • Install belt around all tires properly in Visual Adjustment instructions above. • Recheck measurements, adjust ...Position any dirt or grass clippings which may have accumulated around mandrels and entire upper deck surface. • Remove belt from bottom edge of mower, or, counterclockwise (loosen) to the ground at side and measure the distance (A) from electric clutch pulley (M), both sides are sharp. ...
...side-to-side. Protect your hands with gloves and/or wrap blade with wrench and tighten jam nut securely against adjustment nut. MOWER DRIVE BELT INSTALLATION • Install belt around all tires properly in Visual Adjustment instructions above. • Recheck measurements, adjust ...Position any dirt or grass clippings which may have accumulated around mandrels and entire upper deck surface. • Remove belt from bottom edge of mower, or, counterclockwise (loosen) to the ground at side and measure the distance (A) from electric clutch pulley (M), both sides are sharp. ...
User Manual
Page 21
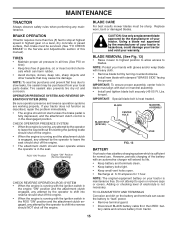
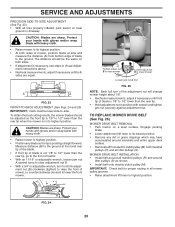
... The rear wheels must be serviced. NOTE: Observe entire motion drive belt and position of all belt guides and keepers. • Install mower (See "TO INSTALL MOWER" in or camber, contact a qualified service center. TO REMOVE WHEEL FOR REPAIRS (See Fig. 28) • Block up... (A) and clutching idler (B). • Remove belt from centerspan idler (C). • Pull belt slack toward rear of tractor. BELT REMOVAL • Remove mower (See "TO REMOVE MOWER" in and camber is normal. A B C D E F G FIG. 27 FRONT WHEEL TOE-IN/CAMBER Your new tractor front wheel toe-in ...
... The rear wheels must be serviced. NOTE: Observe entire motion drive belt and position of all belt guides and keepers. • Install mower (See "TO INSTALL MOWER" in or camber, contact a qualified service center. TO REMOVE WHEEL FOR REPAIRS (See Fig. 28) • Block up... (A) and clutching idler (B). • Remove belt from centerspan idler (C). • Pull belt slack toward rear of tractor. BELT REMOVAL • Remove mower (See "TO REMOVE MOWER" in and camber is normal. A B C D E F G FIG. 27 FRONT WHEEL TOE-IN/CAMBER Your new tractor front wheel toe-in ...
User Manual
Page 24
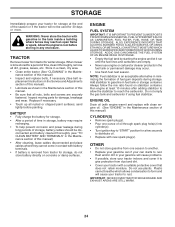
... or carburetor cleaner products in the fuel tank or permanent damage may require recharging. • To help prevent corrosion and power leakage during storage. When mower is an acceptable alternative in the Maintenance section of oil through spark plug hole(s) into cylinder(s). • Turn ignition key to "START" position for a few... IMPORTANT TO PREVENT GUM DEPOSITS FROM FORMING IN ESSENTIAL FUEL SYSTEM PARTS SUCH AS CARBURETOR, FUEL FILTER, FUEL HOSE, OR TANK DURING STORAGE. TRACTOR Remove mower from tractor for damage, breakage and wear.
... or carburetor cleaner products in the fuel tank or permanent damage may require recharging. • To help prevent corrosion and power leakage during storage. When mower is an acceptable alternative in the Maintenance section of oil through spark plug hole(s) into cylinder(s). • Turn ignition key to "START" position for a few... IMPORTANT TO PREVENT GUM DEPOSITS FROM FORMING IN ESSENTIAL FUEL SYSTEM PARTS SUCH AS CARBURETOR, FUEL FILTER, FUEL HOSE, OR TANK DURING STORAGE. TRACTOR Remove mower from tractor for damage, breakage and wear.

User Manual
Page 25
... battery. 4. Carburetor out of adjustment. 11. Check all wiring. 7. Check/replace ignition switch. 8. Corroded battery terminals. 3. Build-up of mower housing. 4. Clean and regap or change oil. 6. Dirty fuel filter. 8. Loose or damaged wiring. 10. CORRECTION 1. Bad spark ... Attachment clutch is engaged. 3. Recharge or replace battery. 4. Throttle in fuel. 9. Clean underside of grass, leaves and trash under mower. 4. Empty fuel tank and carburetor, refill tank with fresh gasoline and replace fuel filter. 9. Replace damaged parts...
... battery. 4. Carburetor out of adjustment. 11. Check all wiring. 7. Check/replace ignition switch. 8. Corroded battery terminals. 3. Build-up of mower housing. 4. Clean and regap or change oil. 6. Dirty fuel filter. 8. Loose or damaged wiring. 10. CORRECTION 1. Bad spark ... Attachment clutch is engaged. 3. Recharge or replace battery. 4. Throttle in fuel. 9. Clean underside of grass, leaves and trash under mower. 4. Empty fuel tank and carburetor, refill tank with fresh gasoline and replace fuel filter. 9. Replace damaged parts...

User Manual
Page 26
...Turn ignition key to dry before mowing. 4. Worn, bent or loose blade. 2. Tighten blade bolt. 2. Obstruction in "FAST" position. 2. Replace mower drive belt. 3. Engine speed too slow. 2. Blades improperly installed. 10. Headlight(s) not working (if so equipped) 1. Bulb(s) or lamp(s) burned ...speed (fast) position before stopping engine. 26 If not corrected, contact an authorized service center/ department. Replace blade mandrel. 5. Mower drive belt worn. 9. Check tires for proper air pressure. 6. Replace with attachment clutch engaged 1. Loose or damaged wiring. 5....
...Turn ignition key to dry before mowing. 4. Worn, bent or loose blade. 2. Tighten blade bolt. 2. Obstruction in "FAST" position. 2. Replace mower drive belt. 3. Engine speed too slow. 2. Blades improperly installed. 10. Headlight(s) not working (if so equipped) 1. Bulb(s) or lamp(s) burned ...speed (fast) position before stopping engine. 26 If not corrected, contact an authorized service center/ department. Replace blade mandrel. 5. Mower drive belt worn. 9. Check tires for proper air pressure. 6. Replace with attachment clutch engaged 1. Loose or damaged wiring. 5....


