

User Manual
Page 2
... California to prevent accidental starting . • Choose a low ground speed so that operators, age 60 years and above, are recommended by putting your tractor. Always turn off engine and wait for all parts to come to a complete stop before cleaning the machine, removing the grass catcher, or unclogging the discharge guard. • Operate machine only in the manual before starting when setting up which can affect...
... California to prevent accidental starting . • Choose a low ground speed so that operators, age 60 years and above, are recommended by putting your tractor. Always turn off engine and wait for all parts to come to a complete stop before cleaning the machine, removing the grass catcher, or unclogging the discharge guard. • Operate machine only in the manual before starting when setting up which can affect...
User Manual
Page 3
.... • Do not turn machine off . Stop machine if anyone enters the area. • Never carry passengers. • Do not mow in handling gasoline. SAFETY RULES Safe Operation Practices for towing. ning. Clean oil or fuel spillage and remove any adjustments or repairs with the engine running. • Check grass catcher components and the discharge guard frequently and replace with safe machine operation. If this is not...
.... • Do not turn machine off . Stop machine if anyone enters the area. • Never carry passengers. • Do not mow in handling gasoline. SAFETY RULES Safe Operation Practices for towing. ning. Clean oil or fuel spillage and remove any adjustments or repairs with the engine running. • Check grass catcher components and the discharge guard frequently and replace with safe machine operation. If this is not...
User Manual
Page 4
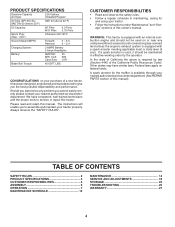
... MAINTENANCE 14 SERVICE AND ADJUSTMENTS 18 STORAGE 24 TROUBLESHOOTING 25 WARRANTY 27 4 PRODUCT SPECIFICATIONS Gasoline Capacity and type: 2.50 Gallons Unleaded Regular Oil Type (API-SG-SL): SAE 30 (above is available through your nearest authorized service center/department (See REPAIR PARTS section of this manual). age" sections of California the above 32°F) SAE 5W-30 (below 32°F) Oil Capacity: W/ Filter: 4.0 Pints W/O Filter: 3.75 Pints Spark Plug: (Gap: .040") Champion...
... MAINTENANCE 14 SERVICE AND ADJUSTMENTS 18 STORAGE 24 TROUBLESHOOTING 25 WARRANTY 27 4 PRODUCT SPECIFICATIONS Gasoline Capacity and type: 2.50 Gallons Unleaded Regular Oil Type (API-SG-SL): SAE 30 (above is available through your nearest authorized service center/department (See REPAIR PARTS section of this manual). age" sections of California the above 32°F) SAE 5W-30 (below 32°F) Oil Capacity: W/ Filter: 4.0 Pints W/O Filter: 3.75 Pints Spark Plug: (Gap: .040") Champion...
User Manual
Page 5
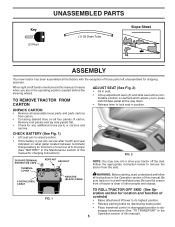
... freewheel control in disengaged position to press clutch/brake pedal all four panels of carton. FIG. 2 DISCARD TERMINAL PROTECTIVE CAPS TERMINAL COVER POSITIVE (RED) CABLE KEPS NUT HEX BOLT NEGATIVE (BLACK) CABLE NOTE: You may now roll or drive your tractor off the skid. WARNING: Before starting, read, understand and follow all instructions in the Operation section of this manual, it means when you to disengage transmission (See...
... freewheel control in disengaged position to press clutch/brake pedal all four panels of carton. FIG. 2 DISCARD TERMINAL PROTECTIVE CAPS TERMINAL COVER POSITIVE (RED) CABLE KEPS NUT HEX BOLT NEGATIVE (BLACK) CABLE NOTE: You may now roll or drive your tractor off the skid. WARNING: Before starting, read, understand and follow all instructions in the Operation section of this manual, it means when you to disengage transmission (See...
User Manual
Page 6
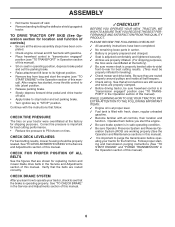
... for location and function of controls) • Be sure all belt keepers. ✓ Check wiring. CHECK DECK LEVELNESS For best cutting results, mower housing should be properly in Operation section of this manual). 6 Operate them before operating your tractor, check to "STOP" position. ASSEMBLY • Roll tractor forward off skid. • Apply brake to stop tractor and set the parking brake. • Raise attachment lift lever to its highest position. • Remove key from bag and start the engine. ✓...
... for location and function of controls) • Be sure all belt keepers. ✓ Check wiring. CHECK DECK LEVELNESS For best cutting results, mower housing should be properly in Operation section of this manual). 6 Operate them before operating your tractor, check to "STOP" position. ASSEMBLY • Roll tractor forward off skid. • Apply brake to stop tractor and set the parking brake. • Raise attachment lift lever to its highest position. • Remove key from bag and start the engine. ✓...
User Manual
Page 8
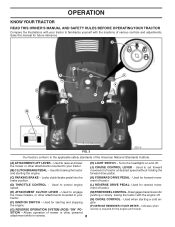
... (C) PARKING BRAKE - Used to set forward movement of the American National Standards Institute. (A) ATTACHMENT LIFT LEVER - tractor. (N) CHOKE CONTROL - Allows operation of various controls and adjustments. Used to engage (M) FREEWHEEL CONTROL - the engine. (P) SERVICE REMINDER / HOUR METER - Indicates when (G) REVERSE OPERATION SYSTEM (ROS) "ON" PO- Locks clutch/brake pedal into the brake position. (K) FORWARD DRIVE PEDAL - Used for future reference. Turns the headlights on and off . SITION - OPERATION KNOW YOUR TRACTOR READ THIS OWNER'S MANUAL AND SAFETY...
... (C) PARKING BRAKE - Used to set forward movement of the American National Standards Institute. (A) ATTACHMENT LIFT LEVER - tractor. (N) CHOKE CONTROL - Allows operation of various controls and adjustments. Used to engage (M) FREEWHEEL CONTROL - the engine. (P) SERVICE REMINDER / HOUR METER - Indicates when (G) REVERSE OPERATION SYSTEM (ROS) "ON" PO- Locks clutch/brake pedal into the brake position. (K) FORWARD DRIVE PEDAL - Used for future reference. Turns the headlights on and off . SITION - OPERATION KNOW YOUR TRACTOR READ THIS OWNER'S MANUAL AND SAFETY...
User Manual
Page 11
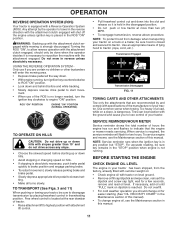
... before starting (See "OIL VISCOSITY CHART" in the Maintenance section of this manual. To service engine and mower, see the Maintenance section in this manual. 11 WARNING: Backing up or down hills with attachment lift control. • Pull freewheel control out and down . • With engine running . TO TRANSPORT (See Figs. 3 and 11) When pushing or towing your tractor. Any attempt by the operator to ROS "ON" position...
... before starting (See "OIL VISCOSITY CHART" in the Maintenance section of this manual. To service engine and mower, see the Maintenance section in this manual. 11 WARNING: Backing up or down hills with attachment lift control. • Pull freewheel control out and down . • With engine running . TO TRANSPORT (See Figs. 3 and 11) When pushing or towing your tractor. Any attempt by the operator to ROS "ON" position...
User Manual
Page 12
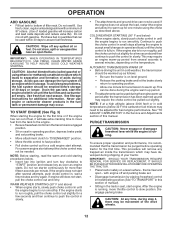
... turn key clockwise to push the control in the tractor seat, start , pull the choke control out and retry. This may be needed. AUTOMATIC TRANSMISSION WARM UP • Before driving the unit in until the fuel lines and carburetor are empty. NOTE: If at a high altitude (above ) • When engine starts, slowly push choke control in cold weather, the transmission should be pulled out slightly. See "TO ADJUST CARBURETOR" in the Service and Adjustments...
... turn key clockwise to push the control in the tractor seat, start , pull the choke control out and retry. This may be needed. AUTOMATIC TRANSMISSION WARM UP • Before driving the unit in until the fuel lines and carburetor are empty. NOTE: If at a high altitude (above ) • When engine starts, slowly push choke control in cold weather, the transmission should be pulled out slightly. See "TO ADJUST CARBURETOR" in the Service and Adjustments...
User Manual
Page 13
... right so that will plug mower and leave undesirable clumps. See "TO LEVEL MOWER HOUSING" in the tractor seat, start by turning to the desired height. • Do not mow grass when it should be properly leveled for best mowing performance. Repeat this driving procedure three times. off engine and set parking brake. • Engage transmission by selecting a low enough gear to half (1/2) speed. Repeat this procedure three...
... right so that will plug mower and leave undesirable clumps. See "TO LEVEL MOWER HOUSING" in the tractor seat, start by turning to the desired height. • Do not mow grass when it should be properly leveled for best mowing performance. Repeat this driving procedure three times. off engine and set parking brake. • Engage transmission by selecting a low enough gear to half (1/2) speed. Repeat this procedure three...
User Manual
Page 14
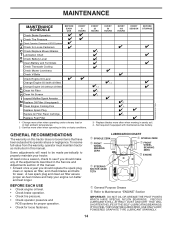
... Replace Fuel Filter 1 - Some adjustments will need to be made periodically to see if you should replace the spark plug, clean or replace air filter, and check blades and belts for wear. BEFORE EACH USE • Check engine oil level. • Check brake operation. • Check tire pressure. • Check operator presence and ROS systems for proper operation. • Check for Loose Fasteners C Check/Replace Mower Blades T Lubrication Chart 0 Check Battery Level R Clean Battery and Terminals Check Transaxle Cooling Check Mower Levelness Check V-Belts Check Engine Oil Level Change...
... Replace Fuel Filter 1 - Some adjustments will need to be made periodically to see if you should replace the spark plug, clean or replace air filter, and check blades and belts for wear. BEFORE EACH USE • Check engine oil level. • Check brake operation. • Check tire pressure. • Check operator presence and ROS systems for proper operation. • Check for Loose Fasteners C Check/Replace Mower Blades T Lubrication Chart 0 Check Battery Level R Clean Battery and Terminals Check Transaxle Cooling Check Mower Levelness Check V-Belts Check Engine Oil Level Change...
User Manual
Page 15
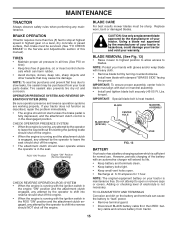
... or checking level of this manual). tery cable and remove battery from your tractor does not function as described, repair the problem immediately. • The engine should not start unless the brake pedal is fully depressed, and the attachment clutch control is running with an automotive charger will extend its life. • Keep battery and terminals clean. • Keep battery bolts tight. • Keep small vent holes open or remove caps or covers...
... or checking level of this manual). tery cable and remove battery from your tractor does not function as described, repair the problem immediately. • The engine should not start unless the brake pedal is fully depressed, and the attachment clutch control is running with an automotive charger will extend its life. • Keep battery and terminals clean. • Keep battery bolts tight. • Keep small vent holes open or remove caps or covers...
User Manual
Page 16
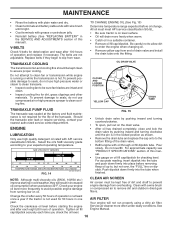
... adjustable. CLEAN AIR SCREEN Air screen must meet API service classification SG-SL. • Be sure tractor is in the locked position as shown. • Remove the drain tube and replace the cap onto to the bottom fitting of the drain valve. • Refill engine with a wire brush or compressed air to seals, do not use high quality detergent oil rated with grease or petroleum jelly. • Reinstall battery (See "REPLACING BATTERY...
... adjustable. CLEAN AIR SCREEN Air screen must meet API service classification SG-SL. • Be sure tractor is in the locked position as shown. • Remove the drain tube and replace the cap onto to the bottom fitting of the drain valve. • Refill engine with a wire brush or compressed air to seals, do not use high quality detergent oil rated with grease or petroleum jelly. • Reinstall battery (See "REPLACING BATTERY...
User Manual
Page 17
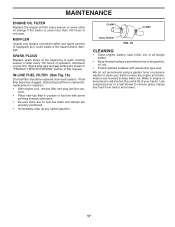
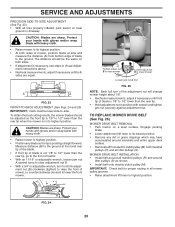
... gap setting are covered to remove grass, leaves and trash from tractor and mower. 17 Water in engine or transmission will shorten the useful life of your tractor unless the engine and transmission are shown in one year. CLAMP CLAMP FUEL FILTER FIG. 16 CLEANING • Clean engine, battery, seat, finish, etc. of all foreign matter. • Keep finished surfaces and wheels free of operation, whichever occurs first. IN-LINE FUEL FILTER...
... gap setting are covered to remove grass, leaves and trash from tractor and mower. 17 Water in engine or transmission will shorten the useful life of your tractor unless the engine and transmission are shown in one year. CLAMP CLAMP FUEL FILTER FIG. 16 CLEANING • Clean engine, battery, seat, finish, etc. of all foreign matter. • Keep finished surfaces and wheels free of operation, whichever occurs first. IN-LINE FUEL FILTER...
User Manual
Page 18
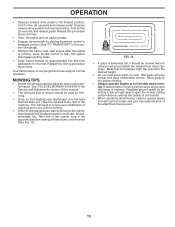
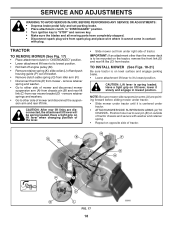
...; Remove clutch cable spring (Q) from idler arm (R). • Disconnect front link (E) from mower - B Q R M F A E H P K C D L FIG. 17 18 SERVICE AND ADJUSTMENTS WARNING:TO AVOID SERIOUS INJURY, BEFORE PERFORMING ANY SERVICE OR ADJUSTMENTS: • Depress brake pedal fully and set parking brake. • Place attachment clutch in "DISENGAGED" position. • Turn ignition key to "STOP" and remove key. • Make sure the blades and all moving parts have completely stopped. • Disconnect spark plug wire from...
...; Remove clutch cable spring (Q) from idler arm (R). • Disconnect front link (E) from mower - B Q R M F A E H P K C D L FIG. 17 18 SERVICE AND ADJUSTMENTS WARNING:TO AVOID SERIOUS INJURY, BEFORE PERFORMING ANY SERVICE OR ADJUSTMENTS: • Depress brake pedal fully and set parking brake. • Place attachment clutch in "DISENGAGED" position. • Turn ignition key to "STOP" and remove key. • Make sure the blades and all moving parts have completely stopped. • Disconnect spark plug wire from...
User Manual
Page 19
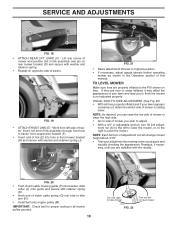
..., turn of adjustment nut will change mower height about 3/16". • Test your lawn appears unevenly cut, determine which side of this manual. IMPORTANT: Check belt for proper routing in flated, it may affect the appearance of tractor. SERVICE AND ADJUSTMENTS M A B FIG. 18 • ATTACH REAR LIFT LINKS (C) - tor. TO LEVEL MOWER Make sure tires are satisfied with retainer spring (K). • Hook end of clutch cable spring...
..., turn of adjustment nut will change mower height about 3/16". • Test your lawn appears unevenly cut, determine which side of this manual. IMPORTANT: Check belt for proper routing in flated, it may affect the appearance of tractor. SERVICE AND ADJUSTMENTS M A B FIG. 18 • ATTACH REAR LIFT LINKS (C) - tor. TO LEVEL MOWER Make sure tires are satisfied with retainer spring (K). • Hook end of clutch cable spring...
User Manual
Page 20
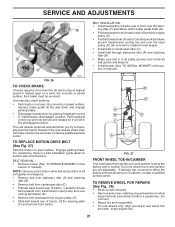
... or grass clippings which may have accumulated around mandrels and entire upper deck surface. • Remove belt from electric clutch pulley (M), both sides of mower, position blade at side and measure the distance (A) from bottom edge of blade to 1/2" lower than the rear tip, go to the front of tractor. • With an 11/16" or adjustable wrench, loosen jam nut A several turns to clear adjustment nut...
... or grass clippings which may have accumulated around mandrels and entire upper deck surface. • Remove belt from electric clutch pulley (M), both sides of mower, position blade at side and measure the distance (A) from bottom edge of blade to 1/2" lower than the rear tip, go to the front of tractor. • With an 11/16" or adjustable wrench, loosen jam nut A several turns to clear adjustment nut...
User Manual
Page 21
... brake. SERVICE AND ADJUSTMENTS S R R BELT INSTALLATION - • Install new belt from tractor rear to affect the factory set at highest speed in highest gear on a level, dry concrete or paved surface, then brake must lock and skid when you try to stop at the factory and is normal. If damage has occurred to front, over cooling fan blades (D). • Remove belt downward from tractor. NOTE: Observe entire motion drive belt and position...
... brake. SERVICE AND ADJUSTMENTS S R R BELT INSTALLATION - • Install new belt from tractor rear to affect the factory set at highest speed in highest gear on a level, dry concrete or paved surface, then brake must lock and skid when you try to stop at the factory and is normal. If damage has occurred to front, over cooling fan blades (D). • Remove belt downward from tractor. NOTE: Observe entire motion drive belt and position...
User Manual
Page 24
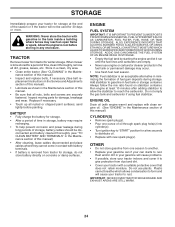
... OF ACIDS DURING STORAGE. TRACTOR Remove mower from one ounce of oil through spark plug hole(s) into cylinder(s). • Turn ignition key to "START" position for storage. • After a period of time in the Maintenance section of this manual. • Be sure that does not retain moisture. STORAGE Immediately prepare your tractor to rust. ENGINE OIL Drain oil (with engine warm) and replace with clean engine oil. (See "ENGINE" in fuel tank or storage container. Store...
... OF ACIDS DURING STORAGE. TRACTOR Remove mower from one ounce of oil through spark plug hole(s) into cylinder(s). • Turn ignition key to "START" position for storage. • After a period of time in the Maintenance section of this manual. • Be sure that does not retain moisture. STORAGE Immediately prepare your tractor to rust. ENGINE OIL Drain oil (with engine warm) and replace with clean engine oil. (See "ENGINE" in fuel tank or storage container. Store...
User Manual
Page 25
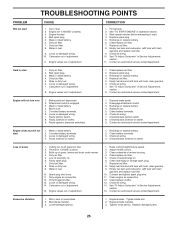
... 1. Clean engine air screen/fins. 12. Contact an authorized service center/department. Loose or damaged wiring. 7. Engine not "CHOKED" properly. 3. Attachment clutch is engaged. 3. Cutting too much grass/too fast. 2. Water in fuel. 10. Weak or dead battery. 4. Clean/replace air filter. 2. Out of grass, leaves and trash under mower. 4. Bad spark plug. 3. Weak or dead battery. 4. Loss of adjustment. 15. Loose or damaged wiring. 14. Carburetor out of power 1. Adjust throttle control. 3. Clean and regap or change oil. 6. Check all wiring...
... 1. Clean engine air screen/fins. 12. Contact an authorized service center/department. Loose or damaged wiring. 7. Engine not "CHOKED" properly. 3. Attachment clutch is engaged. 3. Cutting too much grass/too fast. 2. Water in fuel. 10. Weak or dead battery. 4. Clean/replace air filter. 2. Out of grass, leaves and trash under mower. 4. Bad spark plug. 3. Weak or dead battery. 4. Loss of adjustment. 15. Loose or damaged wiring. 14. Carburetor out of power 1. Adjust throttle control. 3. Clean and regap or change oil. 6. Check all wiring...
User Manual
Page 26
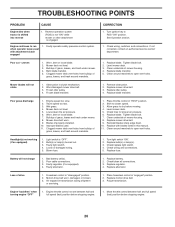
...air pressure. 6. Tighten blade bolt. 7. Turn light switch "ON". 2. Engine continues to dry before stopping engine. 26 Turn ignition key to slower speed. 3. Replace fuse. Faulty alternator. 1. Mower drive belt worn. 9. Motion drive belt worn, damaged, or broken. 3. Faulty operator-safety presence control system. Tighten blade bolt. 2. Clean around mandrels. 1. Worn/damaged mower drive belt. 3. Mower deck not level. 5. Clean around mandrels. 1. Poor cable connections. 3. uneven 1. Replace regulator. 4. Engine throttle...
...air pressure. 6. Tighten blade bolt. 7. Turn light switch "ON". 2. Engine continues to dry before stopping engine. 26 Turn ignition key to slower speed. 3. Replace fuse. Faulty alternator. 1. Mower drive belt worn. 9. Motion drive belt worn, damaged, or broken. 3. Faulty operator-safety presence control system. Tighten blade bolt. 2. Clean around mandrels. 1. Worn/damaged mower drive belt. 3. Mower deck not level. 5. Clean around mandrels. 1. Poor cable connections. 3. uneven 1. Replace regulator. 4. Engine throttle...


