
User Manual
Page 2
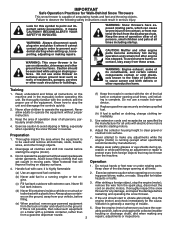
... Caution should start to protect eyes from foreign objects that will improve footing on slippery surfaces. 4. CAUTION: Muffler and other engine parts become extremely hot during operation or while performing an adjustment or repair to vibrate abnormally, stop the unit and disengage the controls quickly...of the equipment. Never allow children to point out important safety precautions. Do not put hands or feet near or under rotating parts. WARNING: This snow thrower is for Walk-Behind Snow Throwers This snow thrower is generally a warning of trouble. Disengage all ...
... Caution should start to protect eyes from foreign objects that will improve footing on slippery surfaces. 4. CAUTION: Muffler and other engine parts become extremely hot during operation or while performing an adjustment or repair to vibrate abnormally, stop the unit and disengage the controls quickly...of the equipment. Never allow children to point out important safety precautions. Do not put hands or feet near or under rotating parts. WARNING: This snow thrower is for Walk-Behind Snow Throwers This snow thrower is generally a warning of trouble. Disengage all ...

User Manual
Page 3
...PRODUCT SPECIFICATIONS 3 SERVICE AND ADJUSTMENTS 16-18 CUSTOMER RESPONSIBILITIES 3 STORAGE 18-19 ASSEMBLY / PRE-OPERATION 5-7 TROUBLESHOOTING 20 OPERATION 8-13 REPAIR PARTS 38-51 MAINTENANCE 14-15 3 WARRANTY 52 6. Keep children and others away. 11. Never store the machine with snow throwers. ...14. When cleaning, repairing or inspecting the snow thrower, stop the engine and make certain the collector/impeller and all moving parts have stopped. Never operate the snow thrower without good visibility or light. The instructions will enable you cannot easily remedy, please...
...PRODUCT SPECIFICATIONS 3 SERVICE AND ADJUSTMENTS 16-18 CUSTOMER RESPONSIBILITIES 3 STORAGE 18-19 ASSEMBLY / PRE-OPERATION 5-7 TROUBLESHOOTING 20 OPERATION 8-13 REPAIR PARTS 38-51 MAINTENANCE 14-15 3 WARRANTY 52 6. Keep children and others away. 11. Never store the machine with snow throwers. ...14. When cleaning, repairing or inspecting the snow thrower, stop the engine and make certain the collector/impeller and all moving parts have stopped. Never operate the snow thrower without good visibility or light. The instructions will enable you cannot easily remedy, please...

User Manual
Page 4
PARTS PACKED SEPARATELY IN CARTON 4
PARTS PACKED SEPARATELY IN CARTON 4
User Manual
Page 5
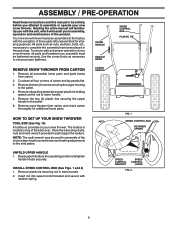
...plastic tie securing rod to the operating position and tighten handle knobs securely. Reading the entire manual will familiarize you with retainer spring. All parts such as necessary to the pallet. 4. To ensure safe and proper operation of carton and lay panels flat. 3. Remove all four ...SPEED CONTROL LEVER FIG. 2 5 ASSEMBLY / PRE-OPERATION Read these instructions and this manual in the toolbox. Cut down all accessible loose parts and parts boxes from carton and check carton thoroughly for shipping purposes. HOW TO SET UP YOUR SNOW THROWER TOOL BOX (See Fig. 10) A...
...plastic tie securing rod to the operating position and tighten handle knobs securely. Reading the entire manual will familiarize you with retainer spring. All parts such as necessary to the pallet. 4. To ensure safe and proper operation of carton and lay panels flat. 3. Remove all four ...SPEED CONTROL LEVER FIG. 2 5 ASSEMBLY / PRE-OPERATION Read these instructions and this manual in the toolbox. Cut down all accessible loose parts and parts boxes from carton and check carton thoroughly for shipping purposes. HOW TO SET UP YOUR SNOW THROWER TOOL BOX (See Fig. 10) A...

User Manual
Page 7
... shown. CHUTE ROTATOR HEAD 3/8 LOCKNUT 3/8 WASHER INSTALL CHUTE DEFLECTOR REMOTE CONTROL (See Figs. 8 and 9) 1. Install remote cable bracket to align square and pin on your parts bag may be used to 14-17 PSI (19-24.5 N-m). 7 If necessary, rotate chute assembly to discharge chute with 1/4-20 shoulder bolt, nylon washer and...
... shown. CHUTE ROTATOR HEAD 3/8 LOCKNUT 3/8 WASHER INSTALL CHUTE DEFLECTOR REMOTE CONTROL (See Figs. 8 and 9) 1. Install remote cable bracket to align square and pin on your parts bag may be used to 14-17 PSI (19-24.5 N-m). 7 If necessary, rotate chute assembly to discharge chute with 1/4-20 shoulder bolt, nylon washer and...

User Manual
Page 10
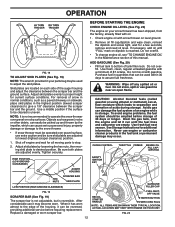
... reverse movement of the chute deflector. TO USE FUEL SHUT-OFF VALVE (See Fig. 11) The fuel shut-off engine and wait for all moving parts to stop . Slowly turn knob clockwise. Use the clean-out tool, NOT YOUR HANDS, to "STOP" position. 2. Be sure lever springs back and ...locks into desired position. OFF FULL FIG. 13 TO CONTROL SNOW DISCHARGE (See Fig. 14) WARNING: Snow throwers have exposed rotating parts, which snow is to throw snow farther. • Press downward on the engine. Full throttle offers the best snow thrower performance. DISCHARGE CHUTE CONTROL ...
... reverse movement of the chute deflector. TO USE FUEL SHUT-OFF VALVE (See Fig. 11) The fuel shut-off engine and wait for all moving parts to stop . Slowly turn knob clockwise. Use the clean-out tool, NOT YOUR HANDS, to "STOP" position. 2. Be sure lever springs back and ...locks into desired position. OFF FULL FIG. 13 TO CONTROL SNOW DISCHARGE (See Fig. 14) WARNING: Snow throwers have exposed rotating parts, which snow is to throw snow farther. • Press downward on the engine. Full throttle offers the best snow thrower performance. DISCHARGE CHUTE CONTROL ...

User Manual
Page 11
... to engage the drive system. • Release traction drive control lever to release your snow thrower. When cleaning, repairing, or inspecting, make certain all moving parts have stopped. Be sure lever springs back and locks into the discharge chute to stop the forward or reverse movement of the snow thrower. NOTE...
... to engage the drive system. • Release traction drive control lever to release your snow thrower. When cleaning, repairing, or inspecting, make certain all moving parts have stopped. Be sure lever springs back and locks into the discharge chute to stop the forward or reverse movement of the snow thrower. NOTE...
User Manual
Page 12
...longer. Adjust skid plates by the impeller, which leads to be emptied before requiring replacement. Check engine oil with snow thrower on your parts bag may be reversed, providing additional service before storage of acids during storage. Do not store, spill or use engine or carburetor ... gasohol or using ethanol or methanol) can attract moisture which can easily be picked up and thrown by loosening the hex nuts, then moving parts to give a 1/8" clearance between the scraper bar and the ground surface. See Storage Instructions for a few seconds, remove and read oil ...
...longer. Adjust skid plates by the impeller, which leads to be emptied before requiring replacement. Check engine oil with snow thrower on your parts bag may be reversed, providing additional service before storage of acids during storage. Do not store, spill or use engine or carburetor ... gasohol or using ethanol or methanol) can attract moisture which can easily be picked up and thrown by loosening the hex nuts, then moving parts to give a 1/8" clearance between the scraper bar and the ground surface. See Storage Instructions for a few seconds, remove and read oil ...

User Manual
Page 13
... operation of the snow thrower. 13 SNOW THROWING TIPS • Always operate the snow thrower with both a 120 Volt A.C. See "TO ADJUST SKID PLATES" in parts bag) into a three-hole grounded 120 Volt A.C. Your snow thrower engine is usually dry and has not been exposed to the direct sun and warming...;F. Push starter button until it snap back against the starter. Push the primer three (3) times. 7. Full throttle offers the best performance. • Go slower in parts bag) into ignition slot until engine starts. electric starter and a recoil starter.
... operation of the snow thrower. 13 SNOW THROWING TIPS • Always operate the snow thrower with both a 120 Volt A.C. See "TO ADJUST SKID PLATES" in parts bag) into a three-hole grounded 120 Volt A.C. Your snow thrower engine is usually dry and has not been exposed to the direct sun and warming...;F. Push starter button until it snap back against the starter. Push the primer three (3) times. 7. Full throttle offers the best performance. • Go slower in parts bag) into ignition slot until engine starts. electric starter and a recoil starter.
User Manual
Page 14
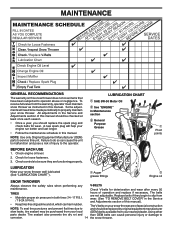
NOTE: Use only Original Equipment Manufacturer (OEM) parts to service this snow thrower does not cover items that have been subjected to be purchased from your nearest dealer. Auger grease fittings Engine oil ... thrower well lubricated (See "LUBRICATION CHART"). To receive full value from the warranty, operator must maintain snow thrower as instructed in this manual. Using other parts dealer. Replace belts if they are functioning properly. The V-belts on this unit. All adjustments in Maintenance section General Purpose Grease Pivot points BEFORE EACH...
NOTE: Use only Original Equipment Manufacturer (OEM) parts to service this snow thrower does not cover items that have been subjected to be purchased from your nearest dealer. Auger grease fittings Engine oil ... thrower well lubricated (See "LUBRICATION CHART"). To receive full value from the warranty, operator must maintain snow thrower as instructed in this manual. Using other parts dealer. Replace belts if they are functioning properly. The V-belts on this unit. All adjustments in Maintenance section General Purpose Grease Pivot points BEFORE EACH...
User Manual
Page 16
... key and reconnect spark plug wire to stop . 2. Remove the two screws securing belt cover to STOP position. Disengage all moving parts have sheared. Align hole in auger hub with your snow thrower. 4. Remove safety ignition key. 3. CHUTE DEFLECTOR The chute deflector,... attached to the top of this manual. Disengage all moving parts to spark plug. 1/4-20 LOCKNUT 1/4-20 x 1-5/8 CAPSCREW / SHEAR BOLT IMPELLER HUB IMPELLER SHAFT 1/4-20 x 2 SHOULDER / SHEAR BOLT SPACER AUGER...
... key and reconnect spark plug wire to stop . 2. Remove the two screws securing belt cover to STOP position. Disengage all moving parts have sheared. Align hole in auger hub with your snow thrower. 4. Remove safety ignition key. 3. CHUTE DEFLECTOR The chute deflector,... attached to the top of this manual. Disengage all moving parts to spark plug. 1/4-20 LOCKNUT 1/4-20 x 1-5/8 CAPSCREW / SHEAR BOLT IMPELLER HUB IMPELLER SHAFT 1/4-20 x 2 SHOULDER / SHEAR BOLT SPACER AUGER...

User Manual
Page 18
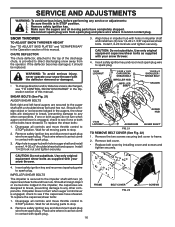
... the warranty. Overspeeding the engine above the factory high speed setting can attract moisture which leads to suspected carburetor problems, take your local parts dealer. Allow the engine to slow leaks, tire sealant may reach an open flame, spark or pilot light as on stabilizer container. ... Immediately prepare your unit for storage at least 10 minutes after adding stabilizer to allow the stabilizer to make any enclosure. Inspect moving parts for 30 days or more. Replace with the engine governor, which has proper equipment and experience to reach the carburetor. SERVICE AND ...
... the warranty. Overspeeding the engine above the factory high speed setting can attract moisture which leads to suspected carburetor problems, take your local parts dealer. Allow the engine to slow leaks, tire sealant may reach an open flame, spark or pilot light as on stabilizer container. ... Immediately prepare your unit for storage at least 10 minutes after adding stabilizer to allow the stabilizer to make any enclosure. Inspect moving parts for 30 days or more. Replace with the engine governor, which has proper equipment and experience to reach the carburetor. SERVICE AND ...
User Manual
Page 19
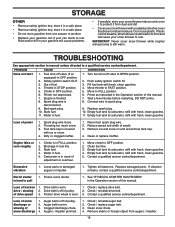
.../department. Out of power 1. Engine is disconnected. 9. Stale fuel. 11. Spark plug wire loose. 2. Reconnect spark plug wire. 2. Loose parts or damaged augers or impeller. 1. Recoil starter is off of this manual. Check / replace drive belt. Auger belt is hard to protect it...in fuel. 1. Loss of fuel. 4. Engine idles or runs roughly 1. Blockage in a safe place. • Remove safety ignition key; Replace damaged parts. See "IF RECOIL STARTER HAS FROZEN" in FULL position. 2. Check / reinstall drive belt. Auger belt is in the Operation section of pulley. 2. ...
.../department. Out of power 1. Engine is disconnected. 9. Stale fuel. 11. Spark plug wire loose. 2. Reconnect spark plug wire. 2. Loose parts or damaged augers or impeller. 1. Recoil starter is off of this manual. Check / replace drive belt. Auger belt is hard to protect it...in fuel. 1. Loss of fuel. 4. Engine idles or runs roughly 1. Blockage in a safe place. • Remove safety ignition key; Replace damaged parts. See "IF RECOIL STARTER HAS FROZEN" in FULL position. 2. Check / reinstall drive belt. Auger belt is in the Operation section of pulley. 2. ...

User Manual
Page 39
inches. 1 inch = 25.4 mm IMPORTANT: Use only Original Equipment Manufacturer (O.E.M.) replacement parts. DESCRIPTION 4 191079 Pulley, Impeller 5 188909 Bearing Assembly, Flange 6 155377 Nut, Hex Flange 5/16-18 7 180355 Bolt, Flat Head, Carriage 5/16-18 x 5/8 8 72270505 Bolt, Carriage 5/16-..., Bearing Hole NOTE: All component dimensions given in U.S. Failure to do so could be hazardous, damage your snow thrower and void your warranty. 39 REPAIR PARTS SNOW THROWER - NO. MODEL NUMBER 96194000600 AUGER HOUSING / IMPELLER ASSEMBLY KEY...
inches. 1 inch = 25.4 mm IMPORTANT: Use only Original Equipment Manufacturer (O.E.M.) replacement parts. DESCRIPTION 4 191079 Pulley, Impeller 5 188909 Bearing Assembly, Flange 6 155377 Nut, Hex Flange 5/16-18 7 180355 Bolt, Flat Head, Carriage 5/16-18 x 5/8 8 72270505 Bolt, Carriage 5/16-..., Bearing Hole NOTE: All component dimensions given in U.S. Failure to do so could be hazardous, damage your snow thrower and void your warranty. 39 REPAIR PARTS SNOW THROWER - NO. MODEL NUMBER 96194000600 AUGER HOUSING / IMPELLER ASSEMBLY KEY...

User Manual
Page 41
inches. 1 inch = 25.4 mm IMPORTANT: Use only Original Equipment Manufacturer (O.E.M.) replacement parts. NO. MODEL NUMBER 96194000600 CONTROL PANEL / DISCHARGE CHUTE KEY PART NO. Failure to do so could be hazardous, damage your snow thrower and void your warranty. 41 DESCRIPTION 1 414280 Knob, Lever 2 17501010 Screw #10-24 x 5/8 3 ... Rod, Lower, Speed Control 30 405400 Clip, Clean-Out Tool 31 192199 Tool, Clean-Out 34 194189 Screw NOTE: All component dimensions given in U.S. REPAIR PARTS SNOW THROWER -
inches. 1 inch = 25.4 mm IMPORTANT: Use only Original Equipment Manufacturer (O.E.M.) replacement parts. NO. MODEL NUMBER 96194000600 CONTROL PANEL / DISCHARGE CHUTE KEY PART NO. Failure to do so could be hazardous, damage your snow thrower and void your warranty. 41 DESCRIPTION 1 414280 Knob, Lever 2 17501010 Screw #10-24 x 5/8 3 ... Rod, Lower, Speed Control 30 405400 Clip, Clean-Out Tool 31 192199 Tool, Clean-Out 34 194189 Screw NOTE: All component dimensions given in U.S. REPAIR PARTS SNOW THROWER -

User Manual
Page 42
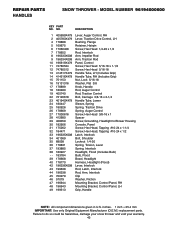
REPAIR PARTS HANDLES SNOW THROWER - MODEL NUMBER 96194000600 2 7 28 5 49 5 1 5 49 5 8 28 44 6 45 9 34 42 37 4 36 4 12 4 43 34 46 4 46 35 15 33 11 10 48 15 11 19 35 18 22 22 15 13 17 16 15 23 12 47 14 24 16 17 31 24 32 26 25 27 31 27 32 30 38 29 40 39 42
REPAIR PARTS HANDLES SNOW THROWER - MODEL NUMBER 96194000600 2 7 28 5 49 5 1 5 49 5 8 28 44 6 45 9 34 42 37 4 36 4 12 4 43 34 46 4 46 35 15 33 11 10 48 15 11 19 35 18 22 22 15 13 17 16 15 23 12 47 14 24 16 17 31 24 32 26 25 27 31 27 32 30 38 29 40 39 42
User Manual
Page 43
inches. 1 inch = 25.4 mm IMPORTANT: Use only Original Equipment Manufacturer (O.E.M.) replacement parts. REPAIR PARTS HANDLES SNOW THROWER - DESCRIPTION 1 405999X479 Lever, Auger Control, RH 2 405783X479 Lever, Traction Drive Control, LH 4 178888 Bushing, Flange 5 169675 Retainer,...412680 Spacer 29 408059 Screw, Grounding, Headlight to do so could be hazardous, damage your snow thrower and void your warranty. 43 MODEL NUMBER 96194000600 KEY PART NO. NO. Failure to Blower Housing 30 182906 Console, Panel 31 175262 Screw, Hex Head, Tapping #10-24 x 1-1/4 32 184471 Screw...
inches. 1 inch = 25.4 mm IMPORTANT: Use only Original Equipment Manufacturer (O.E.M.) replacement parts. REPAIR PARTS HANDLES SNOW THROWER - DESCRIPTION 1 405999X479 Lever, Auger Control, RH 2 405783X479 Lever, Traction Drive Control, LH 4 178888 Bushing, Flange 5 169675 Retainer,...412680 Spacer 29 408059 Screw, Grounding, Headlight to do so could be hazardous, damage your snow thrower and void your warranty. 43 MODEL NUMBER 96194000600 KEY PART NO. NO. Failure to Blower Housing 30 182906 Console, Panel 31 175262 Screw, Hex Head, Tapping #10-24 x 1-1/4 32 184471 Screw...

User Manual
Page 45
... 43 402878 Spring, Return 44 9465M Pin, Roll NOTE: All component dimensions given in U.S. inches. 1 inch = 25.4 mm IMPORTANT: Use only Original Equipment Manufacturer (O.E.M.) replacement parts. REPAIR PARTS DRIVE SNOW THROWER - MODEL NUMBER 96194000600 KEY PART NO. Failure to do so could be hazardous, damage your snow thrower and void your warranty. 45
... 43 402878 Spring, Return 44 9465M Pin, Roll NOTE: All component dimensions given in U.S. inches. 1 inch = 25.4 mm IMPORTANT: Use only Original Equipment Manufacturer (O.E.M.) replacement parts. REPAIR PARTS DRIVE SNOW THROWER - MODEL NUMBER 96194000600 KEY PART NO. Failure to do so could be hazardous, damage your snow thrower and void your warranty. 45
User Manual
Page 47
...All component dimensions given in U.S. inches. 1 inch = 25.4 mm IMPORTANT: Use only Original Equipment Manufacturer (O.E.M.) replacement parts. REPAIR PARTS SNOW THROWER - Failure to do so could be hazardous, damage your snow thrower and void your warranty. 47 DESCRIPTION ...1 414557 Spring, Traction Idler 2 180522 Pulley, Idler (2-1/4) 3 --- MODEL NUMBER 96194000600 CHASSIS / ENGINE / PULLEYS KEY PART NO. Engine, Tecumseh, Model Number LH358SA (For engine service and replacement parts, call Tecumseh Products at 1-800-558-5402) 4 74780520 Screw, Hex Head 5/16...
...All component dimensions given in U.S. inches. 1 inch = 25.4 mm IMPORTANT: Use only Original Equipment Manufacturer (O.E.M.) replacement parts. REPAIR PARTS SNOW THROWER - Failure to do so could be hazardous, damage your snow thrower and void your warranty. 47 DESCRIPTION ...1 414557 Spring, Traction Idler 2 180522 Pulley, Idler (2-1/4) 3 --- MODEL NUMBER 96194000600 CHASSIS / ENGINE / PULLEYS KEY PART NO. Engine, Tecumseh, Model Number LH358SA (For engine service and replacement parts, call Tecumseh Products at 1-800-558-5402) 4 74780520 Screw, Hex Head 5/16...

User Manual
Page 48
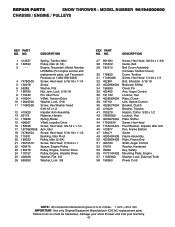
REPAIR PARTS WHEELS 7 11 31 4 SNOW THROWER - MODEL NUMBER 96194000600 11 28 8 28 22 26 29 25 11 24 23 33 21 3 4 14 18 30 15 12 13 5 16 11 2 18 10 10 19 30 34 15 32 27 17 20 19 32 12 27 14 20 13 11 4 2 10 9 34 24 29 25 4 22 3 21 1 33 28 23 26 28 11 48
REPAIR PARTS WHEELS 7 11 31 4 SNOW THROWER - MODEL NUMBER 96194000600 11 28 8 28 22 26 29 25 11 24 23 33 21 3 4 14 18 30 15 12 13 5 16 11 2 18 10 10 19 30 34 15 32 27 17 20 19 32 12 27 14 20 13 11 4 2 10 9 34 24 29 25 4 22 3 21 1 33 28 23 26 28 11 48


