User Guide
Page 7
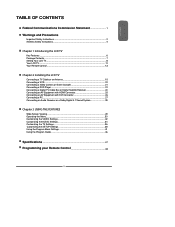
... CONTENTS Federal Communications Commission Statement 1 Warnings and Precautions Important Safety Instructions 2 Antenna Safety Instructions 4 Chapter 1 Introducing the LCD TV Key Features ...6 Package Contents ...7 Setting Your LCD TV...8 Your LCD TV...11 Your Remote Control 13 Chapter 2 Installing the LCD TV Connecting a TV Cable or an Antenna 15 Connecting a VCR ...20 Connecting a Video Camera or Game Console 21 Connecting a DVD Player...
... CONTENTS Federal Communications Commission Statement 1 Warnings and Precautions Important Safety Instructions 2 Antenna Safety Instructions 4 Chapter 1 Introducing the LCD TV Key Features ...6 Package Contents ...7 Setting Your LCD TV...8 Your LCD TV...11 Your Remote Control 13 Chapter 2 Installing the LCD TV Connecting a TV Cable or an Antenna 15 Connecting a VCR ...20 Connecting a Video Camera or Game Console 21 Connecting a DVD Player...
User Guide
Page 9
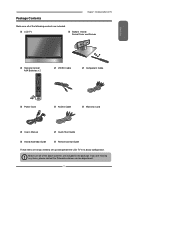
... If you need to set up and operate the LCD TV in the package. LCD TV Bottom Stand / Screw Driver and Screws ENGLISH Remote Control/ AAA Batteries x 2 SET UP TV CAB/ SAT DVD AUX SLEEP DVD MENU VOL CH PAGE MUTE ASPECT LAST GUIDE LIVE TV PIP MENU OK INFO CC EXIT DVR 1 2 ... Card User's Manual Quick Start Guide Stand Assembly Guide Remote control Guide These items are all you are missing any items, please contact the Polaroid customer service department. 7 Package Contents Chapter 1 Introducing the LCD TV Make sure all of the above contents are included in its...
... If you need to set up and operate the LCD TV in the package. LCD TV Bottom Stand / Screw Driver and Screws ENGLISH Remote Control/ AAA Batteries x 2 SET UP TV CAB/ SAT DVD AUX SLEEP DVD MENU VOL CH PAGE MUTE ASPECT LAST GUIDE LIVE TV PIP MENU OK INFO CC EXIT DVR 1 2 ... Card User's Manual Quick Start Guide Stand Assembly Guide Remote control Guide These items are all you are missing any items, please contact the Polaroid customer service department. 7 Package Contents Chapter 1 Introducing the LCD TV Make sure all of the above contents are included in its...
User Guide
Page 12
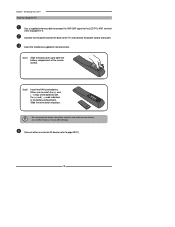
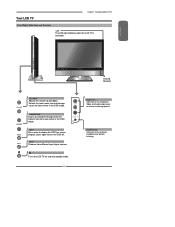
...cleaners (porcelain, stainless steel, toilet, or oven cleaner etc.) on the remote, as it may suffer damage. Chapter 1 Introducing the LCD TV How to setup the TV Use a supplied antenna cable to connect the VHF/UHF signal to page19-27). 10 Connect the AC power cord at the back of... outlet. Connect other an external AV device (refer to the LCD TV's ANT. Insert the 2 batteries supplied in the battery compartment. terminal (refer to match the (+) and ( - ) ends of the batteries with the (+) and ( - ) ends indicated in remote control. Make sure to page15-17). Slide the cover back into ...
...cleaners (porcelain, stainless steel, toilet, or oven cleaner etc.) on the remote, as it may suffer damage. Chapter 1 Introducing the LCD TV How to setup the TV Use a supplied antenna cable to connect the VHF/UHF signal to page19-27). 10 Connect the AC power cord at the back of... outlet. Connect other an external AV device (refer to the LCD TV's ANT. Insert the 2 batteries supplied in the battery compartment. terminal (refer to match the (+) and ( - ) ends of the batteries with the (+) and ( - ) ends indicated in remote control. Make sure to page15-17). Slide the cover back into ...
User Guide
Page 13
... channels. ENGLISH IR Infrared Receiver VOLUME+Adjusts the volume up and down . VIDEO L R VIDEO1 IN MENU Press once to turn the OSD off. Turns the LCD TV on screen display), press again to display the OSD (on and into standby mode. 11 Selects the main-menu item and change values for private... the external headphone for items when in the OSD mode. HEADPHONE Connects to the composite Video and Audio output jacks on external video equipment. Your LCD TV Chapter 1 Introducing the LCD TV Front/Right Side View and Controls LED The LED light indicates when the...
... channels. ENGLISH IR Infrared Receiver VOLUME+Adjusts the volume up and down . VIDEO L R VIDEO1 IN MENU Press once to turn the OSD off. Turns the LCD TV on screen display), press again to display the OSD (on and into standby mode. 11 Selects the main-menu item and change values for private... the external headphone for items when in the OSD mode. HEADPHONE Connects to the composite Video and Audio output jacks on external video equipment. Your LCD TV Chapter 1 Introducing the LCD TV Front/Right Side View and Controls LED The LED light indicates when the...
User Guide
Page 15
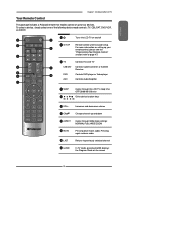
ENGLISH Your Remote Control Chapter 1 Introducing the LCD TV This package includes a Polaroid remote that enables control of the following device mode controls: TV, CBL/SAT, DVD/VCR, or AUDIO. 2 SET UP 1 3 TV CAB/ SAT DVD AUX SLEEP 4 DVD MENU 5 6 VOL CH PAGE 7 8 9 MUTE ASPECT LAST 10 LIVE TV GUIDE PIP MENU 11 OK INFO CC EXIT DVR 1 2 3 ABC DEF...
ENGLISH Your Remote Control Chapter 1 Introducing the LCD TV This package includes a Polaroid remote that enables control of the following device mode controls: TV, CBL/SAT, DVD/VCR, or AUDIO. 2 SET UP 1 3 TV CAB/ SAT DVD AUX SLEEP 4 DVD MENU 5 6 VOL CH PAGE 7 8 9 MUTE ASPECT LAST 10 LIVE TV GUIDE PIP MENU 11 OK INFO CC EXIT DVR 1 2 3 ABC DEF...
User Guide
Page 16
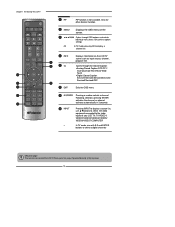
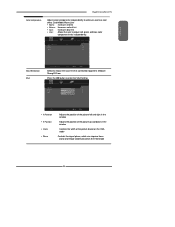
...the video equipment connected to the video inputs of your LCD TV: TV/VIDEO1/ VIDEO2/VIDEO3/VIDEO4/VIDEO5/ VIDEO6/VIDEO7/COMPUTER ▪ In TV mode, use with 0-9 and ENTER buttons to select a digital channels Effective range: The remote can control the LCD TV from up to display a channel list 15 INFO Displays... directly at the receiver. 14 SET UP TV CAB/ SAT DVD AUX SLEEP DVD MENU 13 MENU Displays the OSD menu on the LCD TV MUTE ASPECT LAST LIVE TV 12 screen such as input source, channel, program title. Chapter 1 Introducing the LCD TV 12 PIP PIP function is not available....
...the video equipment connected to the video inputs of your LCD TV: TV/VIDEO1/ VIDEO2/VIDEO3/VIDEO4/VIDEO5/ VIDEO6/VIDEO7/COMPUTER ▪ In TV mode, use with 0-9 and ENTER buttons to select a digital channels Effective range: The remote can control the LCD TV from up to display a channel list 15 INFO Displays... directly at the receiver. 14 SET UP TV CAB/ SAT DVD AUX SLEEP DVD MENU 13 MENU Displays the OSD menu on the LCD TV MUTE ASPECT LAST LIVE TV 12 screen such as input source, channel, program title. Chapter 1 Introducing the LCD TV 12 PIP PIP function is not available....

User Guide
Page 21
...list, then press ▲▼ to select the TV icon. Channel Scan Tuner Mode Channel Skip Time Zone Cable Eastern Time TV Select Exit Press the MENU button on the remote to select digital channel (for example 9.1) Channel List 5-2 RF5-2 9-1 KQED-HD 9-2 KOED-SD 8 CCT 12 13 15 The digital... to turn on the LCD TV. (Scroll down using the UP/DOWN buttons to see Computer-VGA option) Main TV(CABLE/AIR) VIDEO1 (SIDE) VIDEO2 (REAR) VIDEO3 (S-VIDEO) VIDEO4 (YPbPr1) VIDEO5 (YPbPr2) VIDEO6 (HDMI1) VIDEO7 (HDMI2) COMPUTER(VGA) Press the INPUT button on the remote control to display the Main menu...
...list, then press ▲▼ to select the TV icon. Channel Scan Tuner Mode Channel Skip Time Zone Cable Eastern Time TV Select Exit Press the MENU button on the remote to select digital channel (for example 9.1) Channel List 5-2 RF5-2 9-1 KQED-HD 9-2 KOED-SD 8 CCT 12 13 15 The digital... to turn on the LCD TV. (Scroll down using the UP/DOWN buttons to see Computer-VGA option) Main TV(CABLE/AIR) VIDEO1 (SIDE) VIDEO2 (REAR) VIDEO3 (S-VIDEO) VIDEO4 (YPbPr1) VIDEO5 (YPbPr2) VIDEO6 (HDMI1) VIDEO7 (HDMI2) COMPUTER(VGA) Press the INPUT button on the remote control to display the Main menu...

User Guide
Page 32
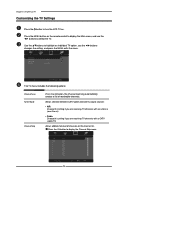
Press the MENU button on the remote control,the on-screen menu will appear on . VIDEO MENU: Allows you to turn the LCD TV on the screen. Chapter 3 Using the LCD TV Operating the Menu Press the button to customize the audio options and effects. ▪ If the signal source is VIDEO/S-VIDEO/...Use the ◄► buttons to select your picture settings. ▪ If the signal source is TV/VIDEO/S-VIDEO/YPbPr/ HDMI, the VIDEO MENU appears as: ▪ If the signal source is TV, the AUDIO MENU appears as : Picture Mode User Picture Mode User Contrast 50 Contrast 50 Brightness ...
Press the MENU button on the remote control,the on-screen menu will appear on . VIDEO MENU: Allows you to turn the LCD TV on the screen. Chapter 3 Using the LCD TV Operating the Menu Press the button to customize the audio options and effects. ▪ If the signal source is VIDEO/S-VIDEO/...Use the ◄► buttons to select your picture settings. ▪ If the signal source is TV/VIDEO/S-VIDEO/YPbPr/ HDMI, the VIDEO MENU appears as: ▪ If the signal source is TV, the AUDIO MENU appears as : Picture Mode User Picture Mode User Contrast 50 Contrast 50 Brightness ...

User Guide
Page 33
... change the value of the sub-menu, and press the OK button. ENGLISH TV MENU: Allows you to set up a variety of features: Language, Closed Caption,Factory Reset, Parental Control, and Sleep Timer. ▪ If the signal source is TV/VIDEO/S-VIDEO/YPbPr, the SETUP MENU appears as: ▪ If the signal source... the ▲▼ buttons to highlight the option of the item. Channel Scan Tuner Mode Channel Skip Time Zone Cable Eastern Time Chapter 3 Using the LCD TV TV Select Exit SETUP MENU: Allows you to edit and label channels.
... change the value of the sub-menu, and press the OK button. ENGLISH TV MENU: Allows you to set up a variety of features: Language, Closed Caption,Factory Reset, Parental Control, and Sleep Timer. ▪ If the signal source is TV/VIDEO/S-VIDEO/YPbPr, the SETUP MENU appears as: ▪ If the signal source... the ▲▼ buttons to highlight the option of the item. Channel Scan Tuner Mode Channel Skip Time Zone Cable Eastern Time Chapter 3 Using the LCD TV TV Select Exit SETUP MENU: Allows you to edit and label channels.
User Guide
Page 34
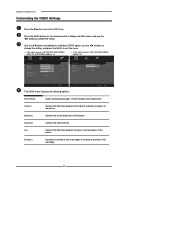
...;► buttons to see crisp edges in the picture; decrease it for soft edges 32 Chapter 3 Using the LCD TV Customizing the VIDEO Settings Press the button to turn the LCD TV on the remote control to display the Main menu, and use the ◄► buttons to change the setting, and press the MENU... to exit the menu ▪ If the signal source is TV/VIDEO/S-VIDEO/YPbPr/ HDMI, the VIDEO MENU appears as...
...;► buttons to see crisp edges in the picture; decrease it for soft edges 32 Chapter 3 Using the LCD TV Customizing the VIDEO Settings Press the button to turn the LCD TV on the remote control to display the Main menu, and use the ◄► buttons to change the setting, and press the MENU... to exit the menu ▪ If the signal source is TV/VIDEO/S-VIDEO/YPbPr/ HDMI, the VIDEO MENU appears as...
User Guide
Page 35
...B Gain 120 Noise Reduction VGA Color Temperature Select Exit Select to reduce the noise level of the picture based on the VGA mode Controls the signal phase, which can improve focus clarity and image stability based on the VGA mode 33 Press the OK button to adjust... red, green and blue color component levels independently. Position ▪ V. ENGLISH Chapter 3 Using the LCD TV Color temperature Adjusts color components independently to achieve a warm or cool effect: Cool/Middle/Warm/User ▪ Warm: Increases red tint ▪ ...
...B Gain 120 Noise Reduction VGA Color Temperature Select Exit Select to reduce the noise level of the picture based on the VGA mode Controls the signal phase, which can improve focus clarity and image stability based on the VGA mode 33 Press the OK button to adjust... red, green and blue color component levels independently. Position ▪ V. ENGLISH Chapter 3 Using the LCD TV Color temperature Adjusts color components independently to achieve a warm or cool effect: Cool/Middle/Warm/User ▪ Warm: Increases red tint ▪ ...

User Guide
Page 36
... Using the LCD TV Customizing the AUDIO Settings Press the button to high-fidelity stereo sound while watching TV ▪ Stereo: Use separate audio tracks for left and right speakers, if available ▪ SAP: You can enjoy a second audio program from among the following options: Bass Controls the relative ... AUDIO menu includes the following options: Surround/Live/Dance/Techno/Classic/Soft/Rock/ POP/Off MTS Allows you to listen to turn the LCD TV on. Use the ▲▼buttons to highlight an individual AUDIO option, use the ◄► buttons to select the AUDIO. ...
... Using the LCD TV Customizing the AUDIO Settings Press the button to high-fidelity stereo sound while watching TV ▪ Stereo: Use separate audio tracks for left and right speakers, if available ▪ SAP: You can enjoy a second audio program from among the following options: Bass Controls the relative ... AUDIO menu includes the following options: Surround/Live/Dance/Techno/Classic/Soft/Rock/ POP/Off MTS Allows you to listen to turn the LCD TV on. Use the ▲▼buttons to highlight an individual AUDIO option, use the ◄► buttons to select the AUDIO. ...
User Guide
Page 38
...turn the LCD TV on. Channel Scan Tuner Mode Channel Skip Time Zone Cable Eastern Time TV Select Exit The TV menu includes the following options: Channel Scan Tuner Mode Channel Skip Press the OK button, the Channel Scanning automatically creates a list of channels on the remote control to display... the Main menu, and use the ◄► buttons to highlight an individual TV option, use the ◄► buttons changes the setting, and press the MENU exits the...
...turn the LCD TV on. Channel Scan Tuner Mode Channel Skip Time Zone Cable Eastern Time TV Select Exit The TV menu includes the following options: Channel Scan Tuner Mode Channel Skip Press the OK button, the Channel Scanning automatically creates a list of channels on the remote control to display... the Main menu, and use the ◄► buttons to highlight an individual TV option, use the ◄► buttons changes the setting, and press the MENU exits the...
User Guide
Page 39
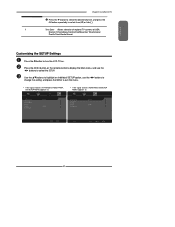
...English Middle OSD Language Time Setup Parental Gamma Reset Default English Middle Setup Select Exit 37 Press the MENU button on . ENGLISH Chapter 3 Using the LCD TV Press the ▼ button to select the desired channel, and press the OK button repeatedly to select show ( ) or hide( ) F Time... Time/Indiana/Central time/Mountain Time/Arizona/ Pacific Time/Alaska/Hawaii Customizing the SETUP Settings Press the button to turn the LCD TV on the remote control to display the Main menu, and use the ◄► buttons to change the setting, and press the MENU to select the...
...English Middle OSD Language Time Setup Parental Gamma Reset Default English Middle Setup Select Exit 37 Press the MENU button on . ENGLISH Chapter 3 Using the LCD TV Press the ▼ button to select the desired channel, and press the OK button repeatedly to select show ( ) or hide( ) F Time... Time/Indiana/Central time/Mountain Time/Arizona/ Pacific Time/Alaska/Hawaii Customizing the SETUP Settings Press the button to turn the LCD TV on the remote control to display the Main menu, and use the ◄► buttons to change the setting, and press the MENU to select the...
User Guide
Page 41
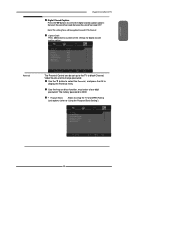
... Block MPAA Unrated NO Block TV Unrated NO Parental Block Select Exit 39 U.S.TV Ratings U.S. The factory password is 0000 Program Block Allows to setup the TV and MPAA Rating Lock options (refer to change password. ENGLISH Parental Chapter 3 Using the LCD TV Digital Closed Caption: Press the... Opacity Window Color Window Opacity Custom Large White Solid Black Solid Black Translucent Closed Caption Style Select Exit The Parental Control can be set up to the TV to block Channel, Video Source and to "Using the Program Block Setting"). Use the ▼ button to select...
... Block MPAA Unrated NO Block TV Unrated NO Parental Block Select Exit 39 U.S.TV Ratings U.S. The factory password is 0000 Program Block Allows to setup the TV and MPAA Rating Lock options (refer to change password. ENGLISH Parental Chapter 3 Using the LCD TV Digital Closed Caption: Press the... Opacity Window Color Window Opacity Custom Large White Solid Black Solid Black Translucent Closed Caption Style Select Exit The Parental Control can be set up to the TV to block Channel, Video Source and to "Using the Program Block Setting"). Use the ▼ button to select...
User Guide
Page 43
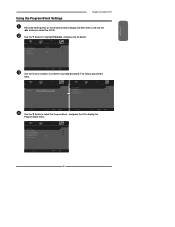
ENGLISH Using the Program Block Settings Chapter 3 Using the LCD TV Press the MENU button on the remote control to display the Main menu, and use the ◄► buttons to display the Program Block menu. OSD Language Closed Caption Parental Gamma Reset Default ... to select the Program Block, and press the OK to select the SETUP. Use the ▼ buttons to highlight Parental, and press the OK button. U.S.TV Ratings U.S. Movie Ratings Canadian English Ratings Canadian French Ratings Block MPAA Unrated NO Block...
ENGLISH Using the Program Block Settings Chapter 3 Using the LCD TV Press the MENU button on the remote control to display the Main menu, and use the ◄► buttons to display the Program Block menu. OSD Language Closed Caption Parental Gamma Reset Default ... to select the Program Block, and press the OK to select the SETUP. Use the ▼ buttons to highlight Parental, and press the OK button. U.S.TV Ratings U.S. Movie Ratings Canadian English Ratings Canadian French Ratings Block MPAA Unrated NO Block...
User Guide
Page 48
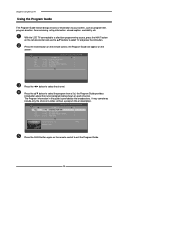
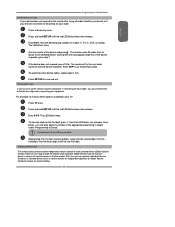
... the program from a list, the Program Guide provides introduction about the current program being shown on the remote control and use the ▲▼ buttons to select the channel. Chapter 3 Using the LCD TV Using the Program Guide The Program Guide feature brings all sorts of information to your screen, such as program...
... the program from a list, the Program Guide provides introduction about the current program being shown on the remote control and use the ▲▼ buttons to select the channel. Chapter 3 Using the LCD TV Using the Program Guide The Program Guide feature brings all sorts of information to your screen, such as program...

User Guide
Page 50
... one that works, see "Searching for future reference. Before proceeding, fi nd the codes for the devices you want to control your device. To program a DVD Player, TV/DVD Combo, TV/VCR/DVD Combo, portable DVD player, or mobile DVD player, use , compact unit. If you can program the remote to... control. To do so, follow these steps. Press a device key (VCR/DVD, CBL/ SAT, or AUX). The LED blinks once as ...
... one that works, see "Searching for future reference. Before proceeding, fi nd the codes for the devices you want to control your device. To program a DVD Player, TV/DVD Combo, TV/VCR/DVD Combo, portable DVD player, or mobile DVD player, use , compact unit. If you can program the remote to... control. To do so, follow these steps. Press a device key (VCR/DVD, CBL/ SAT, or AUX). The LED blinks once as ...
User Guide
Page 51
...blinks = 3), and write down the number in the appropriate code listing in step 8 under "Programming a Device". If a code digit is assigned to your TV: Press TV once. Checking the Codes If you have set its library to the selected device, starting with the most popular code first. The LED blinks...is 0, the LED does not blink. If the device does not respond, press CH▲. Press SET UP to step 7. ENGLISH Programming Your Remote Control Searching for your Code If your device does not respond to the remote after trying all other device codes, repeat steps 1 to 5. Aim the ...
...blinks = 3), and write down the number in the appropriate code listing in step 8 under "Programming a Device". If a code digit is assigned to your TV: Press TV once. Checking the Codes If you have set its library to the selected device, starting with the most popular code first. The LED blinks...is 0, the LED does not blink. If the device does not respond, press CH▲. Press SET UP to step 7. ENGLISH Programming Your Remote Control Searching for your Code If your device does not respond to the remote after trying all other device codes, repeat steps 1 to 5. Aim the ...

User Guide
Page 52
...twice; After that one long blink. Enter 9-9-3 and then press the mode key for example,TV). Try entry sequence again. then release. Locking Volume Control to 1987, only the original remote control will control the volume regardless of each selected device (Global Volume Unlock). The LED blinks four times. ...Unlocking a Single Device's Volume Control Press a device key (TV, VCR/DVD, CBL/ SAT, or AUX). CH▲, CH▼, and LAST do not change channels, press Enter on ...
...twice; After that one long blink. Enter 9-9-3 and then press the mode key for example,TV). Try entry sequence again. then release. Locking Volume Control to 1987, only the original remote control will control the volume regardless of each selected device (Global Volume Unlock). The LED blinks four times. ...Unlocking a Single Device's Volume Control Press a device key (TV, VCR/DVD, CBL/ SAT, or AUX). CH▲, CH▼, and LAST do not change channels, press Enter on ...


