
User Manual
Page 2
... the operating instructions unless you have been made. If you are for a long time, disconnect the plug from the outlet. Plug the two-prong end of the power cord to the side of uninsulated "dangerous voltage" within an equilateral triangle is intended to alert the user to persons. CAUTION: These servicing instructions are qualified to service manual for servicing instructions. 2 NO USE-SERVICEABLE PARTS INSIDE. POWER SUPPLY: Connect the supplied adapter...
... the operating instructions unless you have been made. If you are for a long time, disconnect the plug from the outlet. Plug the two-prong end of the power cord to the side of uninsulated "dangerous voltage" within an equilateral triangle is intended to alert the user to persons. CAUTION: These servicing instructions are qualified to service manual for servicing instructions. 2 NO USE-SERVICEABLE PARTS INSIDE. POWER SUPPLY: Connect the supplied adapter...

User Manual
Page 3
... apparatus. 11) Only use near any way, such as power-supply cord or plug is used, use caution when moving the cart/apparatus combination to dripping or splashing and no objects filled with the apparatus. Important Safety Instructions 1) Read these instructions. 2) Keep these instructions. 3) Heed all warnings. 4) Follow all servicing to qualified service personnel. Note: Do not touch the color TFT LCD screen by the manufacturer...
... apparatus. 11) Only use near any way, such as power-supply cord or plug is used, use caution when moving the cart/apparatus combination to dripping or splashing and no objects filled with the apparatus. Important Safety Instructions 1) Read these instructions. 2) Keep these instructions. 3) Heed all warnings. 4) Follow all servicing to qualified service personnel. Note: Do not touch the color TFT LCD screen by the manufacturer...
User Manual
Page 5
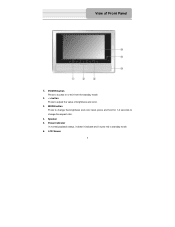
Power Indicator In normal playback status, it doesn't indicate and it turns red in standby mode. 6. MODE button Press to change the aspect ratio. 4. LCD Screen 5 Speaker 5. POWER button Press to access to or exit from the standby mode. 2. -/+ button Press to change the brightness and color level, press and hold for 1-2 seconds to adjust the value of Front Panel 1. View of brightness and color. 3.
Power Indicator In normal playback status, it doesn't indicate and it turns red in standby mode. 6. MODE button Press to change the aspect ratio. 4. LCD Screen 5 Speaker 5. POWER button Press to access to or exit from the standby mode. 2. -/+ button Press to change the brightness and color level, press and hold for 1-2 seconds to adjust the value of Front Panel 1. View of brightness and color. 3.
User Manual
Page 6
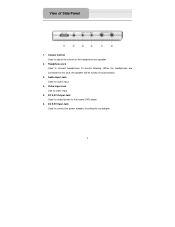
Volume Control Used to the master DVD player. 6. View of the headphone and speaker. 2. Audio Input Jack Used for video input. 5. Video Input Jack Use for audio input. 4. Headphone Jack Used to connect headphones for output power to adjust the volume of Side Panel 1. DC 9.5V Input Jack Used to this jack, the speaker will be turned off automatically. 3. When the headphones are connected to connect the power adapter, including the car adapter. 6 DC 9.5V Output Jack Used for private listening.
Volume Control Used to the master DVD player. 6. View of the headphone and speaker. 2. Audio Input Jack Used for video input. 5. Video Input Jack Use for audio input. 4. Headphone Jack Used to connect headphones for output power to adjust the volume of Side Panel 1. DC 9.5V Input Jack Used to this jack, the speaker will be turned off automatically. 3. When the headphones are connected to connect the power adapter, including the car adapter. 6 DC 9.5V Output Jack Used for private listening.
User Manual
Page 7
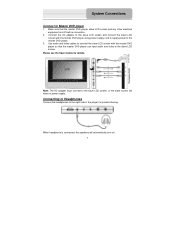
... the right side of the player for details. Note: The AC adapter must connect to the master DVD player. 3. Use audio and video cables to connect the slave LCD screen with the master DVD player using power supply cord to supply power to the slave LCD screen, or the slave screen will automatically turn off before connection. 2. System Connections Connect to the slave LCD screen. When headphone is connected, the speakers will have no power supply. Make sure that the master DVD player can input audio and video to Master DVD player 1.
... the right side of the player for details. Note: The AC adapter must connect to the master DVD player. 3. Use audio and video cables to connect the slave LCD screen with the master DVD player using power supply cord to supply power to the slave LCD screen, or the slave screen will automatically turn off before connection. 2. System Connections Connect to the slave LCD screen. When headphone is connected, the speakers will have no power supply. Make sure that the master DVD player can input audio and video to Master DVD player 1.
User Manual
Page 8
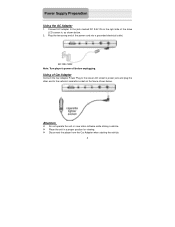
... ¾ Do not operate the unit or view video software while driving a vehicle. ¾ Place the unit in , as the figure shows below . 2. Using of the slave LCD screen in a proper position for viewing. ¾ Disconnect the player from the Car Adapter when starting the vehicle. 8 Plug the two-prong end of the power cord into a grounded electrical outlet. Power Supply Preparation Using the AC Adapter 1. Note: Turn player's power off before unplugging.
... ¾ Do not operate the unit or view video software while driving a vehicle. ¾ Place the unit in , as the figure shows below . 2. Using of the slave LCD screen in a proper position for viewing. ¾ Disconnect the player from the Car Adapter when starting the vehicle. 8 Plug the two-prong end of the power cord into a grounded electrical outlet. Power Supply Preparation Using the AC Adapter 1. Note: Turn player's power off before unplugging.
User Manual
Page 9
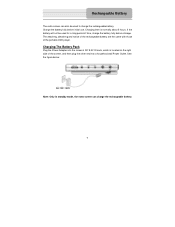
... figure below. Charging The Battery Pack Plug the Power Adapter into a household wall Power Outlet. The attaching, detaching and notice of the rechargeable battery are the same with those of the portable DVD player. Note: Only in standby mode, the extra screen can also be used to charge the rechargeable battery. Charge the battery fully before storage. Charging time is located on the right side...
... figure below. Charging The Battery Pack Plug the Power Adapter into a household wall Power Outlet. The attaching, detaching and notice of the rechargeable battery are the same with those of the portable DVD player. Note: Only in standby mode, the extra screen can also be used to charge the rechargeable battery. Charge the battery fully before storage. Charging time is located on the right side...
User Manual
Page 10
..., unplug the power-supply cord and then plug it in correct video mode. - Make sure the audio source is on . - HOW TO CHECK - There is no sound. Others possibilities: Static or other external interference may cause the unit display abnormally. Make sure your service center or a qualified technician. 10 Troubleshooting SYMPTOM There is no picture. - Make sure the speakers are turned on and in to reset the unit. Make sure LCD screen is correct.
..., unplug the power-supply cord and then plug it in correct video mode. - Make sure the audio source is on . - HOW TO CHECK - There is no sound. Others possibilities: Static or other external interference may cause the unit display abnormally. Make sure your service center or a qualified technician. 10 Troubleshooting SYMPTOM There is no picture. - Make sure the speakers are turned on and in to reset the unit. Make sure LCD screen is correct.
User Manual
Page 11
"Polaroid" and "Polaroid and Pixel" are trademarks of Polaroid Corporation, Waltham, MA, USA. 11 Specifications TFT screen size Video System Frequency Response Power Power Consumption Dimensions Weight 7 inches NTSC 20Hz~20kHz ±2.5dB AC 100~120V, 50Hz <25W 230mm x 154mm x 22mm (L*W*D) 0.37kg DESIGN AND SPECIFICATIONS ARE SUBJECT TO CHANGE WITHOUT NOTICE For service, support and warranty information, visit www.polaroid.com or in the US call 1-866-289-5168, in Canada call 1-866-301-7922 and in Mexico call 01-800-400-2443.
"Polaroid" and "Polaroid and Pixel" are trademarks of Polaroid Corporation, Waltham, MA, USA. 11 Specifications TFT screen size Video System Frequency Response Power Power Consumption Dimensions Weight 7 inches NTSC 20Hz~20kHz ±2.5dB AC 100~120V, 50Hz <25W 230mm x 154mm x 22mm (L*W*D) 0.37kg DESIGN AND SPECIFICATIONS ARE SUBJECT TO CHANGE WITHOUT NOTICE For service, support and warranty information, visit www.polaroid.com or in the US call 1-866-289-5168, in Canada call 1-866-301-7922 and in Mexico call 01-800-400-2443.


