Service Manual
Page 2
... be operated from the wall outlet before cleaning. Do not ignore the purpose of power source indicated on an unstable cart, stand or table. c. If you are not sure of the type of other similar surface. This plug will only fit into the product. If the product exhibits a distinct change in a risk of these instructions. (2) Save these instructions. (3) Follow all servicing to service...
... be operated from the wall outlet before cleaning. Do not ignore the purpose of power source indicated on an unstable cart, stand or table. c. If you are not sure of the type of other similar surface. This plug will only fit into the product. If the product exhibits a distinct change in a risk of these instructions. (2) Save these instructions. (3) Follow all servicing to service...
Service Manual
Page 3
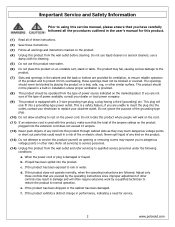
... only the inside an LCD or plasma TV are sensitive to use them. Never slide components over any components. Never modify any objects into the holes in the television. NOTICE ABOUT REPLACEMENT PARTS Many electrical and mechanical parts within the overall system. Never insert any circuit! Important Service and Safety Information Service work should be dangerous! Unauthorized substitute parts may result in fire...
... only the inside an LCD or plasma TV are sensitive to use them. Never slide components over any components. Never modify any objects into the holes in the television. NOTICE ABOUT REPLACEMENT PARTS Many electrical and mechanical parts within the overall system. Never insert any circuit! Important Service and Safety Information Service work should be dangerous! Unauthorized substitute parts may result in fire...

Service Manual
Page 14
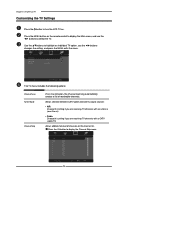
... the VGA mode. Middle Warm User Red/Green/Blue: -19...+19 Noise Reduction Off / Low / Strong / Medium Select to reduce the noise level of the digital sound format: PCM / OFF / Dolby Digital. VGA Auto Adjust Press the OK button to automatically adjust the display settings to match your music type and achieve stunning effects. Sap SPDIF Type PCM, OFF, Dolby Digital Allows the selection of connected equipment: Off...
... the VGA mode. Middle Warm User Red/Green/Blue: -19...+19 Noise Reduction Off / Low / Strong / Medium Select to reduce the noise level of the digital sound format: PCM / OFF / Dolby Digital. VGA Auto Adjust Press the OK button to automatically adjust the display settings to match your music type and achieve stunning effects. Sap SPDIF Type PCM, OFF, Dolby Digital Allows the selection of connected equipment: Off...

Service Manual
Page 15
...Caption Digital Closed Caption Caption Style Input Password Channel Lock Video Lock Change password If a channel is "0000" Set the channel that you want to lock. Enter a 4-digit pin code. Cable Air Auto-search channels and put the programs into memory. Set time zone. Input the old password first, and then input your new password. Restores factory settings. 15 www.polaroid.com Cable_STD/HRC/IRC Auto detect Set the channel that you want to lock. Set language. TV SETUP Channel Scan Tuner Mode Channel Skip Time Zone OSD Language Closed Caption Parental Gamma Reset Default Auto...
...Caption Digital Closed Caption Caption Style Input Password Channel Lock Video Lock Change password If a channel is "0000" Set the channel that you want to lock. Enter a 4-digit pin code. Cable Air Auto-search channels and put the programs into memory. Set time zone. Input the old password first, and then input your new password. Restores factory settings. 15 www.polaroid.com Cable_STD/HRC/IRC Auto detect Set the channel that you want to lock. Set language. TV SETUP Channel Scan Tuner Mode Channel Skip Time Zone OSD Language Closed Caption Parental Gamma Reset Default Auto...
Service Manual
Page 16
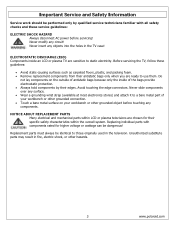
... your TV has no power, check the fuse by AC plug, perform a clear or reset in factory mode and retest before setting your personal password in -Picture will not work using Component 1 and Component 2 as the input sources. The factory preset password is designed to exit. 16 www.polaroid.com Having trouble with a safety fuse. Troubleshooting / Flow Charts Note: Reseat all passwords. Factory Mode Procedure (1) Power on TV. (2) Press volume up and channel up buttons on your Parental Controls (V-Chip...
... your TV has no power, check the fuse by AC plug, perform a clear or reset in factory mode and retest before setting your personal password in -Picture will not work using Component 1 and Component 2 as the input sources. The factory preset password is designed to exit. 16 www.polaroid.com Having trouble with a safety fuse. Troubleshooting / Flow Charts Note: Reseat all passwords. Factory Mode Procedure (1) Power on TV. (2) Press volume up and channel up buttons on your Parental Controls (V-Chip...
Service Manual
Page 21
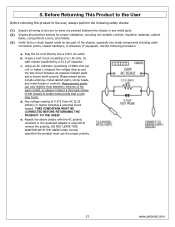
Use the following safety checks: (1) Inspect all wiring to locate metal points that no shock hazard exists on any part of the chassis, especially any metal components including cable connection points, chassis hardware, or antennas (if equipped). THIS CONDITION MUST BE CORRECTED BEFORE RETURNING THE PRODUCT TO THE USER! e. Measurement points include antenna, metal cabinet parts, screw heads, and metal knobs or...
Use the following safety checks: (1) Inspect all wiring to locate metal points that no shock hazard exists on any part of the chassis, especially any metal components including cable connection points, chassis hardware, or antennas (if equipped). THIS CONDITION MUST BE CORRECTED BEFORE RETURNING THE PRODUCT TO THE USER! e. Measurement points include antenna, metal cabinet parts, screw heads, and metal knobs or...
Service Manual
Page 22
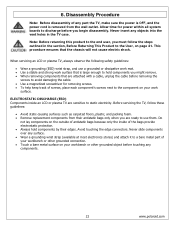
... damaging the cable. • Use a magnetized screwdriver for removing screws. • To help keep track of antistatic bags because only the inside an LCD or plasma TV are ready to the component on your work surface that is removed from their edges. Do not lay components on page 21. Never insert any part the TV, make sure the power is OFF, and the power cord is...
... damaging the cable. • Use a magnetized screwdriver for removing screws. • To help keep track of antistatic bags because only the inside an LCD or plasma TV are ready to the component on your work surface that is removed from their edges. Do not lay components on page 21. Never insert any part the TV, make sure the power is OFF, and the power cord is...
User Guide
Page 2
... of Dolby Laboratories. For service, support and warranty information, visit www.polaroid.com. As a consumer, you are trademarks of properly. Manufactured under license from Dolby Laboratories. Confidential unpublished works. © 1992 -1997 Dolby Laboratories, Inc. Changes are periodically made to www.polaroid.com and click on "Company" or call the customer service number for ensuring that this...
... of Dolby Laboratories. For service, support and warranty information, visit www.polaroid.com. As a consumer, you are trademarks of properly. Manufactured under license from Dolby Laboratories. Confidential unpublished works. © 1992 -1997 Dolby Laboratories, Inc. Changes are periodically made to www.polaroid.com and click on "Company" or call the customer service number for ensuring that this...
User Guide
Page 6
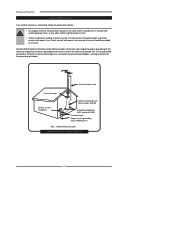
... the grounding electrode. Warnings and Precautions Outdoor Antenna Safety Instructions If an outdoor antenna is connected, follow the precautions below: ▪ An outdoor antenna should not be located in any area where it could come in contact with overhead power lines, or any other electric light or power circuits. ▪ When installing an outdoor antenna system, extreme caution should be taken...
... the grounding electrode. Warnings and Precautions Outdoor Antenna Safety Instructions If an outdoor antenna is connected, follow the precautions below: ▪ An outdoor antenna should not be located in any area where it could come in contact with overhead power lines, or any other electric light or power circuits. ▪ When installing an outdoor antenna system, extreme caution should be taken...
User Guide
Page 7
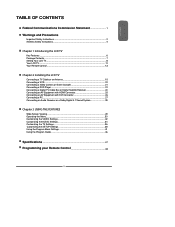
... Your LCD TV...8 Your LCD TV...11 Your Remote Control 13 Chapter 2 Installing the LCD TV Connecting a TV Cable or an Antenna 15 Connecting a VCR ...20 Connecting a Video Camera or Game Console 21 Connecting a DVD Player 22 Connecting a Digital TV Cable Box or Digital Satellite Receiver 24 Connecting an AV Equipment with HDMI Connector 25 Connecting an AV Equipment with DVI Connector 26 Connecting a PC...27 Connecting an Audio Receiver or a Dolby Digital 5.1 Sound System 28 Chapter 3 USING THE FEATURES Wide Screen Viewing...29 Operating the Menu...30 Customizing the VIDEO Settings...32...
... Your LCD TV...8 Your LCD TV...11 Your Remote Control 13 Chapter 2 Installing the LCD TV Connecting a TV Cable or an Antenna 15 Connecting a VCR ...20 Connecting a Video Camera or Game Console 21 Connecting a DVD Player 22 Connecting a Digital TV Cable Box or Digital Satellite Receiver 24 Connecting an AV Equipment with HDMI Connector 25 Connecting an AV Equipment with DVI Connector 26 Connecting a PC...27 Connecting an Audio Receiver or a Dolby Digital 5.1 Sound System 28 Chapter 3 USING THE FEATURES Wide Screen Viewing...29 Operating the Menu...30 Customizing the VIDEO Settings...32...

User Guide
Page 8
... LCD TV Key Features Various Audio/Video terminals for DVD (1080i, 720p) and digital set-top-box (1080i, 720p) connections. 3D Digital Noise Reduction ▪ This function can digitally reduce image noise to provide better picture quality. This system eliminates the cost, complexity and confusion of multiple cables used to connect current A/V systems. HDTV Component Video Inputs ▪ Offers the best video quality for external equipment connection ▪ 2 sets of composite A/V input terminals ▪ 1 set of S-VIDEO...
... LCD TV Key Features Various Audio/Video terminals for DVD (1080i, 720p) and digital set-top-box (1080i, 720p) connections. 3D Digital Noise Reduction ▪ This function can digitally reduce image noise to provide better picture quality. This system eliminates the cost, complexity and confusion of multiple cables used to connect current A/V systems. HDTV Component Video Inputs ▪ Offers the best video quality for external equipment connection ▪ 2 sets of composite A/V input terminals ▪ 1 set of S-VIDEO...
User Guide
Page 9
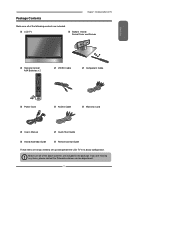
... you need to set up and operate the LCD TV in the package. LCD TV Bottom Stand / Screw Driver and Screws ENGLISH Remote Control/ AAA Batteries x 2 SET UP TV CAB/ SAT DVD AUX SLEEP DVD MENU VOL CH PAGE MUTE ASPECT LAST GUIDE LIVE TV PIP MENU OK INFO CC EXIT DVR 1 2 3 ABC DEF 4 5 6 GHI JKL MNO 7 8 9 PQRS TUV WXYZ INPUT . 0 ENTER Power Cord VIDEO Cable Component Cable AUDIO Cable Warranty Card User's Manual Quick Start Guide Stand Assembly Guide Remote control Guide These items are missing any items, please contact the Polaroid customer service...
... you need to set up and operate the LCD TV in the package. LCD TV Bottom Stand / Screw Driver and Screws ENGLISH Remote Control/ AAA Batteries x 2 SET UP TV CAB/ SAT DVD AUX SLEEP DVD MENU VOL CH PAGE MUTE ASPECT LAST GUIDE LIVE TV PIP MENU OK INFO CC EXIT DVR 1 2 3 ABC DEF 4 5 6 GHI JKL MNO 7 8 9 PQRS TUV WXYZ INPUT . 0 ENTER Power Cord VIDEO Cable Component Cable AUDIO Cable Warranty Card User's Manual Quick Start Guide Stand Assembly Guide Remote control Guide These items are missing any items, please contact the Polaroid customer service...
User Guide
Page 15
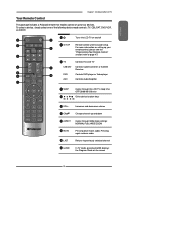
... 47) 3 TV CAB/SAT DVD AUX Controls this LCD TV Controls Cable Converter or Satellite Receiver Controls DVD player or Video player Controls Audio Amplifier 24 SLEEP 5 ► Cycles through Wide mode settings: NORMAL/FULL/WIDE/ZOOM 9 MUTE Pressing once mutes audio. For more information on setting up your remote control, please see the "Programming Your Remote Control" section (refer to previously selected channel 11 GUIDE In TV mode, pressing GUIDE displays the Program Guide on and off 2 SET UP Remote control universal code setup. To select...
... 47) 3 TV CAB/SAT DVD AUX Controls this LCD TV Controls Cable Converter or Satellite Receiver Controls DVD player or Video player Controls Audio Amplifier 24 SLEEP 5 ► Cycles through Wide mode settings: NORMAL/FULL/WIDE/ZOOM 9 MUTE Pressing once mutes audio. For more information on setting up your remote control, please see the "Programming Your Remote Control" section (refer to previously selected channel 11 GUIDE In TV mode, pressing GUIDE displays the Program Guide on and off 2 SET UP Remote control universal code setup. To select...
User Guide
Page 16
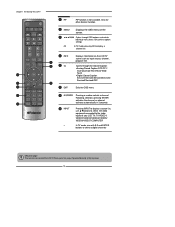
... ▪ In TV mode, use with 0-9 and ENTER buttons to select a digital channels Effective range: The remote can control the LCD TV from up to display a channel list 15 INFO Displays information on the LCD TV MUTE ASPECT LAST LIVE TV 12 screen such as input source, channel, program title. Only for other devices function. SET UP TV CAB/ SAT DVD AUX SLEEP DVD MENU 13 MENU Displays the OSD menu on the screen. 14 OK Cycles through the Closed Caption: Analog Closed Caption:OFF/CC1/ CC2...
... ▪ In TV mode, use with 0-9 and ENTER buttons to select a digital channels Effective range: The remote can control the LCD TV from up to display a channel list 15 INFO Displays information on the LCD TV MUTE ASPECT LAST LIVE TV 12 screen such as input source, channel, program title. Only for other devices function. SET UP TV CAB/ SAT DVD AUX SLEEP DVD MENU 13 MENU Displays the OSD menu on the screen. 14 OK Cycles through the Closed Caption: Analog Closed Caption:OFF/CC1/ CC2...

User Guide
Page 19
... premium pay channels. Setting the RF switch to position A allows viewing of all unscrambled channels by using the converter channel keys. 17 terminal. ■ Some cable TV companies offer premium pay channels are scrambled, a cable TV converter/descrambler is used. ENGLISH Chapter 2 Installing the LCD TV Cable TV (CATV) Connection This reminder is provided to call the CATV system installer's attention to Article 820-40 of the National Electrical Code (NEC) that...
... premium pay channels. Setting the RF switch to position A allows viewing of all unscrambled channels by using the converter channel keys. 17 terminal. ■ Some cable TV companies offer premium pay channels are scrambled, a cable TV converter/descrambler is used. ENGLISH Chapter 2 Installing the LCD TV Cable TV (CATV) Connection This reminder is provided to call the CATV system installer's attention to Article 820-40 of the National Electrical Code (NEC) that...

User Guide
Page 20
... power plug from the main voltage. If the fuse is only used for a long period of the TV and connect the power cord to turn on the remote to wall outlet. The POWER button on the front panel is blown, visit your local hardware store and ask for switching the LCD TV into standby, it does not disconnect the device from the socket. 18 If your TV. HDTV/TV Air/CABLE...
... power plug from the main voltage. If the fuse is only used for a long period of the TV and connect the power cord to turn on the remote to wall outlet. The POWER button on the front panel is blown, visit your local hardware store and ask for switching the LCD TV into standby, it does not disconnect the device from the socket. 18 If your TV. HDTV/TV Air/CABLE...

User Guide
Page 21
... received channel list, then press ▲▼ to create a list of receivable channels for the current input (antenna or cable). Analog Channels: 25 Digital Channels: 0 Cable 47% The Channel Scanning will be required to run Channel Scanning for each RF input to select a channel. ENGLISH Chapter 2 Installing the LCD TV Press the button on the remote to turn on the LCD TV. (Scroll down using the UP/DOWN buttons to see Computer-VGA option) Main TV(CABLE/AIR) VIDEO1 (SIDE) VIDEO2 (REAR) VIDEO3 (S-VIDEO...
... received channel list, then press ▲▼ to create a list of receivable channels for the current input (antenna or cable). Analog Channels: 25 Digital Channels: 0 Cable 47% The Channel Scanning will be required to run Channel Scanning for each RF input to select a channel. ENGLISH Chapter 2 Installing the LCD TV Press the button on the remote to turn on the LCD TV. (Scroll down using the UP/DOWN buttons to see Computer-VGA option) Main TV(CABLE/AIR) VIDEO1 (SIDE) VIDEO2 (REAR) VIDEO3 (S-VIDEO...

User Guide
Page 33
Channel Scan Tuner Mode Channel Skip Time Zone Cable Eastern Time Chapter 3 Using the LCD TV TV Select Exit SETUP MENU: Allows you to edit and label channels. ENGLISH TV MENU: Allows you to set up a variety of features: Language, Closed Caption,Factory Reset, Parental Control, and Sleep Timer. ▪ If the signal source is TV/VIDEO/S-VIDEO/YPbPr, the SETUP MENU appears as: ▪ If the signal source is HDMI/VGA, the SETUP MENU appears as: OSD Language Time Setup Closed Caption Parental Gamma Reset Default English Middle OSD Language Time Setup Parental Gamma Reset Default ...
Channel Scan Tuner Mode Channel Skip Time Zone Cable Eastern Time Chapter 3 Using the LCD TV TV Select Exit SETUP MENU: Allows you to edit and label channels. ENGLISH TV MENU: Allows you to set up a variety of features: Language, Closed Caption,Factory Reset, Parental Control, and Sleep Timer. ▪ If the signal source is TV/VIDEO/S-VIDEO/YPbPr, the SETUP MENU appears as: ▪ If the signal source is HDMI/VGA, the SETUP MENU appears as: OSD Language Time Setup Closed Caption Parental Gamma Reset Default English Middle OSD Language Time Setup Parental Gamma Reset Default ...
User Guide
Page 38
... turn the LCD TV on the remote control to display the Main menu, and use the ◄► buttons changes the setting, and press the MENU exits the menu. Allows selection between CATV cable and antenna signal sources: ▪ AIR Choose this setting if you are receiving TV channels with an antenna (over the air) ▪ Cable Choose this setting if you are receiving TV channels with a CATV (cable TV) Allows addition/removal of receivable channels. Press the MENU button on . Channel Scan Tuner Mode Channel Skip Time Zone Cable Eastern Time TV...
... turn the LCD TV on the remote control to display the Main menu, and use the ◄► buttons changes the setting, and press the MENU exits the menu. Allows selection between CATV cable and antenna signal sources: ▪ AIR Choose this setting if you are receiving TV channels with an antenna (over the air) ▪ Cable Choose this setting if you are receiving TV channels with a CATV (cable TV) Allows addition/removal of receivable channels. Press the MENU button on . Channel Scan Tuner Mode Channel Skip Time Zone Cable Eastern Time TV...

User Guide
Page 52
... Volume Unlock). Troubleshooting PROBLEM SOLUTION LED does not blink when you press a key, but device does not respond. Remote does not control devices or commands are not working properly. CH▲, CH▼, and LAST do not change the Volume Lock setting to remove all listed codes for example,TV). Locking Volume Control to control volume (for the device. Enter 9-9-3 and then press VOL+. Press and hold SET UP until the red LED blinks twice; The LED blinks...
... Volume Unlock). Troubleshooting PROBLEM SOLUTION LED does not blink when you press a key, but device does not respond. Remote does not control devices or commands are not working properly. CH▲, CH▼, and LAST do not change the Volume Lock setting to remove all listed codes for example,TV). Locking Volume Control to control volume (for the device. Enter 9-9-3 and then press VOL+. Press and hold SET UP until the red LED blinks twice; The LED blinks...


